Sooner or later, all owners of storage water heaters have a problem draining water from the tank. There may be several reasons for this:
- preservation for the winter at the dacha or after prevention of central hot water supply in the apartment;
- cleaning the tank from accumulated deposits;
- replacement of heating elements, magnesium anode and other repairs;
- use of water from the tank when the water supply is turned off.
Regardless of the reason, the water heater storage tank is drained according to the same algorithm.
Why can't you drain water through a faucet?
If you turn off the home water supply and fully open the “hot” faucet valve, a maximum of one to one and a half liters will flow out of the tap, and the tank will remain full. To understand the reasons for what is happening and subsequently properly drain water from the heating tank, briefly familiarize yourself with its structure and operating principle:
- The intake of heated water is provided from the upper zone of the tank - the end of the tube is located there. The supply from the water supply is organized into the lower part of the boiler.
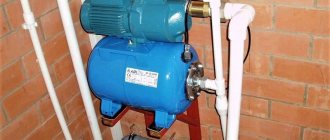
Sectional diagram of an electric heating tank - A poppet-type check valve is installed at the inlet of the cold water supply (CWS) pipe, which prevents water from escaping back into the main. It also relieves excess pressure arising from heating and expansion of the liquid.
- When you use a storage heater (turn on the hot water tap of the mixer), water flows out of the tank under the influence of the pressure of the main hot water pipe.
- Without pressure from the main line, the system does not work - water itself does not flow from the tank. Only a small part of the liquid that was above the intake tube can be released through the mixer tap.
Note. The orientation of the tank in space does not matter; horizontal and vertical models are designed in the same way. The supply is at the bottom of the tank, the DHW extraction tube is at the top.
Internal structure and recommended connection diagram for the Ariston horizontal boiler.
Preliminary conclusion. There is no other option than to drain the water from the boiler through the “cold” pipe, since it is located near the bottom of the tank. The drainage method depends on the piping of the water heater; in some cases, the pipe connections will have to be disassembled a little.
Using a trigger lever
The presence of a trigger lever in the design of the water heating device greatly facilitates draining the water.
The lever element is located on the protective valve device in a direction parallel to the cold water supply pipe, in a vertical position.
In order to completely empty the storage tank, it is necessary to bend the trigger lever at a right angle.
The process of draining water in this way usually takes no more than two hours.
To make draining liquid from water heating equipment using a trigger lever as comfortable as possible, you need to put a regular hose on the “spout” of the valve, which allows you to remove water into the sewage system.
Relief via safety check valve
This method is recommended to be used by all well-known manufacturers of water heating tanks - Ariston, Thermex, Gorenje, Electrolux and so on. The household appliance is connected to the water supply networks according to the diagram (shown above) from the operating instructions:
- a safety group for boilers is installed at the inlet pipe;
- A shut-off valve is placed in front of the group;
- no fittings are provided at the outlet pipe or a ball valve is installed.
Explanation. The safety group is an automatic 3 in 1 element, it includes a check valve + safety valve + drain valve with a plastic lever.
Sometimes there are valves without a lever - you can’t drain water through such a valve.
How to drain water through a valve:
- We shut off the water main at the entrance to the apartment and disconnect the heater from the power supply.
- We release 1-2 liters through the nearest mixer, opening the DHW valve all the way. We leave the plumbing fixture in the open position so that air can fill the void in the tank.
- We place a bucket under the “spout” of the valve, turn the lever and slowly empty the tank.
Before emptying, the heating device does not need to be disassembled and wait for the water to cool. Disadvantages of the method:
- due to the small flow area of the spout (5...8 mm), the water drains too slowly, a boiler of 80-100 liters will be emptied in about 2 hours;
- the valve often becomes clogged and does not allow liquid to pass through well;
- sometimes the security group turns sour, the drain does not work at all.
The method is suitable for small water heaters of 25-50 liters, provided that the valve valve functions normally. It will take too long to release large volumes.
On the left in the photo is a clogged poppet valve, on the right is a measurement of the drain passage (5 mm)
Expert advice
Each of the described methods is not perfect, in the sense that it does not free the water heater to the last drop. To drain the water from the boiler completely, you need to disassemble the storage tank:
- First you need to empty the device using one of the five methods listed.
- Then you need to unscrew the cap at the bottom of the tank, which serves only a decorative function.
- Next, holding the decorative cover, disconnect the wires from the signal lamp.
- Then disconnect the electrical wiring from the housing. But before you do, take a photo of their initial connection so you don't get confused when you reattach them.
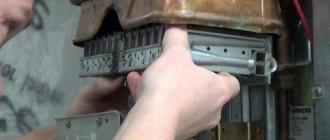
- After this, slowly, counterclockwise, unscrew the flange that serves as a support for the heating element. First, simply loosen the nuts and allow the remaining liquid to drain, then you can completely unscrew the flange.
The heating element must be removed very carefully, without sudden movements, so as not to accidentally damage the tank. The heating element may be coated with scale, which will make it difficult to remove, so if there is resistance, you need to move it slowly from side to side.
To prevent draining water from causing equipment breakdown, experts recommend adhering to the following rules when working independently:
- Before starting all actions, you should disconnect the device from the power supply.
- It would be a good idea to re-read the operating instructions for the device again, study its design features and connection nuances.
- Wait until the contents of the tank cool completely.
- To prevent the water in the tank from stagnating, you need to run approximately 100 liters of liquid through the heater twice a month.
- Make sure that the boiler is filled with water before connecting it to the electrical network after completion of work.
Now you know how to drain the water from the boiler with your own hands. The body of the water heater requires replacement over time, since the metal is subject to natural corrosion, as well as the deposition of salt deposits. However, timely cleaning, preventative draining, and regular replacement of the magnesium anode can extend the life of the equipment for many years.
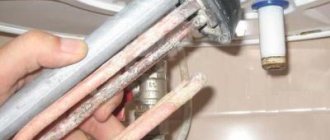
Quick emptying via cold water pipe
To quickly drain water from a boiler connected according to factory instructions, you will need a pipe (gas) or adjustable wrench. We will disconnect the pipes, there is no other way. Procedure:
- We wait until the full tank cools down, or we turn it off and use the heated water as much as possible.
- We close the cold water supply to the house, release some of the water from the mixer, and leave the tap open. Again, turn off the power supply to the water heater.
- Using a gas wrench, unscrew both connections to the boiler. It is worth placing a bucket so as not to flood the floors and other objects under the water heating apparatus.
- Use the key to grab the edges of the valve and slowly unscrew it. Use your finger to close the hole in the “hot” pipe, otherwise air will pass freely into the container and water will flow out.
- We finally twist the safety group, place a bucket below and release the finger. If you need to stop the flow, plug the hot water pipe of the boiler again.
- Before assembling and filling the tank, thoroughly clean the pressure relief valve (preferably blow it out).
Advice. It is more convenient to carry out manipulations when there is a tap at the outlet fitting. You can find a valve with a ½” (internal) thread in advance, screw it on instead of the removed pipe and regulate the air supply/water flow.
The advantage of this method is the speed of emptying; the procedure will take a maximum of 30 minutes. Negative points:
- disassembly is required - you need to remove at least the cold water pipe;
- the water heater must be cooled, otherwise you will get burned;
- the pressure from the fitting is difficult to control, the vacuum does not work immediately.
The flow of water can be slowed down - do not disconnect the hot water supply line from the boiler. Air flows through the mixer more slowly and the flow is intermittent. How to drain an Atlantic 80 liter water heater, watch the video:
Criterias of choice
If a homeowner needs to purchase a drain valve with a mesh for installation on a water supply system, you need to rely on the selection criteria and technical parameters of the product:
- indicators of nominal, test and operating closing pressure;
- tightness class;
- conditional throughput indicators;
- diameter of the landing part.
The documentation supplied with the pumping system or water pump contains information about the technical requirements for the drain valve and its modifications.
You need to purchase new products that were manufactured no more than 5 years ago. If they have been stored in warehouses for a long time, the operation of the part may be unproductive.
Using a trim with a drain valve
The method significantly simplifies the procedure for emptying the water heater. One condition: the piping diagram must have a drain valve installed on the tee after the relief valve, as shown in the picture below. Next is a matter of technology:
- We cut off the cold water pipeline with a valve, turn off the power supply, and open the hot water on the mixer.
- We attach a hose of the required length to the drain tap fitting and prepare a bucket.
- Open the valve and drain the contents in portions.
There is no need to disconnect the pipes; if necessary, the flow can be easily stopped with a tap. The hose does not spray because the mixer restricts the flow of air into the tank. A 50 liter water heater is emptied in 10-15 minutes.
The piping diagram does not show drainage from the relief valve to the sewer system
Important point. Manufacturers of water heating equipment do not welcome this piping option. Reason: there is a tee with pipeline fittings between the safety group and the boiler, which is not allowed by the rules.
Practice shows: installing an additional valve does not pose a threat if the user does not drain sanitary water when the heater is on. In this case, the level in the tank decreases, the water heating element can “surface”, overheat in the air and quickly burn out.
The second condition: the tee must not become clogged, otherwise the path to the relief valve will be closed. Then, when heated, the expanding liquid will rupture the hot water pipeline or the container itself.
Removing sediment
There is nothing complicated about removing liquids with heavy impurities from the bottom of the boiler tank. But it is recommended to trust this procedure to specialists. Maintenance of the device is carried out at the place of its installation or on the floor after preliminary dismantling.
Procedure:
- The casing is removed from the device.
- All electrical wires are disconnected.
- Using a gas wrench, unscrew the union nut holding the heating element.
Once the tubular heater is loosened and loosened, dirty liquid will immediately begin to flow from under it. Therefore, you should have a bucket or other container on hand to drain the sediment.
The electric heating element is completely removed and the remaining liquid and dirt in the heater tank is removed through the resulting hole. For additional flushing, you can slightly open the valve that cuts off the cold water supply.
After the container is completely cleaned, the equipment is reassembled in the reverse order. In this case, the main task is the hermetically sealed installation of heating elements in their place.
Draining from an indirectly heated floor boiler
We will talk about floor-mounted water heaters, whose pipes go up. Other models are equipped with a special drain fitting and are emptied without problems.
Important! The secret to successful draining of a floor heater is the correct piping pattern. The end of the drainage pipe and the shut-off valve must fall below the body of the apparatus, due to which the law of communicating vessels operates.
How to drain water from an indirect boiler with top fittings:
- First of all, cool the container to an acceptable temperature of 25...40 °C.
- Shut off the heating and hot water supply lines and open the water intake valve.
- Make sure that the drainage channel is filled with water - open the drain valve slightly.
- If the channel is empty, turn on the cold water supply and wait until it flows from the drainage tube. Turn off the water supply again. Then the emptying of the “indirect tank” will begin thanks to the law of communicating vessels - drainage will pull all the water out of the tank.
- When the drainage line is full, draining the tank is even easier - open the valve all the way and watch how the liquid leaves the tank.
Since indirect water heaters can hold 100...500 liters, the procedure will take a lot of time - from 30 minutes to 2 hours. The essence of the method will once again be explained by a representative of the ACV company, which produces similar boilers:
Features of the Thermex water heater
The company is engaged only in the production of heating equipment. Thermex devices are characterized by a long service life, good build quality, and economical energy consumption.
You can purchase equipment from this brand in the KVANTA+ online store. The structure of the boiler and the features of its operation depend on the model.
Standard devices consist of the following components:
- Steel protective casing. Sometimes medium-sized devices are equipped with a durable plastic case.
- A tank in which liquid is accumulated and heated. The element is made of metal coated with an anti-corrosion compound.
- Anode made of titanium or magnesium. The part protects the heating element and tank from the destructive effects of moisture.
- A thermostat that regulates the temperature of the liquid in the boiler.
- The heating element located at the bottom of the device. The part has the form of a spiral-shaped nichrome wire, which is placed in a copper casing.
- Branch pipes for connecting the device to the cold water system and discharging the heated liquid.
Standard devices consist of a thermostat and a heating element.
Draining water from a simple design device is not difficult. Such devices do not have a special hole.
They are filled with liquid through the top. To empty the tank, you need to turn the housing over. Emptying a boiler with a separate hole is somewhat more difficult.
Do I need to dump water and when to do it?
It doesn’t always make sense to empty the reservoir of a household appliance. For example, in the event of a breakdown of the automation unit - sensor, thermostat - replacement is carried out without complete disassembly, there is no need to drain the water. In what situations is defecation done:
- for the winter in an unheated building - a country house, a bathhouse, etc.;
- before cleaning the heating element, washing the container from the inside;
- when it is necessary to change the magnesium anode;
- in case of moving the boiler to another location or completely replacing the water heating device.
Advice. To get rid of stagnant water and bacteria (in particular, legionella), it is enough to “fry” the device at maximum mode at a temperature of +75 °C for an hour. Then update the contents of the tank.
Let us remind you how to properly dial a water heater. We open the cold water valve, the “hot” tap and wait. When the container is full, water will flow through the intake pipe into the hot water system and then flow out of the mixer.
Useful recommendations from professionals
Recommendations from experts will help eliminate common mistakes that will help prevent equipment failure:
- Installation, connection and first filling with water must be carried out by a certified store specialist, with a mandatory mark in the warranty card. This guarantees that your equipment will be replaced if a problem is detected.
For a boiler installed in a heated room, draining the water when the owners leave is not necessary.
- When reconnecting the wires, check the connection diagram included in the operating instructions.
Different models have their own connection characteristics.
- It is better to replace all connecting rubber and plastic gaskets when draining the liquid. Consumables are sold in specialized and hardware stores.
To eliminate mistakes when purchasing, take the gasket with you and show it to the seller.
- Manufacturers recommend regular maintenance once every few years. But regularity largely depends on the quality of the water in your home.
If the water in the water heater comes from a centralized water supply, it contains disinfecting components (bleach).
- Water heaters are equipped with filters that need to be cleaned or changed regularly, so the heating elements will last much longer.
The time to replace the filter depends on the water heater manufacturer and its recommendations.
By adhering to the recommendations and instructions, the question of how to drain the water from the water heater will no longer confront you. And the equipment will serve the whole family for a long time.
Like any device that comes into contact with water, an electric water heater requires special care.