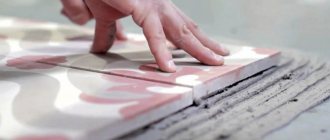
Tiles are an excellent finishing material, which has a number of obvious advantages and an aesthetically pleasing appearance, which can easily be ruined by untreated, sloppy seams. It is for this reason that after laying ceramic tiles, the joints are putty, which hides all visible imperfections in a well-done job.
This procedure must be approached with absolute seriousness, since poorly carried out work not only does not eliminate the shortcomings, but will also add new ones, completely ruining the appearance of the finish.
For this purpose, a special grout is used, which fills all the resulting space between the tiles. Thanks to this, it acquires the most attractive and finished appearance. This article will discuss the distinctive feature of this technology. You will learn the details of how ceramic tile grouting is done.
Purpose of jointing
The jointing is done not only for the purpose of decoration, but also to avoid moisture from getting under the cladding.
The purpose of the jointing boils down to the following:
- Hygiene. Bacteria and various dirt do not accumulate in the joints between the tiles.
- Protection against moisture penetration. A special water-repellent composition is used for jointing. This prevents water particles from reaching the base of the cladding.
- The reliability of the product increases.
Jointing increases the working life of the surface being coated. In addition, it protects the tile adhesive from the destructive power of moisture. - Easy care. Grooving the joints between the tiles makes cleaning the surface easier. If you keep tile adhesive in the joint, it can fall out over time.
- Decorative qualities. Thanks to the jointing, the seams between the tiles look much more beautiful and neat.
Peculiarities
It is important to understand that after completion of installation, at least 7 days must pass before it is possible to begin grouting the seams.
There are various types of glue that make it possible to start jointing already on the fifth day, but it is also preferable to wait.
Many tilers neglect this fact and, in order to complete the job faster, begin to grout the joints the very next day after laying.
This is impossible, since it can negatively affect not only the appearance of already finished seams, but also their quality and strength.
The peculiarity of flooring, compared to wall finishing, is the increased requirements for strength and density. For this reason, the grout for joints must be waterproof and stable to mechanical stress, and in addition have optimal elasticity.
The use of low-quality grouting material can cause the accumulation of debris and dust in the space between the tiles. And the penetration of moisture will promote the formation of fungus.
How to use a marker?
You can renew the seams without thoroughly cleaning them. To do this, markers are used that can have different colors. How to update the grout on kitchen tiles using this method? For this, the following rules are taken into account:
- a marker is selected, the color of which ideally matches the color of the existing seams;
- this method does not allow obtaining a long-lasting result, so usually the marker is used before guests arrive to slightly update the kitchen interior;
- literally after a few days the seams become dark again;
- To get white seams, you just need to run a marker along all the seams in the coating.
Before performing the process, it is advisable to rinse the surface thoroughly and also remove all areas where there is mold or mildew.
Required Tools
To work you will need:
- Small rubber spatula. With its help, it is possible to carefully and uniformly fill the seams without various defects.
- Molding. A mechanism for forming a precise and neat line of joints between tiles. The molding can be replaced with a regular cable with the required cross-section or a toothbrush handle.
- A special knife with a cut blade designed for cleaning glue from joints.
- Construction syringe. Used for comfortable filling of joints with mortar.
- Foam sponge for cleaning the surface from fragments of the composition.
The nuances of working with floor tiles
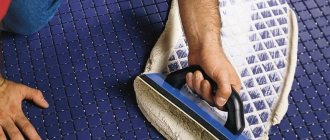
The tile joints on the floor are filled in exactly the same way as on the walls, but there are several nuances that make the work easier. For example, there is a method that allows you to quickly treat a floor with smooth tiles. Instead of a regular sponge, take a hand-held construction float with a rubber pad and fill the seams at arm's length with wide, sweeping movements. The solution will spread evenly and fill the voids tightly if you make it more liquid.
The grater can also be effectively used for the next step - removing grout residues by attaching a porous foam sponge instead of a rubber pad.
This method is not suitable if the texture of the tile is embossed, has protrusions or scars. The grout will fill the depressions in the ceramic, which is an additional labor-intensive cleaning job.
After treating the ceramic cladding, do not forget to fill the seams around sockets, pipes, plumbing fixtures and heated towel rail mounts with mortar.
Materials
The final stage of finishing work is carried out with a grout mixture. Even in the case of seamless masonry, it will be required, because minor gaps always need protection from the penetration of moisture and dirt. Moreover, grout solves several main problems at once. Namely:
- preventing the appearance of fungi and mold;
- auxiliary strengthening of the outer coating in the cladding;
- ensuring dryness even during subsequent care;
- creating the desired decor for the cladding.
There are several types of grout. All of them, one way or another, have their own advantages and disadvantages. Therefore, their use is designed for a specific solution to problems.
Cement based
They are the simplest. Their use is not difficult, and they are sold ready-made. Application consists of pouring out a powdery substance and mixing it with water in special proportions.
You can find them on the back of the package.
Noteworthy is the fact that seams larger than 0.5 cm are not treated with such a mixture. Carry out the work carefully so as not to scratch the surface of the facing material.
The advantage will be the ability to choose from a wide range of colors and shades. But the disadvantage lies in the possibility of destruction from strong household chemicals.
Furanic
This grout is used in industrial facilities. The whole point is its complex application. The facing material must first be coated with ordinary wax.
Then, if it goes beyond the seam, the substance is removed using a hair dryer. Otherwise, it will dry out, and an aesthetically beautiful look cannot be achieved without replacement.
The main advantage will be the ability to use very caustic chemicals for cleaning. This ensures disinfection at all possible levels. The only downside is the black color of the grout.
Epoxy
Used in places of public use or sale of goods. It is easy to clean from dirt, as it is resistant to acid or strong alkali. The advantages include the presence of a solid substance in the chemical composition.
After drying, any dirt can be cleaned off quite easily. There is also a wide range of shades to choose from. The embodiment of the most daring ideas or design solutions is available to buyers.
Disadvantages include high cost and the inability to work in very small seams. The resulting consistency is very viscous. All work is carried out carefully.
Silicone based
Very easy to use. It is easy to learn, even for beginners, which makes it possible to use it in any household. The solution does not spread after squeezing out. All hard-to-reach places are processed without any difficulties.
Unfortunately, this is where all the advantages end. Among the disadvantages, instability to moisture is noted.
Moreover, this includes not only bathrooms, but also simple cleaning. If you neglect this property, you will have to fight fungi and mold.
Latex
One of the most convenient to use. The chemical composition is extremely elastic, which ensures 100% filling of each seam. Does not change its properties due to exposure to temperature or moisture.
It is even possible to cleanse with strong chemicals.
The advantages include a huge selection of shades and colors.
One of the disadvantages is the need to use antiseptics during jointing. These additional measures will once again protect against the appearance of fungi or mold. Also, during application, it is necessary to cover the edges of the facing material with masking tape.
Method number 2. Painting seams
Painting the joints between the tiles is a more reliable way to update the surfaces in the bathroom (they will remain clean and fresh for about six months). The seams can be treated with ordinary lime, water-based paint, or you can choose a special composition in the store that is intended for these purposes.
Painting seams is not considered the most durable option; the effect of the result lasts for a maximum of six months
How to choose paint for seams?
To update the grout, you can choose a color similar to the shade of the old grout, or experiment with the palette. Light paint hides imperfections in the tiles and harmonizes with any shade of tile, while dark paint gives the room an original look. Some of the most well-known manufacturers that produce coloring compounds for seams include Edding 8200, Pufas Frische Fuge, Fuga Fresca.
- Edding A coloring composition designed to “refresh” the appearance of joints between tiles. For convenient use, it comes in the form of a marker; it can be black, white or gray.
Industrial marker Edding 8200, 2-4 mm, round tip, white (for tile joints)
Attention: when choosing a marker for painting seams, you should pay attention to the thickness of the line - if it is wider than the seams themselves, it will be inconvenient to work with the marker.
- Pufas Frische Fuge Komplettset. Inexpensive paint, which has one significant drawback - low durability. Usually has a white tint, but the addition of a tinting compound is allowed.
Pufas Frische Fuge Komplettset
- Fuga Fresca. A composition based on acrylic polymers that adheres well and fills the seams evenly. A wide range of colors allows you to choose any shade to suit your taste.
Mapei Fuga Fresca
Application of the product
It should be noted that when applying paint to a surface, the color may differ significantly from that declared by the manufacturer - especially if the shade of the new composition is much lighter than the shade of the old grout.
When choosing a paint composition, you should carefully read the instructions on the packaging - most products are not used for epoxy joints, as well as those filled with silicone or polyurethane sealants.
Step-by-step instructions for applying paint to seams
In order for the paint to lie evenly on the surface, and the result of the work to please the eye for a long time, you need to follow a few simple rules.
Step 1. Clean the surface between the tiles well (you can use the methods described above). If the dirt is strongly ingrained, you should use a mechanical cleaning method, and if there is mold and mildew, additionally treat them with an antiseptic.
Step 2. Wait for it to dry completely (paint cannot be applied to a wet surface, as the result will be unsatisfactory).
Step 3. The paint is applied with a thin brush, as carefully as possible, and special attention should be paid to vertical seams where the composition can flow down.
Applying paint
Any paint that gets on the tiles must be wiped off immediately, without waiting for it to dry, with a soft cloth, since it will be impossible to remove it later.
Wipe off excess paint with a rag
Step 4. Wait 24 hours until the composition is completely dry, then evaluate the result and, if necessary, apply another or more layers of paint.
After painting the seams, it is advisable to protect them with a special sealant compound, which will extend the service life of the composition.
Video - Change the grout color on the tiles
Video: Touching up tile seams
Optimal seam width
It is necessary to decide on the selection of the width of the seam before the laying process. It depends on the preferences of the master or designer.
Here are a number of recommendations that can help you choose the best type:
- Seams wider than 12 millimeters will make the edges of the tiles visually smoother and hide their disadvantages. But you need to understand that this width reduces the reliability of the tiles, which leads to the formation of cracks. In order to avoid this, it is possible to add sand with large particles to the solution.
- A joint with a width of 3 millimeters is best suited for square tiles measuring 10 - 60 cm.
- It will be difficult to fill a 1.5 mm joint with grout. If the job is done poorly, moisture can seep between the tiles and ruin it.
There is no need to be afraid of making the seams wide, since narrow ones are much more difficult to work with and not any solution will be able to completely fill a small space.
Choosing a color
Usually the shade of the grout is chosen to match the main color of the tile. It is possible to deviate by several tones, but designers do not recommend choosing shades that contrast with the main color.
However, if you choose the right palette, it is possible to use diametrically opposed combinations in order to achieve a fascinating and unique room design.
When selecting grout for floor tiles, it is better not to select white-colored solutions because of its impracticality. After a short period of time, the seams become a dirty gray shade. For snow-white tiles, designers usually advise choosing consistencies and pastes of light gray colors of different intensities.
Rules for using soda and peroxide
Additionally, you can update the seams using regular baking soda, which is mixed with hydrogen peroxide. But the method can only be used by persons who are not allergic to these compounds.
To obtain a solution, you need to mix 4 tablespoons of soda with 3 tablespoons of peroxide. If there are greasy stains in the seams, then you can additionally add a small amount of gel to this solution. The resulting solution must be thoroughly rubbed into the existing seams. The product is left on the surface for several hours, after which the surface is wiped with a dry cloth.
Preparation of the solution
It is imperative to prepare the mixture in a clean and dry container (for example, a bucket), since if water or dust gets in, the grout may become unusable or lose quality.
To dilute the container, you need to pour water or another required mixture (will be noted in the instructions) in a ratio of approximately 3/4 of the container.
The dry mixture must be added gradually, thoroughly stirring the composition. Then the remaining water is poured into the mixture in small doses.
The resulting mass must be allowed to stand for approximately 10 minutes so that the dry lumps can become saturated with liquid. After the composition has infused, it should be thoroughly stirred one more time until a homogeneous mass is obtained.
IMPORTANT! It is necessary to regularly monitor the consistency of the solution, since in some cases less water may be required than specified in the instructions.
Surface preparation
Before grouting, newly laid tiles should be left for about 7 days. But it is worth considering that different types of tile adhesive have different drying times. 7 days will allow literally all types of glue to dry.
Next, you should clean the excess from the seams using a soft metal float, knife or sandpaper.
Wipe with a sponge or vacuum cleaner to get rid of small particles. Without these steps, the tiles or grout may soon begin to crack.
Using washing powder
How to make the seams between tiles white using this method? To do this, perform the following steps:
- The solution is initially prepared by adding a glass of white washing powder to a container with a small amount of water;
- the components are thoroughly mixed, which allows you to obtain a homogeneous mixture;
- the resulting slurry is collected with a hard brush or toothbrush, after which it is used to wipe all the seams on the tile surface;
- while working, it is important to move the brush back and forth;
- After completing the process, the remaining product is washed off with water.
This method provides quick whitening of seams, but this option is only suitable for seams that are white in color. Additionally, the result is short-lived, so in just a few days the seams will become dark again.
Application technology
There are different tools for application, but all you need is: a small container, metal and rubber spatulas, a bucket of water, a thick sponge and a piece of cable. Prepare the grout mixture according to the instructions on the package. Most often this is the ratio of 1 kilogram of dry mixture to 300 milliliters of water.
The main thing is not to add too much water as this will affect the properties of the material. Add the dry mixture little by little to the water while constantly stirring it. Let it sit for about 5 minutes and you can start grouting.
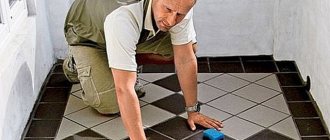
After making the mixture, use a rubber spatula to press the mixture into the seams, collect the excess and rub it in again.
Then we pull it perpendicular to the seam with a metal spatula and cut off the excess. And let's move on to the next section. After about 15-20 minutes, we begin to wash the seams.
At this stage, it is important to squeeze the sponge out well, as if it is very wet, so-called patches of different colors may appear.
Using a sponge, we remove the grout around the seam and if you chose the right time, the seam does not stretch behind the sponge, but it is still elastic. After this, we take a cable that fits the width of the seam and press it in, thanks to which we get indentations that are made using a professional spatula.
We wipe the squeezed out mixture with a sponge, then rinse everything again with a damp, but not wet, one, and after a day the seam may come into contact with water. And after 5-7 days, it will reach its final strength.
Grout update
The most common way to update grout is to use household chemicals. But it can be different, from powders to all different gels. If you are going to use a powder product, the most popular are: Comet, Bref, Pemolux and Domestos.
Of the listed products, only Comet and Bref should be considered for use.
Comet is worth using due to its disinfecting ability. And Bref because of its low price in Russia.
Gels are very expensive and are used only when nothing else helps.
The way to use them is to apply the gel to the seam and then leave it for 8-9 minutes. Then use a hard sponge and plenty of water to remove the gel and seam.
But no matter what product you choose, we advise you not to use sprays as they are most often the final remedy.
After choosing a product as a brush, you can use a toothbrush or any other brush with stiff bristles. Dilute the product you have chosen with water and dip the brush in it and carefully wipe the seams until they completely disappear.
After that, rinsing with water and bringing it to perfection with sandpaper, drying it and performing exactly the same actions as when applying a seam.