Carefully! Electric current | 06/20/2017
Among the variety of hand-held woodworking tools, the edge router occupies a very high place, since with its small size and low energy consumption it is capable of performing many different works with wood. Why is it needed and how do they work? Let's find out!
Device
The production of manual edge milling cutters (or, otherwise, trimmers) is carried out by several popular brands in this segment - DeWalt, Makita, Virutex, but the fundamental design of the power tool in question is the same:
- Drive commutator electric motor, necessarily with low starting torque and speed from 3000...6000 min-1 to 20000...26000 min-1. The engine is equipped with an air cooling system.
- A shaft placed in rolling bearings, to the end of which an edge cutter is attached by means of a clamping sleeve, is the main type of tooling, although, in principle, some other tools are suitable for an edge cutter.
- A lifting device designed to connect and disconnect the shaft from the engine (manual trimmers are not equipped with a coupling, since in this case their weight will increase noticeably).
- The base or roller base is a stable base on which the trimmer rests when in use.
- A clamp that prevents the permissible stroke range of the edge cutter from being exceeded.
- A safety shield that prevents small chips and sawdust from getting into the eyes of the worker.
- A rubberized handle, near which electronic tool controls are usually mounted, providing a smooth increase and decrease in shaft speed.
The kit of an edge router often also includes adapter rods intended for using equipment with a different diameter of the landing part, spare brushes, a dust collector, etc.
Household edge milling cutters of relatively low power (up to 750...1000 W) are designed to be held manually during use, since they are not very heavy. Professional and semi-professional models (for example, Makita rt0700cx2, DeWalt 26200 and a number of others) will require mandatory installation on a desktop or workbench.
Shank Diameter Types
Before you start choosing a cutter, you should first decide on the fastening method, namely in what units the diameter of the shank will be measured - in millimeters or inches.
This will depend on what kind of collets are included with the router - bushings into which the shank itself is clamped:
- If the size is measured in millimeters, then the most common ones will be 6.8 and 12 mm.
- When the dimensions are written in inches, you can choose only one of two - ¼ and ½ inches.
Please note that when converting inches to units, the results are 6.35 mm and 12.7 mm, but despite the small difference, the millimeter shank does not fit with the inch collet and vice versa. The shaft of a milling machine rotates at a speed of up to 25,000 revolutions per minute, and therefore even such minor discrepancies can lead to at least damage to the tool.
Wood edge cutters for hand router
Depending on its class, a manual edge router can perform the following operations:
- Carry out shaped processing of decorative edges - perform roundings and chamfers of various configurations, produce fillets, etc.
- Mill grooves and grooves.
- Make selections for window or door hinges.
- Prepare recesses for the subsequent installation of decorative wooden elements and decorations with a complex external contour.
- Perform edge trimming on laminate flooring, veneer overhang or large solid wood.
With increasing power, the class of tasks performed increases, however, their successful solution requires not only operational experience (simple edge milling cutters are easy to use), but also appropriate equipment of the trimmer with the required assortment of edge milling cutters.
A natural limitation is that each of the manufacturers of this tool focuses primarily on equipment of its own production, so the question of interchangeability disappears.
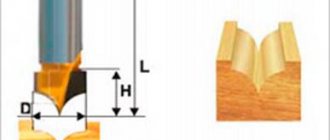
The most common types of edge cutters for wood:
- To perform roundings with a radius of up to 2.5...4 mm;
- To obtain chamfers at an angle of 45º;
- Fillet cutter with a round or oval working profile;
- A roller cutter, with the help of which a protrusion with a circular cross-section can be formed on the flat surface of a wooden workpiece;
- Milling cutters with a shortened cutting part, which are equipped with an upper thrust bearing - they can produce shallow recesses, for example, for hinges;
- Straight groove or spiral for processing various narrow grooves, and in hard-to-reach places;
- Milling cutters with copying bushings, thanks to which the tool can accurately reproduce the movement of an experienced operator’s hand.
A typical edge cutter includes a cylindrical part that rotates in a rolling bearing, a working part, the shape of which is determined by the purpose of the equipment, and a support part, the purpose of which is to increase the rigidity of the cutter and eliminate its longitudinal bending under the load of the working stroke.
The price of domestically produced edge cutters ranges from 600...900 rubles, but for imported cutters the price can reach 1300...1500 rubles. Basically, for the manufacture of such equipment, tool steel grades 9ХС or ХВГ are used. However, for particularly durable wood (oak, hornbeam), it is more advisable to purchase edge cutters with carbide inserts.
Why do you need a milling machine?
The milling device is designed for processing both wood and metal. With its help, it is possible to form recesses or holes of any configuration. This greatly simplifies tasks such as inserting hinges and inserting locks. Doing this with a chisel and an electric drill is not so easy, and it takes a lot of time.
There are stationary milling devices and portable (manual). Hand-held electric milling machines are considered universal devices, with the help of which, in the presence of attachments, it is possible to perform operations for various purposes; you just need to change the position of the part in relation to the device or vice versa.
Stationary devices are used in factories or factories where mass production of wood or metal products is established. Under such conditions, the cutting attachment is stationary, and the workpiece moves along the desired path. When using a hand tool, on the contrary, the part is fixed motionless and only then it is processed, although there are parts that require fixing a hand tool. This is provided for in the design, therefore, it is considered more universal. This is especially true when a large number of parts need to be processed, and it is not possible to use a stationary machine.
A homemade milling machine is a horizontal platform with a hole in the center, to which a hand-held device is attached from below.
There are many types of milling machines, but for use at home or for starting your own business, universal models are more suitable. As a rule, they are equipped with a set of cutters and various devices for performing various types of operations. The only thing is that if you have a manual milling cutter, simple operations can take much longer than when using a stationary machine.
Using a manual milling device it is possible to:
- Make grooves or recesses of any shape (curly, rectangular, combined).
- Drill through and non-through holes.
- Process ends and edges of any configuration.
- Cut out complex shaped parts.
- Apply drawings or patterns to the surface of parts.
- Copy parts if necessary.
Copying parts is one of the functions of any electric milling machine.
The presence of such functions makes it possible to simplify the production of the same type of furniture or the production of identical parts not related to furniture production. This is one of the main advantages of this tool. As a rule, to produce parts of the same type, it is necessary to install copying machines, which are designed to perform only one operation, which is not always profitable, especially in small enterprises.
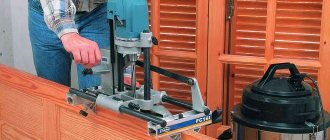
Sequence of work with an edge router
Let's look at it using the example of one of the most successful models of similar equipment designed for woodworking - the Makita rt0700cx2 trimmer. This edge router has increased requirements for electrical safety, but is not intended for work in low light conditions, since there is no illumination of the working area. The presence of a rotating base allows you to perform work on processing straight and inclined edges, milling corners, and even perform so-called plunge milling, when the processed area of the workpiece surface is located on the opposite side from the plane of the trimmer.
The manual router has a block design of the units, so disassembling the unit (for example, to replace brushes or clean) does not take much time. It is advisable to have a set of edge cutters that are suitable for use with a specific trimmer, as well as suitable keys for convenient change of equipment.
Preparing the edge router for work is carried out in the following sequence. Depending on the type of surface of the workpiece, the required type of support sole is selected (there are at least three of them in the basic configuration, all of them are comfortable and stable, and are made of cast aluminum alloy). Similarly, a collet with the required mounting diameter for the cutter is selected.
Using a rubber roller, the desired depth of edge milling is set. Before direct use, the manual milling cutter is turned on at idle speed to identify the possible presence of vibrations: they are possible if a fairly heavy (weight 1.8 kg) milling cutter is positioned non-perpendicular to the working axis of rotation of the cutter.
If the milling volumes are large, a dust collector should be attached. Then fix the locking lever, turn on the trimmer, and smoothly move the equipment with both hands to the stop. The quality of the finished result is ensured by minimal clearances in the guides of the sole, as well as the use of a high-precision bearing that reduces runout of the collet during the milling process.
Inlay
Cutting thin, flush inlays requires shallow cuts and precision, making a router the ideal tool for the job. Inlaying requires shallow digging into the wood to seat the pieces flush with the surface. You can do the job with other routers, but an edge router is best suited for this task. Its small size and much lighter weight are an advantage over other models, as they provide better accuracy when inserting inlay elements.
Based on materials from rockler.com
What technical characteristics must be taken into account when choosing a router?
Which router is better to choose for home use? When purchasing, you need to pay attention to certain indicators. Experts advise that you initially study the power, spindle speed, stroke and additional capabilities of the device, and then choose the appropriate one.
Power
The equipment is divided into:
- light type - with a weight of 2 to 3 kg and a power of up to 750 W;
- medium - with a mass from 3 to 5 kg, intensity from 750 to 1500 W;
- heavy - up to 6 kg in weight, with a capacity of 1500 to 2300 W.
The duration of continuous operation and the permissible length and diameter of the cutter for installation depend on the indicator. When purchasing for regular use, buy equipment with an indicator of at least 1500 W.
Standard Features
Spindle speed
The quality of surface treatment depends on this technical characteristic; a small number of revolutions is used for plastic and procedures with high precision. There are three main types of device:
- slow - gives from 10 to 20 thousand revolutions per minute;
- average - 20-30 thousand units;
- fast - over 35 thousand.
Important! With a large cutter diameter, the angular speed of rotation should be less. Attempts to accelerate cause the wood to catch fire.
Cutting stroke
Important parameters include depth, which shows the functionality of the device. Household appliances deepen from 0.2 to 0.5 cm, professional ones - from 0.7 to 0.8 cm. The indicator depends on the working stroke.
Important! Some models have fine tuning of immersion depth indicators, in increments of 0.01 cm.
Additional functions
The list of secondary functionality is presented:
- constant electronics - helps maintain the number of revolutions at a constant level, required when the equipment is under increased load;
- soft start - allows for a gradual start with increasing speed, which is necessary to increase the life of the tool;
- overload protection - automatically turns on when the device heats up, can turn off the power or report a problem through an indicator.
The device can be equipped with protection against accidental startup. It looks like a button on the case; without pressing it, voltage is not supplied.
Key for blocking switching on
How to make a tongue and groove connection
How to make a tongue and groove connection?
Tenon and groove - what is it?
First of all, you need to define what a tenon and groove is. This is nothing more than a way of connecting parts.
It is used most often in carpentry, as well as in other types of production. There are many types of grooves and tenons, but we'll talk about that another time.
Properly executed tenons and grooves are sufficiently firmly connected to each other. This connection is considered one of the strongest.
Tongue and groove connection method
First you need to determine for what purpose this connection method is needed. If this is a table, then the jumpers in it are usually connected to the vertical legs.
Consequently, the wood fibers run vertically and horizontally. If this is a wall table or a bedside table with drawers, then the jumpers here will be located a little differently. They will be horizontal relative to the legs.
In any case, such a connection will be the most reliable. When making a large number of tongue-and-groove joints, special machines are used. If you need one or more tongue and groove joints, and there is no carpentry equipment at hand, then it would be advisable to do this manually. To do this you will need a set of carpentry tools, including:
- hacksaw;
- clamp - 2 pcs;
- measuring instrument;
- pencil for marking.
- First we will make a spike for the future connection.
- To do this, you need to take a bar and mark the dimensions of the future tenon on it.