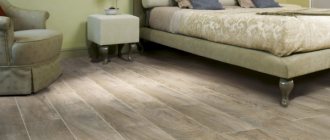
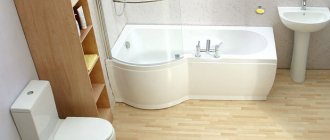
Linoleum is very popular among consumers. This interest is quite simply explained by the opportunity, through fairly modest investments, to provide the premises with a very decent appearance. The relative ease of installation and durability of the coating also play an important role. However, the insufficient strength of the material under the influence of bending loads imposes quite severe restrictions on the base.
Linoleum can be laid in corridors, living rooms, kitchens - in all places that are characterized by high traffic.
This material has such distinctive features as:
- increased wear resistance;
- ease of maintenance;
- relative ease of installation;
- strength and elasticity;
- quite low cost.
Linoleum is laid on an extremely flat surface. The easiest way is to level the concrete base. As for wood, the possibility of laying linoleum on a wooden floor is controversial for many. So is it possible to put it this way? Of course, yes, but subject to careful preparation of the foundation.
Laying linoleum on a wooden floor includes several stages, among which leveling the floor is one of the most important.
Types of material
Unsplash
Linoleum is still a popular flooring choice. It is loved because it is inexpensive, durable, easy to clean and can be installed on any substrate. Depending on what raw materials are used in its manufacture, it is divided into several categories.
Polyvinyl chloride
The main components are synthetic polymers. It can have several bases, for example it can be made of fabric, foam or soundproofing material. Depending on its base, the coating will differ in quality characteristics.
- Floor
What types of PVC linoleum are there, and can it be laid on a heated floor?
Alkyd
It is made from resins of the same name with the addition of mineral fillers. The basis can be either synthetic or natural fabrics. It retains heat well and has little noise absorption, but this type is prone to cracking.
Rubber
Well suited for industrial use. The bottom layer is bitumen and rubber. It’s worth noting right away that it does not allow air to pass through, so it is not suitable for laying on wood.
Killoxyl
It is based on nitrocellulose. It is quite flexible and plastic, and most importantly, fireproof.
Despite their obvious differences, all these types are sold in a huge variety of colors and textures. Their wear resistance and price will depend on the raw materials from which they are made and the thickness of the top protective film. Therefore, when choosing a coating, study all its characteristics and consider how busy the room where you want to use it is.
- Floor
We solve a difficult problem: how to lay linoleum in a room with furniture
Preparation of necessary materials and tools for work
You will need:
- Roller;
- Knife;
- Ruler (two to three meters long);
- Double-sided tape;
- Notched spatula (wooden or metal);
- Liquid for welding joints (if necessary).
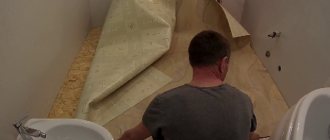
We will pay special attention to the preparation of linoleum. Place all the rolls in the room where the finishing work will take place for several days. Usually, for this purpose, linoleum is spread in the room, thereby providing excellent straightening. If there are places where the material does not adhere tightly to the base, then they can be pressed down from above with some heavy objects: books, boards, etc. If strong kinks are noticed, it is better to go to the point of sale and ask to exchange the product. If you neglect this, then know for sure that you will not have a smooth floor covering.
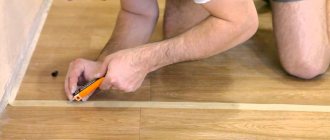
The next step in preparing linoleum is cutting it. But first, remove all the baseboards. Next, stock up on a knife and a ruler. When measuring, leave a small allowance for shrinkage, which materials are susceptible to at high temperatures. Typically 2% is required for PVC coating. If you need to make a cutout for various protrusions (for example, a pipe), then you need to spread the linoleum along the wall, draw the contours of the protruding elements on it with a pencil, and then cut them out with special care. Remember, a mistake cannot be corrected. Therefore, cut the linoleum slowly, make small cuts.
Choosing a substrate
When deciding how to lay linoleum on a wooden floor, another question arises - whether an underlay is needed and what type to choose. If you are faced with the task of improving sound and heat insulation, then the substrate can be very useful. You need to choose it based on your needs.
For soundproofing
Cork material is good for sound insulation. Not only does it make the room quieter, but the flooring is also softer. However, cork is completely unsuitable for rooms with heavy furniture, since the legs can leave dents in the product.
A combined option, which includes jute, wool and linen, is also suitable here. Due to its rigidity, it will provide a hard and durable coating.
Polymer foam material can also make the room quieter. However, of all the options, it can be called the most capricious, since over time its structure loses its shape and sticks together. This causes trodden paths to form on the surface of your floor where you walk most often. To avoid this, the plywood is laid first and the insulation is usually placed underneath.
For thermal insulation
The idea of transforming a house or apartment can be supplemented with insulation. Therefore, you can take a closer look at substrates made of flax fibers. They do not accumulate moisture and provide a special microclimate between synthetic canvas and wood. The foamed type also has heat-insulating properties, but does not allow air to pass through, which can lead to fungus.
Preparation for installation
In order for the installation of linoleum to be of high quality, it is necessary to prepare not only the base, but also the coating material itself. It is important that the linoleum is leveled before installation. To do this, you need to unwind the roll and leave it until completely straightened in the room where you plan to lay it. Otherwise, there is a high probability of bubbles and unevenness appearing after laying linoleum on the floor.
Flooring methods
There are two installation methods from which you can choose how to glue synthetic flooring.
No glue
It can be laid without the use of adhesives. This method is the simplest, but it is not particularly reliable, since the canvas will only be held in place by the baseboard. This technology is used if the room is very small.
With double-sided tape
It can also be fixed with double-sided tape. It is pasted throughout the room in the form of a grid with sides of approximately 50 centimeters.
It is important not to remove the protective film immediately, but to peel it off as the roll rolls out. It is necessary to press firmly and level each area.
On glue
Glue for linoleum on a wooden floor will be the best option, as it will provide reliable and durable adhesion to the base. If you are thinking about how to glue it, then PVA will do the job best. For better adhesion, add a little gypsum to it. Prepare this mixture in batches as it hardens quickly. The gypsum in the glue will also help fill small cracks in old boards.
- Decoration Materials
How to glue linoleum together: detailed instructions
Floor requirements
Wooden floors in a country house can be covered with linoleum only if they meet a number of parameters. First of all, they must be strong and rigid. Walking on them should not result in creaking or other sounds.
A flat base is considered good. Deviations in height of more than 10 mm per 2 linear meters of floor are unacceptable. If there is such a problem, alignment is necessary.
Important! Fastening plywood, boards and other materials to the floor must be done using galvanized self-tapping screws. The use of nails (especially ordinary ones) for these purposes is unacceptable. Gradually their caps begin to protrude and damage the coating.
Installation subtleties
In order for the linoleum laid on a wooden floor to be beautiful and smooth, before installing it you need to learn a few tricks that will simplify your work and make the result better.
Temperature is very important here. Two days before work, try to ensure a stable temperature in the room. The most comfortable environment is considered to be no more than 18 degrees, and the base should be heated to 15. Don’t forget about humidity levels. The recommended level is no higher than 60%.
Give the material one more day to adapt. Unfold the roll, straighten it and lay it out with an allowance of 8 centimeters on the walls. Do not drop the roll during transportation as this may cause dents, cracks and scuffs.
If the installation area is large and you bought several sheets of the product, make sure that they are from the same batch. Otherwise, during installation you risk encountering problems with color and thickness mismatches.
The joints of the sheets must be laid with identical sides facing each other. However, this rule does not apply to canvases with certain textures and patterns that need to be laid in one direction.
- Cleaning
How to remove brilliant green from linoleum so as not to spoil the coating
Which linoleum to buy by size
It has already been said that the width of the roll should match the size of the rooms. When laying the material in standard buildings, this usually does not cause serious problems. In order not to make a mistake before going to the store, you need to take measurements.
Width and length are measured at several points. This will allow you to take into account some of the unevenness of the walls. The purchase is made according to the maximum values. It is advisable to leave a small margin of 10-20 cm in length and width.
It is important to remember that linoleum is not cut in advance. This is a recipe for error. A solid strip with approximate dimensions (with a margin) is laid on a wooden floor. In this case, small allowances should be provided along the edges. The excess can be cut off only after this procedure.
If the roll covers only half of the room or another part of it, the joint is made in the center. In this case, more material may be required, since it becomes necessary to level the pattern (as, for example, when gluing wallpaper).
After purchasing the material, it is recommended to leave it indoors for a couple of hours. In this case, the roll is not unrolled. This approach will allow the coating to adapt to the room temperature. In this case, the linoleum changes slightly in size. Then the roll is spread on the floor and left there for several days. This will allow you to make linoleum flooring with maximum adherence to the base of the floor.
How to lay linoleum on a wooden floor
Before laying linoleum on a wooden floor, the surface must be carefully prepared. After all, a good foundation is the key to long service life and wear resistance of the floor, regardless of its type.
It is worth studying all the details and subtleties of installation work in order to ultimately get the perfect result. Let's look at the process step by step: is it possible to lay it on boards, how and what to lay plywood on.
Preparatory work
Pexels
If installation will be carried out on boards, old parquet or laminate, remove the baseboard and remove all dirt accumulated under them. After this, inspect the surface. If you do not notice any serious flaws or fungal damage, then you need to secure all the parts properly.
Carefully punch through each existing nail. All heads of nails and screws must be “sunk” into the wood. If you neglect this step, holes may appear on your coating in the future.
If installation will be carried out on boards, old parquet or laminate, remove the baseboard and remove all dirt accumulated under them. After this, inspect the surface. If you do not notice any serious flaws or fungal damage, then you need to secure all the parts properly. Carefully punch through each existing nail. All heads of nails and screws must be “sunk” into the wood. If you neglect this step, holes may appear on your coating in the future.
Pexels
The next stage is scraping with a special apparatus or plane. It is this that reveals cracks and chips on the surface of the wood.
For small cracks, putty is suitable, and for sealing wider cracks you can use thin wooden plastics that are pre-lubricated with glue. Using a hammer, carefully hammer them into the recesses until they are completely level with the surface.
After all imperfections in the form of bulges and depressions have been corrected, and the putty and glue have dried, sand the surface and carefully remove the dust with a vacuum cleaner. To protect the wood from pests and mold, treat it with a primer. This will be the final stage of processing the boards before laying the covering.
Pexels
If your floor is very worn, then plywood will help solve the problem. It must be at least 7 millimeters thick.
Remove the baseboards and clean the floor of dust and dirt. If protrusions and bulges are detected in some areas, you need to scrape. If the differences in height between the floorboards are small, then you can skip this step. If the surface has not been painted, then it must be treated with a primer and allowed to dry thoroughly. If insulation is needed, install foam insulation on the subfloor. Next you can start working with plywood.
[email protected] _spb
The sheets should be laid at a distance of 5 mm from the walls, allowing for slight deformation and ensuring ventilation. The plywood is secured with self-tapping screws, the heads of which are tightly twisted and recessed.
The gaps between the plywood are sealed with putty. It is correct to let it dry, otherwise in these places the flooring may rise from evaporated moisture.
Laying process
Unfold the roll and make markings where the cuts will be needed. For example, you may need to cover the area around pipes. Measure their diameter with a caliper, then on the wrong side, using a regular compass, draw the passage of the pipe. Accuracy is important here, since an error in calculations can ruin the entire work.
[email protected] _postavka
There is an option to do without exact calculations. Cut out the approximate diameter of the pipe in the canvas, and after installation, cover this place with a decorative overlay. A sealant matched to the color of the coating will also help to disguise the joint.
If you have chosen a laying method without glue, then level the canvas over the surface, as soon as it has completely settled down and the waves have disappeared, the edges of the walls can be trimmed and secured with a plinth.
When working in a large room, you will probably use more than one sheet of linoleum. Therefore, we recommend gluing them with an overlap of 2-3 centimeters. In the future, this laying technology will make it possible to achieve ideal and almost invisible joined seams.
Spread the adhesive with a notched trowel. Lubricate 40-50 centimeters of the surface with the composition, then roll out the canvas and iron it with a smoothing iron, squeezing out excess air and the mixture onto the part of the floor where the glue will be applied next. In this way, roll out the entire roll all the way to the wall.
[email protected] _remont
The part of the flooring extending onto the wall is cut off with a sharp knife. Leave a gap of approximately 5 millimeters wide with the expectation that the material may expand as it shrinks. Then this gap will be covered with a plinth.
The material laid on the glue must be processed with a hand roller to get rid of small bubbles and distribute the mixture evenly.
[email protected] _floor
The cutting of joints is done on the second or third day, when the material has completely dried and can be walked on. Next, the seams are treated with special silicone welding to prevent water and dirt particles from getting under the flooring.
Existing types of linoleum
This material can have either a natural or artificial base.
1. Natural linoleum
Natural breathable linoleum is made on a jute base, which is coated with a special mixture of resins, oils, flax, chalk, wood flour with the addition of dyes.
Natural linoleum
This is not only an environmentally friendly material - it also has high strength, and also has a very special attractive appearance.
If a dry and even base is prepared for it, then this type of material will last a very long time.
2. Linoleum made of polyvinyl chloride (PVC)
This coating consists of three or four layers:
- it can be without a base, or on a fabric, foam or warm base;
- the second layer is always fiberglass;
- the third - a polyvinyl chloride base with a printed pattern;
- fourth - film, as a protective transparent layer.
The base of the material acts as an insulating and soundproofing layer and can have different thicknesses.
Linoleum based on polyvinyl chloride
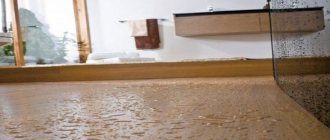
PVC linoleum itself is not afraid of dampness, but if moisture enters the wooden base underneath, the process of rotting of the wood may begin, since it will be covered by the floor covering and air will not flow to it.
If moisture comes from the ground and there is no floor ventilation, then the wooden base may become covered with mold, which will subsequently spread to the walls, and an unpleasant characteristic odor will appear in the room over time. Therefore, this material can only be laid in a dry room with good waterproofing on a wooden or concrete surface.
3. Alkyd linoleum
This type of linoleum can be made from both natural and artificial materials. Its component composition includes minerals, coloring pigments and alkyd resins.
Alkyd resin based material
Alkyd resin flooring has a thickness of 2.5 to 5 millimeters and is produced in a single color or with a specific pattern. It must be laid on a perfectly flat surface, since the material is very brittle, so it is not recommended to lay it on a plank floor with strong level differences. On a prepared floor, this coating will last a long time, as it has good wear resistance. In addition, this type of linoleum has good noise-absorbing properties and retains heat well.
Alkyd linoleum with insulation
If the usual relative humidity in the room is low, then for greater insulation of the floor you can choose alkyd linoleum on an insulated base.
4. Colloxyl linoleum
This variety is made from nitrocellulose and is also considered an environmentally friendly material. It is a baseless floor covering, but at the same time has excellent flexibility and wear resistance, as well as fire resistance and water resistance.
Colloxyl linoleum
Colloxyl linoleum can have different thicknesses, and is used for installation not only in residential premises, but also in public buildings, where it can withstand the load from a large flow of people quite well.
5. Relin
This is rubber-based linoleum, and it is absolutely not suitable for laying on wooden floors, as it is a completely non-breathable material.
When choosing linoleum, you need to pay attention to one more point - there is commercial and non-commercial material. For flooring in residential premises, only non-commercial linoleum is used, since the commercial version may contain impurities harmful to the body, which solve the issue of strengthening it, but, alas, at the expense of environmental friendliness.
Once the type of linoleum has been chosen, before purchasing it, you need to decide on the required dimensions. To do this, carefully measure the dimensions of the room for which the material is purchased, taking into account possible complex configurations. The resulting area of the room is correlated with the required amount of material. The ideal option is if you can cover the linoleum with one sheet without resorting to welding.
Preparing the subfloor
Wooden floor under linoleum
Preparing a wooden covering for linoleum is a very labor-intensive process. The fact is that such a property of the finishing material as high elasticity leads to the fact that it will repeat all the unevenness of the wooden floor - notches, cracks.
It is necessary to carefully inspect the floor structure. Cracks, chips, and crevices need to be filled with putty ; wider ones should be filled in with a narrow lath, and then sanded. It is important to strengthen all boards and planks. If the board becomes unusable, replace it with a new one.
Raised surfaces should be treated with a plane or grinder . If nails or self-tapping screws are sticking out, then they need to be hammered in or tightened well, drowning them deeply, and the resulting indentations should be filled with putty.
In some cases, when wooden boards are damaged, a layer of plywood can be laid down . It is best to use plywood with a 12 mm layer of sheet veneer. If it is thinner, several layers will be required. The best option is FC plywood. It is harmless and does not emit toxic substances. Plywood can be used where there are no large temperature differences and high humidity. It is advisable to dry it for 2-3 weeks, then cover it with an antiseptic and ventilate thoroughly. For better durability, it would be a good idea to coat the plywood with several layers of acrylic varnish.
Plywood is installed on a wooden floor if the height difference when checking the level is no more than 1 cm.
In another case, to eliminate differences, use a backing and tape to strengthen the joints of the material. Before laying plywood, it must be cut so that the number of sheets is minimal. It is important to take into account the property of plywood to increase its area during temperature changes. Therefore, when cutting it, you need to leave space for damper joints - 3-4 cm between the sheets and 8-10 cm between the plywood and the wall. Before laying the plywood, number the sheets so that they are laid according to the diagram.
It must be laid so that a maximum of three seams meet at one point. It is laid, attached with self-tapping screws, which are screwed in deeply, the recesses are puttied, and processed with a grinding machine. You can use parquet glue, bustilate, assembly adhesive, and liquid nails for fastening plywood. Seal the gaps between the plywood sheets with mastic. In order for the sheets to be attached better, the places where they touch need to be reinforced with screws or nails.
Plywood can also be attached in a more complex way using lags. To do this, the cracks between the wooden coverings are filled with assembly adhesive or silicone sealant.
Logs are slats one and a half to two meters long and 15-40 mm wide. They are needed to level the wooden surface.
The slats are attached to the wooden floor with self-tapping screws or dowels in the form of a lattice. It is important when installing the logs that the upper edges are in the same horizontal plane.
Soundproofing material should be placed between the squares of the guide rails. We lay sheets of plywood on top of the joists, strengthening them with self-tapping screws. It is important that the plywood joints land on the joists. To smooth out unevenness between the sheets, sand the joints with fine sandpaper. Coat the top of the plywood with varnish. Laying linoleum on parquet is similar to laying on a wooden surface, but has some features.
Before laying vinyl flooring, you need to check whether the parquet is ventilated.
We remove 2-3 parquet boards from different places in the room (in the middle, near the wall). If rot or a musty smell is found on at least one of the inside sides, then this coating should be removed.
If the parquet is in order, then we level the surface. To ensure a smooth surface, we lay fiberboard and nail it.
We treat the seams with mastic or plaster. But you can do without fiberboard. Using a plane, we remove unevenness in the parquet and the protrusions of individual planks. Use sandpaper to sand the surface of the old coating. You can use a grinding machine. Cover the seams with mastic. When laying linoleum on parquet, you must remember that hot welding is not suitable for sealing seams. In this case, the parquet below can deteriorate and even catch fire.
If the floor in the apartment is concrete, then before laying the PVC covering, you need to level its base.
If the differences in height of the concrete floor are less than 2 mm per square meter, then it is enough to fill the recesses and remove the protrusions.
If the differences exceed the specified mark, then a new screed should be made. There are two screed technologies: wet and dry. Let's look at each of these technologies .
Wet screed
First you need to vacuum the concrete surface and remove debris. We seal the seams with concrete mortar and large gaps with polyurethane foam. Then we waterproof the surface. The easiest way to do this is with plastic film cut into strips. Each strip should overlap the previous one. The overlap should also be done on the walls up to the floor level.
A damper tape is laid near the walls to compensate for possible expansion of the screed. Mark the floor level horizontally. It is better to use a laser level. 3 cm above will be the upper border of the screed. The concrete screed must be at least 30 mm. After one and a half to two meters we lay beacons - pieces of perforated profile.
To better level the floor surface, prepare a solution: pour the dry mixture into water and mix with an electric drill using a mixer attachment. We begin to fill the floor from the far wall, gradually filling the surfaces between the beacons, pushing the cement with a lath, which is called a rule, resting against the upper boundaries of the beacons.
While the screed is drying, it is advisable not to ventilate the room. This is just a rough screed. The final leveling is carried out with a special water-soluble mixture, which itself spreads over the floor. To avoid bubbles, use a spiked roller. When the mixture hardens, cover it with two layers of primer.
Dry screed
Dry screed is carried out in the same way as wet screed, with the difference that insulation, for example, expanded clay, is poured between the beacons. Using a metal rule we level it. Thick plywood or gypsum fiber board sheets are laid on top of the beacons. After this, you can begin laying linoleum.
Linoleum on old linoleum
Is it possible to lay new linoleum without removing the old one?
If the old linoleum has been lying around for many years, has worn out in several places, has stretched out, and has accumulated a lot of dirt and dust on the back side, then this coating needs to be dismantled.
To tear off the old glued linoleum, you need to open the windows. This is a very dirty job, so you need a supply of clean air.
Remove the baseboards. We try to tear off the old finishing coating by pulling the edge. Some pieces come off on their own. But there are places where you can’t do without a spatula or scraper. Where the glue has stuck tightly, pour a little solvent into the joint of the floor. The solvent will soften the glue and the old pieces will come off faster.
It is much more difficult to remove linoleum from a concrete floor, but it is possible. You need to cut the old coating into small squares and try to remove them using a scraper. If that doesn’t work, then tear off the top layer of the old linoleum. Remains of coating and glue remain on the floor. Pour boiling water over them, and then try to peel off the bottom layer.
Acetone or solvent works even better, which we pour onto the remaining coating and scrape off the remaining glue and old linoleum.
If you decide to replace the already laid one, the installation of which was carried out according to all the rules, with leveling the surface under it, with new linoleum, then you can lay it on top of this polymer coating without removing it. This material will serve as a heat insulator and leveling surface for the new linoleum. It needs to be carefully examined to identify any bulges or waves.
Defects in the old flooring should be cut out and replaced with a piece of the remaining piece of linoleum. You can choose a piece of material of the same thickness and quality. Cracks in old linoleum need to be cut on both sides with the letter H, the corners should be bent, and the floor should be coated with adhesive mastic. Then lower the corners onto it, pressing tightly and placing the load. Seal the cracks with sealant.
In large rooms, it is possible to lay polymer material on the old coating without gluing it. The adhesive composition can glue linoleum unevenly, causing the new one to peel off along with the mastic. It is convenient to glue them together with double-sided tape.
Linoleum on carpet
Linoleum can also be laid on carpet.
Before installation, you need to carefully check the old floor covering. Cut out the worn areas and make a patch from the same material. We align the edges and apply glue to the place where it came off the floor. Lay linoleum on top, securing it with baseboards.
In this case, the carpet will act as a backing. The old carpet covering can be removed by carefully cleaning the floor of lint and debris. Where any unevenness remains, treat with a special solution.
Linoleum on old tiles
Linoleum is laid on the old tiles without removing them. Chips. loose tiles must be replaced with others. Then fill with the leveling mixture. After this mixture it would be nice to put a substrate.
The substrate is an insulating material that performs three main functions:
- it separates the material from the floor, preventing mechanical stress, smoothes out unevenness;
- soundproofing material - muffles sounds;
- The thermal insulation function helps the cold air from below not to penetrate into the apartment.
Jute is a backing made from plant fibers. They save the coating from fire and rotting. It removes moisture.
Cork is crushed tree bark.
It is the best sound and heat insulating material, but does not protect against mechanical damage. Furniture that is too heavy can cause the flooring to warp.
Flaxseeds are made from flax fibers. The natural breathability inherent in this substrate protects against fungus and mold.
Experts advise using a combined substrate. Foamed backing cannot be used when laying linoleum, because it quickly loses its shape and deteriorates.
Instead of leveling mixture, you can put fiberboard under the tiles.
Preparatory stage
Linoleum is the most common flooring material. It has many advantages, such as high wear resistance, durability, ease of maintenance, environmental friendliness and affordable price.
Due to its flexibility, the material duplicates all the unevenness of the surface on which it lies. If you lay it on a wooden floor, without preliminary preparation, it will repeat all the defects - cracks, bulges, irregularities and caps from the hardware with which the boards are attached.
Preparing the floor
In order to achieve a perfectly level base, you need to assess its condition and carry out repair and maintenance work:
- eliminate creaking floorboards (attach the boards more firmly to the base with self-tapping screws)
- make sure that the boards are not affected by fungus and mold (if something happens, replace them)
- for differences of more than a centimeter, it is necessary to additionally lay plywood on the damaged areas
- carefully fill the gaps between the boards, then sand and apply primer
- if the paint on the floor is cracked, it is better to remove it
When the floor is perfectly flat, you can begin processing it before laying linoleum. First you need to hammer in all the nails so that the heads do not stick out.
Then perform an initial scraping of the surface, and then patch the cracks. To do this, fill all joints with acrylic putty.
It is elastic and will help avoid deformation of the wood and surface coating during temperature changes. When the material is completely dry, the entire surface must be thoroughly sanded, all dust removed and primed.
Never lay linoleum or other flooring over a damaged wood floor, as this will significantly reduce the life of the new material.
If the old floor is very crooked and the boards are not level, you need to make a plywood underlay. It will provide a perfectly flat surface and ensure water resistance, thereby extending the life of the old floor for many years.
Installation of plywood backing
Tip: If the floor is too damaged to begin with, consider replacing it. Major repairs and elimination of all defects will take more effort, time and investment. And a new floor is a guarantee of quality and protection from rotting.
Installation of plywood
First, you need to measure the plywood and cut the panels to the required length.
It is best to do this with a circular saw so that the cutting lines are even and smooth.
It is recommended to install plywood plates in a checkerboard pattern to avoid deformation at the joints.
You need to retreat one centimeter from the wall.
All sheets are attached with self-tapping screws to the beams and the old floor.
Hardware must be driven into the wood so that there are no protruding heads left, otherwise they will later appear under the linoleum. When the floor is ready, the joints are puttied, sanded and covered with primer.
Preparation of linoleum
Even before choosing and purchasing linoleum, you should take measurements of the floor, taking into account all the recesses where the material will have to be trimmed. Linoleum is sold in rolls of a certain width.
If there is no suitable size, then you will have to mount and make joints. If you have this situation, keep in mind that the joint should be placed parallel to the long wall in the middle of the room. When calculating the material, take into account the margin for adjusting the pattern in case of a joint.
When you have already purchased the required amount of coverage, be sure to lay it out in the room where it will be spread and leave it for 24 hours. This is necessary so that the elastic linoleum takes shape depending on the temperature and levels out after the roll.
Selection and installation of skirting boards
Installation of skirting boards
When the linoleum is laid, you need to let it take “its” position for a couple of days.
After this, you can begin installing skirting boards and thresholds.
It is advisable to buy them at the same time as linoleum in order to match the color scheme as much as possible.
The range allows you to choose a plinth, depending on the taste and preference of the client.
There are strict models, made of high-quality wood, and there are plastic ones.
They also vary in height and many allow you to hide the wiring. Which option you choose is up to you. The baseboard can be matched to the floor covering, or made accentuated, that is, darker or lighter.
Installation of skirting boards does not require any special skills. Wooden models are attached with screws. Plastic ones can be attached with self-tapping screws if the model includes an upper bar that will hide the hardware.
But it is better to fasten such skirting boards with liquid nails. When gluing the product, you do not need to touch the linoleum with glue, so that if the material contracts or expands due to external factors, deformation does not occur.
Laying linoleum from several pieces
If the width of the linoleum is not enough to cover the entire room, you will have to lay several pieces of linoleum.
When choosing the location of the joint, keep in mind that it should be in the middle of the board, and not in the gap between the boards.
The process of such installation is practically no different from that described above, with one exception - it will be necessary to carefully fix the seam between the linoleum panels. This can be done using special welding, or simply by placing an additional strip of double-sided tape under the seam.
If the width of the linoleum is not enough to cover the entire room, you will have to lay several pieces of linoleum
To make the seam as invisible as possible, we recommend laying the linoleum sheets with a slight overlap on each other and using a knife to cut two sheets along the seam at the same time. After this, remove the remaining strips and your seam will be almost invisible - even if you “twisted” the knife with a knife, the junction of the two sheets will turn out perfect.
To make the seam as invisible as possible, we recommend laying linoleum sheets with a slight overlap on each other
Purchase of linoleum and related components
Before purchasing linoleum, measure the length and width of the room being repaired and select the material of the required size on the construction market. Modern manufacturers have learned to produce coatings of standard width. As a rule, it corresponds to the parameters of the rooms in most apartments. With correct calculations, the consumer does not have to worry that the material will remain and he will spend extra money.
In addition to linoleum, you will need the means on which it will be attached. The floor covering can be glued to a wooden base using special glue or construction tape. For additional fixation, use a plinth. It will also hide the gap near the wall.
To ensure that linoleum lays flat and lasts a long time, different substrates are used. In the case of a wooden base, this is especially true. Natural cork is used as a layer between the boards and the floor product. But it is expensive, so you can get by with a cheaper polyurethane foam backing.