Wall cladding with decorative stone continues to be in demand, as it allows you to create the effect of naturalness and luxury. However, after laying the materials, the spaces between them are finished, which makes the composition complete, holistic, and airtight. Grout for decorative stone can be purchased ready-made or prepared independently.
The purpose of grout and its features
The brick joint is wide, which means the craftsman will have to prepare a lot of mortar. Therefore, manufacturers produce grout in large bags. If the master knows that he has a lot of work to do, he needs to buy the maximum packaging. In this case, you will be able to save an additional amount. In addition to the size of the bag, the composition comes in different fractions.
You can learn a lot of interesting information on this topic from the video:
Experts are accustomed to calling the process of processing seams “jointing”. The space between the bricks is filled with a special compound. Grouting is only appropriate for those surfaces that will not be plastered or sheathed with other materials.
Standard approach to brick jointing
What can you make it from with your own hands?
Budget-friendly, but no less high-quality - making a grout (grout mixture) yourself. Initially, you need to know the main types of grouting components:
- Cement mixtures are simple, easy to prepare, cheap, but high-quality material. To make a fugue, you will need to mix cement mixture (you can use white cement), sand and water in equal proportions. Sand is selected to the smallest fraction. A dye or color of the desired decor color is added to the mixture.
- Gypsum fugue - this composition requires skill, as the gypsum sets quickly. The mixture is made in small portions, which do not have time to harden during work. Gypsum is diluted to a semi-liquid state; slaked lime or 2% of any glue of animal origin is added for strength. Such substances will replace the plasticizer, make the fugu less fragile, and increase the hardening time.
- Alabaster mixture is a type of gypsum, only after additional heat treatment. Alabaster powder is diluted with water to a semi-liquid, thick state, you can add dye. In use it is similar to gypsum composition.
- Clay grout - a grout of this material is made from a clay mass with the addition of a small amount of slaked lime and cement. When hardened, the mixture will be very strong.
Advice
You can buy a ready-made grout mixture and modify it, for example, add the desired color and even glitter. If the design requires a transparent seam made of liquid glass or epoxy, then adding shiny elements will make it more impressive.
A fugue made independently is inferior to industrial compositions, but the quality can be similar. Before mashing, you should make sure that the self-made fugue has the necessary qualities or is close to these parameters:
- elastic, easy to fit at seams;
- after drying, it does not crack, does not crumble, and does not fall apart when cared for;
- the setting time of the composition should be equal to the treatment of one square meter of cladding surface;
- for wet rooms, the composition of the fugue must be moisture resistant;
- the grout mixture must withstand washing with household chemicals;
- aesthetics of the composition: the grout must correspond to the idea and overall design of the facing surface.
The feasibility of using jointing
In construction, grout has decorative and practical significance. The first option has the following properties:
- Emphasize the correctness of the lines.
- A new color is added to the created design.
- The drawing turns out clear and bright.
- The appearance of the structure is improved.
- The masonry is more neat and expressive.
- Grout combines horizontal and vertical lines.
Important! Beginning craftsmen need to remember that processing seams does not eliminate surface defects: excess cement, curvature of walls, fragments of hardened composition on bricks.
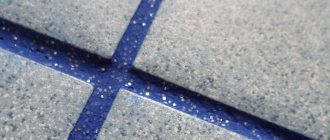
High-quality jointing of brickwork
Practical value:
- Protection of cement composition from the destructive effects of moisture.
- Increased sound insulation characteristics.
- Significant extension of the protective properties of the cement base.
- Strengthening the thermal insulation of the building.
- Increasing the strength of brick masonry.
- Strengthening the density of joints.
- Additional tightness.
- Hiding small cracks and crevices.
You can seal the holes if the masonry is done carefully. If there are decorative seams, use whole bricks, without flaws. It is necessary to ensure that the solution has the same thickness on all parts of the surface.
According to accepted SNiP standards, the width of the horizontal and vertical space left should not exceed 15 mm. Grout is used for decorative, building material, gypsum tiles. A special composition is also used for facade panels and natural stone.
Final processing of a brick wall
Manufacturers
For those who prefer to seal the seams with a ready-made mixture, there are many varieties of factory-made mortars, fugues and paints. You can choose a ready-made option for artificial and natural facing bricks, all types of slabs and paving stones, and wild stone finishing. The popular “Ivsil” fugue is available in a wide range of colors and is suitable for exterior and interior use. On average, consumption is 0.5 kg of dry mixture per 1 square meter. for suture gaps 3 mm deep and 4 mm wide.
Classic grouts “Ceresit” and “Polymin” come in white, have different compositions, viscosities and will help isolate the joint ditch from moisture. Consultants at the construction market will help you choose the right brand and type. It should be remembered that polymer compounds are more suitable for interior decoration. Facade work requires cement grouting. For bathrooms there is a special type of insulating mixtures. It is allowed to add colored pigment (red, green) to white material to achieve the required shade to make the masonry look beautiful.
Common 5 ways to apply grout
The list of effective methods for distributing the mixture includes:
- Many craftsmen practice concave technology. The mixture located between the silicate is compacted with a sharp spatula. Afterwards, the excess is cut off and smoothed with a jointing spatula. It turns out to be concavity in the middle, the edges are covered with cement. The seams must be filled with a jointing spatula; the cement mass is compacted with the same tool.
- The second way is by pruning. This option is simple and accessible. Excess solution is removed with a regular trowel. The surface is treated with a stiff brush.
- Convex method. To work, you need an arc-shaped spatula. The tool is passed along the seam, filling the space with the building mixture. You can form an original curved outward seam.
- Beveled version. This technology does not require any special skills; everything is done very quickly. At an acute angle, a trowel is passed along the working surface and excess composition is removed. The depth is 4 mm.
- Double-cut triangular method. This is the most difficult option; the master must have the skills for the result to be beautiful. This grouting technology is appropriate inside the house on decorative brick. You need to remove 6 mm of cement from the seam. The grouting compound is placed into the formed gap. Use a sharp spatula to form a triangular cut.
Important! Builders actively use a type of brickwork where horizontal joints are thicker than vertical ones. This results in an unusual design.
Application of a universal solution
How to use?
To fill the seams with your own hands, you will need a set of tools, including a rubber and wooden spatula, and a special device for achieving even filling of gaps - a grout bag. It is useful for aesthetically and quickly processing red decorative bricks and clinker tiles. First, you should dilute the grout and prepare the surface where it will be applied. Then carefully apply the mixture and compact it into the joint gap between the bricks. It is recommended to wipe off the excess immediately, without waiting for it to dry.
Each mixture has its own instructions for use, however, on average, dry compositions are dissolved in a proportion of 1 kg per 200 ml of water. The mass must be homogeneous, so it should be mixed well manually or mechanically. The grout has its best characteristics in the first three hours, then it begins to thicken and loses its elasticity. It is better not to use stale mortar; this can lead to loss of waterproofing of the joints due to microcracks subsequently forming when the mixture dries.
Available Blends
For grouting, ready-made products consisting of epoxy resin or a cement base are used. Cement-based mixtures are more in demand, are easy to use, can be easily cleaned from the surface, and have an affordable price. Manufacturers place instructions on the packaging with clear proportions for diluting the mixture. Usually this is water, but there are more advanced building materials that are mixed with latex.
Long lasting grout
The classic composition includes the following components:
- Dyes.
- High-quality types of cement.
- Quartz sand.
- Universal additives to speed up drying.
- Plasticizers.
The color range of cement grouts is varied.
Decorative grout
Epoxy products are used in places with increased mechanical loads, in conditions where exposure to aggressive environments is possible. In terms of durability, epoxy mixtures are significantly superior to cement ones.
Application of a construction mixer
Care
Proper treatment of the seam with grout is already half the guarantee of its long service and attractive appearance of the facade made of decorative stone.
Many of the grouts are stain resistant and stain resistant. Further care is carried out in conjunction with the care of the decorative stone itself and involves periodic cleaning of the surface.
First of all, it is necessary to provide a roof structure and a sloped blind area to prevent stagnation and water from getting onto the decorative stone and sealed seams. Washing out of the mixture when using water is unlikely if the application technology has been followed. But in any case, cleaning the surface from contaminants must be carried out carefully so as not to wash out the solution.
The principle of self-grouting
To obtain the most attractive result, it is necessary to prepare white alabaster, M500 cement, quartz sand in a ratio of 2:2:10. It is better to work with a semi-dry suspension, as it will not get dirty or crack. The grout mixture can be prepared in other proportions:
- Water in the amount of 6 liters.
- Cement – 4 buckets.
- Standard packaging of white grout.
- Fine sand 2 buckets.
Preparation of the solution
To make the jointing white, add lime. Rain may cause streaks and the wall will look damp. A beautiful white color can be obtained if you use a store-bought mixture.
High-quality products from a trusted manufacturer
Important! You can check the quality of the mix using a trowel. The ideal option is when the mass does not flow down or fall off the tool. The prepared solution can be used within two hours. Otherwise, plasticity will decrease and the mixture will harden.
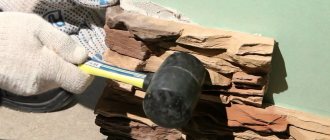
Manipulations with decorative material
Common Shades
Options for applying seams between decorative stones
There are several interesting varieties of how you can decorate seams using grout. We offer several options:
- Flush. One of the simplest methods that an inexperienced builder can handle. The solution is filled into the seams, and its remains are removed with a trowel. When all the cracks are filled and the grout has hardened a little, go over them with a stiff brush.
- Concave. For this purpose, use a special narrow spatula; it should not be very long. After cleaning the gaps, fill the grout with a jointing tool.
- Convex. For this purpose, a special arc-shaped tool is used. To do this, it is leaned against the wall with an arc and the seam is filled. Gradually move the spatula as the seam fragment is filled.
- Rectangular. To do this, first clean up to five millimeters of mortar in the cracks, even if it has frozen. Afterwards, grout is filled into these spaces to the very edge of the gap.
- Beveled. It involves making seams not straight, but at an angle. The approximate cutting angle is 3-5 mm. This effect will be convenient for rooms with high humidity, since water is easily drained through the seams.
Each method of applying grout is not suitable in all cases. For example, a convex one will not look beautiful on a wall with decorative trim in a small room.
Grouting joints between white gypsum decorative bricks Source vash-remontik.ru
Main stages of grouting
The seams are processed after finishing the bricklaying. The process is monotonous and it takes a lot of time to solve the problem. A novice master will be able to do the grouting himself. For inexperienced masons, experts have created step-by-step instructions:
- Prepare the surface. You need to clean the masonry and seams with a regular stiff brush.
- Rinse the wall with clean water. The most convenient way to do this is with a pressure hose. Wet the wall surface. This is necessary so that the brick does not draw moisture out of the mortar, and cracks do not form during natural drying.
- After preparation, prepare the solution according to the instructions.
- Use a large spatula to scoop up the working mixture, gradually applying it to the seam. It is better to use narrow jointing. To do this, craftsmen carefully embroider the joints located horizontally.
- To remove accumulated air and achieve maximum density, the tool is pressed into the gap.
- Vertical joints are filled with cement-sand mortar according to the standard pattern. The prepared composition is held in the palm of your hand.
- The entire area is cleaned with a brush.
- At the final stage, the type of jointing is formed. This procedure begins immediately after the solution has set.
Important! Experts recommend determining the amount of solution in advance in order to have time to use it before it hardens.
Surface preparation
Shaping the finish
by product
Under numerous layers of plaster and paint there may be a brick wall hidden, the appearance, color and texture of which will be more attractive than the most expensive paints and the most original wallpaper. Despite its laconicism, open masonry can decorate the interior, giving it a special charm.
Of course, it’s better to think about such an interior solution while building the walls: in this case, you just need to leave them unplastered. But a similar effect can be achieved in another way: simply by removing the old plaster from the wall.
Stucco: the charm of traditional decor
Exquisite patterns on the wall. Volumetric interior decoration (photo)
Decorating the wall: fashionable and original
We start by knocking down the old plaster and cleaning the seams between the bricks from crumbling mortar. And we lightly scratch the remaining, well-preserved mortar to ensure better adhesion to the new mortar, which will be used to fill the joints.
This is a rather dirty and labor-intensive job, so it is better to do it when the entire room is being renovated.
Effective advice from experts
Recommendations and tips will help you avoid the most common mistakes and improve the quality of repairs:
- Before use, river sand is sifted. There should be no large fractions in the grout mixture.
- The fresh solution should be allowed to brew a little. It is better to knead for at least 30 minutes.
- When filling voids with mortar, you must try not to get the product on the surface of the brick.
- During laying, minor gaps are left on the front side for decorative processing.
- If a concave seam was chosen, then the master can simultaneously fill the horizontal and vertical of the structure.
- It is better to remove the remaining solution immediately.
- Before the product hardens, you need to eliminate defects. Otherwise, it will not be possible to achieve the maximum effect.
- It is better to carry out construction work in cloudy but dry weather.
- For jointing, you can use an old knife or other metal object.
Important! You need to start filling the voids from the vertical gaps.
Professional treatment
Sealing of gaps between decorative slabs, artificial finishing and bricks of external walls is carried out only after installation. It will be possible to smooth the surface beautifully if the standards of the accepted finishing have been followed: ensuring the same distance between the bricks, evenness of the masonry. If mistakes were made, the craftsman will have to rub down the old solid, make jointing, or combine different types of mixtures, paint, and plaster.
Removing solution residues
Ideal brick jointing result
Universal solutions
In addition to the best manufacturers, you can use universal tools from the RSS and Perel brands.
RSS
High quality grout mixture. Used for all cladding materials both indoors and outdoors. The composition of the mixture is thick, which allows it to be evenly distributed in the seams . Has the following properties:
- moisture resistant;
- withstands temperature changes;
- has a mineral composition.
Perel
The company's line is represented by many compositions with the following characteristics:
- resistant to temperatures;
- universal (for interior and exterior work);
- moisture resistant;
- suitable for syringe gun;
- multi-colored.
This composition belongs to the category of decorative, used to obtain premium surfaces of tile joints.
apply impregnate
After two or three days, when the grout has dried, the wall needs to be treated with an impregnation agent, which will protect it from contamination and make it easier to care for the surface (there are special preparations on sale for impregnating exposed brickwork). The impregnate is applied with a brush or sponge.
As a result of this treatment, the wall will not absorb water and will become resistant to fats and household chemicals.
Grouting and jointing mixtures are building materials designed to bring tiling work to perfection.
They perform both aesthetic and practical functions. Types of grouting compounds Modern grouting for joints can have a cement and epoxy base. Products of the first group are characterized by lower cost, which explains their wide popularity. When using these materials, you don’t have to save money - the joints should be filled in excess so that no cracks or crevices remain. If desired, a cement-based grouting mixture can be used with your own hands, without turning to specialists.
To do this, you need to prepare a solution of the required consistency, and the work itself should be performed with goggles and a respirator, which will protect the body from harmful volatile compounds. Epoxy materials are sold in ready-to-use form. They are highly flexible and therefore easy to apply. The compositions will be an excellent solution for use by beginners.
Their main drawback is their high cost compared to cement-based analogues. Selecting grout for difficult operating conditions You should be especially careful when choosing grout for filling joints that will be installed in the bathroom. This is a special room that faces sudden temperature changes, as well as high humidity. The best solution would be a grout containing epoxy resins.
This material does not absorb moisture and has high adhesion. Therefore, it can be used when tiling, which is laid on the walls and bottom of swimming pools, when finishing facades and lining the interiors of public premises. Epoxy grouts have a high hardening speed, so you need to work with them quickly. It is noteworthy that the material retains its original color for decades.
It is sold in a ready-to-use form. How to choose a grout mixture There are recommendations from experts who will help you choose the optimal solution for grouting joints. For example, for a floor it is preferable to choose a material with a darker shade than tiles. It is better not to use light colors - over time, due to exposure to dirt, they will darken and lose their aesthetic appeal. It is preferable to purchase grout from well-known brands.
They are distinguished not only by their excellent appearance, but also by their excellent performance parameters. For example, they may contain substances that prevent the formation of fungus and mold. Our catalog contains products from the following brands:
St. Petersburg, Piskarevsky pr., 150, bldg. 2, letter N
Clinker tiles are an expensive and very beautiful material that requires careful laying and sealing of joints with special compounds. Thanks to professional grouting, the seam becomes neat, and the cladding will become not only a decoration of the building, but a protective barrier from bad weather, mold and destruction.
It provides several important advantages:
improving the decorative qualities of masonry.
The grout is available in various colors, which allows you to choose the most suitable shade that will highlight the beauty of the color and texture of the clinker. In addition, successful grouting allows you to hide the imperfections of the masonry and make its geometry close to ideal; tile protection. It resists chipping on the edges well;
strengthening the cladding. The composition for sealing joints strengthens the masonry, makes it more resistant to various external influences, prevents moisture from getting under the tiles, thereby increasing the frost resistance of the facade and preventing the appearance of mold.
The gray adhesive composition spoils the appearance of the facing brick, and moisture getting into the seam between the tiles and freezing can even lead to rapid destruction of the cladding. Grouting for clinker tiles is designed to avoid all these negative consequences.
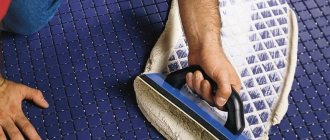
Cleaning tiles
Can I use a grater?
Some craftsmen do not use a small rubber spatula, but do all the work with a grater. This method of application is possible if the tile is smooth and does not have textured recesses. Otherwise, the mixture will get into these areas and will be difficult to remove from there.
It is advisable to have several graters with different attachments: a rubber one for applying a fugue and a felt or foam rubber one for washing and forming seams. With some skill, you can use a grater with both the long and short sides.
Cleaning the surface and smoothing the seams
After fusing, marks may remain on the surface of the tile. They can be washed off with detergent and a sponge. Make sure that the composition does not contain dyes, as they can change the color of the fugue.
To remove epoxy grout residue, you need to use specialized products that are effective only for 12-24 hours after application. The composition is applied to the stain, wait 5-10 minutes, and then washed off. The remaining product should be collected with a sponge and the floor should be washed again with clean water.