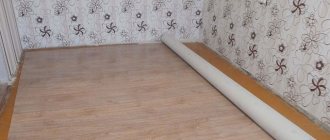
The most convenient way to update a plank floor in an old house is to lay a new material on the surface. With linoleum this is as easy as shelling pears, but what to do with a piece of flooring that is laid in a floating manner and requires the most even base possible? Have you decided to update the floor yourself and opted for laminate? Don't know how to install laminate flooring on a wooden floor? Learn the intricacies before starting installation, because during the repair process there may be a lot of pitfalls.
Laminate laid on a wooden base in compliance with the technology will serve no worse than other flooring
Features of the base
Wood is a rather capricious material, like most natural coatings. It is vulnerable to pests and rodents, is not moisture resistant and is highly flammable. Laying laminated boards on a wood base involves more difficulty than on other subsurfaces.
Manufacturers of laminated boards do not recommend laying the material on a natural wood subfloor. This is due to the property of wood to deform over time, which will also affect the evenness of the final floor.
However, if there is no particular choice and it is not possible to concrete the floor, be at least minimally careful.
- First, make sure that the base is suitable for subsequent loads and is intact. It should not have chips, cracks or crevices.
- If the flooring is made of untreated wood, inspect the boards for signs of fungus, rot, or pests.
- The floorboards themselves should lie flat, without sagging.
- Check that the boards are not rotten. The wood should not crumble in your hand, turning into dust.
Damaged boards and those adjacent to them must be replaced.
Important! If one of the above defects is present, the strips must be repaired or replaced.
If the floorboards have no flaws, but the entire covering is wobbly, simply secure the planks with any hardware. Laying the laminate ensures that the base is as level as possible and not shaky.
Checking the evenness of the floor
It is believed that the permissible curvature of the floor for laying laminate should not exceed 2 mm per 1 m of length.
These limits make it possible to ensure a sufficiently tight fit of the canvas to the base, eliminating flapping and rumble when walking.
In addition, unevenness of the underlying layer causes excessive load on the interlocking joints of the panels, the appearance of cracks and gaps at the seams. All these factors together can destroy the coating in a fairly short time, so monitoring the state of the base geometry is mandatory.
The following methods can be used to determine surface quality::
- Applying a flat, rigid strip or ruler to the floor and visually assessing its condition. The method is simple, but it allows you to obtain fragmentary, point-by-point data that does not give a complete picture.
- Cords are stretched along the diagonals of the room or in the longitudinal direction. By their location above the floor level, one can judge the curvature, the presence of folds or convex areas on the surface.
- Using a hydraulic level. Allows you to determine deviations from the horizontal, their magnitude and location.
All these methods are effective to one degree or another, but they do not solve the problem, but only indicate its magnitude.
In order to eliminate detected unevenness, it is necessary to level the floor.
Why laminate? Advantages of the material
Every year, the increasing popularity of laminate is due to its attractive appearance, which can compete with many expensive materials. Drawings applied to the coating can imitate any texture without losing a decent appearance.
A wide range of laminate allows you to choose panels to suit any interior
Laminate is classified depending on its quality and performance capabilities. Thus, the most expensive and high-quality material belongs to the highest class.
However, in general, laminate of any classification has the following advantages:
- strength,
- easy care,
- environmental friendliness,
- wear resistance,
- long service life,
- ease of installation.
If laminate flooring is properly cared for, it can last for decades.
The minimum service life of laminate flooring with proper care is about 17 years. During use, the boards do not wear out, do not fade, and do not lose their aesthetic and performance qualities.
Prices for different types of laminate
Laminate
Selecting a substrate
Any standard materials that are used for any coatings are suitable as a substrate:
- Cork.
- Izolon.
- Polyurethane foam.
All these materials have their advantages and disadvantages, but the main purpose of their use is to reduce noise when walking. Since the presence of capillary moisture from a wooden base cannot be expected, and the vapor permeability of wood is practically zero, the whole task comes down to noise insulation of the coating .
Here you need to act based on the condition of the base and choose either a double substrate, if there are doubts about its qualities, or one of those mentioned earlier.
Is it worth using?
Laminate is an affordable replacement for expensive parquet. It is actively used for renovation of residential and commercial premises. The material is easy to install, but is too demanding on the quality of the subfloor. It is possible to lay laminate on old floorboards, but only if a certain number of requirements are met, the main of which is high-quality and competent preparation of the base, including repair or replacement of damaged elements, leveling the base and the use of a substrate.
The piece strips have locks for connection and fixation in the desired position. No additional fastening to the base is required. Laminate flooring is laid loosely on a prepared wooden base, allowing it to “breathe”, contracting and expanding in accordance with changes in temperature and humidity levels.
If the laminate is statically and securely fixed on a wooden base, the floor may deform along with the rough base
The structural difference of laminate boards is that during installation the material does not need to be firmly fixed with glue or hardware.
The adhesive method for installing laminate flooring exists, but it is rarely used due to the high consumption of glue, the complexity of installation, the impossibility of reusing the coating after disassembling the floor, and the immobility of the surface.
The image above clearly shows what will happen to laminate flooring if it is firmly glued to a wooden floor.
The most widely used method of attaching laminate flooring is without the use of adhesive mixtures. Its advantage is that it provides good independent aeration of materials and, accordingly, decent ventilation of the floor. And a well-ventilated structure, as is known, does not rot and lasts much longer.
If the room is not heated or the humidity level is high, you will have to abandon the installation of common types of laminate.
Strengthening boards with screws
So, all the materials have been purchased, let's start strengthening the floor with screws. There is an article on the site about what to do with a creaking floor in an apartment; it partially talks about this work.
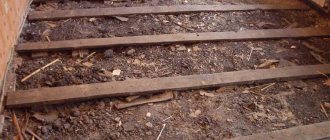
Since the screws were difficult to insert into the wood, we first drilled holes about 70% of the length of the screw, and then used screws to tighten the boards to the joists.
We strengthen the floor in rows along the joists
Of course, if you have a powerful screwdriver, you will be able to do this much faster without additional drilling. In our case, the cheapest Chinese screwdriver, which quickly sat down, so the whole job lasted for several days. The main thing is to screw the boards tightly to the joists so that they do not dangle when walking. Since the doors will soon be replaced, we cut down the slopes to install the plinth.
We file the door slopes
During work, it turned out that there was too much blowing from under the floor on the street side, so we had to seal the gap with foam. In this case, you need to moisten the surface before treating with water, and also spray the foam after application, since the polymerization process of the polyurethane foam requires moisture.
There was a strong blow from the street from this gap
It got so much better
Area of application of the material
Despite all the artificiality of the laminate, its behavior during operation is not much different from OSB boards or plywood. The main element in the composition of laminated boards is a board created by pressing lumber.
Laminate structure and layers
The base of the laminate determines the scope of application of the laminate. Manufacturers do not recommend using poor quality material when decorating floors in rooms with high traffic levels and high humidity levels. Also, do not place the material in rooms where systematic wet cleaning is provided.
Laminated board is one of the best and most suitable coatings:
- in the living rooms,
- for bedrooms,
- on insulated balconies,
- in work offices,
- for children's rooms,
- in the halls.
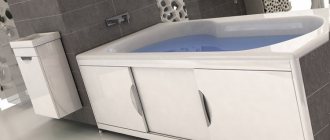
For the hallway or kitchen, it is recommended to use moisture-resistant material made using HDF technology.
To decorate the floor in the bathroom, you can only use moisture-resistant laminate
The only unpleasant moment is the cost of such material. Often the buyer is not satisfied with it, and he makes a choice in favor of cheaper alternatives.
Preparing for DIY installation
- Preparatory work begins with clearing the room of all objects, furniture, baseboards and other elements that could interfere with installation.
- Then a visual inspection of the surface is carried out , determining the degree of wear and the presence of floor unevenness.
- A separate item should include checking for the presence of squeaks, which are often a problem with old wooden floors. If it is not fixed immediately, the floor will always creak. To eliminate them, various means can be used, from strengthening the moving areas by pulling them through with screws, to partial dismantling and re-installation through elastic pads.
- If significant surface defects are found, you must resort to laying plywood directly on the floor or, in case of strong deviations from the plane, through a system of leveling joists . Plywood cannot be laid in solid sheets; they must be cut into approximately 4 parts and, when laying, maintain 5 mm gaps between the pieces. This will compensate for possible thermal expansion or dimensional changes due to atmospheric humidity.
- If the condition of the floor is generally satisfactory, but there are some violations, apply local putty, grinding or planing the surface .
Choosing a laminate
The durability of the floor depends on the quality and correct choice of the material laid on it.
In accordance with the purpose of the room for which the laminated board is selected, the material is divided into classes.
| Laminate class | Features and scope |
| 34 | It is used in huge shopping complexes, waiting rooms at airports and train stations, schools, hospitals and other public and administrative buildings with huge crowds of people. |
| 33 | Intended for public spaces with high traffic. |
| 32 | In home rooms of average traffic level (living room, hallway, balcony, kitchen area). |
| 31 | Used in rooms with minimal traffic (living rooms of apartments and houses). |
Class 31 laminate has the most affordable price. The latter type is characterized by high wear resistance and strength, along with a high price.
The higher the class of the laminate, the higher its cost, the better the quality and the wider the scope of application.
In addition to the class of the laminate, the price of the coating can be influenced by:
- degree of additional processing of slabs;
- base thickness;
- size of the protective and decorative layer (the larger the layer, the higher the cost);
- the presence of chamfers, embossing, etc.;
- country of origin (Chinese and domestic material of the same class will be much cheaper than European).
The manufacturer's brand also affects the cost of coverage. It is known that when buying a product from a well-known company, we overpay for advertising of a well-known brand.
Often in construction stores you can find materials from unknown brands that are in no way inferior in quality to expensive branded coatings.
Video - How to choose laminate? Secrets
How to level an uneven floor
In order to eliminate detected irregularities, you must use one of several methods:
Surface grinding and planing
This method is suitable for single, small flaws found on the old surface.
Complete sanding of the entire area of the room will require too much time; in addition, the presence of wood dust has a very negative effect on the condition of the respiratory system of people and animals .
Leveling the floor using sheet materials
There are several options available here, which are used depending on the degree of unevenness.:
- Laying sheets directly onto the floor surface. Used when elements are bent without a general disruption of the plane. For example, the appearance of humps on floorboards, multiple bulges on old parquet, etc.
- Leveling the plane using a system of bars or joists. If the base has a noticeable slope, then the usual laying of sheet materials will not correct the situation. You must first install a system of support bars, the tops of which create a flat horizontal plane, after which sheet materials can be laid.
The best solution would be to use fairly thick plywood, as it does not break and provides a fairly smooth surface. It should be remembered that laying sheet materials, especially on joists, makes the floor level much higher, which may require replacing all door panels .
Sand-cement screed
This method is used if the floor level cannot be raised for some reason. For example, if there is a noticeable slope, one side must be kept at the existing level, and the other must be leveled by 2-3 cm.
Installing joists in this case is not advisable, since they and the subsequent laying of plywood will greatly change the floor level. Therefore, in such cases, the way out is to fill the leveling screed .
IMPORTANT!
This method is rarely used, since screeding on a wooden base is a risky step; moisture may seep under the floor, swelling of the base, etc.
Preparing the foundation
Dismantling an old plank floor in order to replace it with OSB or plywood sheets is a labor-intensive task and not everyone is able to do it on their own. But is it right to install laminate planks on old plank floors?
If laminate flooring is to be laid on a wooden surface, such a base requires a number of preparatory measures
There are a number of requirements that an old natural wood base must meet. The wood surface must be hard and dry. If bending is felt when applying force to any area, the floors are probably affected by rot or fungus. And if this deficiency is not eliminated before installing the laminate, the damage process will spread to the entire surface of the subfloor, which will ultimately lead to the need for a major overhaul.
To prevent the laminate from deforming after installation, it must be mounted on a solid, not shaky base.
Differences in the height of the subfloor should not exceed 2 mm per 2 m of base length. Laying laminate on a curved surface will lead to sagging of the material, deformation of the joints of the boards and creaking of the floor. Usually, if an old plank floor does not meet the necessary requirements, it is put in order by locally replacing damaged fragments.
If the floor is completely crooked, it is leveled with slabs of any sheet wood-based material
Diagnostics of old flooring
To assess the feasibility of laying new finishing material on such a base, you need to carefully examine the boards for the presence of parasites and damage.
To identify rotten boards, tap the surface with a hammer. The knock on undamaged material will be louder
Namely:
- insects and rodents,
- rot and mold,
- fungus,
- recesses,
- floorboards creaking,
- deflections or deformation of the planks.
If a visual inspection is enough to assess the external covering, then what to do with the internal frame?
Mechanical impact on the old plank floor will help determine its suitability for laying a new base over the planks
When walking on the floor, the floorboards should not creak or sag. Minor deflections under very heavy objects are acceptable, but the base must support the weight of a person. There should be no knots, depressions or protrusions on the covering, as well as gaps between the floorboards.
Elimination of defects
If the inspection reveals deficiencies that prevent further work, they must be eliminated.
Ideally, paint should be removed from old boards before laying laminate. It is by the same color of the elements that their suitability for use is determined
Ways to eliminate the shortcomings of a plank base:
- Subsidence of the floor surface. At the site of damage, the area is dismantled by dismantling several boards. Support wedges are placed under the joists and the floorboards are secured. If the floor sags over almost the entire area, the entire base will most likely need to be replaced.
- Rot and fungal microorganisms. To get rid of mold that affects the surface of the coating, it is necessary to replace the affected fragments, including their neighbors, with new beams or boards and treat the surface with an antiseptic. If for certain reasons this is not possible, lay a layer of waterproofing on the damaged base and level the surface with wood-based sheet materials (fibreboard, OSB, MDF or plywood). This approach should prevent further damage to the planks by the fungus.
- Slats creaking. Often, if a wooden floor creaks, it means that the boards are not nailed to the joists properly. Old hardware has become loose during use of the floor and new fasteners are required. Drive the existing nails on the floor into the boards until they stop and strengthen the base with black self-tapping screws. When screwing in hardware, make sure that their heads are well recessed into the surface.
- Recesses or small holes in boards. Traces of woodworm infestations are sealed with wood putty or a mixture of sawdust and PVA glue, and after drying, the surface is treated with bioprotective materials.
If, after strengthening the boards, the floor still creaks, you will need to strengthen the joists themselves. To do this, the covering is torn off, and a brick or timber is placed under it.
Sometimes floorboards make a squeaking sound when force is applied to the surface if they rub against one another. In this case, it is enough to treat the joints with talc or graphite powder, and seal noticeable gaps with a mixture of sawdust and PVA glue.
Leveling the subfloor
A wooden surface under a laminated board can be leveled in three ways. This is laying sheet slabs, wet screed or scraping.
If the curvature of the floor is insignificant, you can get by with scraping
Cycling
Cycling is used only on relatively flat surfaces to eliminate minor defects. To treat the floor with this method, you will need a rubber spatula, sandpaper, a hand plane, a sanding machine and a level. Before starting work, we recess the metal fasteners into the wooden surface. We go over the surface with a scraping machine and check the evenness of the floor with a level.
If there are chips or cracks, we seal them with wood putty. After the material has dried, the floor will need to be sanded again.
Cycling is a dusty process. After completing all work, be sure to clear the room of debris.
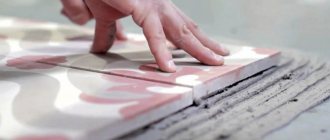
Installation of wood-based materials
Most often, a wooden floor for laying laminate is leveled by laying particle boards on top. This method allows you to further insulate and strengthen the base, perfectly leveling it without much effort. It is best to use 12-15 mm thick plywood for these purposes.
Laying plywood on an old wooden base
Rules for laying plywood on a wooden floor
- The slabs are mounted staggered, offset by half a sheet. This is necessary to more evenly distribute the load on the floor.
- To attach plywood, in addition to hardware, an adhesive composition is used. This is necessary to increase the stability of the sheets.
- Plywood, like any wood, has the ability to “breathe”. In order for the material to expand unhindered under the influence of temperatures, centimeter gaps are left between the plates.
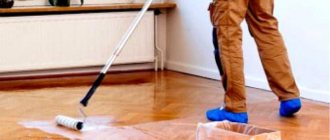
When the plywood subfloor is completely installed, the surface is treated with a sander and covered with drying oil
Cement strainer
Wet floor screed is a more durable, but also labor-intensive option. Laminate flooring can be laid on a flat concrete surface without any difficulty and there is no risk of floor deformation. To fill a wooden floor with a screed, you will need to strengthen its structure, otherwise it will not withstand the load.
Wet screed on a wooden floor
To do this, the old floorboards are torn off and the joists are leveled. Expanded clay or gravel is poured between the beams. Alternatively, you can add dry insulation to the ready-made cement mixture. Cement is poured between the logs and the surface is leveled using the rule, using the logs as beacons (for this purpose they must be perfectly flat). The screed hardens in 4 days. It is advisable not to touch the floor during this period.
After the screed has dried, you can lay the underlay and install the laminate.
Prices for different types of cement
Cement
Online calculator for calculating the amount of laminate per room
Go to calculations
Stage 4. Warm floor under laminate (if necessary)
It is not always possible to lay heated floors in a wooden house under laminate. If the apartment initially has wooden floors installed, then installation is possible, but has its own characteristics.
In the case of concrete floors covered with a finished wooden floor, it is recommended to completely dismantle the boards, pour a screed on top of the concrete base, and then lay a warm floor on top of it.
There are also a number of requirements for the quality and composition of the laminate that will be laid on top of the heated floor:
- the thickness of the die must be at least 7 mm;
- the formaldehyde emission class must be E0 or E1. Indicators E2 and E3 are prohibited from being laid in tandem with heated floors! When heated, they will evaporate dangerous amounts of harmful substances into the air.
Even if all the requirements are met, the heated floor cannot be heated too much. The maximum permissible temperature is 30–32 °C. When used at higher temperatures, the laminate will quickly become unusable, releasing toxic substances.
If you comply with all installation and safety requirements, the flooring will last a long time and will not harm the health of residents and their pets.
Types of heated floors
Warm floors come in three types:
- water. The screed contains pipes connected to the heating system. This option is the least expensive, but with this option it is difficult to regulate the heating temperature. It is worth noting that water floors are allowed only in private houses or apartments with autonomous heating. Residents of apartments with central heating are prohibited by law from installing this type of heated floor - this will result in a fine and forced rework of the entire system;
- electric. This option is much more expensive both in terms of installation and during operation, but it can be installed in any room. Also, the advantages of an electric floor include convenient temperature control (you can control not only the number of degrees, but also use several thermostats to turn on only individual zones of the heated floor) and a relatively small level of raising the floor;
- thermomats. This type is also called film infrared heated floor. Installation under laminate on a wooden floor is also acceptable for all rooms. During installation and operation, this is the most convenient option, but at the same time the most expensive. Therefore, you need to accurately calculate the required heating area (there is no heated floor under massive furniture) so as not to overpay.
Each option has its own installation and operation features, so when choosing, you need to focus on a specific situation.
Laying heated floor elements
According to the installation technology, water and electric heated floors require the presence of a screed laid on a layer of thermal insulation materials.
With this approach, the floor can no longer be considered wooden. But if during the renovation process it is already planned to use screed or mixtures to level the wooden floor under the laminate, then they can be combined with the installation of a heated floor.
But with this technology, before installation you will have to:
- Remove the boards completely.
- Cover the joists with moisture-repellent compounds and cover with a vapor barrier film.
- Fill the space between the joists with thermal insulation materials.
Only after this can you begin installing the screed and heated floor.
To avoid “wet” work with cement-sand mixtures, the “dry installation” option was invented. In this case, the logs and the space under the boards are processed according to the same scheme:
- The prepared boards are laid on top of the logs and grooves are made into them with a milling cutter for cables or pipes.
- Special metal plates are laid on top of the gutters to distribute heat evenly, and the cable is laid along them.
Another option for “dry installation” is using polystyrene boards. In this case, the subfloor is covered with an overlapping film. The edges are connected with construction tape. Polystyrene mats with bosses are laid on top, and a cable or pipe is laid along the gutters.
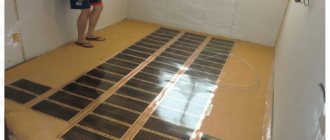
You can implement any of the options, but when carrying out repairs yourself, it is advisable to take into account your own skills and not attempt too complex work. The simplest option in this case would be to install a film thermomat under the laminate on a wooden floor.
In this case, it is enough to spread a reflective substrate (foil side up) on the prepared floor and place thermomats on top of it in the right places.
The film is connected to the thermostat. After which the entire floor is covered with thick polyethylene film (waterproofing barrier).
An important point: when installing a heated floor on a wooden floor, it is imperative to provide a ventilation system for the joists, otherwise they will rot very quickly.
Regardless of the type of heated floor chosen and the method of its installation, before laying the laminate, the heating system must be checked. Don’t just inspect the pipes or “ring” the wires, but connect them.
The water heating system is tested at the highest possible pressure. When testing electric heating, the test takes place in several stages, including turning the floor on and off.
Each time you turn it on, you need to increase the temperature by 5°C, gradually bringing it to the maximum permissible (this may take 2-3 days).
Why do you need a substrate and how to choose it?
The use of underlay under laminate floor panels is mandatory.
The backing under the laminate serves as a kind of shock absorber for the material so that it does not break or deform if there are defects on the rough surface
It performs a number of functions:
- final leveling of the rough surface,
- protection of the laminate from deformation,
- protecting the floor from moisture,
- uniform load distribution between the slats,
- additional floor insulation,
- noise absorption.
The most widely used backing material is polystyrene foam. It is much cheaper than the cork offered by the manufacturer, but is practically in no way inferior to it.
The construction market offers three types of underlay for sheet laminate flooring:
- Polyethylene foam . It is considered the most popular substrate due to its low price. The material has a foil layer, is resistant to moisture and microorganisms and protects the room from the cold. The disadvantage is that such a substrate quickly sags and eventually requires replacement. When choosing this type of substrate, pay attention to the density of the foam layer. The higher it is, the better the quality of the material. As a rule, for household purposes, a substrate of 2-3 mm thickness is sufficient.
- Polystyrene two-layer backing. Instead of foamed polyethylene, expanded polystyrene is added to the foil layer, which has higher performance characteristics. The substrate is not afraid of the formation of fungi and rot, and is resistant to mold and moisture. The disadvantage of the material is that it is difficult to install: due to the highly compressed foam, the substrate does not roll out well.
- Cork. This type of substrate is the most expensive. Made from pressed crumbs of cork tree bark, it can be natural or combined. This substrate is very rigid and resistant to stress, environmentally friendly, perfectly insulates the floor and protects the room from extraneous noise. Despite its naturalness, the cork substrate is biostable. Thanks to its manufacturing technology, the material masks unevenness in the subfloor better than other substrates. A significant disadvantage of cork backing is that the material is resistant to moisture.
Choosing a substrate for laminate
When choosing a high-quality cork substrate, pay attention to its structure. If you're paying for durability, make sure the material isn't see-through.
Prices for various types of laminate underlays
Underlay for laminate
Stage 1. Preparing the subfloor
To carry out installation work, you must first remove the old coating. For this purpose, dismantling work is carried out. It is worth noting that all actions must be performed carefully so as not to damage the wooden base.
Dismantling
In order to carry out dismantling efficiently, it is necessary to prepare tools. The work may require:
- nail puller;
- hammer and chisel;
- knife;
- jigsaw;
- perforator;
- Bulgarian.
The specific tool used depends on what kind of coating is being removed from the wood base. The easiest way is to dismantle the old linoleum. Old parquet is the most difficult to remove. Regardless of what material is removed, the first step is to remove all furniture and baseboards.
Assessment of pavement condition
After dismantling work, it is necessary to assess the condition of the coating. First of all, you should understand the condition of the plywood or any other material. If it is rotten, has lost its strength or has serious defects, then new material cannot be placed on it. If the subfloor is in order, then you need to get rid of the debris, and then proceed to the preparatory work of laying the laminate.
If there are serious defects, a new wooden or concrete floor is created. The base can be a concrete screed, a dry Knauf floor or plywood on joists.
Important! Minor defects can be corrected. If the plywood is loose, you can use additional fasteners. Broken elements are replaced.
Calculation of the quantity of materials
To lay laminate flooring on a wooden floor with the most common method of leveling the surface, you will need the following materials:
- plywood,
- adhesive composition,
- hardware,
- substrate,
- laminate,
- plinth.
To count the number of hardware, we count the number of joists in the room (we determine their location by the nails in the floor) and count the boards. The resulting values need to be multiplied together, so we will get the required number of screws, to which we need to add 15-20% for reserve and unforeseen situations.
Old floorboards are screwed to the joists with one fastener in increments of 400-600 mm
Plywood sheets are screwed in increments of 150 mm . To calculate hardware for fastening sheet material, divide the length of the room by 15 cm, then its width and multiply the resulting values, not forgetting to add 15-20% to the resulting quantity for the reserve.
If you save on fasteners and increase the distance between hardware, the plywood will swell and vibrate when walking on the floor
To calculate the plywood itself, we measure the area of the room in which the floor renovation is planned. According to the obtained value, we calculate the area of the plywood, divide it by the size of the sheets (1500 or 750 mm2) and obtain the required number of slabs, rounding their number up.
To calculate the laminate and substrate we use the same technique. We write down the area of the room and go with this data to the hardware store. The consultant will calculate the required number of slabs and rolls independently.
At home, calculating the number of laminate sheets will be difficult, since all the slabs have different overall dimensions
When buying laminate, pay attention to the lot number. It should be the same on all boxes. Otherwise, the floor covering will differ slightly. If this is not important to you, you can save a lot of money by purchasing leftover material from different batches.
Pay attention to the integrity of the packaging. If it is broken, the slat locks may be damaged.
The amount of plinth is calculated according to the perimeter of the room, excluding doorways. Additional accessories, such as corners and caps, are calculated according to the individual design features of the room.
Important! When purchasing materials, do not forget about the necessary reserve in case of defects or other unforeseen situations.
Is it possible to lay laminate flooring on a wooden floor?
Laminate is also called a “floating” floor. This is due to the fact that the individual dies are connected only to each other, without being attached to the rough base in any way.
Therefore, for the laminate it does not make much difference what exactly it will be laid on. Moreover, laying it on wooden floors has a number of advantages :
- with this installation, the floor turns out to be very warm (especially with a correctly selected underlay);
- due to the presence of technological gaps around the perimeter of the room, the wooden floor is ventilated - and therefore does not rot;
- Laminate is a wood derivative and therefore has similar resistance to temperature and humidity fluctuations. This means that when heated, both the subfloor and the finishing coating will expand approximately equally, and when cooled, they will contract, which will increase their service life.
Step-by-step installation instructions
First, decide how best to lay the slats - along the floorboards, diagonally or crosswise. Experts recommend laying laminate flooring along the direction of the main light source. Otherwise, all seams will be very clearly visible, especially if the panels are joined poorly.
Diagonal laying of laminate flooring must be done in compliance with all the rules, otherwise you can ruin the interior
The correct way to lay laminate flooring, especially for beginners, is with the narrow side facing the window. When the slats are positioned along the light flow, the visibility of their connections is reduced.
Preparatory stage
When the material has been calculated and purchased, you can prepare the tools necessary for the job. A person who is not involved in interior decoration professionally may have questions, but, as a rule, all the necessary arsenal is located in every home pantry.
This:
- beating thread,
- building level,
- roulette,
- square,
- pipe bypass cutter,
- pencil,
- scissors or knife,
- jigsaw or hacksaw,
- screwdriver or Phillips screwdriver,
- rubber mallet,
- miter box for cutting wooden plinths,
- pliers.
Minimum required tools for laying laminate flooring
Also, in certain cases you may need a hammer drill, but not everyone has one. In any case, if a tool is not available, you can always rent it.
Laying technology
Before starting installation work, determine a place to store packages of material. Remove doors from hinges and clear the floor of unnecessary items. Clean the surface from dust.
If laminate flooring is laid on a plank floor without plywood or screed, it is better to lay the panels perpendicular to the old floorboards
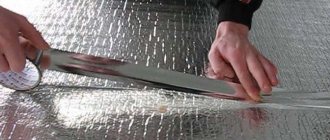
Step 1. Lay the backing. The material is laid parallel to the laminate slabs. If a single piece of underlay is not enough to cover the entire floor, carefully connect the joints with tape.
Laying the substrate
Step 2. Lay the first row of laminate , starting work from any corner adjacent to the main light source. First we connect the solid panels. Then we trim the fragments in hard-to-reach places.
Laying the first row of laminate
Step 3. When cutting the material, turn the board 180 degrees , apply it to the installation site and mark the cut line. In this way, all lamellas that require trimming are marked.
A simple and correct way to mark laminate flooring for trimming
Step 4. After forming the first row, we assemble strip by strip, connecting the modules to each other with locks. The next row is attached to the previous one only after it is completely assembled. After assembling the second row, carefully lift it, holding on to the ends, and turn it a little so that the lock snaps into place. You can achieve a tight connection by tapping the joints with your hand or a mallet.
For a tight connection, tap with a hammer or mallet
It is best to lay laminate flooring offset by half a strip. This will make the connection more reliable.
Laying the last row: features
The more laminate is laid, the more inconvenient it will become to work with. 80-85% complete , experienced specialists recommend continuing to lay the material from the opposite wall, standing on the already laid laminate. And then simply connect the resulting strip to the existing base.
The laminate must be laid, maintaining a centimeter gap between the panels and the wall. This is necessary for deformations so that the floor does not stand on end
Laying the last row causes certain difficulties due to the need for partial trimming of elements. Moreover, often due to the unevenness of the walls, the width of the stripes is unequal.
If cutting is required, it is better to leave it for later, when the main part of the floor is covered. This way you will see a visual picture and be able to distribute the material as rationally as possible.
Marking and cutting the planks of the last row is done one by one: strip by strip.
Laying laminate flooring in hard-to-reach places
Installation of laminated flooring in places of protrusions and niches, near door and window openings, heating radiators, as well as in places where communications pass, is difficult only at first glance.
The correct way to bypass pipes with laminate if communications are far from the wall
We go around the pipes. Communications may be close to the wall or further away from it. For such situations, there are two ways to bypass the pipes. First, measure and, if necessary, cut the strip. Then we mark the location of the pipes with a pencil, carefully cut out the holes with a milling cutter, not forgetting to leave a temperature gap, and cut the approach to the pipes. When the board has already been laid in its permanent place, we place a cut piece of laminate on the back of the pipes on the glue.
Gaps around pipes and other metal objects must be treated with acrylic sealant to match the finish
How to get around a door or window opening, niche or ledge? Before installing the laminate inside the doorway, do not forget to check whether the panel will close normally after installing the covering or whether it will require trimming. When laying laminate in such places, do not forget about the temperature gap. All corners and protrusions are measured and marked in approximately the same way as the pipe installation locations, and everything is trimmed carefully with a saw or jigsaw.
Even if the niche cut is unaesthetic, it will later be hidden by the plinth
Installation of skirting boards
When the entire floor is covered with laminate, we begin laying the baseboard. Planks made of wood or plastic are laid strictly along the perimeter of the room, bypassing corners and niches (there are internal and external corner elements to connect the plinth in these places). The plinth is attached to the wall with dowels and nails, then the fastening points are covered with a decorative strip.
To neatly go around corners, the plinth kit includes all the necessary additional elements.
When installing a wooden plinth, it may be difficult to cut corners of the elements.
After installation of all the necessary strips is completed, the spaces inside the doorways are closed with special thresholds. Upon completion of work, wipe the floor surface with a damp cloth.
Prices for various types of floor plinths
Floor plinth
Stage 6. Nuances of installation in an apartment and private house
When installing laminate flooring yourself on a wooden floor, you should give preference to the “click” locking system. Such dies are the easiest to install, and if there is an error during the installation process, you can re-lay the laminate.
The “lock” dies have to be not only snapped into place, but also hammered in. Without proper skill, it is difficult to correctly calculate the force, so there is a high probability of damage to the locks during the installation of laminate flooring yourself.
There are several schemes for laying laminate flooring. These methods do not have significant advantages or disadvantages and only affect aesthetic perception.
The only noticeable difference is the material consumption: when laying straight in scraps, it will take 5-7%, when laying diagonally - 15-20%.
There are many online calculators that allow you to choose the optimal scheme and calculate the required number of tiles before laying laminate flooring on an old wooden floor.
They take into account not only the area of the room, but also its shape, the location of doors and windows (it is desirable that the light falls along the longitudinal seams, so they are less noticeable), the dimensions of the dies and other parameters. The dies will also be numbered there to make it clear how to lay the laminate correctly (in what order to use the outer trims).
Next, it’s enough just to follow the drawn up diagram, while observing a number of simple rules:
- start installation from the corner of the room (any corner that is more convenient for the installer);
- at the extreme row, cut off the lock (the ridge that is turned towards the wall);
- leave a technological gap of 1–2 cm around the perimeter of the room (it will be covered with a plinth). It is advisable to insert wedges around the perimeter during the installation process so that the laminate layer does not move out and violate the gap size (they are dismantled after installation);
- laying is carried out in a checkerboard pattern;
- make sure that the joint of the substrate does not coincide with the edge of the die (when laying on mats);
- when installing the dies, direct the groove towards you and the ridge away from you;
- if the room area is large, make a 1–2 cm technological seam every 10 m, which is subsequently covered with a connecting profile made of plastic or aluminum;
- After installation is completed, you cannot use the room immediately (you need to give the laminate 2-3 days, depending on the manufacturer). The floor covering should “rest”.
The step-by-step instructions for laying laminate flooring yourself are quite simple. All you need for installation is a jigsaw, tape measure, pencil and level. But there are still a number of places where difficulties may arise when assembling the floor with your own hands.
Pipe lining with laminate
If the heating and water supply risers in the apartment are not hidden in the walls, then novice installers usually have difficulties in these places. There are two ways to route pipes:
- cut the materials so that the pipe fits at the junction of two dies. In this case, a hole of the required size is simply cut out at the end (diameter plus a technological gap along the entire perimeter of the pipe, at least 8 mm). The main thing is not to make a mistake with the place of the cut;
- if the pipe hits the center of the die, installation will be more difficult. You need to accurately measure the required distance and accurately mark the center of the pipe on the die. Next, a hole is made using a crown of the required diameter (taking into account the technological gap). The die is divided perpendicularly into two parts with a jigsaw in the center of the holes. Both parts are installed in their places (the joint can be connected with a small amount of glue).
This process is presented in more detail in the video:
Laying laminate. Neat hole for heating pipes
The resulting hole is closed with special decorative plates for lining the pipes. They are available in plastic, wood, metal, in different colors and sizes, so choosing the right design will not be difficult.
Laying dies under a low battery
The best option in this case would be to start installing the laminate on boards along the wall on which the battery hangs. Then the first longitudinal row will simply need to be slipped into a narrow gap and you will not have to deal with the difficulties of snapping the lock into place.
If for a number of reasons this cannot be done, and the dies will lie perpendicular to the battery, then in this case the action plan is as follows.
- The beginning of the longitudinal strip of the laminate should be under the battery. Take a lamella of the required size and snap it into a free area of space, as close to the battery as possible.
- Next, very carefully, so as not to damage the lock, the die is hammered into place with a hammer through an attached block (it is better to first practice on unnecessary scraps).
Installing laminate flooring in a room with curved walls
If the shape of the room is curved, the laminate is cut in such a way that a short joint of the dies is adjacent to the curved wall.
In this case, the main thing is not to make a mistake with the radius of curvature. The cutting is carried out with a jigsaw with fine teeth (so as not to damage the top finishing layer).
If the walls are simply uneven, and the gap between the outermost row of tiles and the wall is uneven, then there are four options:
- level the walls to an acceptable level;
- laying should be carried out diagonally;
- select a sufficiently wide plinth to cover the gap (taking into account the required technological gap, this method is only suitable for small irregularities);
- Place the dies level, and fill the places of greatest deviation with dies spread out lengthwise (or diagonally). The number of trimmings with this method will increase, but the appearance will be acceptable.
The appropriate option must be chosen based on the specific features of the room.
Laying the last row of laminate flooring
Difficulties arise due to the fact that the wall prevents the last row of locks from being securely latched.
In this case, professionals use a special bracket for laying laminate flooring. It’s not worth purchasing it just to lay one row. It is easy to make and looks somewhat like a bent shoehorn. If it is not possible to make a staple, then a regular nail puller can replace it.
Useful tips
When choosing a substrate for laminate or the laminate itself for a bathroom, hallway or kitchen, it is better to give preference to non-natural materials. This will help save a significant part of the budget and prevent dampness.
For rooms with high levels of humidity, it is not recommended to use a cork backing, no matter how moisture resistant it is. Due to its porous structure, the material quickly absorbs moisture and fails.
The rolled backing under the laminate should be laid with a slight overlap of 10-15 mm
Laying laminate flooring on an old wooden floor is possible under any circumstances. The quality of the floor after repair will depend on the efforts and funds invested. For example, material laid on an unprepared surface may warp when humidity increases/decreases, or play and wobble when subjected to force. Even if you lay plywood in accordance with all the requirements, but do not prevent further damage to the subfloor by fungus, after a few years it will remind you of itself with unpleasant consequences. Do everything in compliance with technology and even the most inexpensive class laminate laid on a wooden surface will last for decades.
List of mistakes when laying laminate
Among the main mistakes that beginners make when working with laminate are:
- laying laminate directly on a concrete slab in apartments (it is necessary to create a screed, joists or any other type of rough covering);
- no technological gap during installation (the first row is moved close to the wall);
- laying on a curved base;
- snapping locks without technological tapping (the entire row must lie down on its own, for this you need to walk with a block and a hammer along the entire length).
Laminate flooring is laid using an extremely simple technology, which, when studied, can significantly improve the quality of the work performed.
Important! You need to carefully study the installation instructions for a specific laminate model before starting work.
Required tools for installation
In order to properly lay the laminate you will need the following tools::
- Hacksaw with fine teeth. Sometimes a hacksaw is preferred, which can also be useful for sawing metal locks.
- Jigsaw, power saw.
- Electric drill with a set of regular and feather drills.
- A sharp knife for cutting the substrate.
- Ruler, tape measure, square, pencil.
- A regular hammer or one with a rubberized head.
- Tamping block.
- Set of wedges.
There are special sets of tools for laying the covering, which include all the most necessary devices. For example, clamps for laminate flooring are unlikely to be found by a home craftsman who has not previously dealt with laying the material.
The same can be said about the laminate bracket, with which it is convenient to seal the seams of panels located close to the walls. There are also special devices for cross-cutting panels, allowing you to quickly and very cleanly cut them at right angles, which is constantly required during installation .
It's nice to have a hand-held power saw, and even better, to be able to mount it on a base that turns it into a circular saw. There are also special tamping bars that do not crush the locking parts of the laminate when tamping panels for greater joint density.
NOTE!
The listed tools are the basic and most necessary set; each master can use additional tools or devices if they are able to somehow facilitate the work and improve the results.
Installation of plastic plinth
The plastic plinth is chosen to match the color of the laminate or linoleum. Modern skirting boards are made of plastic. They look beautiful and are attached to the walls. There are solid baseboards and those with a channel for laying cables. Skirting boards are fastened with latches or screws. I chose a plinth with a cable duct and attached it to the wall with self-tapping screws. It is convenient to hide television and computer cables and screw heads for securing the baseboard itself in the cable channel.
Before purchasing a floor plinth, you need to calculate the required length, determine which and how many plugs and corners will be needed. To drill holes in the walls for dowels, I used a homemade jig.