Save and read later -
The THX certification was created to ensure that movie theaters meet certain standards. Since then, the company's reach has expanded to include both home theater and standalone AV products. So I asked THX CTO Scott Francis if he had any tips on how to optimize and position the screen, speakers, and seating to get the most out of your home system. Moreover, in a variety of situations - when watching individually, with a family, or when watching a large group of films, TV shows and sports programs.
He began with a truism: “In general, the ideal setup is the one that you like the most and brings the most joyful emotions to you and your guests. There is no need to be afraid to change something to suit your taste or for the sake of the comfort of guests just because the existing system is considered “technically correct.”
What is the ideal screen placement?
Ideally, the screen should be positioned directly opposite, centered at almost eye level from the primary viewing position. A deviation from the horizontal or vertical axis of 10-30 degrees does not greatly affect the quality, and modern screens have wide viewing angles, designed for viewing by a large group. Usually the room dictates the conditions, and therefore you need to think about the seating, choosing the furniture itself and its arrangement so as to eliminate neck pain and other discomfort during prolonged viewing.
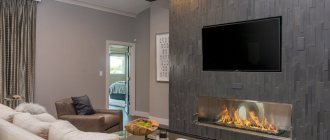
Very often, this problem is caused by screens that are hung above fireplaces - they end up being located too high for most sofa models, which is why you have to lift your head up. However, if you most often look at the screen while lounging on the couch, this solution may be convenient. In this situation, you can even add a second row of high chairs located behind the main sofa near the bar or table, which is quite common in combined kitchens/living rooms.
If you're using a projector rather than a TV, the viewing angle may be more awkward. Find a place where you don't have to raise your head.
Type and placement of rear speakers
One of the fundamental rules for choosing acoustics is homogeneity. It is understood that all the main speakers of a multi-channel system (this does not apply to the subwoofer) must belong to the same series of the same manufacturer. However, installation conditions often make their own adjustments. It happens that it is not possible to place spectator seats (chairs or sofas) at a distance of at least one meter from the back wall. And if this is exactly the situation (which is undesirable), the only way to ensure more or less correct surround sound is to use wall-mounted speakers with shallow cabinets. They should be mounted at a height of approximately 2 meters from the floor and, if possible, oriented slightly towards the audience. Next, correction is made by the receiver settings. It also makes sense to use a high location of rear wall speakers if it is necessary to provide sound for seats in several rows. You can see clear examples of how such a scheme is implemented in any modern commercial cinema. If there are 2-3 seats and they are installed in one row, then bookshelf-type cabinet speakers on high stands or on wall brackets are perfect for sounding the rear channels. They should be located just above the spectators’ heads, at a distance of at least 1.5 m (preferably further) from them.
What is the ideal speaker placement?
When the location for the screen is known, you can install the acoustics: they should be placed approximately symmetrically relative to the focal point - the center of the screen. Most rooms cannot be called symmetrical - they may have three walls, offset central lines, steps and other architectural excesses. Some of these oddities aren't that big of a deal-breaker in your viewing and listening space, but if you can't get the left, right, and center channels on a plane at the right angle with the right and left speakers the same distance from your listening position, there's something wrong. not this way. You may need to change the screen layout.
The central channel should be installed as close to the screen as possible - on average, directly above or below it, although in projector installations it is possible behind the acoustically transparent screen. For sports broadcasts this is not so important, but in feature films most of the dialogue comes from here, so having a center channel close to the screen will add realism to the picture.
Speaker placement diagram in a 5.1-channel system
The left and right channels should be at the same distance from the center and from the viewing point. A small deviation from the line of 10-20% can be compensated with the help of a receiver, but a strong deviation will break the construction of the stage, and you will hear speakers instead of content. For sports broadcasts, a wide channel arrangement is an interesting solution, but in feature films, speakers located at the corners of an obtuse triangle (where the angle of the axis along which the sound travels from the speakers is more than 30 degrees from the central axis) may not sound so good.
I've seen many people mount the left and right channel right next to the display. I don't like this option, it seems like it makes the scene smaller. For most content, extending the scene beyond the screen is a winning option.
However, if you're using the room for stereo, you can benefit from a little distance between the right and left channels. More specifically: if the right and left channels are located within 15 degrees of the line of sight, the direct sound will dominate the reflected sound. As the angle increases, reflections will increase, and this will increase interference.
Speaker placement diagram in a 7.1-channel system
Surround sound acoustics and height channels must be located symmetrically relative to the listening position, and, most importantly, they must be audible! I often see how people simply sculpt them anywhere or even hang them on the ceiling, pointing down. Consider smaller surround speakers that you can place around ear level without obstructing the sound. Symmetry within the path length is one of the most important parameters.
In a 5.1 system, the surround speakers need to be positioned slightly behind, otherwise the stage may collapse. On the other hand, if it is too far away, that very voluminous, immersive effect may be lost. Experiment with the placement of the acoustics, taking into account the capabilities of the room, and decide which option best plays out the content you like.
For sports broadcasts, I like this system: the front and rear channels are located almost in the corners of the quadrangle, and the listener is in the center of the rear half of this quadrangle, closer to the rear channels. To my ears, this setup creates a serious stadium effect.
Dolby True HD or DTS HD Master Audio system placement diagram (surround speakers should be placed so that there is a 60° angle from the listening position)
Subwoofers are very easy to position approximately, and almost impossible to place precisely. You've probably heard that bass travels in all directions and therefore the placement of the subwoofer is not particularly important. This is true to some extent, but placing the subwoofer too far off center or in some unusual locations can result in interesting effects in sound and latency for certain listening positions. Using two subwoofers can largely solve this problem, as can moving a single subwoofer around the room. In the end, delay settings can help. Depending on the acoustics of a particular room, positioning at different distances from walls or corners can also make quite a difference. Experiment with installation location and content.
The THX website says: “If you have four subwoofers, place one in the center of each wall. If you have two subwoofers, place them one at a time in the center of two walls opposite each other. If you have one subwoofer, place it in the center of the front wall."
How to assemble a home theater yourself using the included components
In order to assemble a home theater with your own hands, you will need to purchase not only a projector, but also a sound structure/computer/monitor/light filters.
Assembly steps
By following the step-by-step instructions, you can avoid mistakes that often arise during the assembly process.
Stage 1
First of all, you need to purchase an LCD projector (resolution 1280*720 pixels/brightness - 1600 lumens). The projector's contrast ratio should reach 10,000:1.
To achieve good sound, you need to buy several speakers and place them in different parts of the room. The speakers are placed on the floor or mounted to the wall. You will also need an adapter with wires.
Stage 2
The wires from the speakers are removed under the baseboard.
Stage 3
The adapter is connected to one side of the wire leading to the subwoofer. The second is connected to the cable from the speaker. A central column is installed on top of the screen.
Stage 4
The subwoofer is placed on the side of the screen and a wire is pulled from it to connect to the computer/laptop.
Note! A computer is needed to display images on the screen.
Stage 5
The computer is connected via DVI. The screen is fixed to the wall using special fasteners.
Stage 6
The projector is attached to the ceiling. To do this you will need to use a special hose.
Also, do not forget that you need to hang light filters on the windows, which will reliably protect against light penetration. By creating the complex yourself, you can save an impressive amount of money.
How to assemble, connect and configure a home theater - from design to arrangement and connection of all components into the overall system of acoustics and Smart TV:
What is the ideal seating arrangement relative to the screen and acoustics?
Where you see and hear well! Think about all the reflective and absorbing surfaces in the room and the path a sound wave must travel to reach your ears. Is there a solid wall behind you? Maybe a painting or rug will help combat the reflections from that wall. From your chair you should be able to see the entire screen and all the speakers without any problems.
Then think about the "through lines" running from the speakers through your head. What's behind your head? Wall? Is it coated with reflective or absorbent material? What is the angle of reflection? Could the sound bounce off of it in some strange way and create a hum or mud in the room? Adjusting the angle of attack, location or method of mounting the speaker can help with this, but you can also do something with the wall.
Various recommended ratios
Countless studies have been done on the ratios for better room acoustics. There are so many different options that deciding which one is “right” can be extremely difficult. I'm going to recommend three golden room ratios developed and researched by LW Sepmeyer. Please note that these ratios are based on the height of the room!
LW Sepmeyer's golden room ratios
These relationships were developed by studying the wavelength of low-frequency sound and its response in rooms of different sizes. A room with one of these ratios is more likely to handle low frequencies better with fewer acoustic problems.
I'll explain this in more detail below, but first I'll give some examples of room sizes using the above "golden ratios".
Ratio A
Example 1: 8 ft Height = 8 x 9.12 x 11.12 with a cubic volume of 811.32 ft³ Example 2: 10 ft Height = 10 x 11.4 x 13.9 with a cubic volume of 1584.6 ft³
Ratio B
Example 1: 8' Height = 8 x 10.24 x 12.32 with a cubic volume of 1009.25 ft³ Example 2: 10' Height = 10 x 12.8 x 15.4 with a cubic volume of 1971.2 ft³
Ratio C (much larger rooms)
Example 1: 8 ft Height = 8 x 12.8 x 18.64 with a cubic volume of 1908.74 ft³ Example 2: 10 ft Height = 10 x 16 x 23.3 with a cubic volume of 3728 ft³
What are the best TV settings for watching fast-paced content like sports?
Your TV most likely has a "sports" mode, and I'd start there. The settings for this mode vary greatly from model to model. For example, edge enhancement works well on some devices, but on others it takes a few frames to get going. This is normal for feature films, but in sports broadcasts it is infuriating.
Many TVs can create intermediate frames using "predictive" algorithms, a process most commonly called frame interpolation. If your model knows how to create such frames well, then the broadcast will look less “crystalline” and rough. However, a “soap opera” effect can also result. Some TVs simulate the phosphor fading effect in these intermediate frames, familiar from CRT and plasma TVs, and it looks nice.
Connecting to a TV
There are many options for connecting your home theater to your TV. Below you can find the main ones:
- Via headphone jack . To do this you will need to use the miniJack 3.5 mm slot. Most television receivers have a similar socket. To connect the equipment you will need a special cord, on one side of which there will be a miniJack tip, and on the other side - a pair of RCA “tulips”.
- Via SCART connector . Some TV models have a SCART interface output, while home theaters have an RCA interface. You can connect a “non-pair” using a special cable, on one side of which there is a SCART connector, and on the other - a pair of RCA “tulips”.
- HDMI OUT is the best option. To connect, you will need to find an HDMI IN slot on the back wall of the DC receiver (the port may be marked ARC). Next, the user goes to the settings category on the TV and selects the option to play sound through the acoustic system playing audio/voice for acoustic system. The playing audio/voice for dynamic checkbox is unchecked.
Connection diagram for home theater to TV:
Cinema connection
Note! If you prefer the headphone jack connection method, you should understand that the sound quality will be lower than using other methods. Therefore, experts advise using this method only as a backup option.
Connecting smart TV to home theater
What are the best audio settings for watching live sports?
Turn it all the way up! If you built the setup according to my advice, then the broadcast should be good. Most processors and receivers are equipped with various effects, including “stadium”, and in good systems such effects are not necessary, but in an impromptu group viewing they can improve the sound.
Basketball in particular is replete with crisp, percussive highs that are widely spaced. For some, all the squeaking of sneakers and balls on the glossy floor seems too annoying, and for such listeners the tops need to be softened a little.
How to prepare a wall for a projector?
The easiest option with guaranteed quality is to buy a special vinyl screen. But for the same money you can buy a large TV: screens that will not spoil your enjoyment of the film cost from 30 thousand rubles and almost indefinitely. Optimal options for 60-100 thousand rubles. For comparison, a 55-inch diagonal TV from a trusted company with 3D costs 50 thousand rubles.
Screens for projectors come in roller and tension type. A screen with constant tension will last longer, but it cannot be removed out of sight, unlike a roll screen. You can try making your own projector screen by purchasing a sheet of vinyl. But any mistake can be costly - the material is capricious.
Another option is to paint a flat wall. In an economical version, matte white paint in several layers. The brightness and clarity of the picture will be much better if you take a more expensive screen-paint - a complex of special coatings.
It is better to make the remaining walls in the room dark and matte. Or at least enclose the projection area in a dark frame.
Negative factors of premises.
All the factors discussed below can be figuratively combined in one word, one problem - the resonance of the room. Let's briefly go through the main factors of the negative impact of a room on sound:
The first is Reverb.
As Wiki explains to us, “Reverberation is the process of gradually decreasing the intensity of sound as it is reflected multiple times.”
The presence in a room of a very large amount of reflected sound signal will be expressed in the “ringing” of the room itself. Among experts, this concept is called reverberation time, this is the duration of sound attenuation, expressed by the time it takes to weaken it a thousand times. This is about 60 dB, one might say - almost inaudible sound level. So to speak, an “echo” effect will be heard. Such a room is practically unsuitable for listening to music. It will be very difficult to perceive it normally.
A room that is too noisy will act in much the same way, but with the opposite effect. There is a thick carpet on the floor, a woolen carpet on the wall, which almost completely muffles any resonant sounds, the windows are covered with thick and heavy curtains, and there is a soft sofa.
In such a room, the sense of spatial volume will be disrupted; the listener may not hear the stereo effect at all, and will not be able to focus the sound stage on the ear. Simply, the sound will dissipate in the surrounding environment.
The second is a standing wave.
A standing wave is a sound wave that encounters a solid surface located perpendicularly on its path, is reflected from it and returns along the same route. This is scientific language.
In another way, standing sound waves arise due to reflections and mutual superpositions of low-frequency vibrations, the wavelengths of which correspond to the size of the room. In this case, sharp rises and dips in low frequencies will be heard at some individual points in the room.
Let's look at the picture below. Let's compare the frequency with the wavelength.
The frequencies most susceptible to the resonant influence of rooms are those from approximately 250 to 100 hertz, since they are very close in length to the size of our rooms. Large rooms are good; if problems with standing waves arise in them, it is only at the lowest frequencies.
Third - Early reflections.
Another factor is called early reflections. It is inherent mainly in high-frequency vibrations. The mid-frequency component may also be affected, but to a lesser extent. High frequencies can be reflected from any surface of the floor or walls if the speaker is very close.
Thus, we hear them almost simultaneously with the direct signal from the speakers, which contributes to disruption of the perception of stereo effects and loss of the overall sound image. Also, the uniformity of the frequency response deteriorates due to the phase mismatch of direct and reflected sound. Obvious distortions appear.
Fourth – Fluttering Echo.
The title is strange, but it almost explains itself. As Vicky says, a “fluttering echo” appears when in large rooms measuring 25 square meters or more, when there are two parallel smooth walls or a ceiling and floor, between which there is a sound source.
If you clap your hands in a room and if a quick characteristic echo with a metallic ringing sounds, then this is a “fluttering echo”.
A little differently, a “flutter echo” occurs when sound is placed between parallel, smooth, highly reflective surfaces.
Large living rooms, gyms, and indoor swimming pools are more susceptible to this effect. In short, any premises decorated with any hard materials - tiles on the wall, porcelain tiles on the floor. But in a small bathroom this effect is practically absent, because there is a very small distance between the walls.
We host a collection of films
A true film fan does not download films from the Internet (remember that this is illegal), he buys Blue-ray or DVD. This collection needs to be stored somewhere, and doing it in your movie viewing area is both convenient and appropriate. The discs can simply be placed on bookshelves, interspersed with Oscar statuettes and portraits of your favorite actors. Or you can buy special narrow racks and focus only on storing disks.


