Why extract electricity from the ground?
In order to generate electricity, you need to find a potential difference and a conductor. By connecting everything into a single flow, you can provide yourself with a constant source of electricity. However, in reality, taming the potential difference is not so simple.
Nature conducts enormous power of electricity through a liquid medium. These are lightning discharges, which are known to occur in air saturated with moisture. However, these are just single discharges, and not a constant flow of electricity.
Man took on the function of natural power and organized the movement of electricity through wires. However, this is just a transfer of one type of energy to another. Extracting electricity directly from the environment remains mainly at the level of scientific research, experiments in the category of entertaining physics and the creation of small low-power installations.
The easiest way to extract electricity is from a solid and moist environment.
Energy from the void
Science does not provide an intelligible definition of either field or energy. But she clearly formulates - energy does not come from nowhere and does not disappear anywhere. Trying to extract “energy from nothing,” we can only try to “fit in” to the process of its natural transformation from one type to another.
Energy is determined by useful work, and the field is determined by the spatial characteristics of the influence of its source. Both the static electric charge, the dynamic magnetic effect around a current-carrying conductor, and the heat of a heated body are considered fields.
Any field can perform useful work, and therefore transfer part of its energy. It is this property that prompts us to look for sources of free energy in various fields. It is believed that there is many times more such energy than in traditional sources mastered by mankind.
For example, we know how to use the gravitational energy of the huge Earth, but we do not know how to extract it from the attraction of a tiny stone. It's too small to make sense, but it's practically inexhaustible. If we come up with some way to extract it from a stone, we will get a new source of energy.
This is roughly what researchers and developers of all kinds and stripes are doing in an attempt to extract “energy from nothing.” The field from which various prospectors strive to learn how to extract an energy resource is what they call ether.
Ether and its properties
This term was in use in science a century ago.
Using the concept of “ether”, all the basic laws of physics and more were discovered. Operating precisely with this concept, Nikola Tesla and other minds of the 19th and early 20th centuries carried out their research and development. Science once renounced the ether. As a result, many phenomena, such as fields, turned out to be inexplicable without it, and he himself now has no clear definition. This did not prevent the concept of “ether” from being used to justify the development of obtaining “free energy from nothing.” Although now this often means completely different phenomena.
Today, the expression “obtain ethereal energy” means both its extraction from the same ether that N. Tesla had in mind, and in general all methods of obtaining “free energy from nothing.” The ether is considered a structural part of space and a carrier of any energy.
Nikola Tesla and his ideas
Most modern designers strive to get electricity “out of thin air.” The most famous developer of such methods was Nikola Tesla. He is called the discoverer of almost all the existing “benefits of civilization.” Internet, radio, television, mobile communications - almost everything is considered to be based on the principles discovered by him at the beginning of the 20th century.
Many of his developments are considered lost since his death . Some of them are known exclusively as principles, others only in general terms. However, many current designers are trying today to reproduce Tesla's discoveries and devices, taking advantage of modern scientific and technological discoveries.
Most of Tesla's ideas are based on extracting it from the fields formed by the interaction of the Earth with its ionosphere. This system is considered as a large capacitor, in which one plate is the Earth, and the other is its ionosphere, irradiated by cosmic rays. Like any capacitor, such a system constantly accumulates charge.
And various home-made devices developed according to Tesla’s ideas are designed to extract this energy.
Unity of three environments
The most popular medium in this case is soil. The fact is that the earth is the unity of three media: solid, liquid and gaseous. Between small particles of minerals there are drops of water and air bubbles. Moreover, the elementary unit of soil - a micelle or clay-humus complex - is a complex system with a difference in potential.
A negative charge is formed on the outer shell of such a system, and a positive charge on the inner shell. The negatively charged shell of the micelle attracts positively charged ions in the medium. So electrical and electrochemical processes are constantly occurring in the soil. In a more homogeneous air and water environment, there are no such conditions for the concentration of electricity.
Electricity from two rods
This method is based on a completely different theory and has nothing to do with the Earth’s magnetic or electric field. And this theory is about the interaction of galvanic pairs in a saline solution. If you take two rods of different metals and immerse them in such a solution (electrolyte), a potential difference will appear at the ends. Its value depends on many factors: composition, saturation and temperature of the electrolyte, size of the electrodes, immersion depth, and so on.
Such generation of electricity is also possible through the ground. We take 2 rods from different metals, forming a so-called galvanic pair: aluminum and copper. We immerse them in the ground to a depth of approximately half a meter, keeping the distance between the electrodes small, 20-30 cm is enough. We water the area of land between them generously with saline solution and after 5-10 minutes we take measurements with an electronic voltmeter. The meter readings may vary, but at best you will get 3V.
Note. The voltmeter readings depend on the soil moisture, its natural salt content, the size of the rods and the depth of their immersion.
In fact, everything is simple, the resulting free electricity is the result of the interaction of a galvanic couple, in which moist earth served as an electrolyte, the principle is similar to the operation of a salt battery. A real experiment about the potential difference across electrodes driven into the ground can be seen in the video:
How to get electricity from the ground
Since the soil contains both electricity and electrolytes, it can be considered not only as an environment for living organisms and a source of crops, but also as a mini power plant. In addition, our electrified homes concentrate in the environment around them the electricity that “drains” through grounding. You can't help but take advantage of this.
Most often, homeowners use the following methods to extract electricity from the soil located around the house.
Traditional sources
The most pressing question for owners of country houses and summer cottages will be the source of electricity (
Autonomous sources of electricity
The second option to provide a country house with electricity is to use autonomous energy sources. Such sources can be wind, sun, water and flammable materials.
Using autonomous energy supply, the home owner becomes completely independent in terms of obtaining electricity for consumption.
No approvals, power lines, etc. are required. Of course, obtaining electricity will still be associated with costs. And at the initial stage they will be quite significant, since the necessary equipment costs a lot.
In the future, it is also necessary to carry out maintenance of all components of the energy supply system, but in the end everything will pay off.
Let's briefly consider the most common autonomous sources of electricity.
Method 1 - Neutral wire -> load -> soil
Voltage is supplied to residential premises through 2 conductors: phase and neutral. When creating a third, grounded conductor, a voltage of 10 to 20 V arises between it and the zero contact. This voltage is enough to light a couple of light bulbs.
Thus, to connect electricity consumers to “ground” electricity, it is enough to create a circuit: neutral wire - load - soil. Craftsmen can improve this primitive circuit and obtain a higher voltage current.
Method 2 - Zinc and copper electrode
The next method of generating electricity is based on using only land. Two metal rods are taken - one zinc, the other copper, and placed in the ground. It is better if it is soil in an isolated space.
Isolation is necessary in order to create an environment with high salinity, which is incompatible with life - nothing will grow in such soil. The rods will create a potential difference, and the soil will become an electrolyte.
In the simplest version, we get a voltage of 3 V. This, of course, is not enough for a home, but the system can be complicated, thereby increasing the power.
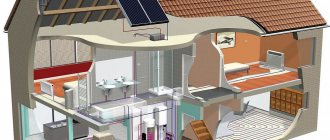
Heat pumps for heating
Heat pumps are one of the most advanced technological solutions in obtaining alternative energy for your home. They are not only the most convenient, but also environmentally friendly.
Their operation will significantly reduce the costs associated with paying for cooling and heating the premises.
Image gallery
Photo from
Heat pump with heat intake from ground or groundwater
Air-to-water or air-to-air heat pump external unit
The relationship between the external and internal components of eco-systems
Heat pump indoor unit equipment
Classification of heat pumps
I classify heat pumps by the number of circuits, the source of energy and the method of obtaining it.
Depending on the final needs, heat pumps can be:
- One-, two- or three-circuit;
- One- or two-capacitor;
- With the possibility of heating or with the possibility of heating and cooling.
Based on the type of energy source and method of obtaining it, the following heat pumps are distinguished:
- Soil - water. They are used in temperate climate zones with uniform heating of the earth, regardless of the time of year. For installation, a collector or probe is used, depending on the type of soil. Drilling shallow wells does not require obtaining permits.
- Air is water. Heat is accumulated from the air and directed to heat water. The installation will be appropriate in climate zones with winter temperatures not lower than -15 degrees.
- Water is water. Installation is determined by the presence of bodies of water (lakes, rivers, groundwater, wells, settling tanks). The efficiency of such a heat pump is very impressive, which is due to the high temperature of the source during the cold season.
- Water is air. In this combination, the same reservoirs act as a heat source, but the heat is transferred directly to the air used to heat the premises through a compressor. In this case, water does not act as a coolant.
- Soil is air. In this system, the heat conductor is the soil. Heat from the ground is transferred to the air through the compressor. Non-freezing liquids are used as energy carriers. This system is considered the most universal.
- Air is air. The operation of this system is similar to the operation of an air conditioner, capable of heating and cooling a room. This system is the cheapest, as it does not require excavation work or laying pipelines.
When choosing the type of heat source, you need to focus on the geology of the site and the possibility of unhindered excavation work, as well as the availability of free space.
If there is a shortage of free space, you will have to abandon heat sources such as earth and water and take heat from the air.
The efficiency of the system and the costs of its installation largely depend on the correct choice of the type of heat pump.
Working principle of a heat pump
The operating principle of heat pumps is based on the use of the Carnot cycle, which, as a result of sharp compression of the coolant, provides an increase in temperature.
Most climate control devices with compressor units (refrigerator, freezer, air conditioner) operate on the same principle, but with the opposite effect.
The main operating cycle, which is implemented in the chambers of these units, has the opposite effect - as a result of a sharp expansion, a narrowing of the refrigerant occurs.
That is why one of the most accessible methods for manufacturing a heat pump is based on the use of individual functional units used in climate control equipment.
So, a household refrigerator can be used to make a heat pump. Its evaporator and condenser will play the role of heat exchangers, removing thermal energy from the environment and directing it directly to heating the coolant that circulates in the heating system.
Low-grade heat from soil, air or water, together with the coolant, enters the evaporator, where it turns into gas, and is then further compressed by the compressor, resulting in the temperature becoming even higher
Assembling a heat pump from scrap materials
Using old household appliances, or rather, their individual components, you can assemble a heat pump yourself. Let's look at how this can be done below.
Step #1 - prepare the compressor and condenser
Work begins with the preparation of the compressor part of the pump, the functions of which will be assigned to the corresponding unit of the air conditioner or refrigerator. This unit must be secured with a soft suspension on one of the walls of the workroom where it will be convenient.
After this, you need to make a capacitor. A 100 liter stainless steel tank is ideal for this. You need to install a coil into it (you can take a ready-made copper tube from an old air conditioner or refrigerator.
The prepared tank must be cut lengthwise into two equal parts using a grinder - this is necessary for installing and securing the coil in the body of the future capacitor.
After installing the coil in one of the halves, both parts of the tank must be connected and welded together so as to form a closed tank.
To make the condenser, a 100-liter stainless steel tank was used; using a grinder, it was cut in half, a coil was installed, and reverse welding was performed.
Please note that when welding you need to use special electrodes, and even better, use argon welding, only it can ensure maximum quality of the seam.
Step #2 - making an evaporator
To make an evaporator, you will need a sealed plastic tank with a volume of 75-80 liters, into which you will need to place a coil made of pipe with a diameter of ¾ inches.
To make a coil, it is enough to wrap a copper tube around a steel pipe with a diameter of 300-400 mm, followed by fixing the turns with a perforated angle
Threads must be cut at the ends of the tube to subsequently ensure connection with the pipeline. Once assembly is complete and the seal has been checked, the evaporator should be secured to the wall of the workroom using brackets of the appropriate size.
It is better to entrust the completion of assembly to a specialist. While some of the assembly can be done yourself, soldering the copper pipes and pumping in the refrigerant should be done by a professional. Assembly of the main part of the pump ends with the connection of heating batteries and a heat exchanger.
It should be noted that this system is low-power. Therefore, it will be better if the heat pump becomes an additional part of the existing heating system.
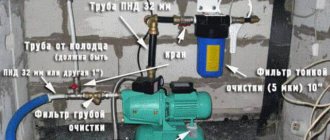
Step #3 - arrangement and connection of an external device
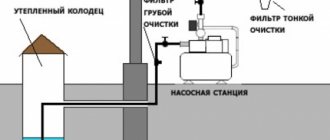
The best source of heat is water from a well or borehole. It never freezes and even in winter its temperature rarely drops below +12 degrees. It will be necessary to install two such wells.
Water will be drawn from one well and subsequently supplied to the evaporator.
Groundwater energy can be used year-round. Its temperature is not affected by weather conditions and seasons
Next, the waste water will be discharged into the second well. All that remains is to connect it all to the inlet of the evaporator, to the outlet and seal it.
In principle, the system is ready for operation, but for its complete autonomy it will require an automation system that controls the temperature of the moving coolant in the heating circuits and freon pressure.
At first, you can get by with an ordinary starter, but it should be noted that starting the system after turning off the compressor can be done in 8-10 minutes - this time is necessary to equalize the freon pressure in the system.
Method 3 - Potential between roof and ground
3. A fairly large potential difference can be created between the roof of the house and the ground. If the surface on the roof is metal and the surface in the ground is ferrite, then you can achieve a potential difference of 3 V. This figure can be increased by changing the size of the plates, as well as the distance between them.
It is legal?
Yes, the power grid is not punished for this, since we will not use the phase. And in fact this is not theft.
Will electric meters take this energy into account?
It all depends on the type of electricity meter. There are meters with one shunt (with one measuring element) - the most common and two-shunt (with two measuring elements). One shunt I just don’t take into account zero - since their measuring shunt is located on the phase.
How much electricity can you get?
It all depends on the number of subscribers in the network and the power of all wiring. Usually it's somewhere between 3-10 volts. If you connect a step-up transformer, you can light an LED lamp. The voltage after the step-up transformer is about 100-220 V.
Scheme
Any transformer from a radio, tape recorder, etc. It is advisable to use a low voltage of 3-9 Volts on the secondary winding. Please note that you use all manipulations at your own peril and risk.
Design and use of wind generators
Wind energy was used by our ancestors. Since those distant times, in principle, nothing has changed.
The only difference is that the millstones of the mill are replaced by a generator and a drive, which converts the mechanical energy of the blades into electrical energy.
Image gallery
Photo from
Step 1: Selection of parts for the manufacture of a wind generator
Step 2: Removing the motor and chuck from the unwanted drill
Step 3: Parts for the wind generator mounting assembly
Step 4: Install the assembled mounting unit
Step 5: Install the Bearing from the Inside of the Plate
Step 6: Assembling the wind generator and installing it on the siteAssembling the wind generator and installing it on the site
Step 7: Attaching the Wind Turbine Blades to the Plate
Step 8: Small homemade wind generatorSmall homemade wind generator
Installing a wind generator is considered economically profitable if the average annual wind speed exceeds 6 m/s.
Installation is best done on hills and plains; ideal places are considered to be the coasts of rivers and large bodies of water, away from various utilities.
Wind generators are used to convert the energy of air masses into electricity; they are most productive in coastal regions
Classification of wind generators
The classification of wind generators depends on the following basic parameters:
- Depending on the placement of the axis, there can be vertical and horizontal ones . The horizontal design provides the ability to auto-rotate the main part to search for wind. The main equipment of a vertical wind generator is located on the ground, so it is easier to maintain, while the efficiency of vertical blades is lower.
- Depending on the number of blades, one-, two-, three- and multi-bladed wind generators . Multi-bladed wind generators are used at low air flow speeds and are rarely used due to the need to install a gearbox.
- Depending on the material used to make the blades, the blades can be either sailed or rigid . Sail-type blades are easy to manufacture and install, but require frequent replacement, as they quickly fail under the influence of sharp gusts of wind.
- Depending on the pitch of the screw, a distinction is made between variable and fixed pitches . When using a variable pitch, it is possible to achieve a significant increase in the range of operating speeds of the wind generator, but this will lead to an inevitable complication of the design and an increase in its weight.
The power of all types of devices that convert wind energy into an electrical analogue depends on the area of the blades.
Wind generators practically do not require classical energy sources to operate. Using an installation with a capacity of about 1 MW will save 92,000 barrels of oil or 29,000 tons of coal over 20 years
Wind generator device
Any wind turbine contains the following basic elements:
- Bladesrotating under the influence of wind and providing movement of the rotor;
- Generator , which produces alternating current;
- Blade control controller , responsible for the formation of alternating current into direct current, which is required to charge the batteries;
- Rechargeable batteries are needed to accumulate and equalize electrical energy;
- Inverter performs the reverse conversion of direct current into alternating current, from which all household appliances operate;
- A mast is necessary to lift the blades above the ground until the height of movement of air masses is reached.
In this case, the generator, blades that provide rotation and the mast are considered the main parts of the wind generator, and everything else is additional components that ensure reliable and autonomous operation of the system as a whole.
The circuit of any even the simplest wind generator must include an inverter, a charge controller and batteries
Low-speed wind generator from a self-generator
It is believed that this design is the simplest and most accessible for self-production. It can become either an independent source of energy or take over part of the power of the existing power supply system.
If you have a car generator and battery, all other parts can be made from scrap materials.
Step #1 - making a wind wheel
The blades are considered one of the most important parts of a wind generator, since their design determines the operation of the remaining components. A variety of materials can be used to make blades - fabric, plastic, metal and even wood.
We will make blades from sewer plastic pipes. The main advantages of this material are low cost, high moisture resistance, and ease of processing.
The work is performed in the following order:
- The length of the blade is calculated, and the diameter of the plastic pipe should be 1/5 of the required footage;
- Using a jigsaw, the pipe should be cut lengthwise into 4 parts;
- One part will become a template for the manufacture of all subsequent blades;
- After cutting the pipe, burrs on the edges must be treated with sandpaper;
- The cut blades must be fixed on a pre-prepared aluminum disk with the provided fastening;
- Also, after the modification, you need to attach a generator to this disk.
Please note that PVC pipe is not strong enough and will not be able to withstand strong gusts of wind. For the manufacture of blades, it is best to use a PVC pipe with a thickness of at least 4 cm.
The size of the blade plays an important role in the magnitude of the load. Therefore, it would not be amiss to consider the option of reducing the size of the blades by increasing their number.
The blades of the wind generator are made according to a template from ¼ PVC sewer pipe with a diameter of 200 mm, cut along the axis into 4 parts
After assembly, the wind wheel should be balanced. To do this, you need to mount it horizontally on a tripod indoors. The result of correct assembly will be the immobility of the wheel.
If rotation of the blades occurs, it is necessary to sharpen them with abrasive before balancing the structure.
Step #2 - making a wind generator mast
To make a mast, you can use a steel pipe with a diameter of 150-200 mm. The minimum length of the mast should be 7 m. If there are obstacles to the movement of air masses on the site, then the wind generator wheel must be raised to a height exceeding the obstacle by at least 1 m.
The pegs for securing the guy wires and the mast itself must be concreted. As guy wires, you can use steel or galvanized cable 6-8 mm thick.
Mast braces will give the wind generator additional stability and reduce the costs associated with constructing a massive foundation; their cost is much lower than other types of masts, but additional space is required for bracing
Step #3 - re-equipment of the car generator
The modification consists only of rewinding the stator wire, as well as manufacturing a rotor with neodymium magnets. First you need to drill the holes necessary to fix the magnets in the rotor poles.
The installation of magnets is carried out with alternating poles. Upon completion of the work, the intermagnetic voids must be filled with epoxy resin, and the rotor itself must be wrapped in paper.
When rewinding the coil, you need to take into account that the efficiency of the generator will depend on the number of turns. The coil must be wound in a three-phase circuit in one direction.
The finished generator needs to be tested; the result of correctly performed work will be a reading of 30 V at 300 rpm of the generator.
The converted generator is ready for rated voltage testing before the final installation of the entire low-speed wind turbine system
Step #4 - completing the assembly of the low-speed wind generator
The rotating axis of the generator is made of a pipe with two bearings mounted, and the tail part is cut out of galvanized iron 1.2 mm thick.
Before attaching the generator to the mast, it is necessary to make a frame; a profile pipe is best suited for this. When performing fastening, it is necessary to take into account that the minimum distance from the mast to the blade must be more than 0.25 m.
Under the influence of the wind flow, the blades and rotor move, resulting in rotation of the gearbox and generating electrical energy
To operate the system, you need to install a charge controller, batteries, and an inverter after the wind generator.
The battery capacity is determined by the power of the wind generator. This indicator depends on the size of the wind wheel, the number of blades and wind speed.
Myths and reality
Modern science has been able to prove the presence of its own electromagnetic field around the planet. It not only creates natural vibrations in the Earth's atmosphere, but is also designed to protect all of humanity from the effects of solar radiation, dust and other small particles that could come from space. From a theoretical point of view, if you place one electrode on the ground surface and raise the second one up 500 m, then the potential difference between them will be about 80 V. If you increase the distance proportionally to 1000 m, then the voltage level should double.
However, in practice, everything turns out far from so smoothly:
- Firstly , the electrodes must have a sufficiently large area, which is why they will have windage and difficulties will arise with their mass and fixation at height.
- Secondly, the electromagnetic state of the earth's field is not constant, so it largely depends on various factors and its distribution in space is also uneven.
- Thirdly, the upper electrode will be the main candidate for attracting discharges of atmospheric electricity, which will lead to overvoltage in the generator.
Nevertheless, certain experiments in obtaining free electricity still exist, but their practical implementation is more experimental than substantive in nature.
Why save energy?
If saving money on electricity bills is not a strong incentive for you, then look at the problem differently. Electricity is produced by thermal power plants, which daily emit many harmful substances into the atmosphere by burning natural fuels: coal, oil and gas. Environmental pollution leads to global warming and, as a result, natural disasters. Efficient use of electricity will help preserve nature. If every person consciously addresses environmental issues, we can save the planet for our children. We bring to your attention the best ways to effectively save energy at home.
What can you try?
But you should be careful, since some of the proposed options are created solely as commercial advertising and are not useful even from a theoretical point of view. Such methods are intended to sell non-working devices to gullible applicants for free voltage.
However, there are experiments that make it possible to extract electricity, albeit at a relatively low voltage. Among the existing methods of generating electricity from the ground, we will consider several truly working options.
Scheme according to Belousov
The name of the method comes from the name of the scientist who proposed this method of generating electricity from the earth. For this, double passive grounding without any activators, two capacitors and inductors are used. Belousov's scheme is shown in the figure below:
Rice. 1. Scheme for generating electricity according to Belousov
The extraction of electricity from the ground will occur according to the following principle:
- High-frequency discharges present in the soil are constantly passed through a circuit of two groundings. But they will be filtered out by the inductive component of the first coil of the Tr.1 circuit.
- The capacitors in the circuit are connected by positive plates to each other; it is important to follow this sequence, otherwise the accumulation of electricity, as in a single capacitance, will not occur.
- A light bulb is connected to the second coil, which, if electricity is available, will show that you have managed to generate current. This is a kind of load that you can replace with any device.
Basic Saving Rules
Economy lamp. Photo by OZON
The main rules for saving electricity:
- Replacing incandescent lamps with modern LED lamps. They consume several times less electricity.
- It is important to turn off the TV and other household appliances when no one is using them.
- Large chandeliers should be replaced with spotlights and small lamps.
- Before leaving home, you need to turn off the lights in all rooms.
- Extension cords should only be used when absolutely necessary, as they increase energy consumption.
- Household appliances consume a little electricity in standby mode, but this also needs to be taken into account.
- The washing machine must be loaded in accordance with the manufacturer's instructions. Overload leads to high energy consumption.
- Insulating windows and floors will help you save on the use of heaters.
Options for autonomous garage lighting
As already mentioned, the best choice for any garage structures will be LEDs. They have a lot of advantages, among which the following points should be highlighted:
- creating uniform and bright lighting;
- in terms of glow intensity, such a lamp creates a luminous flux that is equal to daylight;
- economical consumption of electricity;
- such lighting devices can be powered from various devices (for example, from a battery) in a situation where there is no source of electricity.
LED Garage Lighting
Most often, 12-volt LED strips are used to illuminate garage spaces. With its help, you can create general lighting by running a ribbon around the perimeter of the structure. In such a situation, the light emanating from the tape will fall evenly. Using an LED strip, you can also create local illumination of shelves and racks, as well as an inspection pit.
Note! To illuminate the inspection pit, a lamp or LED strip must be purchased with a high moisture resistance class. This is due to the fact that there is always high humidity here due to poor ventilation and lack of heating.
The same conditions and requirements are typical for the basement. In this regard, the lighting installation that will be used here should not have a power higher than 12 volts. You need to remember that in certain places in the garage you need to install a waterproof lamp, both when creating autonomous lighting and when electricity is available.
Popular sources of renewable energy
“Green technologies” will significantly reduce household costs through the use of practically free sources.
Since ancient times, people have used mechanisms and devices in everyday life, the action of which was aimed at converting the forces of nature into mechanical energy. A striking example of this are water mills and windmills.
With the advent of electricity, the presence of a generator made it possible to convert mechanical energy into electrical energy.
The water mill is the predecessor of the automatic pump, which does not require the presence of a person to perform the work. The wheel rotates spontaneously under the pressure of water and independently draws water
Today, a significant amount of energy is generated precisely by wind complexes and hydroelectric power plants. In addition to wind and water, people have access to such sources as biofuels, the energy of the earth's interior, sunlight, the energy of geysers and volcanoes, and the power of tides.
The following devices are widely used in everyday life to generate renewable energy:
- Solar panels.
- Heat pumps.
- Wind generators for home.
The high cost of both the devices themselves and installation work stops many people from receiving seemingly free energy.
Payback can reach 15-20 years, but this is not a reason to deprive yourself of economic prospects. All these devices can be made and installed independently.
When choosing a source of alternative energy, you need to focus on its availability, then maximum power will be achieved with a minimum of investments
Autonomous garage lighting and methods for its implementation
In a garage, autonomous lighting is necessary in a situation where there is no electricity in the area or there are frequent interruptions. Therefore, to ensure that there is always light in the garage, many car owners install autonomous lighting.
Note! In the garage, you can organize two types of lighting: from a 220-volt power supply and autonomous lighting. In this case, autonomous lighting in this situation will already be called emergency lighting. But this approach is relevant only when the main lighting has already been done earlier, and problems with it appeared relatively recently.
Garage lighting
Today there are many ways to make autonomous garage lighting with your own hands. The most popular among car owners are the following ways to organize light in a garage without electricity:
- placement of solar panels;
- installation of a wind generator;
- purchase of a gasoline generator;
- battery usage;
- garden lamp;
- Philippine lantern.
For a better understanding, let's look at each lighting method in more detail.
Lighting with solar panels
Today, many people install solar panels in their private homes and even apartments. With their help, you can not only save on electricity, but also illuminate a garage that does not have electricity.
Garage lighting with solar panels
Despite the popularity of this lighting method, it is unlikely to be suitable for a garage for the following reasons:
- the cost of one solar battery and its connection will cost a significant amount;
- It is unlikely that you will be able to install such a system yourself without the help of specialists;
- complexity of the system for connecting lighting devices and batteries to storage equipment (batteries).
But by spending once on the purchase and installation of solar panels, you will not only receive high-quality autonomous lighting for any room, including the garage, but you will also be able to sell the excess electricity that has accumulated to the state. A 12-volt lamp can be powered from such a system. Moreover, their number can reach several pieces, which is just suitable for a given room. If there is a need for a voltage of 220 volts, then this system needs a 12 volt converter or inverter.
Selection of the optimal system
Now a little about which system is better to use in different cases.
At a summer cottage or country house, you can use any autonomous energy supply. Everything depends on climatic conditions.
In the southern regions, where there are many sunny days a year, it is preferable to use a solar energy supply system, while in the northern regions it is preferable to use a wind power system.
In this case, it is better to immediately make a combined system so that there is a backup power source, and fuel-powered installations are excellent for this.
As for urban conditions, only solar and wind systems are suitable for autonomous energy supply to an apartment, the main elements of which (panels, wind turbines) can be installed on the roof of the building.
Other autonomous systems cannot be used in apartment conditions.
Important to know: Rules for installing electrical wiring in a wooden house.
Lighting using a wind generator
For autonomous lighting of the garage, you can use a homemade wind generator. Such a windmill will also generate free electricity, which can be used to power a 12-volt lamp.
Note! You can either make a windmill yourself or buy a ready-made device. However, a purchased wind generator will cost a pretty penny.
Homemade wind generator
When creating this type of lighting, wind speed must be taken into account. In a situation where strong winds are rare in the area of residence, then this method of lighting will be ineffective. Here, all the costs that went into installing a wind generator will not pay off.
How to save electricity when heating water
The boiler not only heats the water, but also maintains its temperature at the same level all day. If you do not control the consumption of hot water, then you will have to pay a significant amount to heat it at the end of the month.
How to save hot water:
- Do not set the temperature on the boiler too high, this way you can reduce the energy consumption for heating water during the day.
- Good thermal insulation of the boiler will help keep the water hot for a long time without additional heating.
- If you take a shower instead of a bath, you can reduce your water consumption by three times. This is provided that you spend no more than 20 minutes in the shower.
- It is more economical to wash dishes once a day. But if you don't like the mess, wash your plates with hot water in a bowl and then rinse them with cold running water.
Lighting using a gasoline generator
Instead of a wind generator, you can use a gasoline or diesel generator to create autonomous garage lighting.
Gasoline generator
It is rational to use a gasoline generator only when problems with electricity are rare and the lights are turned off for a short period of time. It is also rational to purchase it if you often use power tools in the garage.
Rechargeable batteries and their applications
Another way to create autonomous lighting in a garage building is to connect the lamps to a battery. The battery can power a 12 volt lamp.
Car battery
When the lights are turned off, such a lighting device (rated at 12 volts) can work for 10 hours. Of course, if the battery was fully charged before. You can use a spare car battery to illuminate your garage. With its help, it is best to power an LED strip that can be run around the entire perimeter of the premises.
Features of electrical installation
If everything is more or less clear with the sources, we move on to the rules for arranging the electrical network itself:
Electrical panel installation
- The installation of wiring and electrical appliances in a country house can be done with your own hands, but it is better to entrust the connection to the main line or generator to specialist electricians.
- We must install a sign with a meter at the entrance to the house. We also connect each branch of wires to the panel through an RCD - an automatic circuit breaker. The use of such fuses can protect the system from voltage surges and short circuits.
Advice! If you are often away, then it makes sense to set up remote switching on of electricity at your dacha. To do this, we install a special module with a GSM receiver in the panel, which activates the entire system based on a signal from a mobile phone. It is especially convenient to use such a controlled unit in winter: by the time you arrive, the heating devices will have time to warm up the air.
To protect against fire, we lay wires in non-flammable channels
- When using generators, you need to carefully calculate the power of all devices connected to the network. For example, heating a country house with electricity may require the installation of a separate generating unit, otherwise in the fall and winter we will have to choose: either our batteries work or the light bulbs shine.
- Country houses made from block containers, frame structures and log buildings are highly flammable. To reduce the risk of fire, all wiring should be laid in non-flammable, preferably metal, boxes.
Proper grounding is one of the safety conditions
- It is also highly desirable to ground the wires. To do this, we connect each branch of the system to a grounding circuit brought out. The circuit most often consists of a triangle of steel or copper-plated rods dug into the ground and connected to the house electrical network by a conductive cable.