Tile has been and remains one of the most popular finishing materials, especially in certain rooms and areas. This coating impresses with its reliability, durability and high decorativeness, however, over time, even the most attractive materials become boring. And if repainting the walls or re-sticking the familiar wallpaper is not particularly difficult, the process of dismantling and replacing the tiles is complex, labor-intensive, and expensive. In a situation where you want to freshen up the room, but there is no desire to undertake a major renovation, and you can’t get by with cosmetic tiles, special stickers will help out. These beautiful tile stickers are a great opportunity to diversify your interior with minimal investment.
Self-adhesive film
Self-adhesive is an excellent alternative to traditional ceramic finishing of the space above the work surface.
The films are based on polyvinyl chloride or thermoplastic polyester and foil. The material does not allow moisture to pass through, does not deform during washing, and copes well with heating up to almost 200 degrees. Anti-vandal film is easy to use; no special skills are required for gluing. The back surface of the sheet usually has a grid line along which it is convenient to measure the desired size.
The main advantage of PVC film is the unlimited choice of prints. It can imitate wood, ceramics, natural stone, be plain or multi-colored, with shiny embossing or with discreet floral patterns.
Glue the oilcloth with wallpaper glue. Procedure for installing oilcloth
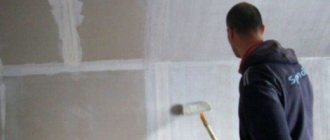
First of all, it is advisable to calculate the required amount of material. To do this, it would be correct to take measurements of the room or kitchen area, depending on your goals. Measure the length, width and height and subtract the area of the room using the formula. You can also give the dimensions to the seller and he will calculate the area of your premises. And there is no need to even say that the coating with a pattern must be purchased with a reserve, because you will be gluing the oilcloth with a selection. Next you need to prepare your walls. You need to remove the old coating (paint, wallpaper, etc.), clean it from dirt and dust, wash off the dirt, and so on. It goes without saying that at the end of the procedure the walls must be thoroughly dried. Purchase oilcloth of the required size and quantity from a hardware store, and don’t forget about glue. Of course, we all know very well that PVA glue and Bustilat are used to glue the coating. Please note that they are diluted with water, so they do not leave stains when they dry. Everyone knows that excess glue can simply be removed with an ordinary rag. Do not use expired glue, check the date of manufacture of the glue with the date of gluing. According to the description on the package, you need to prepare glue. The material is cut into the required strips, adjusted according to the ornament and design. And it doesn’t even need to be said that the strips are carefully coated with glue - with a brush or roller, so that bubbles do not appear later. Undoubtedly, it is worth mentioning that the glue is first applied to the wall, allowed to dry slightly and again smeared with a second layer. The strip is glued to the surface, proceeding in the same way as with wallpaper: press the canvas from the center to the edges, smoothing the oilcloth over the surface, thereby expelling the air. The next sheet of oilcloth must be glued with a slight overlap. The joints are painstakingly rolled with a special wallpaper barrel so that they are not visible. If the pasting is done on chalk whitewash, then you should first treat the wall with glue so that when the whitewash dries, it does not move away from the plaster. Better yet, before gluing the oilcloth, wash off the whitewash and prime the walls. It is advisable to start gluing the oilcloth from the corner of the room, moving clockwise. After you have glued the sheets, you can glue the paper strips at the joints of the sheets with regular glue, and after they dry, wet them and peel them off
This is to seal your joining seams. If after you have finished the work, air bubbles suddenly form, then you need to carefully pierce them with a syringe, let a little glue in there and smooth them out.
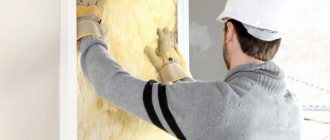
Fiberboard
Chipboard sheets are actively used in interior decoration due to their relative cheapness and functionality. Due to the aggressive effects of water and heat, not any type of fiberboard is suitable for the kitchen. It is better to give preference to super-hard and hard or refined type of slabs. They have the lowest rates of swelling from exposure to moisture.
Treated and laminated fibreboards are particularly decorative. A layer of dye or film is applied to the surface of the slabs, imitating the texture of natural materials, respectively. Such sheets are more resistant to abrasion and swelling during operation.
Pros of high-speed interior transformation
The original design tools in the form of amazing vinyl stickers for tiles, reminiscent of elegant decoupage, but unlike it, accessible to everyone, have already declared themselves quite authoritatively, thanks to a number of positive qualities:
- environmental Safety;
- extensive collections that allow you to select specific color and compositional motifs;
- resistance to moisture;
- preservation of sticker decor during significant temperature fluctuations;
- Duration of image brightness, practically not dimming from sunlight;
- simple application techniques;
- simple care, consisting of wiping the surface of the stickers with a soft cloth without aggressive or abrasive cleaning mixtures.
The financial availability of stickers provides a unique opportunity to update the kitchen interior as often as necessary. You can completely replace all stickers with new ones. If you have developed artistic thinking, you can quickly get an updated look by combining different sounding patterns, united by a single color background. In such a situation, only some stickers that have lost their original charm will need to be dismantled. They are removed by simply prying up one of the corners and carefully peeling off the entire image.
If necessary, you can use a regular household hairdryer, which allows you to warm up the sticker: after this procedure, it falls off the tile on its own, leaving no traces.
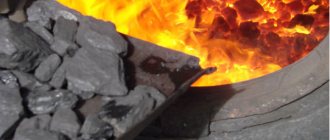
Graphite paint
In black and white or Scandinavian style kitchens, slate backsplashes look harmonious. Waterproof paint is applied to degreased and primed plywood in several layers. After drying, the surface has a slightly rough, matte texture. In addition to the usual black color, you can look for deep green, blue, brown, etc. Chalk lays softly on a painted surface and is easily washed off with a damp cloth.
A slate apron is perfect for writing a grocery list or your favorite recipes. Kitchen-themed drawings and wishes for household members, made in original fonts, look interesting.
Technology of pasting furniture with polymer films
If you decide to update your kitchen furniture using self-adhesive film, then first prepare the base. It should be understood that the decorative covering will not hide potholes and bumps, it will only disguise the stains, so all unevenness must be removed before pasting. A video with tips will simplify the workflow.
12 rules for working with self-adhesive tape
- The fittings and doors must be removed, and each kitchen cabinet (facades and frame) must be inspected for the presence of depressions and bulges.
- If there are defects on the furniture, all irregularities are filled with putty and sanded well.
- To calculate material consumption, you will need measurements of all parts of the kitchen unit. You need to carefully measure all the parts that you plan to paste over.
- All dimensions are transferred to the back side of the film. It is usually made of white paper, on which the drawn lines are clearly visible.
- When cutting, you should always leave a margin of about 1 cm. This will help in your work: if you start gluing the vinyl at the wrong angle, the margin will make it possible to correct the situation. All excess is easily cut off with a breadboard knife.
- Decorative self-adhesive film is cut with a stationery knife, curved lines are cut out with scissors.
- Then you need to degrease all the surfaces to be decorated so that the “self-adhesive” does not come off over time. Window cleaning liquid or other products are suitable for this. Grease stains need to be treated especially carefully so that the decorative finish does not come off.
- Pasting of kitchen units is carried out on a dry and clean surface, otherwise the “self-adhesive” will begin to bubble and peel off from the base.
- The film must be applied evenly.
- The backing is removed in several stages: first, only a few centimeters are peeled off, after gluing them, a little more is removed, and so on until the entire panel covers the part to be decorated.
- Smooth out the plastic decor from the middle to the edges. Air bubbles must be removed during operation. It is convenient to work with a plastic scraper, stroking the surface with a soft cloth.
- Small air inclusions are removed with a needle. The finished part can be processed through the fabric with a warm iron.
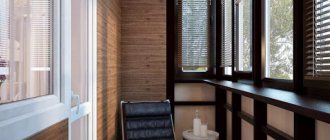
Lining
If the walls in the kitchen are decorated with clapboard, it can also be used to decorate the space above the work surface. A large selection of colors, ease of processing and installation allow it to fit into almost any interior. For a Scandinavian-style kitchen, white lining is suitable, for a chalet and Russian interior - a board of a natural wood shade.
The apron is easy to clean and is not afraid of moisture and heat. For a longer service life, the lining is coated with antiseptic impregnation and a layer of varnish.
General information
The oilcloth for the table is made from laminated protective transparent PVC film. Production - South Korea.
The product has a shiny laminated surface and reliably protects the table from any damage. The oilcloth structure is flexible and durable. It is tear-resistant, practically does not wrinkle and cannot be cut with a knife. Soft glass remains transparent for a long time and retains all its properties.
Thanks to the flexible tablecloth, wear and tear on the tabletop is reduced. Dust on the surface covered with a protective film is practically invisible, any dirt can be easily wiped off without scratching or staining the table material.
Flexible glass is intended for use:
- in any office;
- in the kitchen;
- in the dining room;
- in a restaurant (cafe).
Which table is it suitable for?
Protective film is suitable for all types of tables, but is especially relevant for glass and lacquered ones. The tablecloth protects the kitchen table from cuts, the desk from rubbing, and the dining table from accidental stains.
It can also be any table in shape:
- rectangular;
- square;
- round;
- oval;
- non-standard shape.
Main characteristics
Before purchasing the product, you must select the thickness:
- 1.2 mm is used to protect chests of drawers, window sills, children's and school tables;
- 1.8 mm is well suited for the kitchen (protection of tables and countertops), children's (protection of desks) and office (protection of tables and window sills);
- 2.2 mm is designed to protect large surfaces and helps emphasize the premium quality of the interior.
Liquid glass on the table has the following characteristics:
- Duration of operation - up to 5 years;
- transparency - 98%;
- hardness - 37;
- blue pigment that protects against yellowness;
- resistance to sunlight;
- food standard - the material is allowed for contact with food;
- synthetic smell - absent;
- There are no heavy metal impurities in the composition.
Advantages of flexible glass
Main advantages of the product:
- easy to trim after shrinkage;
- has a comfortable temperature range - from –20 to +80;
- merges with the surface;
- just spread out;
- does not slip, lies well under its own weight;
- greasy stains are not eaten away;
- any dirt is easily removed.
If you want, you can decorate the tablecloth. Any stickers can be easily attached to the silicone surface. You can also paint it with permanent paint, or attach fringe around the perimeter.
Washable wallpaper
Not the most practical, at first glance, but a budget-friendly and easy-to-implement way to decorate an apron is to use wallpaper. The work will only take a couple of hours, and the fresh look will last for a long time. The wallpaper used is the same as on the walls, or in harmony with them. In the first case, the kitchen space becomes visually larger, in the second, the apron can become a bright accent.
Non-woven or vinyl wallpaper that can be washed is suitable for the kitchen. It is better to avoid paper ones due to high humidity.
Installing a glass or acrylic screen on top of such wallpaper will significantly increase its service life, but will increase the cost of repairs several times. Another popular way to protect wallpaper from excess moisture is to run a row of tiles along the bottom of the apron.
Crosses - a guarantee of stability of the width of the seam between the tiles
These plastic elements come in different sizes. Professionals recommend using crosses with a thickness of about 2 mm under standard conditions. With this indicator, the seams are the most aesthetic. They are spacious enough to provide a setback without creating large gaps.
Crosses are the simplest tool needed when gluing tiles, so it doesn't matter who makes them. They are made of plastic under standard conditions, so they are not remarkable in anything special - you can choose any, taking into account the recommendations.
Sheet PVC panels
If the stove is placed on a kitchen island or a hob without a flame is built into the work surface, you can decorate the apron with sheet panels made of polyvinyl chloride. There are many texture and color options:
- Brick;
- A natural stone;
- Ceramic tile;
- Patchwork;
- Mosaic, etc.
With gentle washing and no contact with hot steam, the color and pattern of the panels will be preserved for many years.
The result is at your disposal
Now you can congratulate yourself on your new achievement - laying tiles yourself. If you follow these rules, the result will definitely be successful. It is important to show attentiveness, perseverance, accuracy and responsibility. And your loved ones will definitely rejoice at the results of your diligence.
Apron without finishing
The presence of modern hydrophobic impregnations allows you to leave a rough finish on the walls, including in the area of the kitchen apron. If brickwork or “rough” concrete fits harmoniously into the interior of the room, the wall is treated with a moisture-proof compound and coated with several layers of varnish.
Refined rough finishing is a signature feature of loft interiors. The more natural cracks and chips on the surface, the better. Coating with varnish makes the material dust-free and blocks pores from grease and moisture. After treatment, the apron can be washed in the same way as other materials.
Exposure to moisture, steam, grease and cleaning agents gradually renders plastic and oilcloths unusable. Despite all the advantages of inexpensive finishing materials for the kitchen, they will have to be changed every 2-3 years, even with careful use. This finishing option is ideal for renovating rented apartments or for those who cannot stand monotony.
Selecting and preparing glue - strictly according to the instructions
The adhesive composition must correspond to the work being carried out and the type of tile used. All this information is indicated on the packaging of each composition. Any consultant in the store can tell you what kind of glue is needed for your conditions.
To prepare the composition, it is necessary, again, to focus on the data indicated on the packaging. As a rule, cold water is poured into the container first, then glue is gradually added. The mixture must be stirred constantly until the consistency of thick sour cream is obtained. Doing this by hand is harder and of lower quality than using a drill with an attachment or a mixer directly. After cooking, you need to let it sit for a few minutes, then stir again.
Renewing seams
The seams between tiles often accumulate dirt faster than ceramics, become unsightly and can cause the spread of fungus in the room. This should be avoided at all costs, so it is not recommended to delay when renewing seams.
Rules for cleaning damaged seams
Regular care will help with minor damage. For this purpose, special detergents are used to restore the surface.
It is convenient to clean the space between the tiles with an old toothbrush; homemade recipes are also used for this: a paste with soda, vinegar and ammonia.
If the contaminants are absorbed too deeply, this procedure will not give a noticeable result. In this case, it is better to completely renew the grout.
Complete seam replacement
In order for the new layer of grout to stick properly, you must first remove the old one completely or partially. To do this, it is convenient to use a stationery or construction knife, sharply sharpened and with a narrow blade.
First you need to “cut” the seam in the middle, then cut out the old grout at an angle on each side.
Important: the whole process must be carried out slowly, so as not to accidentally scratch or damage the ceramic surface.
If necessary, unusable or weakly holding squares are also removed, which still need to be replaced (fixed) during the repair work.
After the entire space between the tiles has been cleaned, it is necessary to treat the surface with an antifungal compound. This will not only ensure the durability of the coating, but is also necessary for the further safe use of the premises.
The procedure for applying the grout joint:
- The surface to be treated must be thoroughly cleaned and dried.
- Dilute the grout for joints in the required proportions (according to the manufacturer’s recommendations); you can use ready-made paste.
- Using a wide spatula, apply the mixture to the space between the tiles, pressing slightly into the surface.
- Use a narrow rubber spatula to smooth out the seams.
- Wash off any remaining grout from the tiles with a damp sponge.
The seams should dry well under natural conditions. This usually takes from one to five days, after which the missing areas are corrected and the excess layer is removed with rolled sandpaper.
Read more about replacing seams in the article - Removing grout from tile seams at home
Toilet and bath stickers
This means, as mentioned above, the use of stickers is not limited to just pasting tiles into the bathroom. They look quite unusual on the toilet or on the bathtub itself. Well, if you take the topic of bathrooms seriously, you can’t take it at all, it’s quite sensitive.
Bathroom
It all depends on your mood, stickers can be replaced at least every month, this does not involve much expense or difficulty. They can be very easily removed from the tiles, and the remaining adhesive can be removed with a sponge and soapy water. Therefore, creating a unique interior is quite easy.
If there are small children in the house, then you can stick anti-slip stickers on the bottom of the bathtub so that the child feels confident. They come in different colors, shapes, with patterns of different animals. This will not only add a special touch to the interior of the bathtub, but will also bring specific benefits.
Toilet
Here the imagination tries its best, because this is one of the few places where you can funny play with the understanding of what is happening. For example, it would be very original to glue a snake trying to bite on the inside of the toilet.
This will be normal for you, but the new guest will certainly smile and remain in a great mood. You can stick a fish on the toilet, maybe even a gold one. During the time spent in the bathroom, she will definitely have time to fulfill your several wishes. It all depends on your imagination.
Colors
Apron stickers can be of any color , from bright saturated shades to black, white or gray.
- Stickers in the form of photo wallpapers that depict sea and mountain landscapes very Their bluish-blue color scheme gives the interior freshness and some coolness, which is especially important in the summer heat.
- Bright yellow, orange and red fruits or sunflowers, also often found on photo wallpaper stickers, on the contrary, will create a sunny summer atmosphere in the kitchen: their very appearance will make you feel warmer even on the most dank and slushy November day or a blizzard and frosty February day.
- Stickers in brownish-golden or beige colors help create an autumn mood and home comfort.
- Stickers made in greenish tones will create an upbeat spring mood, joyful and bright, like a clear April morning.
- Stickers in the form of dark silhouettes, pasted on a light surface, will give the kitchen a charming sophistication of retro style.
- But white stickers on the black surface of the apron will create a feeling of some mystery.
Advice! In order for the sticker to fit most organically into the overall design style of the kitchen, its color should be in harmony with the color of the apron and, if possible, be a shade close to it.
Pros and cons of bathroom tile stickers
Stickers for tiles are made of vinyl film, which is easy to adhere and is not affected by moisture. The advantage of such a film is its resistance to temperature changes. The stickers do not fade or lose their presentability for five years.
The only drawback of such stickers is that they cannot be used on rough surfaces. In this case, the sticker will quickly peel off.
This decorative element is easily applied to the tile; it can be easily re-glued to another place, or completely removed, without leaving any marks on the tile.
To use these stickers you need a flat surface.
With your own hands
The sticker can be made with your own hands. Self-adhesive film, which is sold in stores in a wide range, will come to the rescue. We cut out different figures from it (you can first draw them on paper and then cut them out according to the template). Here you have your homemade stickers ready. You can also involve children in this exciting activity.
Such stickers can represent a stone, brick, or shimmering surface. You just need to glue a special film on top of the ceramics. You can create a whole work from individual fragments: this panel will decorate your wall.
Restoration of facades with decorative film
The appearance of the kitchen largely depends on the cladding of the facades. If your kitchen has smooth doors without a relief made of chipboard, then they can be easily covered with vinyl film.
Updating kitchen MDF facades with convexes will be easier if you use an industrial hair dryer. Only a well-heated film can take the desired shape. If there are decorative details on the facades, they must be removed before pasting.
Replacement of the old film is carried out only after removing the previous layer. Remember that decorative film is only applied to prepared surfaces.
It should be taken into account that in production, MDF film facades pass through a special press, which makes it possible to obtain a smooth surface without flaws. At home, MDF can only be covered with self-adhesive.
Beautiful stickers for tiles
Stickers, thanks to their wonderful qualities, have managed to earn the love of home craftsmen. They can be glued to floor tiles for decoration or used as an anti-slip agent. For walls, stickers are used as interior decoration when highlighting a certain area.
Stickers designed for gluing to tiles have many advantages and wonderful properties. First of all, it is an opportunity to update the interior in any theme. The ability to frequently and quickly change the interior without wasting time. Possibility of quick dismantling without damaging the tile surface. It is possible to hide minor tile defects that have formed over time.
Moisture-resistant tile stickersIt can be:
- Chips;
- Cracks;
- spots;
- And pollution.
Using stickers, you can highlight a certain area and focus attention on certain areas of the room. Bright children's themed stickers can be used to develop and broaden the horizons of young children
The low cost of stickers makes it possible to widely use the product for various purposes.
Non-adhesive materials withstand sudden temperature changes well and are resistant to ultraviolet rays. During the entire period of operation, the stickers do not change their shape. You can apply stickers yourself without specific knowledge and skills. The material from which the stickers are made is completely safe for the environment and humans.
Types of stickers
Nowadays, it is not difficult to purchase vinyl stickers for decorating tiles; there is a large assortment of these products on sale, allowing you to realize any of your wildest ideas.
Stickers by type differ in the following parameters:
- size;
- color spectrum;
- material and production method;
- product quality;
- manufacturer;
- functional purpose;
- place of application;
- price range;
- complete set (one-piece image or consisting of individual elements).
Vinyl stickers on tiles will help update your interior
The most economical option is stickers made in China, although they are significantly inferior in quality to European manufacturers, whose products can be used for five years or more without losing their original quality.
What can be done
Adding new colors to the tiled mosaic is an excellent solution that can radically change the design of the kitchen. You can
improve the appearance of the backsplash in the kitchen and even transform it beyond recognition without changing the old tiles in different ways. The most accessible and popular of them:
- renewal of seams;
- painting;
- decoration with stickers;
- decoration with self-adhesive film;
- partial replacement of tiles.
Some of these methods require more costs and skills, others less. The choice of method depends on what result you want to get - completely transform the tiles in the kitchen or simply refresh it.
Important : Whatever method is chosen, before decorating the tiles, they must be thoroughly washed from dirt and degreased. Otherwise the work will fail.