Almost every home craftsman has encountered this type of work such as installing a floor. And this is not necessarily a house or apartment. There is a garage and outbuildings. Therefore, craftsmen know firsthand that the greatest labor intensity and serious financial expenses occur in screeding.
The correct choice of the method of leveling it will help to minimize the cost of laying the floor, i.e. type of screed. And it can be wet, semi-dry and dry. Those who hire professional builders for repair work also need such knowledge. Otherwise, the workers will do what is most profitable for them financially.
Construction sites missed this point - at the time of preparation of the article, there are no comprehensive works on the comparative analysis of types of screeds on the Internet. You have to look for which screed is better, semi-dry or wet, or maybe dry, on various forums. And there the reviews and comments are the most contradictory, even going so far as to deny semi-dry screed as a type - well, the solution, according to some commentators, cannot gain strength with such an amount of water.
The editors of the StroyGuru website decided to fill the gap and post on their pages a complete analysis of the strengths and weaknesses of each type of screed, compare their performance characteristics, and provide recommendations for use in various situations.
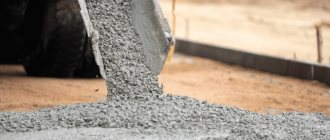
Why is concrete grouting required?
The technological operation of grouting allows for additional forced compaction of the upper layers of concrete.
Pouring a concrete floor is divided into several technological operations, the precise execution of which guarantees the developer the high quality of the resulting coating, regardless of whether this work is carried out using construction mechanisms over large areas or with one’s own hands in small volumes.
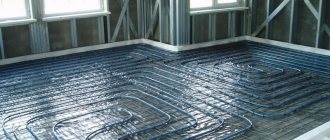
We will assume that the required layer of concrete of the required grade has been applied to a well-prepared base. Now, using various manual rules or a leveling vibration machine, the concrete layer is evenly distributed over the floor surface. At this time, heavier particles of crushed stone and sand tend to sink into the lower layers of concrete, squeezing smaller particles of sand and cement laitance onto the surface, which reduces the strength characteristics of the finished concrete screed. Instead of dried moisture, voids and unevenness remain, giving the surface an unattractive appearance.
In addition to external cavities, microvoids are formed in the upper layer of concrete, reducing the adhesion strength of the filler particles to each other and, as a consequence, leading to the detachment of the upper layers from the base during operation with the formation of quite deep potholes. As a result, the concrete floor will require expensive repair work, which in most cases does not fully restore the uniformity and strength of the coating.
To mitigate these shortcomings, a complex technological operation requiring highly qualified workers is performed - grouting the concrete floor surface with the possibility of using additional reinforcing components.
The technological operation of grouting allows for additional forced compaction of the upper layers of concrete, which has a positive effect on the strength and wear resistance of the coating. Special grouting mixtures called troppings are used as strengthening additives.
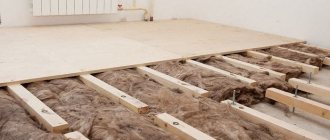
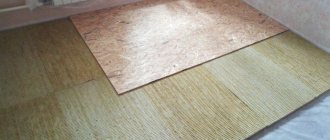
Preliminary preparation of the subfloor
Before pouring self-leveling floors, prepare the base for the floor step by step:
- Work begins by removing the old flooring along with the baseboards.
- Clean the surface from oil stains and dust.
- The coating that peels off is completely removed.
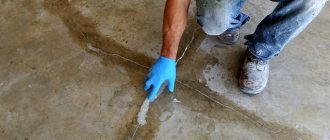
- Cracks and potholes are sealed with mortar. This is done at least a day before the start of work on the floor.
Before creating a self-leveling floor covering, tools and equipment are selected.
Concrete Grouting Operations
Grouting a concrete screed is divided into several technological operations:
- Rough grouting, during which the cement laitance is squeezed out and the top layer of concrete is pre-compacted;
- Final grouting of the screed;
- Surface treatment with a liquid polymer that seals the smallest pores;
- Cutting expansion joints.
You can try to perform all these operations (see video) with your own hands, but only qualified personnel are able to correctly determine the moment of the beginning and end of each technological operation.
Technology for laying concrete floor screed
Cement stone hydration process
To find out the drying time of the floor screed before facing with decorative materials, you need to clearly understand what processes occur inside the concrete. The main nuances of hydration (formation of high-strength cement stone in a poured volume) are:
- hardening is impossible without a sufficient amount of water, at the same time, 20% of the liquid by weight of dry cement is enough for hydration;
- first, needle-shaped crystals (aluminate structure) are formed in concrete, clinker minerals C2S, C3S (silicate structure) are formed between them;
- then the clinkers are strengthened, on the second day they displace aluminates, on the 28th day the structure consists of 90% silicates;
- It is this time that is considered to be the set of strength of cement stone; its further strengthening lasts for decades.
- the rate of hydration depends on the presence of additives, air temperature, water-cement ratio W/C, cement grinding and the mineral composition of the clinker included in its composition
Necessary equipment
An example of a trowel with blades
To carry out high-quality troweling of a concrete floor, special construction machines and mechanisms are used:
- Rotary disc trowels with electric or gasoline drive;
- Bladed rotor units, called helicopters due to the external resemblance of the working mechanism to propeller blades;
- Manual or automated machines for uniform application of strengthening mixtures to the surface of semi-dry concrete screed;
- Metal trowels for removing possible defects, checking the quality of grout and performing troweling work manually in areas adjacent to columns and wall structures where the use of mechanisms is impossible.
Trowels can be single- or double-rotor; as a rule, they allow you to work with both a disk and blades after simple adjustments, which allows you to use one unit to perform all technological operations.
Mechanical dispenser for applying dry grout mixture to the floor surface.
The differences in the characteristics of helicopter operation are shown in the video, where it is clearly visible that the movement of the unit along the floor surface can vary depending on the angle of the control handle or the position of the control levers of the two-rotor unit. In both cases, highly qualified personnel are required to perform the work efficiently and safely. Having some skills in working with troweling units, you can do the grouting yourself, using single-rotor machines with a disk no larger than 600 mm.
On areas of approximately 20-25 sq. m. you can do the grouting yourself without the use of mechanisms with an average surface quality acceptable for installing floors in a garage, utility room or screed for laying tile finishing materials.
Floor screed
Hi all! The question is this: due to limited funds, we cannot screed the floor in the entire square. Is it possible to do it partially, or is it better to do it completely, and let the family “tighten their belt”?
Masters online: 109 Orders per week: 1,581 Offers per day: 758
You can do it in parts, but it’s better to do it all at once. avoid excess dirt and other hemorrhoids.
Ekaterina, the screed can be done completely throughout the entire room (this will make it possible to solve the issue of “unevenness” and differences once and for all), but if you partially level the floor - without violating the technology of working with the material and determine the thickness of the layer to create an overall “ 0", then there will be no difficulties either. Everything depends on the differences and curvature, since if the situation is critical, then for some time the leveled zones will differ from those where work has not yet been carried out.
Take expanded clay as a filler and use it throughout the apartment.
It’s better to tighten the belt) than to stir up the dirt many times and buy material. done the job - go for a walk, you know it yourself
Can be done room by room.
possible. The joints of the connections need to be primed thoroughly.
The question is irrelevant! Just do it right away - you will hide the tubes with wires there, then it will be very dusty, and the furniture will get in the way. Of course, consider the layout options.
It’s possible in parts, but it’s better all at once, it all depends on the specific case, to save money you can resort to small tricks, if you’re interested, knock on PM, I’ll tell you
Make a dry screed with GVL Knauf 20 mm. For an apartment of 80 m2 with a difference of 30 mm and a minimum layer of 20 mm, approximately 45,000 rubles are needed for the material.
You can, of course, just lay a damper tape in the doorway, and when you decide to continue, cover the joint with molding. Although of course this may create some inconvenience in the form of a step, it all depends on the level of the new screed.
It is possible partially. The main thing in this matter is to take the floor point of the corridor on the landing as a mark for the finished floor. then for the next rooms are again tied to this point.
Partially possible. Expansion joints are specially made for large areas. Here is the answer
Everything is done partially according to the beacons and then with the finishing mixture
Installation of PVC windows- Covering the drain hole with your own hands
- How to lay flexible tiles on the roof?
definitely better completely
Why did you decide to make a screed, what will be the covering then? You need to check the difference in the floor (min. 0 and max.), take into account the difference in floor coverings (thickness), etc. You can do it step by step, but live in dust, moisture and Discomfort. But using only the Internet advice and having no skills, money and nerves are in the wind.
It’s good to do everything at once, of course, but it’s not necessary.
JACK OF ALL TRADES - drill, nail, replace, assemble, install, change, etc. Call. I'm waiting for your call.
It is possible separately, because Make technological gaps anyway. Good luck!
How to properly lay a vapor barrier on the ceiling?- Is it possible to glue wallpaper on whitewashed walls?
- Imitation of a brick wall made of gypsum plaster
better to do it completely
You can partially make a screed, find the highest point in your apartment and then it will be clear how much you need to raise at the bottom (for 1 square meter, a 50 kg bag will give approximately a 3 cm layer)
It can be done partially, having first set the level in the entire apartment, so that in the future the floor level will be the same everywhere.
They don’t stop halfway; it’s better to choose the shorter path from the beginning.
Rough grout
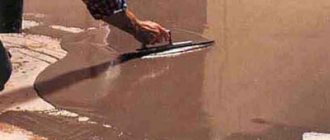
Rough grouting of the poured floor begins after the concrete screed has gained initial strength and the excess moisture that has accumulated on its surface after vibration treatment has dried. Depending on the quality of the concrete, the underlying surface and the outside temperature, the technological pause between leveling and grouting can range from 1 to 15 hours. During this time, the concrete “sets” and acquires strength, at which a person stepping on the surface weighing 65-80 kg leaves a mark 2-3 mm deep. In this case, the main part of the surface should be semi-dry with the possible presence of puddles of water, and the cement laitance should be easily displaced when moving the trowel without pressure.
Machine with disc trowel for roughing
Rough grouting is performed in two passes in a direction perpendicular to each other using a trowel disk. When carrying out work, it should be taken into account that the parts of the screed adjacent to the walls or columns harden faster. The joints are grouted using edge trowelling machines. Work must be carried out quickly to keep the surface semi-dry to provide sufficient moisture necessary to moisten the cement hardening mixture.
Using a special machine, similar to a small seeder, consisting of a hopper for the mixture, a loosening auger and a dosing device, the reinforcing mixture is uniformly applied. When using the unit, tropping is evenly applied to the surface, thereby achieving high quality of the resulting coating. When doing DIY work in small areas, tropping can be applied using a suitable sieve, distributing the mixture evenly over the surface.
Cost of concrete floor screed per m2
After distributing the tropping, a second rough grouting is carried out using a trowel disk. The signal to begin work is the impregnation of the strengthening mixture with moisture taken from the concrete with darkening of the scattered material. Why is it important not to overdry the concrete so that the surface is semi-dry?
Important! The technological map and instructions of the manufacturer of the strengthening mixtures directly indicate that it is prohibited to pour water on tropping applied to semi-dry concrete!
Tools
To create a self-leveling floor, the following tools are required:
- Containers for stirring mixtures and water.
- Construction mixer, electric drill with attachment.
- Putty knife.
- Raklya.
Roller, paint shoes
- Use a needle roller to remove air from the solution.
- Special shoes with spikes for walking on mortar.
- Typically, building level.
- Electronic humidity meter.
- Primer roller.
After preparing the tools, materials, and base for work, the pouring of the self-leveling floor begins.
Finish grout
Finishing grouting with a blade machine
The finishing grouting of the screed, as shown in the video above, is carried out by a helicopter with installed metal blades, which ensure optimal compaction of the surface without destroying the top layer of concrete.
The angle of installation of the blades increases from 5-10 mm during the first and second passes to 20-25 mm for the next two or three passes. Gradually the grouting speed increases.
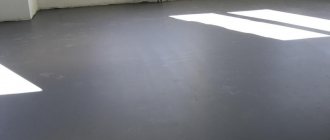
It should be noted that it is impossible to perform high-quality finishing of the surface with your own hands using hand tools, so the use of troweling units is mandatory. High-quality concrete has a flat, smooth, almost glossy surface, as shown in the video above.
How to cook
To get one cubic meter of M150 CP solution you need: Mix 380 kilograms of M400 cement with 260 liters of water and 1.5 tons of clean sand.
- The proportionality of such a solution is for 1 unit of cement you need 0.7 parts water and 4 parts sand.
- Or, for 1 unit of water, you need 1.5 parts of cement and 5-6 parts of sand.
- Solutions TsPS M 100 and M200
- strength class B-7.5, (load up to 100 kgf/cm 2);
- F50 frost resistance.
- W2 waterproof
- strength class B-10, (load up to 130 kgf/cm2);
- F50 frost resistance.
- W2 waterproof.
Note
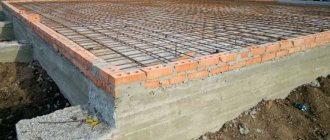
The data given in the regulatory documents apply to solutions of the so-called design period (age). For CPS this is 28 days. I also draw your attention to the fact that the standard strength of the underlying concrete layer for the DSP screed should not be less than B22.5. Everything is according to SNiP.
Additional processing
For additional protection of the floor surface from moisture, special polymer impregnating compounds are applied to the concrete surface. Impregnation clogs the smallest pores, binds microscopic particles of the top layer, which protects the concrete from dust and accidentally spilled aggressive liquids. Impregnation can be easily done with your own hands using a velor roller or brush, as shown in the video.
After completing all of the above technological operations, all that remains is to cut the expansion joints and seal them with special sealing materials. A high-quality concrete floor that can withstand significant loads is ready for use.
The ratio of components in cement-sand screeds
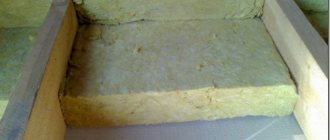
For the construction of screeds up to 50 mm thick, only cement-sand mortars or materials with granotsiev, in which the grain size does not exceed 7 mm, are used. The proportions of the components depend on the brand of binder and the required brand of the finished solution. If the screed is laid in a room with low traffic, then it is enough to make a cement-sand mortar of grade M100 (strength class B 7.5). If increased loads on the floor are planned, then it is recommended to use a material of a higher grade M150 (B10, B12.5). In addition, high-quality solutions quickly gain strength sufficient for finishing work.
Table of consumption of cement and other components of cement-sand mortars for screeds
Brand of cement-sand mortar, C:P (by weight)
| M100 | M150 | |
| 400 | 1:4,5 | 1:3 |
| 500 | 1:5,5 | 1:4 |
When drying, the cement-sand screed, even if the technological rules for pouring and maintenance are followed, can become covered with cracks. To reduce the likelihood of their occurrence, fiber is added to the solution. In residential areas with low and medium traffic, polypropylene fibers are used. They not only prevent the formation of cracks, but also increase the wear resistance of the surface. Fiber additives are recommended for screeds under soft finishing floor coverings such as linoleum and PVC tiles. Approximately 300 g of fiber fibers are added to 1 m 3 of the mixture intended for floors with low traffic. When making a solution with fiber, the dry components (cement, sand, fiber fibers) are usually first mixed, and then water is added to the mixture.
Types of strength characteristics
| Compressive strength | The main characteristic for cement screeds is directly related to the brand of screed |
| Tensile strength | Required when working on wooden substrates or when laying parquet |
| Tensile strength | Required for a given value of adhesion, peel load |
| Flexural strength | Required when working on flexible ones. movable bases |
| Shear strength | Required for high shear loads (forklift braking) |
Scope of application
Leveling the concrete screed is necessary when pouring cement mortar into the screed:
in parking lots; in warehouses, hangars, production workshops; in shopping centers; inside social facilities and public places; in industrial buildings; in areas with high vibration exposure; in places where heavy vehicles are stored.
However, it is not recommended to trowel concrete in:
residential and domestic premises; premises where aggressive chemicals are stored; laboratories; premises where sterility is required.
metal corner for wall mounting
Advantages and disadvantages of the method
Among the strengths of concrete grouting, experts name:
the resulting dust-free and smooth coating; a smooth surface of the screed; increased resistance of concrete to oil and gasoline; faster installation of the screed; savings on finishing; the ability to choose any color from a palette of shades; low price.
Even this modern method of installing a cement screed has disadvantages. These include:
- Unpredictable behavior of the concrete coating after work. Possibility of grouting only the raw surface. High complexity of the work, requiring professional skills and abilities. Expensive materials for strengthening concrete and the need to have professional equipment.
Manually
When grouting manually, you will need the following tools:
- Trowel is a type of trowel made of polished steel with a curved handle (can be replaced with a regular spatula). The length of an ordinary trowel does not exceed 22 cm, and the width is 17 cm. The length of the handle varies from 10 to 15 cm. A metal or polyurethane trowel. A rectangular tool with a wooden handle that looks like a plane. Its parameters: 12 by 16 cm. Grater. Narrower than a traditional grater (width is only 5 cm), but longer (20 cm). Container on wheels for even distribution of topping. Board to protect knees.
The procedure for performing manual processing is similar. However, it is worth considering the following features:
It is recommended to apply topping to the surface using a construction sieve, distributing the dry mixture more evenly than mechanically. Instead of a sealing mixture, dry cement or its mixture with sand in equal parts is often used. The screed is grouted manually in a circular motion, working the entire surface until the concrete becomes dark gray, smooth and almost dry. When working, use a popliteal board - an ordinary wooden board - to minimize marks on the surface being treated. After rough processing and applying topping, the finishing stage begins when the compacting mixture on the screed acquires a dark color.
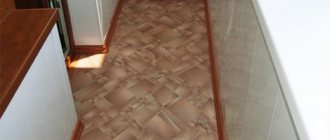
A properly grouted floor has a uniform color, dry surface and smoothness. If minor defects and irregularities remain, then these places on the screed are rubbed with fine sandpaper.
The concrete base is considered ready when the concrete is completely dry: after 5–7 days. However, walking on the surface without fear of leaving marks is allowed after only a day.