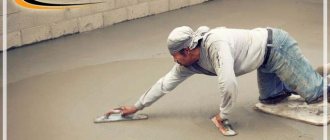
The most important stage in finishing any room is insulating the floors. Many people underestimate the amount of heat loss through the floor, but properly selected insulation can save up to 30% of energy on heating. Particularly large savings are achieved when using a heated floor system, which simply needs to be insulated from below so that it does not heat the floors or the ground.
Floor insulation thickness
Choosing the type of insulation that is best suited for your room is only half the battle. It is important that the insulation layer is of sufficient thickness, because even the best insulation will not provide sufficient thermal insulation if it is laid in too thin a layer. On the other hand, an excessively thick layer of insulation reduces the height of the ceilings in the room and is an unjustified waste of money.
Thermal conductivity of some insulation materials
It is important to understand that the required thickness of insulation depends on the climatic conditions in your area. It is obvious that when using the same insulation in houses of the same type in Sochi and Norilsk, completely different layer thicknesses will be required. Therefore, you need to take into account that all the recommendations in the article are given for the typical climate of central Russia, where the temperature in winter rarely drops below -25 degrees. If you live in a milder or more severe climate, then the recommendations need to be adjusted up or down.
Let's consider the main types of thermal insulation and the required layer thickness when used in various types of floors.
Calculation of insulation thickness for underfloor heating systems
We insulate a stone house
Many professionals and private craftsmen know how to build a warm house at the installation stage.
But we’ll look at how to make a house warmer during its actual use below. Note that a stone house can be insulated in three ways:
- Outside . It is considered the most optimal option, since it is convenient to carry out the work, and the walls are reliably protected from the formation of mold and mildew.
- Inside . This method wastes not only energy and time, but also the usable space of the room. Therefore, insulation from the inside is not as common as external insulation.
- In-wall insulation. This technology is only permissible at the stage of building a house, when expanded clay is poured between two walls, thereby forming the walls of the house like a pie.
We will look at the external insulation of a stone house.
The following materials can be used as insulation:
- Mineral wool in slabs;
- Extruded polystyrene;
- Polystyrene foam is common in slabs;
- Cork boards;
- Expanded clay;
- Warm plaster.
Work on insulating the walls of a brick house is carried out using the following technology:
- The walls of the building are completely cleaned of dust, dirt and debris. If cracks are found in the masonry, they should be covered with cement mixture.
- After this, the stone walls along with the plinth are primed in one or two passes with drying intervals.
- Now you can attach the insulating material to the walls. As a rule, this is mineral wool or polystyrene. The slabs are attached to the walls either with glue, placing it pointwise on a sheet of insulation, or with dowels. The slabs are placed close to each other in a checkerboard pattern (that is, tied like brickwork).
- Next, a reinforcing mesh is attached over the installed insulation, onto which decorative plaster is subsequently applied.
Floor insulation in a stone house
If you wish, you can also insulate the floors in a built stone house. Although it is best to do this at the stage of constructing the cottage.
To ensure high-quality floor insulation in a finished building, you will either have to raise the floor over a concrete screed on joists, which will take up some space in the room, or dismantle the old screed and install a new one with insulation.
- If the first option is chosen, you must first clean the floor from dust and dirt and prime it.
- After this, a layer of waterproofing material is laid on the floor, extending 10 cm onto the walls on each side.
- Wooden logs are laid on top in increments equal to the width of the insulating boards. If expanded clay is used as insulation, then the logs are laid in increments of about 70 cm.
- Insulation is installed between the laid joists and covered with a vapor barrier material towards the insulation with a vapor barrier edge.
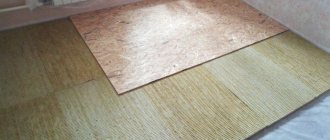
- All that remains is to lay down the plywood boards and lay the finishing flooring.
If you decide to dismantle the old screed, then it must be removed down to the ground. After this, a sand and gravel cushion is poured, which is well compacted. Waterproofing is laid over sand and crushed stone and everything is covered with expanded clay.
To form a new screed, you can use a dry mixture. It is distributed efficiently over the floor and forms a reliable foundation. All that remains is to cover the floor with plywood panels, placing them in a checkerboard pattern and leaving gaps between the joints for the natural expansion of the wood due to temperature changes.
As you can see, building a house with good insulation is both profitable and comfortable for all household members.
A cozy atmosphere in a house, for all its inhabitants, depends on various factors: quality, type of material used in the construction of walls, foundation, roof. The complexity of the structure itself also has some influence.
Required materials and tools
To insulate a floor with foam plastic, the following materials and tools are required (the list is universal, suitable for thermal insulation of both wooden and concrete floors):
- Styrofoam;
- well-dried timber for logs;
- OSB or GVL sheets for flooring on joists under MDF laminate, quartz vinyl laminate, parquet, ceramic tiles, porcelain tiles, etc.;
- wood screws 3-4 cm long;
- self-tapping dowel;
- U-shaped metal profile, studs or corners for connecting the joists to the concrete base;
- deep penetration primer;
- waterproofing material (polyethylene film, mastics, etc.);
- metallized tape;
- polyethylene film;
- perforator;
- screwdriver;
- jigsaw;
- roulette;
- knife with replaceable blades;
- level;
- marker;
- construction stapler.
How to calculate the thickness of insulation - methods and methods
A warm house is the dream of every owner; to achieve this goal, thick walls are built, heating is provided, and high-quality thermal insulation is installed. In order for insulation to be rational, it is necessary to choose the right material and correctly calculate its thickness.
What data is needed to calculate the thickness of the insulation?
The size of the insulation layer depends on the thermal resistance of the material. This indicator is the reciprocal of thermal conductivity. Each material - wood, metal, brick, foam plastic or mineral wool - has a certain ability to transfer thermal energy. The thermal conductivity coefficient is calculated during laboratory tests, and is indicated on the packaging for consumers.
If the material is purchased without labeling, you can find a summary table of indicators on the Internet.
The thermal resistance of a material is a constant value; it is defined as the ratio of the temperature difference at the edges of the insulation to the force of the heat flow passing through the material. Formula for calculating the coefficient: R=d/k, where d is the thickness of the material, k is the thermal conductivity. The higher the value obtained, the more effective the thermal insulation.
Why is it important to correctly calculate insulation indicators?
Thermal insulation is installed to reduce energy loss through the walls, floor and roof of a home. Insufficient insulation thickness will cause the dew point to move inside the building. This means the appearance of condensation, dampness and fungus on the walls of the house. An excess layer of thermal insulation does not significantly change temperature indicators, but requires significant financial costs, and is therefore irrational. This disrupts air circulation and natural ventilation between the rooms of the house and the atmosphere. To save money while ensuring optimal living conditions, an accurate calculation of the thickness of the insulation is required.
Calculation of the thermal insulation layer: formulas and examples
To be able to accurately calculate the amount of insulation, it is necessary to find the heat transfer resistance coefficient of all materials in a wall or other area of the house. It depends on the climatic indicators of the area, therefore it is calculated individually using the formula:
tв - indoor temperature indicator, usually 18-22ºC;
tot is the average temperature value;
zot — duration of the heating season, days.
Values for calculation can be found in SNiP 01/23/99.
When calculating the thermal resistance of a structure, it is necessary to add up the indicators of each layer: R=R1+R2+R3, etc. Based on the average indicators for private and multi-storey buildings, approximate values of the coefficients are determined:
The thickness of the insulation depends on the building material and its size; the lower the thermal resistance of the wall or roof, the larger the insulation layer should be.
Example: a wall made of sand-lime brick 0.5 m thick, which is insulated with foam plastic.
Rst.=0.5/0.7=0.71 - thermal resistance of the wall
R- Rst.=3.5-0.71=2.79 - value for foam plastic
Having all the data, you can calculate the required insulation layer using the formula: d=Rxk
For foam plastic, thermal conductivity k=0.038
d=2.79×0.038=0.10 m - foam boards 10 cm thick will be required
Using this algorithm, it is easy to calculate the optimal amount of thermal insulation for all areas of the house except the floor. When making calculations regarding base insulation, you must refer to the soil temperature table in your region of residence. It is from this that the data is taken to calculate the GSOP, and then the resistance of each layer and the required value of insulation are calculated.
Popular ways to insulate a home
Thermal insulation of a building can be carried out during the construction stage or after its completion. Among the popular methods:
- Monolithic wall of significant thickness (at least 40 cm) made of ceramic brick or wood.
- The construction of enclosing structures by well masonry is the creation of a cavity for insulation between two parts of the wall.
- Installation of external thermal insulation in the form of a multilayer structure made of insulation, lathing, moisture-proof film and decorative finishing.
Using ready-made formulas, you can calculate the optimal thickness of insulation without the help of a specialist. When calculating, the number should be rounded up; a small margin of the thermal insulation layer will be useful for temporary temperature drops below the average.
Expanded clay
Expanded clay
Expanded clay is a popular thermal insulation material used in wooden floors and floors with dry screed based on gypsum fiber board. In the latter case, in addition to thermal insulation, it is also a leveling material.
Expanded clay is one of the cheapest materials for thermal insulation; it does not burn, is safe for health and is lightweight. At the same time, it easily absorbs water, which reduces its thermal insulation properties and significantly increases its weight. Therefore, the use of expanded clay requires reliable waterproofing. Another disadvantage of expanded clay is that when working with it, a large amount of dust rises into the air.
Expanded clay as thermal insulation
In terms of thermal insulation properties, expanded clay is inferior to most synthetic materials, so it requires backfilling with a thicker layer, which reduces the height of the ceilings in the room.
Using expanded clay for insulation. The photo shows expanded clay being poured with lean concrete
For effective thermal insulation of the first floors of buildings from the ground, the expanded clay layer must be at least 400 mm when using wooden floors and 300 mm when using concrete floors.
Between the floors of private houses, at least 200 mm of expanded clay should be poured into the floors for wooden floors and 150 mm for concrete floors. In apartment buildings, a layer of expanded clay of 50-80 mm is sufficient.
| Indicators | 10-20 mm | 5-10 mm | 0-5 mm |
| Bulk density, kg/m3 | 280-370 | 300-400 | 500-700 |
| Crushing strength, N/mm2 (MPa) | 1-1,8 | 1,2-2 | 3-4 |
| Grading, % | 4 | 8 | 0 |
| Frost resistance 20 cycles, gravel weight loss, % | 0,4-2 | 0,2-1,2 | not regulated |
| Percentage of crushed particles, % | 3-10 | 3-10 | No |
| Thermal conductivity, W/m*K | 0,0912 | 0,0912 | 0,1099 |
| Water absorption, mm | 250 | 250 | 290 |
| Specific effective activity of natural radionuclides, Bq/kg | 270 | 270 | 290 |
How to calculate the amount of material
Warm air rises, so the roof must retain most of it - the insulation must be thicker.
Thermal insulation of the roof increases comfort and the microclimate in the room. Insulation also improves the thermal resistance of the structure and reduces heat losses. Thermal insulation does not heat the building, but only retains heat inside the house
Therefore, it is important to calculate how many layers of insulation are needed for the roof, what width is needed and what material to buy
All calculation work is carried out at the design stage. It is necessary to take into account the individual characteristics of the structure, climatic conditions, characteristics of the heat insulator and the purpose of the rooms. Calculations are made in advance taking into account the type of roof and its dimensions.
The roofing insulation is laid on the rafters. It is necessary to calculate how many slabs will be placed along and across the roof slope. To do this, it is necessary to take into account the distance between the rafters, the number of steps and the length of the slope.
An example of calculating the amount of mineral wool for a gable roof
The roof is symmetrical, the number of rafters is 7, the distance is 60 cm, the length of the slope is 5 m. Slabs with dimensions of 1.17 × 61 × 25 cm were chosen for installation. You can also take rolled mineral wool.
First of all, the number of slabs that will be laid in a row is determined. To do this, the length of the slope (5 m) is divided by 1.17 and the result is 4.27 pieces. This value is multiplied by step (7) and the result is 29.89 slabs per slope and 59.78 for the entire symmetrical roof. The result obtained is rounded up and a margin of 15-20% is added. As a result, the entire roof will require about 70 slabs.
Calculations
To achieve high-quality and effective heat retention and complete protection from the cold, you need to know how to calculate the thickness of the insulation. Such calculation of insulation thickness is carried out using existing formulas, which take into account:
- thermal conductivity;
- heat transfer resistance of the load-bearing wall;
- coefficient of thermal conductivity;
- coefficient of thermal homogeneity.
The listed characteristics are no less important at the moment when the foam thickness is calculated.
When determining the dimensions of the selected slab made from a particular material, it is worth considering that the thickness of each product allows the use of laying in 2 layers. After calculating the thermal insulation, you can be convinced that it is most convenient and profitable to use mineral wool slabs as insulation, and the thickness of such insulation should be from 10 to 14 cm.
Calculations are carried out using a specially created formula, and to obtain accurate data characterizing the heat insulator used, you need to take into account:
thermal conductivity coefficient of the load-bearing wall; if the wall is multi-layered, then it is important to take into account the thickness of its individual layer; thermal homogeneity coefficient; we are talking about the differences between brickwork and plaster; It is important to know the thickness of the load-bearing wall.
By multiplying the sum of all indicators by the thermal conductivity coefficient of the selected insulation, you can calculate the thickness of the heat insulator.
The choice of products sold on the construction market is based on these data.
It is equally important to decide on:
- where exactly the insulation will be placed; it can be the inner surface of the walls or the facade of the building;
- what material will be used as cladding; the façade of the building can be finished with facing bricks or decorative slabs;
- how many layers of thermal insulation will be used in the construction of the structure.
When choosing the thickness of the insulation, it is important to take into account the characteristics of the region in which the building is located. In the coldest regions, you will need material whose thickness reaches 14 cm, and in warm regions it is enough to install slabs 8-10 cm thick
The video shows the procedure for determining the thickness of the insulation:
Based on the results of the calculations, you can easily select the most suitable thermal insulation material, retain heat in the house and protect the walls of the building from destruction under the influence of negative, low temperatures.
Until the second half of the 20th century, few people were interested in environmental problems; only the energy crisis that broke out in the West in the 70s raised the question: how to save heat in the house without heating the street and without overpaying for energy.
There is a solution: insulating the walls, but how to determine what thickness of insulation for the walls should be so that the structure meets modern requirements for heat transfer resistance?
The effectiveness of insulation depends on the characteristics of the insulation and the method of insulation. There are several different methods that have their own advantages:
- Monolithic structure, can be made of wood or aerated concrete.
- A multilayer structure in which the insulation occupies an intermediate position between the outer and inner parts of the wall; in this case, at the construction stage, ring masonry is performed with simultaneous insulation.
- External insulation using a wet (plaster system) or dry (ventilated facade) method.
- Internal insulation, which is performed when it is impossible to insulate the wall from the outside for some reason.
To insulate already constructed and operating buildings, external insulation is used as the most effective way to reduce heat loss.
Selection of insulation material
When choosing a material for insulating the walls of a house, it is necessary to compare several options to ensure the most comfortable temperature conditions inside the building and save money on work and materials.
| Material | Foam plastic (expanded polystyrene) | Polyurethane foam | Basalt wool | Ecowool | Glass wool |
| Release form | Regular slabs, extruded | Spraying (foam mass) | Plates, mats | Scattering, spraying | Plates, rolls |
| Thermal conductivity coefficient depending on density | 0,030…0,050 | 0,041…0,020 | 0,032…0,050 | 0,037 | 0,042…0,07 |
| Installation method | On disc dowels, on glue | Spraying from a cylinder, requires limiters (open or closed cells) | Fastening with disc dowels, strips | In bulk, spraying on surfaces of any geometry. In the bulk method, it is placed between layers of building materials. | Disc dowels, special fasteners |
| Required surface finish (protection) | Plaster | Plaster, decorative cladding | Steam and waterproofing, any facade finishing | Mandatory sheathing or rough wall for exterior finishing | Under hard cladding (lathing, rough wall) |
| Water permeability, vapor permeability | Absent | Absent | Hygroscopic, loses properties when humidity increases | Hygroscopic, does not change thermal conductivity up to 20% humidity by volume | Hygroscopic, loses properties when moistened |
| Fire safety | Flammable, emits smoke, permissible temperature up to 75 degrees Celsius | Low flammability, does not emit harmful substances | Non-flammable, maximum temperature up to 600...700 degrees Celsius | Does not burn, makes it difficult for fire to spread | Non-flammable, does not emit harmful substances |
| Noise insulation | Low | High | Medium, high (depending on density) | High | High, medium (depending on density and construction method) |
| Application area | Inclined, vertical and horizontal flat surfaces. Ideal for plinths and basements | Surfaces with any geometry, preferably horizontal and inclined | External thermal insulation of facades, roofs, surfaces with simple geometry | Any structures, including complex geometries, inside and outside the building | Any designs of simple geometry |
Table. Comparative characteristics of heat-insulating materials
It should be noted that when deciding how to insulate the walls of a house from the outside, it is worth taking into account the emergence of new materials with higher performance characteristics. However, upon purchase, the manufacturer is obliged to provide certificates of material conformity, test results, and give the opportunity to check the properties of the insulator. One of the simplest ways to check is to weigh a cubic meter of material adjusted for packaging, since it is the density that unscrupulous manufacturers indicate with deliberate inaccuracy. For comparison and financial calculations, you can use the data in the following table.
Table. Comparative indicators of heat-insulating materials at different layer thicknesses.
The choice of material should also be based on cost. Depending on the thickness of the layer and thermal insulation ability, the final cost of insulating the outside of a wooden house with a more expensive material may be less than a cheaper one. For comparison, the data is presented below.
Table. Comparative cost of a cubic meter of heat-insulating material (Moscow, end of 2021).
Selection of insulating material taking into account the cost of work
Before you finally decide how to insulate the house outside, it is also important to find out the cost of the work. If they are carried out independently, the cost of fastening and preparing the walls (roof, under-roof structures, foundation, etc.) for installation is taken into account
If professional installation is preferred, you should find out the prices of the selected company in advance.
How to insulate outside walls:
- depending on the type of main wall, choose the method of fastening - using an adhesive (adhesive-cement, cement) composition, using disc-shaped dowels, other fasteners, spraying;
- prepare the wall for installation (cleaning the façade finishing - if necessary), level the surface if there are significant protrusions;
- carry out installation;
- perform surface finishing. This could be laying out an additional layer of facing brick, decorating the facade with siding or clapboard, sealing it with plaster or facade tiles, installing a ventilated facade, and so on.
How long will it last
Foam plastic is resistant to moisture and aggressive substances of organic origin, so the service life before replacement is, according to manufacturers, 700 freeze-defrost cycles.
This is significantly longer than the service life of the plaster layer, in which, in addition to the composition itself, the polymer mesh is destroyed. Based on the recommended operating parameters, you can expect the service life of external foam insulation to be from 20 to 40 years. It all depends on the quality of the building materials and the careful work carried out.
Insulating the walls of a house with polystyrene foam is one of the available ways to save heat in winter and coolness in summer. A simple installation process that anyone can master makes insulation with foamed polystyrene a popular method that allows significant savings on the purchase of materials and wages for builders.
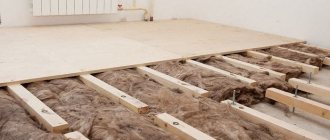
Step-by-step plan for installing a wooden floor on joists
Having laid and secured the logs, they begin to install the lower subfloor. Creating a subfloor in a wooden house with your own hands occurs in the following order.
Only after laying and securing the logs do they proceed to installing the subfloor
On both sides of the log at the bottom, so-called cranial bars are fixed, having a cross section of approximately 4x4 cm.
The subfloor boards are laid precisely on these bars, laid tightly, but not secured.
Next, the entire subfloor is covered with waterproofing. Along the edges, waterproofing is applied to the joists and the wall to the final floor height.
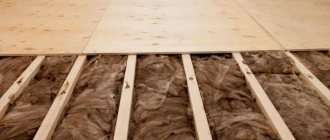
Insulation is laid out on the waterproofing between the joists. If the thickness of the floor insulation in a wooden house allows, then it is laid in 2 layers. The choice of insulation for a wooden floor is an important issue. The most commonly used environmentally friendly materials are mineral wool, expanded clay (fired clay) or foam glass.
The entire subfloor is covered with waterproofing
It is on the insulation that the vapor barrier is placed. Polyethylene or polypropylene film can serve as a vapor barrier. This layer will trap moisture vapor trying to escape from the house to the outside. Otherwise, they will settle in the insulation and cause damage to the wooden floor structures. The vapor barrier should cover the joists and go onto the walls along with the waterproofing material. The vapor barrier is attached to the joists with a stapler, the film layers are laid with an overlap of 5–15 cm and the edges of the joints are taped.
Floor ventilation is provided. If the thickness of the laid layers is equal to the height of the logs, then counter battens are attached on top of the vapor barrier along the logs. They will create a gap for ventilation.
Since wood has good sound conductivity, it is necessary to take care of sound insulation. A material that simultaneously absorbs sound can serve as insulation: mineral wool, expanded polystyrene or expanded clay. Mineral wool is most often used.
Sound insulation can also be created using an underlay for the floor covering. Membrane sound insulators (Vibrostol, Texaund, Schumanet), acoustic felt or combined felt, cork sheets, and CSP boards (cement-bonded particle boards) are suitable for this purpose. If the finishing coating is assembled from OSB boards, then they themselves have the property of sound insulation.
Laying the finishing layer is the final stage
The final step is laying the finished floor. The finished floor in a wooden house can be constructed from OSB boards, boards, plywood or chipboards. The final floor covering will already be installed on it. If the finished wooden floor is assembled from simple or tongue-and-groove boards, then at the edges it should have a distance of 2 cm from the walls, which is then filled with insulation.
Penoplex screed: technology
Let's consider the simplest case - Penoplex for a floor under a screed on a concrete base. This can be concrete preparation in a floor structure on the ground, or a concrete floor in a high-rise building or private house. The procedure is as follows:
Local irregularities larger than 5 mm are leveled. The manufacturer does not specify the alignment principle. That is, it can be a leveling screed (if there are too many irregularities) or local filling of potholes and cracks with a solution. In the second option, it is necessary to trim/cut/knock down the strongly protruding fragments. Sometimes they even level it with sand. This method is also not excluded.
Standard scheme for using Penoplex under screed
You can level the base with sand, but do you really have a lot of unevenness
? Actually, the whole technology. All clear. Only questions may arise regarding the minimum thickness of the Penoplex screed. The manufacturer recommends at least 40 mm. When laying floors in wet rooms, it is advisable to cover the slab with waterproofing. Choose the type of waterproofing material yourself. The rest of the technology is the same.
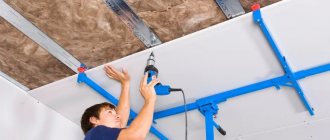
Option No. 3 – thermal insulation of the ceiling from above
It is considered the simplest way. If the ceiling made of concrete slabs or load-bearing wooden beams have been previously covered and there is no desire to touch them, then lathing is installed in the attic. For its construction, a wooden beam with a thickness of 50 millimeters or more is usually taken.
The width of the beam, which is also the depth of the sheathing, is calculated taking into account what layer of insulation is needed on the ceiling. 30 millimeters are added to this value to create a ventilation gap.
Next, the entire attic space is covered with a vapor barrier over the sheathing. We should not forget that the membrane of this material allows steam to pass in only one direction and it should only move upward. These products always contain markings indicating which side is vapor-permeable. The membrane is secured to the sheathing using a furniture stapler.
Then you can fill or lay the insulation. If bulk materials are used, they are poured out, leveled and everything is ready. As for laying a heat insulator in slabs, for example, mineral wool, then you have to work hard.
When laying mineral wool, slabs with a thickness of 100 mm are usually used. They are mounted in one layer. Next, another row of insulation is placed on top. In this case, the joints of the lower and upper layers should not coincide with each other. The result is monolithic thermal insulation. At the final stage, a rough flooring is made on top of the sheathing.
How to insulate aerated concrete, mineral wool or polystyrene foam
Mineral (stone) wool and polystyrene foam are the main insulation materials for aerated concrete houses. Low-density aerated concrete (D200) and sprayed polyurethane foam are used much less frequently.
Insulation should be carried out only from the outside of the building so that the dew point is closer to the outer layer of the wall.
Dew point is a place in the wall with zero temperature. In this zone, a zone of increased condensation (moisture) is formed; the wall in this place constantly freezes and thaws.
If we compare polystyrene foam and mineral wool, then wool is a more expensive and correct solution for aerated concrete walls; it’s all about vapor permeability. Cotton wool has excellent vapor permeability, which ensures that moisture is removed from the wall to the outside of the house. Thus, the interior will be drier and more comfortable. The thickness of mineral wool insulation can be made to any thickness, but it is more economically feasible - from 100 mm.
Polystyrene foam does not allow steam to pass through well, trapping it in the wall and creating increased humidity in the house. Moreover, aerated concrete walls need to be insulated with foam plastic with a thickness of 100 mm or more in order to guarantee that the dew point will shift from the wall to the insulation. Otherwise, at the boundary between the foam plastic and the wall, moisture will constantly freeze and thaw, reducing the service life of the wall.
In general, we recommend using mineral wool or foam plastic with a thickness of 100 mm or more, but it is better to give preference to mineral wool.
Styrofoam
Usually this word refers to foamed polystyrene and extruded polystyrene (penoplex). In terms of chemical composition and thermal insulation properties, these materials are practically the same, however, penoplex has much greater bending strength and resistance to crumbling than traditional polystyrene foam. For this reason, recently most consumers are abandoning foamed polystyrene (foam) in favor of extruded polystyrene (penoplex).
Styrofoam
The advantage of this type of thermal insulation is its low price, ease of installation and moisture resistance. The disadvantages include the flammability of this material, and when polystyrene burns, a large amount of toxic substances is released.
Polystyrene slabs are produced in thicknesses from 5 mm to 50 mm; a special chamfer is made on the edges of the slabs so that during installation, gaps and, consequently, “cold paths” do not appear at the joints.
Expanded polystyrene
If a layer thickness of more than 50 mm is required, then two or even three layers of polystyrene are laid, with each new layer being laid offset relative to the previous one so that the joints of the slabs of the upper row fall on the centers of the slabs of the lower one.
Screed diagram with foam plastic
When insulating a floor located directly above the ground, the foam layer must be at least 300 mm for a house with a wooden floor, and 200 mm for a house with self-leveling concrete floors. You should lay at least 4 layers of the thickest foam panels, offset from each other.
If there is a cold basement under the floor, then the foam layer can be reduced by 50mm.
To insulate floors between floors of a private house, 150 mm of foam is sufficient for wooden floors and 100 mm for concrete floors.
If you are insulating floors in an apartment building, then for all floors except the first it is enough to lay one layer of foam plastic 50 mm thick. On the ground floor the thickness can be increased to 80-100 mm.
| Index | Polyspen | Polyspen Standard | Polyspen 45 | Control method |
| Density, kg/m3 | 30-38 | 30-38 | 38,1-45 | 5.6 each |
| Bending strength, MPa, not less | 0,4 | 0,4 | 0,4 | 5.8 each |
| Water absorption in 24 hours, % by volume, no more | 0,4 | 0,4 | 0,4 | 5.9 each |
| Thermal conductivity at 25+-5 degrees Celsius, W/m * °C, no more | 0,028 | 0,028 | 0,030 | at 5.10 |
| Toxicity, Hcl 50, g/m3 | T2 moderately hazardous | T2 moderately hazardous | T2 moderately hazardous | at 5.11 |
| Flammability group | G-3 normal-flammable | G-4 highly flammable | G-4 highly flammable | at 5.12 |
| Flammability group | B-2 moderately flammable | B-3 flammable | B-3 flammable | at 5.13 |
| Smoke coefficient | High smoke generating ability | High smoke generating ability | High smoke generating ability | at 5.14 |
| Compressive strength at 10% linear deformation, MPa, not less | 0,2 | 0,2 | 0,3 | 5.7 each |
Calculated thicknesses of Penoplex thermal insulation
Penoizol
This is a liquid version of polystyrene foam, which has the same pros and cons as the solid version. Its advantage is that it can be poured into hard-to-reach places and, after hardening, forms a monolithic coating without seams.
Penoizol
The disadvantages include the fact that you need to think about the method of supplying penoizol for pouring; on high floors this can be a problem. In most cases, penoizol is used during the construction of private houses; when insulating floors in apartment buildings, it is more convenient to use polystyrene foam and penoplex.
The required thickness of the penoizol layer is the same as that of solid foam.
Selection of insulation
Glass wool is the most economical type of insulation.
The choice of material depends on the requirements for insulation and availability. It is necessary to take into account the cost of the heat insulator itself, its transportation and installation. Also, the insulation should not be heavy, so as not to create excessive load on the joists.
A popular roof insulation material is extruded polystyrene. It has good thermal conductivity, so for high-quality thermal insulation it is enough to apply a thin layer. Expanded polystyrene is lightweight, easy to install and attach to the roof surface. It has a higher price than other materials, but the cost of installation, transportation, and service life make it worth it.
The most economical materials include glass wool. Its production technologies have been improved, so it has improved characteristics and properties. Glass wool is not subject to combustion and does not emit harmful substances. It has low thermal conductivity and allows steam to pass through well.
Mineral wool is obtained from mineral fibers. This is a standard insulation that is laid in slabs. Its main advantage is the ability to maintain high temperatures for a long time. Often used for thermal insulation of bathhouse roofs.
Polystyrene concrete
This is a relatively new material for insulation; it combines the strength of concrete and the lightness of polystyrene. The material has excellent heat and sound insulation properties and at the same time is a durable screed. It is ideal for thermal insulation of large rooms, since it is very easy to pour and level; a team of experienced craftsmen can pour up to 500 m2 of polystyrene concrete per day.
Polystyrene concrete
Due to its low weight, polystyrene concrete does not place a large load on the floors, unlike traditional liquid screed. It does not require waterproofing or additional insulation. You can lay tiles or laminate on a thick backing directly on top of polystyrene concrete. To lay soft coverings such as carpet or linoleum, a thin layer of traditional screed, no more than 30 mm thick, is poured over the insulation.
Polystyrene concrete floors are being poured
For effective thermal insulation of the first floors of private houses, 300 mm of polystyrene concrete above the ground is sufficient; if there is a basement under the floor, then the layer can be reduced to 200 mm. 100 mm of insulation is usually poured into the floors between the floors of private houses; in apartment buildings, a layer of 50 mm is sufficient.
| General characteristics of polystyrene concrete | Values |
| Flammability group | G1 |
| Density | from 150 to 600 kg/m³ |
| Frost resistance | from F35 to F300 |
| Strength characteristics | from M2 to B2.5 |
| Coefficient of thermal conductivity | ranging from 0.055 to 0.145 W/m °C |
| Vapor permeability of polystyrene concrete | 0.05 mg/(m h Pa) |
Thickness of floor insulation along the ground. Layer options
Insulation of the floor on the ground is carried out in two ways: they differ in the design of the underlying layer. The main criterion for choosing the number of layers when insulating a floor is the composition of the soil and the groundwater level. If there is a possibility that the latter will rise to the heat-insulating layer, additional waterproofing measures should be taken. In each case, the floor insulation device must comply with a specific scheme.
Concrete base layer
Such a floor insulation cake can be considered basic. The design of this flooring option includes the following layers.
- Compacted. Often the soil that was removed when digging the foundation, of course, except for black soil and peat, is filled back in. Moreover, it is compacted every 200 mm times. This is one of the measures to eliminate or at least reduce the risk of cracking of the future floor.
- Compacting with crushed stone. Moistened crushed stone of a fraction of 20-60 mm is covered with a layer of 70 mm, leveled and compacted with a tamper. Its main task is to further compact the soil.
- Underlying concrete. It would be more correct to consider lean concrete a technological rather than a structural layer of the pie. It is used as a basis for waterproofing. The optimal thickness of the underlying layer is approximately 60–70 mm. M100 concrete is used for its production. The concrete is laid evenly, without sudden changes, since this determines the density of the insulation and waterproofing.
On a note
After laying the insulation, the height difference should not be more than three to five millimeters per 2-meter strip.
- Waterproofing. As a waterproofing material, as a rule, a built-up roofing material, a polymer-bitumen or PVC membrane, or a simple polyethylene film laid in two layers is used. Insulation. The main insulation is usually laid horizontally dry. The quality and integrity of thermal insulation is determined by the thoroughness of the joints between sheets or slabs. Cold bridges may form on the side of the foundation walls. To eliminate this phenomenon, it is necessary to additionally lay 40–50 mm of insulation vertically. Secure it with dowels. The upper surface of the main insulation layer should be located at a level corresponding to the horizontal waterproofing of the foundation. There are several options for choosing insulation.
- Vapor barrier. The most optimal solution in terms of quality/price ratio is polymer-bitumen membranes based on polyester and fiberglass. PVC membranes are more durable, they are not subject to rotting, however, this material is also more expensive. You can make a vapor barrier from polyethylene film, which must be laid in two layers.
Attention
Polyethylene film can be easily damaged during the concrete pouring process, and it is almost impossible to control its integrity.
Cement strainer. It is made from M100 mortar and reinforced with a wire mesh ø 4–6 mm, and the cell size is 100 by 100 mm.
Glass wool and mineral wool
An example of floor insulation with mineral wool
Perhaps this is one of the most budget-friendly options for thermal insulation. In addition to its low price, cotton wool does not burn at all and has good vapor permeability, so it is excellent for insulating wooden floors. This is where the advantages of this material end. The disadvantages include the fact that cotton wool tends to accumulate moisture and this causes rotting and mold growth, the second disadvantage is that over time the wool crumbles if the thermal insulation layer under the floor is not sealed tightly enough, as a result, particles of fibers can pass through the finishing coating become airborne and cause respiratory irritation. Also, wool has very low strength, easily breaks and deforms, which makes it impossible to use it under a concrete screed.
For floor insulation on the ground, rigid mineral wool slabs are recommended
Despite its disadvantages, mineral wool is widely used as insulation, usually in wooden floors.
Most manufacturers produce glass wool and mineral wool in rolls or sheets with a thickness of 50 to 200 mm. Sheets can be laid in several layers with offset joints for better thermal insulation.
Insulation thickness
To use mineral wool on the first floors located above the ground, very good waterproofing is required. Cotton wool instantly absorbs moisture, after which it loses its thermal insulation properties. For this reason, it is better to use foam plastic for thermal insulation of the first floors. If for some reason it is still necessary to use mineral wool, then its layer should be at least 400 mm.
Multilayer laying of insulation
If there is a basement under the floor of the first floor, then a layer of mineral wool 300 mm thick is sufficient.
When insulating wooden floors between floors of a private house, the layer of wool should be at least 200 mm, and in wooden floors of apartment buildings a thickness of 100 mm is sufficient.
| Name | Advantages | Minuses | Thermal conductivity |
| Sawdust | Cheap, environmentally friendly material, lightweight | Flammability, susceptibility to rotting | 0.090-0.180 W/mK |
| Expanded clay | Eco-friendly, durable material, not subject to rotting, non-flammable | Heavy weight, fragility | 0.148 W/mK |
| Styrofoam | Does not rot, is waterproof, lightweight and easy to install | Low vapor permeability, cannot withstand high temperatures, releases toxins when melted | 0.035-0.047 W/mK |
| Mineral wool | Low thermal conductivity, easy to install, environmentally friendly, fireproof | When moistened, it shrinks and loses its insulating properties. | 0.039 W/mK |
How to calculate the thickness of floor insulation
Installation of insulation under the floor of the house Before you begin calculations, you should know at what depth the floor is located relative to ground level. You should also have an idea of the soil temperature at depth in winter. Data can be taken from the table of dependence of soil temperature on depth and location:
First, it is necessary to determine the GSOP, then calculate the heat transfer resistance, determine the thickness of the floor layers (for example, reinforced concrete, cement screed for insulation, floor covering). Next, we determine the resistance of each layer and summarize the obtained values. Thus, we will find out the thermal resistance of all layers of the floor, except for the insulation.
To find the thickness of the insulation, from the standard thermal resistance we subtract the total resistance of the floor layers with the exception of the insulating material. The thickness of insulation for the floor in a house is calculated by multiplying the thermal resistance of the insulation by the thermal conductivity coefficient.
Ecowool
Ecowool
This material is very similar in characteristics to mineral wool, but is made from cellulose fibers, therefore it is absolutely safe for health. Just like mineral wool, ecowool is afraid of water and is easily deformed. Therefore, in most cases it is used to insulate wooden floors between floors.
Ecowool insulation
The big advantage of ecowool is that it is installed by spraying under pressure from a special pipe. Thus, the insulation can be “blown out” under the already assembled floor; for this you only need to make several small technological holes.
Spraying ecowool
The required thickness of the ecowool layer corresponds to the thickness of the mineral wool layer, all other things being equal.
Characteristics of basalt and ecowool
Video description
First of all, you need to understand what you can’t do – you can see this clearly in the video:
And the insulation process itself occurs as follows:
First you need to remove the baseboard and remove the old floor
However, you need to be careful not to buy new material.
Open floor beams are inspected for rotten elements that must be replaced. It is best to fasten new wooden parts using galvanized self-tapping screws that are not subject to corrosion.
It is best to attach the support beam from below the joist.
The rough flooring is made from an unedged board, the length of which corresponds to the distance between the joists or is 2 cm less than this parameter.
The subfloor is not laid closely, and the beams need not be attached to the elements of this covering.
Houses located in areas with high groundwater levels very often suffer from high humidity with all the ensuing consequences. Therefore, it is very important to protect the floors with roofing felt or glassine. The waterproofing strips are laid overlapping, gluing the joints with tape.
The insulation is laid on top of the finished floor joists. In addition, another layer of waterproofing is required.
To create a ventilation gap, counter-battens are nailed on top of the insulation.
The final stage is laying the new flooring.
Final finishing of the finished floorSource chrome-effect.ru
Whatever material or technology is used, first of all, you must always remember that a high-quality result can only be obtained if the work technology is strictly followed.
What is penoplex
Heat loss through the walls of a building can range from ¼ to 1/3 of the total. Increasing thermal resistance due to the inclusion of special coatings in the design of external walls makes it possible to reduce its thickness and reduce the consumption of other building materials.
Wall insulation is necessary not only to prevent heat from escaping from the house in the cold season, but also to excessive heating of the room in the summer, so the correct choice of a heat insulator determines the financial costs not only during construction, but also during operation (heating, air conditioning).
Differences from other options
In the name of this insulation, you should pay attention to the word “extruded”, since a different production technology distinguishes it from ordinary polystyrene. The molten polymer is passed under high pressure through small nozzles, resulting in a dense foam board with a thickness of 20 to 100 mm as a result of solidification.
The molten polymer is passed under high pressure through small nozzles, resulting in a dense foam board with a thickness of 20 to 100 mm as a result of solidification.
The technical characteristics of various brands of penoplex are presented in the summary table:
Of the presented types, only 45 are used for making road surfaces, the rest are used for insulating residential buildings.
Meaning of indicators
The fine-porous structure of penoplex (100 - 200 microns) makes it a fairly light but durable material. Its characteristic qualities are:
- resistance to mechanical loads (when laid on a flat surface);
- low vapor permeability (thickness 20 mm is comparable to 1 layer of roofing felt);
- moisture resistance allows use on the outside of walls, in bathhouses, bathrooms, basement levels without heating;
- the insignificant coefficient of thermal conductivity expands the possibilities of use in thin partitions created with your own hands: balcony railings, veranda walls, extensions or garages;
- low weight does not lead to a significant increase in the load on the base when covering already designed structures (insulation of individual apartments in a multi-storey building);
- the density of the polymer allows the use of conventional cutting tools to adjust sheets to size when performing work;
- chemical resistance to most compounds used in construction (exceptions: gasoline, diesel fuel, acetone, enamels, oil paints, formaldehyde, acetate-based solvents). For more information about the qualities of the material, watch this video:
What to compare with
The listed characteristics classify penoplex among modern achievements in the line of traditional insulation and polymer counterparts.
The ratio of technical characteristics can be seen in the reference tables of materials:
How to open a toilet cistern lid with a button, step by step instructions?
Well, there’s actually only one action.
But if you want step-by-step, please:
- We turn on the light in the toilet.
- We open the door.
- Close the toilet lid (if it is not closed, so as not to drop anything there).
- Unscrew (directly with your fingers) counterclockwise the ring around the button.
- Lift the tank cap and remove it.
Two days ago I encountered this problem myself. Water was leaking from the flush barrel into the toilet and I wanted to see what the problem was. To do this, it was necessary to look into the drain tank itself.
I wanted to remove the lid of the barrel, but the drain button did not allow me to do this, the water flowed as if it were being drained.
Abandoning this idea, I called a plumber.
The plumber who came upon my call, with a slight movement of his hand, unscrewed the ring under the drain button, removed it and the holder, and thus the lid was also easily removed. How could I not have guessed, it’s so simple!
The plumber replaced the ball valve, adjusted the water level, installed the fittings in their place, and closed the tank with a lid.
There is nothing complicated about this, as it turns out))
To begin with, I would recommend getting acquainted with the structure of the drain tank and the procedure for assembling it.
Open the tank in the reverse order of steps. Manually unscrew the button and open the lid itself. The button should be unscrewed without much effort, since both the button itself and the “glass” of the valve body are made of plastic and are not subject to corrosion during operation.
Step-by-step instructions: 1 using a screwdriver, carefully so as not to damage the surface, turn the ring around the button counterclockwise, 2 after shifting, the ring can be unscrewed by hand, it will rotate so easily. 3. Unscrew the ring, it will look like a plastic cylinder. 4. Take it out. 5 It becomes possible to slightly lift the toilet lid
Gently rotate it 90 degrees until it is positioned across the tank and it becomes possible to remove the double-sided clothespin holding the button: move one end to the right and the other end to the left, thereby rotating the clothespin along the central axis.6. You can already remove the lid from toilet barrel.7.After removing the lid, you need to place it on a flat, stable surface.8.After repairs, check everything for malfunctions in the open form.9.If everything works well in the toilet mechanism, then simply reassemble everything in the reverse order
3. Unscrew the ring, it will look like a plastic cylinder. 4. Take it out. 5 It becomes possible to slightly lift the toilet lid. Gently rotate it 90 degrees until it is positioned across the tank and it becomes possible to remove the double-sided clothespin holding the button: move one end to the right and the other end to the left, thereby rotating the clothespin along the central axis.6. You can already remove the lid from toilet barrel.7.After removing the lid, you need to place it on a flat, stable surface.8.After repairs, check everything for malfunctions in the open form.9.If everything works well in the toilet mechanism, then simply reassemble everything in the reverse order
Frame house projects
- 1 room
- 1 bathroom
- 42² Total area
- 6 x 7m Construction area
- 1 room
- 1 bathroom
- 28² Total area
- 5 x 4m Building area
- 4 rooms
- 2 bathrooms
- 170² Total area
- 11 x 8m Construction area
- 3 rooms
- 2 bathrooms
- 127² Total area
- 10 x 7m Construction area
- 4 rooms
- 2 bathrooms
- 200² Total area
- 9 x 13m Construction area
- 4 rooms
- 2 bathrooms
- 140² Total area
- 12 x 9m Construction area
- 3 rooms
- 2 bathrooms
- 127² Total area
- 9 x 8m Construction area
- 4 rooms
- 2 bathrooms
- 130² Total area
- 10 x 10m Construction area
- 3 rooms
- 1 bathroom
- 83² Total area
- 10 x 9m Construction area
- 1 room
- 1 bathroom
- 30² Total area
- 7 x 6m Building area
- 3 rooms
- 2 bathrooms
- 156² Total area
- 11 x 9m Construction area
- 4 rooms
- 2 bathrooms
- 140² Total area
- 8 x 9m Construction area
- 4 rooms
- 2 bathrooms
- 120² Total area
- 8 x 10m Construction area
- 1 room
- 1 bathroom
- 35² Total area
- 5 x 9m Construction area
- 2 rooms
- 1 bathroom
- 42² Total area
- 6 x 9m Construction area
- 2 rooms
- 1 bathroom
- 72² Total area
- 12 x 6m Construction area
- 2 rooms
- 1 bathroom
- 74² Total area
- 7 x 6m Building area
- 3 rooms
- 1 bathroom
- 110² Total area
- 13 x 9m Construction area
- 3 rooms
- 1 bathroom
- 75² Total area
- 9 x 7m Construction area
- 1 room
- 1 bathroom
- 45² Total area
- 6 x 9m Construction area
At a fairly low price, the quality of materials used in frame housing construction is growing every year. It is not surprising that this type of building is becoming increasingly widespread in all regions of Russia. And depending on the climate zone, the same project will have different requirements for heat conservation, therefore, what the thickness of the walls of a frame house should be must be determined in each case separately.
There are several subtypes of frame technology - if the general principle of building houses is the same, then the nuances, including the thickness of the walls, may differ
Manufacturers
In the construction market, products used for thermal insulation of underfloor heating are represented by a wide selection of types, as well as various brands.
Among the trusted companies selling their goods on the domestic and foreign markets, the following companies stand out:
- High-quality polystyrene is produced by the Knauf trademark .
- Mineral wool is represented on the market by the URSA
. - The consumer is also offered thermal insulation for Thermo
. - In addition, it is worth noting the Amorim
and Mylar film from
Daewoo enertec
.
To make a choice of material that will justify the money spent on it, you need to pay attention not only to the characteristics of the raw material and its parameters, but also to the service life of the material. Many types of products that have high performance and properties, unfortunately, have a short service life
As a result, replacement of the thermal insulation material with a new one will need to be carried out much earlier than the need for preventive maintenance of any elements of the underfloor heating system. This is especially true for floors where the covering is made with tiles, for example in a bathroom, as a result of which it will be necessary to dismantle the products. Therefore, the minimum lifespan of floor insulation products should be 10-15 years
Many types of products that have high performance and properties, unfortunately, have a short service life. As a result, replacement of the thermal insulation material with a new one will need to be carried out much earlier than the need for preventive maintenance of any elements of the underfloor heating system. This is especially true for floors where the covering is made with tiles, for example in a bathroom, as a result of which it will be necessary to dismantle the products. Therefore, the minimum lifespan of floor insulation products should be 10-15 years.
As for the properties of the material, which are worth paying attention to first of all, it is necessary to highlight the following:
- coefficient of thermal conductivity;
- level of resistance to mechanical loads;
- resistance to dynamic influences;
- vapor permeability;
- hygroscopicity;
- density of the material.
For rooms with high ceilings, the height of which exceeds 250 cm, you can opt for durable insulation with a rigid polymer base. For wooden floors, it is best to purchase environmentally friendly and non-flammable material. Mineral wool may be a good thermal insulation option in this case. For floors where the heating system is equipped with a cable, the main property of the insulation is the presence of a heat-reflecting layer, regardless of the form in which the material is made.
Features of the heat insulator
The production of penoplex for wall insulation includes the following technological operations:
- Granules of the material are loaded into an extruder, where they are heated to 130-140°C;
- Foaming agents – porophores – are added to the portion;
- The thickened mass is squeezed out of the extruder onto a conveyor belt, after which it is cut into dimensional slabs;
The mixture of semi-finished penoplex for external wall insulation consists not only of polystyrene foam and foaming agents - it also contains antioxidants designed to prevent thermal oxidation during processing and damage to the integrity of the insulation during operation, fire retardants to increase fire resistance, as well as antistatic, light-stabilizing and modifying additives that protect thermal insulation material from the influence of external factors.
The main positive parameters of the material:
- Low moisture absorption of expanded polystyrene is the main advantage;
- The minimum coefficient of thermal conductivity, which allows, when calculating the thickness, to choose thin slabs;
- High vapor permeability of penoplex: a 20 mm thick slab replaces one layer of roofing material, but at the same time also insulates the working surface;
- High compressive strength and other mechanical loads. The extrusion method in the production of thermal insulation allows the cells of the material to be evenly distributed, improving the quality of density and strength;
- Easy and quick installation of insulation due to its low weight and good density;
- Long service life of extruded foam – up to 50 years;
- Excellent sound insulation and minimal chemical activity.
Features of penoplex
Penoplex size range:
- Slab length – from 120 to 240 cm;
- Slab width – 60 cm;
- Thickness – from 2.0 to 12.0 cm.
Disadvantages of extruded foam:
- Flammability of groups G3-G4, formation of toxic smoke during fire;
- Polymer additives in the composition of the material can evaporate toxic substances when exposed to sunlight. Therefore, the optimal use of penoplex is external, for example, insulation of brickwork;
- Petroleum products and some organic substances can deform penoplex, the thickness of which can be any. These are substances such as: formaldehyde and formalin, acetone and methyl ethyl ketone; liquids containing ethyl, benzene components, polyester resins, synthetic paints and fuels and lubricants.
Performance characteristics of penoplex
Thermal conductivity properties determine the quality of insulation with penoplex. The higher the thermal conductivity coefficient, the fewer centimeters the layer of insulating material will be. Laying the insulator from the inside or outside depends on the characteristics of vapor permeability and strength (density). You can compare the parameters of popular materials for insulating floors and other surfaces by studying the data in the table:
Comparison of thermal insulators
From the table it is clear that foam plastic thermal insulation has an average thermal conductivity value, which is slightly less than that of polyurethane foam, mastics and roll materials. But you can choose penoplex only because the layer of such liquid insulation does not have joints and seams, like slab insulation, no matter how many layers are applied to the surface.
Why polystyrene foam?
The unique properties of polystyrene foam can significantly reduce heat loss when installed correctly.
This insulation has the best thermal conductivity: regular foam 0.036-0.050 W/mS and extruded 0.028-0.034 W/mS.
The photo shows a comparison of regular and extruded foam
Insulating floors with polystyrene foam not only creates a reliable protective barrier from the cold, but also increases waterproofing
This material has low water absorption, which is very important for insulation. Wet material will simply not be able to provide reliable thermal insulation. EPS has a high density and can withstand high loads of up to 400 kg per square meter
There are also special types that are used for insulating roads and runways - they can withstand even greater loads. Therefore, you don’t have to worry that the floor will shrink after pouring the screed. This material is optimally suited for use with electric and water underfloor heating systems. The material tolerates changes in temperature and humidity well and is not exposed to microorganisms. The plates are light in weight because they consist of closed air capsules. They are easy to cut, fix, and transport. Because of this, the DIY installation process becomes even simpler. Low price - on average, about 4 thousand rubles per cubic meter.
Types of polystyrene foam
Insulation of the first floor of the house
Insulation can be produced by several types of polystyrene foam, which differ in their production method and characteristics.
- Regular foam. It consists of 98% air in a vapor-tight shell. Thanks to this, it has good thermal insulation properties and is light in weight. However, this material is very short-lived, fragile and highly absorbs moisture, so if you use it for flooring, you need to take this into account.
- Extruded polystyrene foam is produced in a completely different way, so it does not have the disadvantages of polystyrene foam. The material is durable, strong in compression and almost does not absorb moisture. However, it also costs more than polystyrene foam.
- Granular foamed polystyrene. Used primarily to add to concrete to increase its thermal insulation.
- Penoizol is a universal insulation material that is applied by spraying it onto the surface. Supplied in liquid form. Unlike ordinary polystyrene foam, it is not capable of spontaneous combustion. Mechanically it is less strong, but more durable.
The most popular brands in Russia are EPPS Penoplex, URSA, TechnoNIKOL. The standard size of the slabs is 60*120 cm and 50*100 cm. Regular foam plastic for living rooms should be chosen with the PSB-S-35 marking, and its quality must meet the requirements of GOST 15588-86.
Types of polymer materials
Polymer materials include polystyrene foam, polystyrene foam, penoplex and others. Let's take a closer look at some of them.
Styrofoam
Polystyrene foam as a material for home insulation is becoming more and more popular. This is due to its affordable price and high performance characteristics. Insulation technologies are constantly evolving.
So what is considered to be polystyrene foam? This is a white, gas-filled polymer containing a huge amount of tiny particles of foamed polystyrene. Many people mistakenly believe that polystyrene foam and polystyrene are the same material. In fact, expanded polystyrene is a type of polystyrene foam. However, their production processes are fundamentally different.
Polystyrene foam, which is used in construction, is obtained by treating polystyrene granules with steam. As a result, the particles of the raw material swell, increase in size and adhere to each other. The result is a lightweight material with a porous structure.
Main characteristics of polystyrene foam:
- low thermal conductivity;
- ease;
- very low hygroscopicity, it absorbs moisture no more than 3% of its mass;
- resistant to mold, mildew and microorganisms;
- does not support combustion, the material melts when exposed to open fire and quickly dies out;
- easy to install, easy to cut;
- high sound insulation properties;
- floor insulation with polystyrene foam can be carried out without protective clothing, it is non-toxic and does not create dust when cutting (unlike glass wool);
- environmental Safety.
The main disadvantage of the material is its fragility, so transporting and laying foam must be done carefully, especially in windy weather.
Expanded polystyrene
Expanded polystyrene also comes in different forms:
- expanded polystyrene is a cheap material, but it has relatively low thermal insulation characteristics, it is capable of accumulating moisture, and the recommended service life is only 10 years;
- extruded polystyrene foam is a type of foam with a cellular structure; it is produced using a non-press method, by foaming using pentane and water vapor.
Typically, extruded polystyrene foam is used for floor insulation. Its structure has good heat and moisture insulation and can withstand long-term mechanical loads.
It has almost all the positive characteristics of polystyrene foam. At the same time, its resistance to temperature changes is a third higher, it is much stronger in compression and bending, and much denser. But the cost of expanded polystyrene is noticeably higher.
Recently, slabs of different colors have appeared: orange, blue, green. Color does not affect the characteristics and quality; it simply determines whether the material belongs to the brand.
Insulation of the concrete base
Concrete floors are distinguished by high reliability indicators; they are usually very smooth and durable; they are not afraid of serious loads. However, it cools down quickly, does not retain heat, and the cold lets in easily. That is why concrete floors must be insulated. And here, too, polystyrene foam comes to the rescue. However, depending on whether there is a basement under the concrete floor or not, the insulation technology will also differ.
Floor screed with foam plastic
If there is a basement
This section is relevant for owners of private houses or those who have apartments on the ground floors. Concrete floors in these cases are quite cold, and even a good floor covering will not save you from discomfort. Here it is recommended to mount the insulation on the basement side, then the concrete slab itself, that is, the ceiling, will be in a layer of air and will better retain heat, and the cold will not penetrate into the house.
It is best to use foam plastic with a thickness of 5-10 cm, as is the case with wooden floors
If the concrete slab is uneven, then in any case it is important to prepare it for the installation of foam sheets. All cracks on it, if any, are sealed with polyurethane foam.
Insulation of the floor above the basement without heating
You can fix the foam on the concrete using dowels 12-14 cm long. You need to work slowly, drilling holes in the concrete with a hammer drill, marking places for fastenings. Before fixing the material, apply a special adhesive suitable for foam plastic to the surface of the concrete. The joints between fixed sheets can be covered with polyurethane foam.
Cellar insulation with foam plastic
No basement
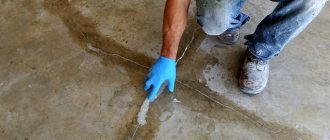
If there is no basement in the house, and the apartment is located above the first floor, then another technology for floor insulation with foam plastic is used. In this case, the sheets are installed above a concrete surface. The old floor covering is completely removed, all cracks in the base are sealed, and the floor is leveled. It is best to seal cracks with thick cement mortar. Only after this is the floor waterproofed with special compounds or materials. The easiest way is to use bitumen mastic, but in some cases roll material will also be convenient.
The use of polystyrene foam for floor insulation
Afterwards, a reinforcing mesh or ordinary masonry is laid on the surface of the waterproofing. And only then sheets of foam plastic are placed on it. But here you can use thin sheets about 2-3 cm thick. The main thing is to install it with a minimum of joints so that cold bridges do not form. It is best to fix the foam with special glue.
Next, after laying the foam, the beacons are installed using a laser level. They can be fixed with the same mounting adhesive. Beacons are placed at a distance of no more than 1.4 m from each other, but at the same level. After this, a screed solution is poured over the foam - a regular concrete screed is performed, and the foam will be sealed on both sides with concrete surfaces.
Beacons for foam screeds
Techniques for performing insulation work for floors
There are two main options for thermal insulation:
- Thermal insulation on joists. When choosing this technology, the insulation in the form of slabs has to be laid out in a checkerboard pattern. Stitches also need to be re-dressed. You should first lay a special film to ensure waterproofing. The material can be fixed using either dowels or glue. Having completed the installation of the slabs, the seams are carefully sealed using polyurethane foam, and then the floor covering is attached to the joists. If you choose reliable insulation, such a floor will retain heat.
- Insulation completed with screed. If you are thinking about how to properly insulate the floor in a wooden house, consider the thermal insulation option, which involves creating a concrete screed on top of the thermal insulation layer. First of all, waterproof the base. The next step is laying a mesh made of fiberglass. As a result, the structure becomes stronger. Next, concrete mortar is applied over the mesh.
Popular types of polystyrene foam
Polystyrene foam is usually produced in the form of slabs. The following types of polystyrene foam boards are most popular among consumers:
In the production of expanded polystyrene, various technologies are used that determine its characteristics, areas of application and installation methods.
Pressless expanded polystyrene
The manufacturing process of this type of material is that polystyrene granules are placed in hot water, and after swelling they are dried and foamed, placed in special molds or an extruder.
Considering the low cost of production, such foam plastic has a very affordable price, and therefore is especially popular among citizens who are puzzled by the installation of a warm water floor.
Extruded polystyrene foam
The foam of this type is produced by mixing polystyrene granules with a foaming agent under pressure and at a high degree of heat. The result is a viscous mass, which is extruded using a special tool equipped with an extrusion head.
Laying extruded polystyrene foam
Extruded polystyrene foam for heated floors is especially popular among installers installing water-based systems. Plates made from this material are also widely used in other areas of construction, for example, for insulating roofs, foundations and facades of houses.
Foiled polystyrene foam
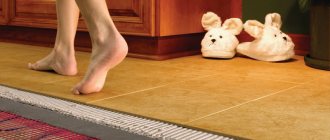
This type of foam has a distinctive feature, which is the presence of an additional metallized layer. This material is often used in underfloor heating systems, as the foil layer acts as a reflector, increasing heating efficiency by evenly distributing heat.
When installing a warm water floor, it is always necessary to lay an additional layer of foil under the pipeline, acting as a reflector. The use of foil polystyrene foam eliminates this need.
However, when laying it, it is necessary to take into account that the concrete screed in which the system is placed completely corrodes the thin layer of aluminum that covers the slabs in a short period of time. Therefore, this material must be protected with an additional layer of waterproofing.
It should be noted that foil polymer insulation can be used when installing water and cable heated floors. But it cannot be used when laying infrared mats.
Profile polystyrene foam
The use of this material makes it easier to install a heated floor system, as it eliminates the need to lay a reinforcing mesh to which the pipeline is attached, apply markings and install guides, since all these functions are performed by bosses located over the entire surface of the slab.
The distinctive features of such a plate are the following factors:
- the bosses themselves, which make it possible to easily lay a water pipeline or an electric heated floor cable, regardless of the chosen scheme;
- increased mechanical strength provided by the high density of the material;
- the presence of a shell that acts as a vapor barrier that protects against moisture;
- a layer of laminated foil, impervious to chemical attack;
- the presence of locking connections, thanks to which the slabs are laid without gaps;
- the presence of a relief pattern on the underside of the slab, which provides ventilation and smoothes out minor irregularities in the base.