When carrying out a major overhaul of a long-used home with concrete floors, one very often encounters the need to restore the integrity of these seemingly “indestructible” coatings. Unfortunately, they are also subject to aging and gradual destruction. Over a long period of its service, a screed once poured over a floor slab can, under the influence of deforming forces (associated, for example, with building shrinkage, seismic points, operational static and dynamic loads), become covered with a network of cracks and begin to crumble. Concrete can lose its strength over time, especially if used in unfavorable conditions where there are opportunities for increased erosion.
DIY concrete floor repair
Bringing dilapidated concrete floors into “working” condition can be done in different ways, depending on the degree and nature of the damage. And we must immediately note that this is not such a simple task as it might seem at first glance. There are even situations when it is much easier to completely dismantle the old screed and pour in a new one rather than bother with restoration attempts.
So, let’s figure out how to repair concrete floors with your own hands: from the main reasons for the coating to become unusable to possible technologies for its restoration at home.
Dismantling the screed - effective methods and detailed instructions!
Any major renovation of a room begins with a large amount of rough work. This includes removing old wallpaper from the walls, replacing windows and doors, and updating the flooring. In the latter case, it is often necessary to dismantle the screed, especially if it was filled in a long time ago and has already partially lost its performance characteristics. The work of removing it is quite labor-intensive and complicated, but you can handle it yourself if you wish. How to do this correctly, spending a minimum of money?
Dismantling the screed
Floor screed and its main functions
Before we talk about how to properly and efficiently remove the old screed, you should understand and understand what it is and why it is installed in residential and industrial premises. A screed is a base that is laid on a subfloor (for example, ceiling, soil, etc.), and the finishing floor covering is mounted on top of it.
The screed allows you to level the surface of the subfloor layer or, conversely, give it a certain slope
This property is very important in relation to some floor coverings - among the variety of finishing materials, there are those that are very demanding on the evenness and cleanliness of the base, and it is precisely these qualities that can be achieved by laying a screed layer
What types of floor screeds are there?
Also, all kinds of communications can be laid inside the created base - water supply and sewerage pipes, electrical wiring, ventilation, etc. The screed allows you to evenly distribute the load that the floor experiences daily over the entire surface. Also, thanks to it, it is possible to create good hydro-, heat- and sound-insulating layers.
Floor screed device
On a note! The underfloor heating system, if it is represented by a water or electric cable, is also installed inside the screed.
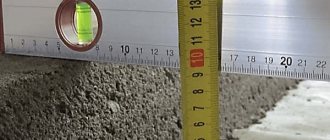
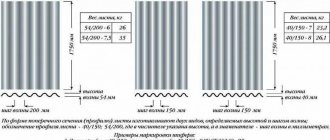
On average, the thickness of the screed layer is small - about 4-10 cm, depending on how much it is necessary to level the rough base. There are thicker options, but this is rare.
Cement consumption for screed
The screed can be monolithic, made from a building mixture based on cement, sand and water - concrete, as well as composite, which is a layer of gypsum materials and expanded clay. This layer acquires particular strength by placing a reinforcing mesh made of steel or polymer materials inside the screed - the result is a reinforced screed.
Reinforced concrete screed
The main advantages of the screed:
- long period of operation;
- excellent strength;
- the ability to provide thermal and waterproofing of the floor;
- resistance to various types of loads.
The disadvantages of the screed are its complex installation, long drying period, and significant cost of work. Yes, and dismantling it if necessary is not so easy.
Concrete screed restoration scheme
Dismantling - relevance and features of implementation
If a screed is a strong and reliable foundation that can be used for a long time, then why does it have to be dismantled sometimes? Why do some property owners decide they need to remove that old foundation? The fact is that even the strongest and most reliable materials are destroyed and deformed over time. And the best option in this case is not to correct or repair the old screed, but to remove it and make a new base.
When is floor screed removal required?
In general, screed dismantling is carried out in the following cases:
- destruction and deformation of the old foundation;
- the appearance of a large number of cracks on the surface;
- incorrect installation;
- floor level reduction required;
- installation of heated floors;
- Repair of communications inside or under the screed is necessary;
- long term use of the old screed.
Repair of shallow cracks
Small and shallow cracks are first sawed lengthwise with a grinder, deepening them to 50 millimeters and widening them to 20 millimeters. The length and depth depend, again, on the hardness of the screed. Remove dust using a vacuum cleaner. If the screed is strong, does not emit a lot of dust and is difficult to saw, such a floor can be repaired with a self-prepared mixture.
If the screed is weak and sawed easily and effortlessly, to repair it you will need a good, high-quality primer and a thixotropic mixture. The repair technology is the same as when removing potholes.
Price for dismantling floor screed in the estimate
One of the norms of the repair collection 57 of the FER or GESN estimate and normative bases may be suitable as a price in the estimate for the dismantling of floor screed and floor coverings. It should be noted that a direct literal norm is not currently presented in the collections of these bases of estimate standards.
However, the price in the estimate for the dismantling of cement screed is most often the norm under the code FERr57-2-4. This standard is found in 57 repair and construction collection FER and involves dismantling cement floor coverings with a thickness of 150 mm.
Despite the fact that the FERr57-2-4 standard is designed for dismantling floor coverings, due to the coincidence of the work algorithm, it can also be used as a price for dismantling floor screeds. Dismantling of coatings takes place according to this standard using jackhammers.
The scope of work in the specified price for dismantling the floor screed is measured at 100 m2. In addition, it should be noted that as a result of dismantling work, the formation of construction waste at the site is a frequent occurrence.
It should be borne in mind that the price in the estimate for dismantling the cement screed under the code FERr57-2-4 is no exception in this regard
However, when drawing up an estimate form, it is important to take into account that the loading, removal and disposal of construction waste is not included in the standard work, which means that these works must be taken into account separately
If for some reason the scope of work of standard FERr57-2-4 is not enough to determine the cost of screed dismantling according to FER, then the possibility of using standards from construction collections for screed installation with the application of dismantling coefficients to them is not excluded.
Thus, to create a price for dismantling the floor screed in the estimate, one of the norms of the 11th construction collection can be applied. This collection combines most of the necessary standards for the installation of not only various floor coverings, but also standards for work on the construction of various structures, including screeds.
Collection 11 will be discussed further in the text in the appropriate paragraph. In this case, Figure 1 shows an example of the price in the estimate for dismantling a cement screed with the inclusion of a factor for dismantling.
Figure 1. Cost in the estimate for dismantling the screed
Causes
To dismantle the floor screed, some compelling reasons are necessary. Among the most basic are existing surface defects, as well as errors made during installation work. It can even be said that it is much easier to completely remove the floor screed than to partially remove the floor screed. Eliminating deficiencies sometimes even brings more trouble and financial costs.
Another reason is the repair of communication systems that are located under the floor pouring. But here everything should be done efficiently and with caution. All safety measures must be fully observed.
In your work you will need to use a certain set of tools, among which the main ones include:
Construction teams, due to their experience, can complete the work as quickly as possible. Moreover, they have all the necessary tools for this, including special equipment - a joint cutter, a dismantling robot and much more.
Screed dismantling sequence
First, we examine the existing screed and determine the need for all or partial disassembly. In some cases, it is enough to repair cracks or make partial repairs by cutting out and sealing individual sections.
We determine the thickness of the screed, composition, presence of reinforcement and utilities by cutting out a fragment using a grinder or opening a small area with a hammer drill.
Depending on the screed material, we determine the dismantling method.
Before you start working with impact tools, it is necessary to protect the windows from accidental contact with screed fragments.
We begin dismantling the screed from the far corner, gradually moving towards the exit.
Important! It is necessary to work with a jackhammer carefully so as not to damage the ceiling. We place the disassembled pieces of screed into tight bags and take them to the storage location
We place the disassembled pieces of screed into thick bags and take them to the storage location.
To minimize dust formation, regularly wet the floor with water during operation.
After removing construction debris from dismantling the screed, the floor should be dust-free and primed with penetrating primers to secure the concrete coating.
Partial dismantling of the screed.
Sometimes there is no need to completely dismantle the screed. This happens when the floor level is slightly reduced.
We proceed as follows:
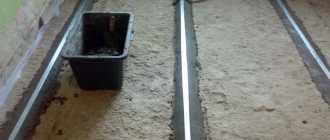
- Using a grinder, cut parallel strips of equal depth on the surface of the screed.
- Using a hammer drill with a spatula attachment, knock down the solution in a continuous layer to the cut depth.
- We remove the fragments of the screed and vacuum the base.
- We treat the surface with a penetrating primer to secure the remaining layer of screed.
Figure 11. Partial dismantling of the screed.
Description of repair of small potholes
The presented instructions fully describe the process of minor repairs. The edges of the potholes are processed using a grinder with a diamond wheel, cutting out a rectangular hole with smooth edges. At the same time, its perimeter is expanded along all edges to two centimeters. We also increase the depth by 1-2 cm. This depends on the strength of the screed - the more dusty it gets, the deeper it needs to be cut.
All bulges are removed with a punch or manually. All recesses are knocked out in the form of a rectangle using a hammer drill. If they are shallow, they can be processed using a hammer and chisel, but be very careful so that the pothole does not crack. The dust in the pothole is first blown with a vacuum cleaner and then sucked up.
Treat the excavation from the inside with a layer of priming solution for concrete surfaces. After complete drying, the recess is sealed with a previously prepared cement solution, leveled with a rule and left until completely cured.
How to remove a layer of concrete from the floor. Concrete manufacturer MLB
Over time, an old or poorly made screed (the intermediate layer between the reinforced concrete slab and the finishing floor covering) may swell, become cracked, or begin to crumble. In such situations, the question arises: how to remove a layer of concrete from the floor without damaging it and spending a minimum of effort on this procedure? You will find the answers in this material.
Protective equipment and tools
In most cases, a joint cutter is perfect for removing the concrete layer from the floor, with which you can quite easily dismantle screeds up to thirty centimeters deep.
It is also quite possible to use a concrete hammer, hammer drill and other tools for drilling or diamond cutting of concrete.
Those who are accustomed to relying entirely solely on their own physical strength can try to use a crowbar, hammer, chisel and sledgehammer. This set of tools will also be indispensable if work is carried out in the absence of electricity.
If we talk about protective equipment and auxiliary equipment, then you will definitely need:
- Workwear
- Protective glasses
- Helmet
- Respirator
- Durable bags for storing waste
Preparatory stage
Before you begin removing the screed itself, you should remove the skirting boards and remove the existing flooring (if you plan to continue using it, do this with extreme caution). The operations described above do not require the use of any “exotic” tools and can be performed quite easily even by beginners who do not have relevant experience
The operations described above do not require the use of any “exotic” tools and can be performed quite easily even by beginners who do not have relevant experience.
The most effective ways to remove concrete screed
To remove a layer of concrete from the floor, you can use two methods:
- Impact - used in cases where the screed does not contain any reinforcing elements. Removal of the concrete layer is carried out using an electric jackhammer, the power of which must be selected depending on the thickness of the screed.
- The cutting and drilling method is the optimal solution for residential and public buildings, since it is characterized by a relatively low noise level. In addition, during the work process, as a rule, it is possible to avoid excessive loads on supporting structures.
After the main part of the work on dismantling the concrete layer from the floor is completed, all that remains is to pack the resulting construction waste into pre-prepared bags for subsequent disposal and begin preparing the solution for a new screed.
Features of panel board removal
Panel parquet consists of square modules with a base made of wood or chipboard, on the front side of which small strips are glued. This type of parquet is somewhat easier to remove than piece parquet. As a rule, dismantling in this case begins from the wall opposite the window, from the last installed panel, which has an open groove. One module is pryed up with a crowbar and torn off from the base. The remaining shields are removed in the same way.
Panel parquet
You can also use a chisel or hammer drill to remove panel parquet. Dismantling the panel covering occurs quickly, even though previously this type of parquet was often laid on resin and held up very well.
What can panel parquet be like?
Table. How to remove panel parquet with your own hands.
| Steps, photo | Description of actions |
| Step 1 | Using a grinder, a cut is made in the parquet flooring between several adjacent panels. |
| Step 2 | The resulting debris is immediately collected with a vacuum cleaner - then there is less risk of getting very dirty. |
| Step 3 | With the help of a crowbar, the parquet board is raised - the crowbar is driven between it and the base. The shield is removed. |
| Step 4 | If the crowbar does not fit well into the gap between the shield and the base, you can use a hammer or hit it with your hand (depending on the required effort). |
| Step 5 | The required number of parquet panels are removed or the covering is completely dismantled, depending on what needs to be achieved - minor repairs to the floor or a complete replacement of the covering. |
| Step 6 | Each new section is sawed with a grinder. Further dismantling is carried out according to points 2-5. |
| Step 7 | Remains of parquet that are not removed immediately are cleaned off additionally. |
| Step 8 | The base, if it is installed on self-tapping screws, is easiest to remove - to do this, the fasteners are unscrewed and the base sheets are removed. |
| Step 9 | You can also, if you don’t mind the base, simply tear it off the joists using a crowbar. |
Dismantling the concrete covering
There are many ways to dismantle a concrete coating, the most popular and most effective are: impact, concrete removal with slabs and cutting. We will tell you a little further about the features of the impact method, but now you will find out by what principle all concrete dismantling occurs.
The process can be divided into the following stages:
- Beginning - at this stage it is necessary to make an initial hole, from which further dismantling will take place. To do this, you can use any of the possible methods.
- After the beginning has been made, the entire screed is divided into individual elements by impact or by cutting.
- Finally, large parts are torn off from the supporting base and taken out of the room.
If the old screed is laid on a layer of crushed stone, then it must be removed together with the layer of crushed stone, this will make it much easier for you to tear it off from the base. Most often, broken concrete is collected with a shovel, and placing a shovel through the rubble will be very difficult. It is much easier to do this by sliding along the base.
Features of various methods
This option involves an impact force that is applied to the concrete surface, due to which the concrete begins to crack and break into small pieces, which can then be easily collected and thrown away or used for other purposes. Dismantling a self-leveling floor or concrete with a topping layer is best done using this method, since it is best suited for high-strength coatings and helps to easily clean more areas.
The power of electric jackhammers must be correctly calculated and selected depending on the thickness of the layer to be removed.
Next, we will tell you how to do the work correctly using:
- Impact devices: hammer drill and jackhammer.
- Cut concrete using a diamond blade.
- Dismantling the screed - drilling with a diamond drill.
Working with impact devices
We start from the door or any corner convenient for you. First, punch a hole all the way to the base and clean it completely. After this, you begin to chip five to ten centimeters from the edge, gradually expanding the hole and moving across the entire area. It is better to carry out the work in sections of three to five square meters. They crushed the intended area, cleared it and continued work.
Dismantling, during which the mortar is removed from concrete and cement, regardless of the method in which it is done, consists of breaking the floor into pieces.
A jackhammer is best suited for such purposes, since it is designed for this type of work. Many craftsmen use a simple hammer drill, equipped with a special pick or chisel. In this case, the drilling mode must be turned off and only the impact function must be left.
Cutting concrete
Dismantling concrete with a simple circle on metal is impossible. You will need to purchase a special diamond-coated wheel that is designed for concrete and stone.
When working with a circular saw, determine the level to the base so as not to touch it when cutting. This is about 10 cm, on the first floors it can be up to 25 cm.
The entire area is cut into small sections of half a square meter, then they are carefully undermined and removed entirely. In this case, it is necessary to work in safety glasses and a respirator, as there will be an incredible amount of fragments and dust, it is better to open all the windows and create a strong draft.
Working with a drill
If your hammer drill cannot dismantle a concrete floor, you can make the task easier. To do this, take a diamond drill and make a large number of holes in the concrete. After that, we use a lance to beat off the areas that are drilled on all sides. Try to maintain a right angle when drilling, as the drill can easily break.
If the work is progressing too slowly due to the constant overheating of the tool, try to find or purchase another hammer drill. Then, in the intervals when one cools down, you can safely use the second. Also, in order to crush the screed continuously and not be distracted by cleaning, you can find an assistant who will clean the area behind you.
- How to make a concrete floor screed with your own hands
- How and with what to level the floor in an apartment
- How to choose the right self-leveling floor mixture
- Stages of polishing and grinding a concrete floor
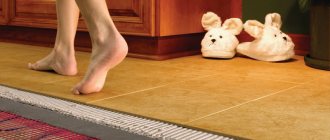
- We competently fill the water heated floor
Precautionary measures
Cutting and grinding concrete is a dusty and labor-intensive process. Therefore, you should prepare for it.
- Protect your respiratory system with a respirator and your eyes with goggles;
- Wear closed clothing;
- It is advisable to remove everything unnecessary from the room and cover heavy furniture with plastic wrap;
- It is advisable to carry out the work with the windows open and additionally humidify the room.
How to coordinate openings in load-bearing walls
The arrangement or expansion of openings in a concrete wall must be carried out in accordance with all standards and have permission from the relevant authority. When making a decision to carry out redevelopment, you need to take into account a number of indicators:
- The number of the floor on which the redevelopment work will be carried out (the load on the walls will be less, the higher the floor on which the apartment is located).
- What year was the house built?
- What is the width of the opening and where is it located (at the junction of the slabs, at what distance to the external walls).
- What condition are the walls in the room?
The redevelopment of an apartment can be entrusted to employees of organizations that have permission to carry out such construction work. Nowadays, very often owners remodel buildings and apartments, widen old openings in the walls, and install new ones.
- Diamond cutting is considered the leader in building dismantling work. The cutting elements are capable of cutting through a concrete wall whose thickness exceeds 60 cm.
- Cutting using the waterjet method is more environmentally friendly and safe.
- A good effect is obtained when using oxygen-lance drilling, however, certain training and experience are required to perform the work. You can get burned if you do not follow safety precautions when working.
The main thing, when carrying out work, do not forget that the changes that will occur in the load-bearing walls must be carefully calculated and approved by the appropriate authority, and the openings must be strengthened.
Base requirements
The filling technology requires compliance with the following requirements:
- Strength and integrity of the rough coating. Before installation, a number of surface preparation activities are carried out:
- small cracks are sealed with cement mortar;
- the entire surface is carefully tapped, any voids found are cleared and sealed with cement mortar;
- the prepared base is covered with a layer of primer, which will strengthen the old screed and prevent the appearance of fungus or mold on the surface.
- Compliance with the standards for the thickness and weight of the floor, since not all floors can withstand increased load. This is especially true for multi-storey buildings. And an increase in the thickness of the base will affect the height of the ceilings, which will affect the appearance of the entire room.
Important! Remember that the use of metal reinforced mesh makes the floor structure heavier.
Floor and ceiling
During a major overhaul, it may be necessary to dismantle the old flooring and screed, which is located between the load-bearing floor and the final finish.
How to perform this operation most effectively and what aspects to pay attention to is the topic of this review. . And first a little theory
A floor screed is a monolithic (made from cement-sand mortar) or composite (for example, dry screed) structure, which is applied directly to existing floors and allows you to solve a number of important construction problems:
And first, a little theory. A floor screed is a monolithic (made from cement-sand mortar) or composite (for example, dry screed) structure, which is applied directly to existing floors and allows you to solve a number of important construction problems:
- Filling voids, potholes, assembly joints and finishing the floor (for the possibility of subsequent finishing);
- Possibility of increasing the consumer characteristics of the object (when laying additional layers of heat-insulating, waterproofing and noise-absorbing materials under the screed);
- Increasing strength characteristics by introducing reinforcing metal mesh into the floor screed.
- Increasing the load-bearing loads of the entire building as a whole.
However, over time, the existing foundation may deform, which is the most common reason for dismantling a floor screed.
Types of screeds
There are several types of leveling screeds, the main ones:
- wet;
- semi-dry;
- dry;
- self-leveling.
The choice of technology depends on the purpose of the premises, operating conditions, scope of work and financial capabilities.
So, dry screed is not suitable for rooms where leaks and flooding are possible.
Semi-dry is not economically profitable when performing small volumes, as it requires the use of special equipment and mechanisms.
Self-leveling mixture is ineffective in the presence of large differences and unevenness.
Wet screed
The screed mortar is made from cement and sand in a ratio of 1:3, with the addition of plasticizers and water.
The mixture is thoroughly mixed in a mortar mixer or a hammer drill with an attachment until it reaches a homogeneous creamy consistency.
Important! A screed made using wet technology is subject to shrinkage and cracking, so it must be reinforced with a steel masonry mesh with 100x100 cells. In order for the reinforcement, after pouring the concrete, to be in the mass of the screed, you need to place special plastic clamps or improvised devices under the mesh: wooden blocks, plywood scraps, lumps of mortar
In order for the reinforcement, after pouring the concrete, to be in the mass of the screed, you need to place special plastic clamps or improvised devices under the mesh: wooden blocks, plywood scraps, lumps of mortar.
The solution is poured onto the prepared floor and stretched using the beacon rule.
Figure 2. Pouring cement-sand screed using the wet method.
Cement-sand screed creates a durable, reliable coating that is ready for subsequent finishing after 28-40 days.
Semi-dry screed
It is made from a mixture of grade 400 or 500 cement, fine river sand, fiberglass and modifying additives that increase the ease of installation and improve the performance properties of the coating. Water is added to the solution in minimal quantities, only to hydrate the cement.
Fiber fibers act as reinforcement in such a screed.
It is advisable to arrange a semi-dry screed for significant volumes.
To manufacture it, special equipment is required:
- a pneumatic blower that performs the function of a mortar mixer and a pump that supplies the mortar to the installation site;
- damper in the form of a funnel, for distributing the mixture over the surface, dampening the speed of the semi-dry composition arriving under pressure.
- trowel - for compacting and creating a perfectly even, smooth layer.
The solution is placed on the base and leveled using a straightener. Immediately after installation is completed, it is processed with a trowel.
After a day, the screed is ready for use. You can begin finishing after three to four days, depending on the humidity and temperature in the room.
Due to the minimal amount of water, a dense and durable layer is created that is not subject to shrinkage and cracking.
Figure 3. Semi-dry screed device.
Dry floor screed
This screed is laid in dry, heated rooms and consists of a layer of insulation and a coating of rigid sheet materials: gypsum plasterboard, gypsum plasterboard, plywood or special two-layer gypsum fiber floor boards from Knauf.
Expanded clay mixture, Penoplex or hard mineral slabs are suitable as insulation.
The most common is dry screed with expanded clay insulation, as it has excellent sound insulation and high thermal properties, low weight and ease of installation.
Important! When backfilling, use expanded clay of different fractions to create a more dense layer
Figure 4. Dry screed device.
Self-leveling screed
Self-leveling screed is used if it is necessary to level bases with minor defects and unevenness.
For its production we use dry construction mixtures or ready-to-use polymer compositions.
Dilute the dry mixture and mix according to the instructions on the package. In this case, the thinner the layer, the more liquid the consistency of the solution should be.
The thickness of the self-leveling layer should not exceed 15-20 millimeters.
Pour the finished composition onto the surface, spread it over the surface with a comb spatula and roll it with a needle roller to remove air bubbles.
The liquid plastic mixture, spreading over the surface, fills all irregularities, cracks and pores. Creates a perfectly flat, smooth, durable base, ready for finishing in 5-7 days.
You can walk on this surface the very next day.
Figure 5. Self-leveling screed device.
Technology and cost of concrete floor dismantling
The most common type of base for flooring is a layer of cement-sand mixture, which is located on the ceiling. If defects appear in the screed or its reconstruction is required, the concrete floor must be dismantled. Pouring the next layer of mortar is not always effective, since the solidity of the structure is lost and the load on the floors increases (more details here).
- Demolition technology
- How much does dismantling cost?
In what cases is the screed dismantled?
The concrete layer is multifunctional: it fills uneven floors, levels the surface, provides strength, thermal and waterproofing of the floor, and durability of the top coating. The quality of the screed depends on the correct percentage of the components of the concrete mixture, the presence of a lower layer of crushed stone or expanded clay, and reinforcing mesh (more about this here). If one of these conditions is not met, the concrete is destroyed.
The screed is removed under the following circumstances:
- the performance characteristics of the floor have deteriorated - signs of breakage (cracks and delamination) have appeared, unevenness has arisen, cement is seeping through the seams of the finishing coating;
- it was decided to replace the floor tiles because voids appeared underneath them;
- installation of reinforced screed required
- repair or installation of pipes and cables in a concrete layer is carried out;
- it is necessary to change the floor level;
- The house is undergoing a major renovation.
Dismantling methods
- Manual. It is advisable for small amounts of work, as it requires great physical effort. The work is carried out using a pick, crowbar, sledgehammer, hammer, chisel.
- Mechanized. It is carried out by construction companies using mechanical and electrical tools - in an apartment, a hammer drill with a “shovel” attachment is usually sufficient. In difficult cases and when the concrete layer is thick, electric platforms, diamond cutting equipment, a grinder, and high-power pneumatic concrete breakers are used.
- Combined. It is a manual method with the connection of equipment. It is practiced for the careful and delicate removal of concrete in multi-storey buildings, so as not to cause inconvenience to the residents of neighboring apartments. Manual work is carried out on problem areas.
Preparing the premises
Preparing to repair a concrete floor comes down to emptying the room and thoroughly cleaning it. Large debris is raked with a shovel, then the floor is thoroughly swept two or three times with a wet broom and spraying. After each sweep, potholes and cracks are blown out with a household vacuum cleaner after the floor has dried.
If you have the opportunity to use an industrial vacuum cleaner, preparing the floor can be done in an hour: suck the floor, blow out potholes with cracks, suck again - and that’s it, the preparation is complete.