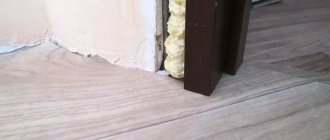
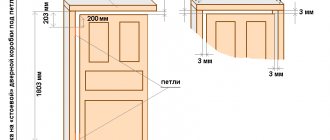
- The slats are cut to the required height. When suspended, they should be raised above the floor by 1.5-2 cm.
After connecting the lamellas and half-lamellas, a locking panel is attached on one side, and a blind (fixing) panel on the other.
The finishing of the opening with platbands is done after the installation of the arched transom.
Video of installation of an accordion-type folding system:
In small apartments, doors to a skylight with an arch must be planned before work on its creation begins. And you can close an existing gap without harming the surrounding area using a folding structure.
How to close an arch: installing an accordion-type folding door and other options
Openings with an arch make standard apartment interiors stylish and elegant. The arched shape of the doorway visually expands the space and changes the interior beyond recognition. In city apartments, arched openings are not always left open, since it is necessary to ensure the possibility of complete separation of individual rooms. But the curved upper lintel creates difficulties when choosing and installing a door in an arched opening. There are several options for how to close such an opening with a door; they differ both in the complexity of execution and in the principles of approach to solving such a problem.
Review of interior curtains: options in the interior, photos
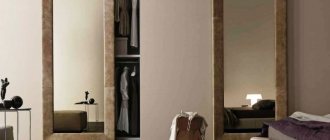
Interior curtains have been used since ancient times. Curtains serve as decoration for doorways. On the one hand, they are decoration and create comfort, but at the same time they have certain functions: hide an area of the room from prying eyes, conveniently move between rooms, and also exclude excess light. It follows from this that the presence of interior curtains does not indicate wealth and a sense of style. There are situations when you need to connect two rooms, but the door is not at all suitable for this, for a number of reasons: the size of the opening, the furnishings in both rooms, etc.
Interior curtains have been used since ancient times.
They decorated the homes of people of different incomes, and appeared in palaces and stone castles.
Options for closing an arched opening
There are two types of situations when the owner installs a door in an arched opening. The first is when the issue of installing the door is decided after the arch is made. In this case, the matter is complicated by the fact that the opening is already ready, and you have to rely on ready-made conditions.
Arch made inside the opening
The second is when the owner thought in advance about options for installing a door in the arch, and when making the opening prepared the necessary elements for this (niches for a cassette sliding door). From the options below, you can choose the best one, depending on your specific situation.
When creating arches, the opening was not enlarged, but roundings were made
An important factor when choosing the type of door and the method of installation in the arch is the method of making the opening with the arch. If the radius is inside a rectangular opening, then its actual height will remain the same, but visually it will appear lower.
Closing the opening on one side with a sliding door to the full height
Sliding doors are installed on the outside, with the doors sliding along the wall. The size of the canvas is made according to the height of the opening at the top point of the arch. Thus, the sash will overlap the arch on one side of the opening. On the reverse side the passage will remain open.
Sliding door with curved opening
Important! In this combination of a rectangular panel and an arched passage, the sash should have a symmetrical pattern, either in the form of radius panels, or be made using arched glazing. In this case, all segments in the design of the canvas should have a vertical orientation, preferably without horizontal jumpers. This way you can visually raise the opening.
Cassette door installation
This is the best option, which is planned at the stage of creating the arch. An arch with a cassette-type sliding door is also a budget option compared to the cost of manufacturing a door leaf with arched shapes. A rectangular canvas with the same pattern is used. This approach will allow you to close a non-standard opening with any shape.
Cassette door in arched opening
Making a wooden door
If the door is installed in a ready-made opening, and sliding structures are not suitable for the owner for some reason, all that remains is to go to a carpentry shop and order an arched door.
Wooden door in an arch
In wide openings you can install a double door, each leaf of which is a folding door book.
The opening increased in height
Making an arched portal by cutting out the upper part above the opening in the partition is the correct option from an aesthetic point of view. Such an arch will look proportional in the room. A high arch will give more room for imagination, and there are many more possibilities for installing a door into it. The main principle of closing a high arched passage with doors is the use of structures with transoms. With this approach, standard doors of any type can be installed in the opening.
Door block with transom
An expensive and at the same time luxurious option is to order a solid wooden panel with a solid wood frame from the workshop. This method is used to close narrow arches designed for a single-leaf door. A cheap option would be a regular door with a transom.
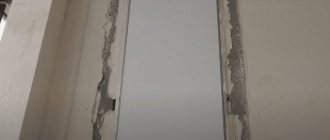
The most affordable way to close an arch with a door is to make a rectangular box without a threshold and install an accordion-type folding door into it. These systems are sold in kits, have a variety of designs, and are easy to install. After installing the folding door, you can evaluate how it looks in the interior, and in accordance with the impressions received, make an upper arched transom and complete the design of the opening.
In addition, folding systems are not designed for intensive use. This is exactly the mode that is usually assumed when installing in an arch, because only in the open state does it look impressive.
How to decorate
- Along the entire contour you can hang closed or open shelves or put up shelving. This way, you will get additional storage space for things, books, and trinkets.
- If the arch is made of plasterboard, you can make through windows, niches, shelves for flowers or accessories a few centimeters from the passage.
- The pomposity of the interiors will be added by facing the openings on the sides with plaster bas-reliefs, and on top with sandrik, that is, a slightly protruding cornice.
- You can add spotlights, LED strip or ready-made furniture lighting to the slopes.
- Slopes can be decorated with extensions and platbands, which are made from wood, MDF and PVC panels. Together they give a finished look and expressiveness to the entire structure and can serve as one of the accents in the interior. The extensions come with or without grooves. The first type is preferable, since the joints between the planks will be less noticeable and will not require careful adjustment. Platbands are very different. They are often made from wood, pre-treated with insecticides, microorganisms and fire repellents. This material is unlikely to soon cease to be a favorite of designers and homeowners; it is very practical, aesthetic, environmentally friendly and versatile.
What are folding doors made of?
The bulk of folding systems in stores are made of MDF or plastic. The plastic is light and practical, but it lacks soundproofing properties, and the design itself is noisy and gives the impression of laxity.
Important! The plastic panels have stiffening ribs, so despite their external flimsiness they are rigid and durable.
The assembled plastic structure is lightweight, so the technician will not need outside help for installation. The plastic itself is easy to cut, and modern movable interlocking panels allow you to assemble and install the structure yourself in a few hours. In addition, guide profiles in plastic structures are attached via clips, which simplify the installation process.
Systems with MDF slats look solid, but they are more difficult to install. They look organically in an arched opening. Due to the weight of the structure, the guides are attached to the opening using self-tapping screws.
Classification of curtains
If you decide to cover the doorway with curtains, then there are a wide variety of them. Below are the most common options.
Curtains
Despite the large mass, weight and visual load, in some cases the use of curtains with lambrequins is justified. With their help, doorways to the bedroom or nursery are most often decorated. In the first case, you can also highlight the women's boudoir. The combination of fabrics on the door and window opening in the living room will also look interesting.
Plastic
As you know, modern style (hi-tech, modern and minimalism) involves the use of practical materials, which include plastic. Therefore, in this case, you can use plastic partitions that will fit perfectly into a functional interior. The canvas can be either flat or divided into two parts. The list of advantages includes not only decorativeness, but also soundproofing. By choosing this option for decorating the doorway to the kitchen, you can protect other rooms from unwanted odors.
Roller blinds
Original and practical curtains that roll up onto a shaft placed at the top are considered fashionable today. The style and types are quite diverse, which will allow a professional designer to realize any ideas and ideas, and an amateur to decorate rooms to his liking. It is worth noting one drawback - the duration of opening, which complicates the speed of movement between rooms.
How to install a folding structure
First, the box is made and installed. It is assembled from additional panels that do not have the usual quarter for the door leaf. The box is made according to the height of the straight part of the sides of the arched opening.
After installing the box, you need to measure the height and width of the resulting opening and only then go shopping for a folding system. This way you can accurately calculate the number of sections and select them according to width.
Important! After purchasing a folding door, you must carefully read the installation manual. Each manufacturer provides their products with detailed instructions.
- In budget models made of PVC, the slats are connected to each other through special grooves or using gaskets. The joining process looks like this: the panels are moved, one lamella is inserted into the groove of the other lamella and pulled to the end.
- The MDF sections have special eyes that fit together and a long pin (axle) is threaded through them.
Assembling folding door slats
- It is better to install the lock and handle in the lock panel before assembling the blade.
- The slats are cut to the required height. When suspended, they should be raised above the floor by 1.5-2 cm.
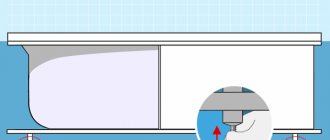
- The rollers are attached to the upper end of the sections one at a time, starting from the locking lamella. Before installation, it is advisable to treat them with technical petroleum jelly.
- The top profile is cut exactly to the width of the opening, and the side profiles are placed close to it from below.
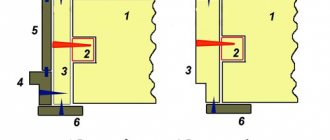
- The procedure for installing the profile depends on the intended method of attachment to the opening. If the profile is attached to clips, you need to mark and secure the clips around the perimeter of the box. To do this, a line is drawn in the center of the upper jumper, and using a level it is continued on the racks. The clips for the locking vertical profile are smaller than the others. On the top jumper, clips are attached in increments of 5-7 cm, and on the sides it is enough to install 4 pieces. After trimming the guides, all that remains is to insert them into the fixed clips. If they are tight, you can use a rubber mallet.
- If the profile is attached to self-tapping screws, then first install the upper guide. It is screwed onto one screw in the middle. After this, the guide is unfolded so that the sash rollers can be inserted into it. Having inserted the sash, it is assembled in the center, the profile is turned back, finally aligned and the remaining screws are tightened. Only after this the side parts are screwed in level.
- At the end, the blind panel is snapped into the side profile and the mechanism is checked for smooth operation. A strike plate for a lock or latch is installed in the lock profile.
After connecting the lamellas and half-lamellas, a locking panel is attached on one side, and a blind (fixing) panel on the other.
The finishing of the opening with platbands is carried out after the installation of the arched transom.
Installation video of the accordion-type folding system:
In small apartments, doors to an opening with an arch need to be planned before work on its creation begins. And you can close an existing opening without damaging the surrounding space using a folding structure.
Source: mezhdveri.ru
Unique engineering board Bentline SUPERBASE
Solid board is a popular floor covering that is often chosen, but this coating has its drawbacks: in the Russian climate, the board often begins to dry out, which leads to warping, the appearance of gaps and cracks. Moreover, the thicker the boards, the greater the effort that occurs when they dry out.
But there is a solution - this is a perfect version of an engineered board with a unique design and SUPERBASE fastening system!
Bentline engineered board has a 2-layer construction, with a SUPERBASE fastening, which no other manufacturer has. It is specially designed for the conditions of the domestic climate with sudden changes in humidity and temperature conditions.
Source
How to make an interior arch - design, drawings and assembly procedure
Transforming the interior of premises is done in different ways. One of them is replacing the door with an arch. There are several technologies for its arrangement, but if you look at it in detail, almost all of them are similar and can be completely implemented on your own. Moreover, you can install both purchased elements of the “vault” and those made independently.
Do-it-yourself arch: step-by-step instructions (plasterboard), 3 methods
Types of arches
Types of interior and corridor arches
One of the options for a semi-arch in the interior
The classic is distinguished by the correct shape of the top. This is strictly a semicircle, the radius of which is equal to half the width of the doorway. This type looks good with an opening height of at least 2.5 m. It fits well into any interior, but looks best in a long corridor, or instead of the entrance door to the kitchen.
A classic arch requires a height of at least 2.5 m
Art Nouveau arch on the site of a former balcony door
Suitable for openings of large width and not very high height
Portal with wood frame
Before you start making an arch, you need to decide on its parameters. select the type, and then the parameters: where it will start, and what the radius of curvature will be. It could be a really sharp bend, or it could just be some rounding of the corners.
Rounded corners in standard doorways look better than steep arched curves
Step-by-step instructions with photos: the fastest way
A profile frame is screwed to the selected dimensions
Screwed the drywall into place
Now we take a piece of profile or hard corner and set aside half the width of the opening from one edge. At this point we make a hole in the corner and insert a nail into it. We stick this nail into the middle of the doorway we marked earlier on the sheet. It turns out to be a kind of compass, with which it is easy to draw an ideal line.
Device for outlining an arc
Using a corner we draw an arc
We fix the cut out fragment
Why is it so difficult and not just to make a copy of the first sheet? Because few openings are symmetrical. As a result, installing the second sheet so that the lines of the arch coincide is very problematic.
Level both walls at the same time
We measure the length of the arc, cut out a piece of the profile of the same length, make notches on the walls every 3-4 cm. This tape will need to be secured along the arch arch on one side and the other.
How to cut a profile for an arch
We fasten the notched profile, simultaneously giving it the shape of an arch
Jumpers are cut from the same profile
Fastening jumpers
We attach a strip of gypsum board to the arch
Next came the finishing work: a special corner is attached to the corner, everything is puttied using the usual technology: first the starting joints and corners, then the finishing one.
Arched opening made of plasterboard: second method (photo report)
This method is good if the thickness of the partition is small: try attaching the profiles if the gap between them is several centimeters, and then attach the jumpers. It all starts the same way: the first wall of the arch is cut out, attached and transferred to the second sheet.
First we also cut out the sides
Afterwards, wooden crossbars are cut along the width of the gap between the two sheets, which are attached along the edge of the arch with self-tapping screws.
Insert wooden blocks cut along the width of the opening
The cut strip of drywall is fastened starting from one of the sides. To make it more convenient, you can fix it with clamps, since the thickness of the wall is small. When attaching the strip, you can use the self-tapping screws that were used to fasten the bars. This way you will definitely hit the crossbar.
Using clamps, the strip can be fixed
Then all that remains is to secure a special perforated corner in the corner and smooth out the unevenness.
A corner is attached to the arch arch, everything is puttied. Putty allows you to hide all the flaws
It is also more convenient to smooth the dried putty along the arch arch with the entire plane of sandpaper attached to a grater. It’s unpleasant that dust falls into your eyes, making it almost impossible to work without glasses.
DIY plasterboard arch is ready
The arch is assembled from plates cut from plasterboard
They are attached to putty diluted with a mixture of PVA and water. This batch dries quickly, so first we cut the plates and try them on. You can fold it on a table, but the vault will turn out upside down, but it will allow you to evaluate how correctly the plates are assembled.
Side view of the arch opening
A putty arch looks like this
Preparatory activities
Choosing an arch type
Experts recommend focusing on the ceiling height and the general style of decoration of the room. There are several options for arched structures, but most of them reduce the opening by installing a supporting frame by about 150 - 200 mm.
- With low ceilings, it is hardly worth getting rid of interior doors. At the very least, you should think carefully. The only possible option for finishing the opening after their dismantling is plastering followed by pasting (wallpaper, fabric) to match the walls. Building an arch using this method is quite simple; it is only necessary to correctly process the end parts of the passage. But this room design option has a significant drawback, and therefore does not suit everyone - the lack of sheathing makes it impossible to install hidden spotlights in the opening.
- In some articles on the topic of making an arch, there are recommendations for giving the desired geometry to the passage between rooms using cellular blocks, bricks or concreting. Not to mention the complexity of such work, it is worth considering the additional load on the floor. And since you will also have to deal with the solution, it is not the best option for an apartment.
But if the decision is made, then you should take into account the features of the interior of the home. This will help to correctly determine the optimal type of arch.
- Classical. The upper part is an arc with a constant radius (semicircle). It is relatively easy to make, since it has the correct geometry. But it is advisable to install it only in openings between rooms with high ceilings.
- “Modern”, “Romatica” are well suited for multi-storey buildings. The latter type of arches has a large width, and therefore are recommended for installation in the opening leading from the hall to the hallway.
- "Portal". The fundamental difference from others is that this is a rectangular arch. It is advisable to install it in private buildings. When applied to an apartment, it looks great, but only if straight lines predominate in the design style of the room. A significant advantage of this design is that it can be installed without much difficulty, even if you have no skills.
- "Ellipse" and "Trapezoid" have a more original shape. When deciding how to make an arch in a doorway according to one of these schemes, it is worth considering that the correctness of the geometry largely depends on the accuracy of the calculations of the parameters of all elements and radii (angles).
There are other options for designing openings: Venetian, Florentine, with “shoulders” and a number of others. But it is so difficult to build an interior arch of any of these varieties that you should not choose them for independent installation.
Selection of materials
- Frame. There are only two options here - wooden slats and metal profiles. It is more difficult to work with the former, especially if the vault has a geometry with changing parameters. Bending wood is not only a complex process, but also a long one. In addition, wood absorbs moisture well, is susceptible to drying out, and therefore deformation cannot be avoided. In this regard, a door arch assembled on a metal frame is more durable and reliable.
- Facing. Panels made of plastic or chipboard with lamination look great, and they do not require further finishing. The downside is that it is difficult to choose their shade for a specific interior; besides, such an arch will be more expensive. It is better to use elements made of fiberboard, multi-layer plywood (small thickness) or gypsum board. Working with these sheet materials (cutting, bending) is much easier. Plus, the finishing design can be done in any way you wish.
But you should pay close attention to the recommendations on how to make a wooden arch. There is no doubt that the design will be strong, durable and inexpensive. But there are a number of nuances.
- You must have experience working with wood. It is difficult to bend and, in some cases, to process. For example, the selection of grooves and quarters cannot be done without special tools and devices.
- The lumber still needs to be selected correctly. First of all, by breed. Each has its own characteristics, and its use largely depends on the specific microclimate of the room.
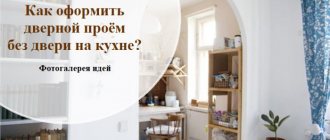
What to veneer with
To understand how to design a doorway without a #door, you need to decide on the decoration of the premises. Since it faces two rooms at once, you need to consider how it will look from both sides, not forgetting about style and color nuances.
Pixabay
Wood and MDF
Wood finishing is used in most historical #styles. For these purposes, oak, ash, hornbeam and pine are most often used. The parts are sold ready-made, fastened with nails or self-tapping screws. A substitute for natural wood can be MDF, a material made from pressed fibers. The panels are attached with glue or liquid nails. How to decorate a doorway in this way, look at the photo.
Pixabay
Stucco molding
Polyurethane is a flexible and dense material from which the arch frame is often made. It also allows you to create an imitation of expensive gypsum stucco. Installation is carried out using special glue. Polyurethane can also be used to create columns on the sides of the doorway.
Polymer stucco molding does not break, cuts well, and is compatible with any assembly adhesive. Gypsum is nobler, but heavier and cannot withstand falls, so you need to work with it very carefully. In addition, special glue or gypsum mortar is required for installation.
The surface can be left white or painted.
Instagram @niart_interior
Stone and tile
Stone cladding is much heavier than wood or polyurethane. Before starting work, the walls are leveled using putty. The choice of glue depends on the weight of the stone: liquid glue is suitable for light slabs; for heavy slabs, a solution of cement, glue, lime and sand is prepared. The facing begins from the bottom and gradually rises, giving the bonding agent the opportunity to dry. Each element must be held against the wall until it sets. Excess must be removed immediately if it comes to the surface, otherwise it can spoil the final appearance.
Inlays made of wood or plastic, inserted between the rows of tiles, will help maintain the same thickness of the seams. They are easy to remove after the composition has dried.
The seams are decorated with grout, and the entire composition is decorated with a composition that adds shine. Artificial stone and clinker are highly wear-resistant, but their natural counterparts have much higher strength. For interior partitions they may be too heavy. Most often, the edges of the masonry are made uneven and torn, creating deliberate negligence and the effect of antiquity, which, in contrast, looks advantageous in modern interiors.
Plaster and paint
It's easy to decorate a #doorway with your own hands using plaster. Its installation does not require special skills. Before applying it, the base of the arch is leveled and treated with a primer. The paint is applied after drying. The relief depends on the shape and surface of the roller used.
Plastic panels
The panels bend well and fit easily even on non-standard shapes. The covering is attached with glue. The finished set consists of six trims (three on each side - top and sides) and three extensions. The top elements are not only flat, but also suitable for arches. If necessary, they can be easily cut with a hacksaw.
Corners are subject to harsh operation due to high traffic and require high-quality finishing. Plastic cannot boast of durability, but if treated with care it will last a long time. Among its advantages are ease of maintenance, the presence of grooves for wires, a variety of colors and imitation textures.
Drywall
GCR is durable, easy to install and easy to cut with a knife. It has good adhesion to any adhesives. They cover a frame made of metal or wooden profile. The frame is attached to the walls and ceiling. It can have any configuration. Its strength depends on the thickness of the profile and the distance between the prefabricated elements. The profile bends and cuts easily. The sheets are installed with self-tapping screws. The seams between them are puttied.
Stone, clinker, wood, MDF panels, simple painting or wallpaper are suitable for many styles: eco, scandi, loft, minimalism, ethno, country, kitsch and others. True, the last two finishing options look neat only with perfectly smooth walls. This applies most of all to painting, which emphasizes any unevenness, especially in the presence of decorative lighting.
Operating procedure
- Removing the door frame. The opening must be completely cleaned; not only from the frame with the sash, but also from sealing/insulation materials.
- Definition of parameters. As a rule, to make an arch in an apartment with your own hands, the opening will have to be slightly widened. In most standard buildings, the internal walls are made of bricks, blocks or simply frame partitions, and therefore increasing their height or width is not so difficult. Moreover, you won’t have to do any special leveling - the defects will be hidden under the lining of the arch.
- Marking. One nuance should be noted on this point; The ends of the wall must be strong. Therefore, if it does not meet this requirement in a separate area, you will have to think about either strengthening it (for example, with a corner), or additionally removing part of the material and then leveling it. But in the latter case, the size of the opening will increase. This is typical for houses made of wood if it is discovered that rot has developed on the timber (log).
- Dimensions should be taken at several levels. Even if the distortion is visually unnoticeable, difficulties may arise when installing the door arch with your own hands.
- There are many discrepancies in the question of what to do first - draw up a drawing of the arch or determine the dimensions of the opening. Here it is worth focusing on local specifics. If the wall material is easy to process, then widening the opening is not difficult. Otherwise, the design parameters will have to be “adjusted” to it.
- Fastening the supporting frame. It is installed in several stages.
- Arrangement of the main circuit. In accordance with the drawing, all external vertical installation slats are “fastened” to the wall.
- Fastening the "vault". Additionally, the upper part of the arch is fixed with hangers, which are located symmetrically across the entire width of the opening.
- Strengthening the frame. For this purpose, transverse elements are used, installed along the arch along its entire profile. Approximately - 50±10 cm from each other. For gypsum boards, the maximum is sufficient (about 55 - 60), but if the cladding is done with boards, then the interval should be reduced to 45 - 50.
- Sealing gaps. In fact, this is one of the ways to insulate an opening. Depending on the material of the wall and frame, the appropriate means is selected - mortar, polyurethane foam, putty or other.
- Wiring. As a rule, all arched openings are illuminated. Therefore, the lines are installed before finishing the frame begins.
- Cladding of the structure. The specifics of fixing the cladding elements depend on their material. But they are attached to the metal profile slats with self-tapping screws; the easiest and most convenient way. You just need to mark the location of the holes and drill channels for the hardware.
- The easiest way to make an arch instead of a door is from plasterboard. But not a traditional design, but a special one, designed specifically for such structures. It is reinforced with fiberglass (on both sides), and therefore does not break when bent. If the frame has a complex shape, then this is the best material for its cladding.
- Changing the geometry of conventional gypsum boards is done using different methods - “wet” or “dry”. This is a separate topic, and before starting work, this issue should be carefully studied. Each method has its own specifics, but one thing in common is increased sheet consumption. Without experience, you cannot do without damaging and discarding drywall.
- When cutting gypsum board or plywood, it is better to use a jigsaw. Precise cutting cannot be achieved with a conventional tool.
- Finishing the arch
- Applying putty. This is necessary to smooth out roughness.
- Primer treatment. Such products simultaneously increase the moisture-repellent properties of the base and the adhesion of the material.
- Strengthening the finish (if necessary). The edges of the gypsum board are reinforced with a small corner (made of plastic, with perforation), the surface itself is reinforced with a reinforcing mesh, which is glued.
- Re-application of putty composition and primer.
- Grinding.
- Finish coating. Possible options are paints and varnishes, decorative films, veneer, wallpaper, stucco, mirrors. There are no stereotypes - your own imagination will tell you what look to give to the opening.
In principle, the process of installing and finishing the arch does not present any difficulties for a business man. And if you take into account in advance such a point as the maintainability of the structure, then they will not arise in the future.
Source: bestdoor.guru
see also
Comments 20
Arches are a trend of the early nineties. In short, bad taste! Fuck them... so that the repairs don’t make it cloudy. Porcelain tiles, imitation stone, plaster... There are millions of options! Loft, in short.
Removing the arches is a good idea. What instead of them?! Brick makes a small room even smaller, and the darker it is, the more noticeable it is. I would make the maximum opening if doors are not needed. It seems like we managed without them. The narrow passage would be visually compensated by a huge mirror covering the entire wall (on which hangs some kind of framed picture). Such a mirror costs money; a budget option is to assemble it in fragments. Plus I would play it all off with light. It’s hard to suggest more based on three photos without a plan)) My hallway smoothly transitions into the living room (and vice versa). I tried to erase all the edges. Because of the dog I was forced to install doors, but they are invisible when open. Bricks were used to disguise columns that were inappropriate in a living space.
For now I'm looking at this option. Only the stone will be light brown.
It will be better with light, but the wall looks upside down. This will visually lower the ceiling.
It will be lighter. And it doesn’t underestimate anything.
Putty and paint. I did this myself, I don’t have a photo at hand
Remove it and make regular openings to the very top point of the arch, you can raise it even higher by 10 centimes. If you install a straight portal, you must first take the portal and then make an opening for it.
The era of the 90s is over, but it remains in people’s minds. Remove the arches, install doors, there will be sound insulation between rooms. Or in the end, if you want an arch, then expand it and make it rectangular
Semicircular arches of this size do not look good at all. Especially if you highlight them with some kind of decoration. If you want a modern renovation, then only rectangular arches, either trimmed with paneling and door frames, or simply with wall material. This is how I did it. The arch is as large and invisible as possible. In real life, compared to the visualization, a small lintel appeared, about 30 cm high, along which the ceiling molding runs. But this is due to the fact that pipes had to be laid somewhere, and I didn’t want to lower the ceiling in the living room
These arches are generally out of place... They will visually narrow an already narrow room.
To reduce this effect, there is no need to “emphasize” the arch with finishing (platbands and additional trim). It needs to be finished with the same materials as the walls.
And if they are finished, then the trim (including on the doors!) should be the same tone as the baseboards, and approximately the same width. Not necessarily to match the floor, not necessarily to match the doors, but definitely the same tone as each other. Then they form a “single broken line” in the interior, and look like a complete composition, and not disparate details.
By the way, the fillet (plinth) on the ceiling visually “lowers” the height of the ceilings. Without them, the room seems more spacious.
In order for the cornices to emphasize the height of the ceilings, you just need to paint them the same color as the walls) but it’s more fashionable now without them at all, yes, but also a pain in the ass, ideal walls should be...
I would say this: some styles don't require moldings, and some even want them. The question is that you need to be aware of the role of the top molding in the interior, correctly fit it into the ceiling boxes, and not just use it to hide unaesthetic transitions between the wall and the ceiling. Some people actually sculpt moldings 3-5 cm high on a 10-15 cm ceiling box, also leaving a “hanging” edge of the molding on the side. Of course it looks terrible
In modern style and minimalism, the best thing is that there are no moldings at all, hidden baseboards in the wall and no thresholds between rooms. But this is a relatively expensive pleasure. Such a renovation (without furniture) will now cost from 40-50k per square meter on the floor
Tile cutting device
It's been a while since I added anything here.
Preface: why exactly this way, and not using a machine.
Firstly, I’m not entirely sure that the so-called wet tile cutter will cope with this task, and I’m sure that a cheap one definitely won’t cope, and an expensive one, let’s say from 50 thousand rubles. Maybe he can handle it, maybe he won’t.
Therefore, with such a daisy, I refused to buy an expensive machine because the work will not pay for such costs, and cheap rubbish is not needed.
This means we work the old way, proven and cheap.
In general, I have a tile cutter, it’s not the worst, it successfully coped with various tasks, but there was a problem with this porcelain tile. It (porcelain stoneware) breaks off along the cut line completely uncontrollably, it can clearly break, or the arrow can go to the side. The second problem is that the surface is very fragile, just like a glass surface; even behind the roller, chips can occur. A diamond cup can also chip even with a light touch. There is no need to talk about a diamond disc at all, the surface after it is jagged and chipped, which means that not every water-powered tile cutter can cope with such a task.
Arch in the bathroom - tell me the solution?
There is a small arch made of plasterboard (protrudes 50 cm from the wall), under which the sink will be located. I plan to install 3 spotlights in the arch. The front side of the arch is tiled:
We need a solution - how to finish the arch from below. At first there was an option - to putty and paint over it. But is it reliable? I didn’t really want to lay the tiles “on top”. Are there any modern or aesthetic solutions? Or just paint or lay tiles?
26.11.2012 at 17:14
Lexa0312 wrote: Or just paint or lay tiles?
You are contradicting yourself, it looks like you have a suspended ceiling there? I would paint it white/matte and not worry about it.
26.11.2012 at 17:17
I'm sorry, but where is your arch? didn't see it in the photo
26.11.2012 at 17:58
Probably it was not an arch that was meant, but a beam (false beam). PS I would put tiles.
26.11.2012 at 18:18
It's clear. then probably:
Lexa0312 wrote: Are there any modern or aesthetic solutions?
. I agree, there is an aesthetic one: of course, cover it with tiles. It wasn't that noticeable
11/26/2012 at 10:46 pm
what kind of crosses are these?
28.11.2012 at 17:29
Crosses for expansion joint between tiles (will be removed). The ceiling is not suspended - suspended from plastic panels.
For now I’m leaning towards the option of filling it with putty + painting it with waterproof paint.
Question: how to ensure the joint of drywall with the edge of the tile (tile thickness 10 mm) so that cracks do not appear during operation. Should I try a serpyanka? You can’t really stick it to the edge of the tile, will it even stick there?
I want to give up “lay with tiles” because... My tiles are quite heavy (300x450x10 mm) and even if you use super-strong glue, it will still hang on a piece of paper (plasterboard) and, God forbid, it will fall off. I probably would have laid it out with lighter tiles.
Why is it better to build a house than to buy a ready-made one, especially if this house was built for sale.
Why is it better to build a house than to buy a ready-made one, especially if this house was built for sale.
The beginning of this story was absolutely ordinary.
In a newly purchased residential building, one heating radiator was not heating. The plumber who had been called before “improved” this radiator by removing the control valve and stupidly installing a plug in its place. Remember how Celentano repaired the car in “The Taming of the Shrew”, since then he has had many followers
What materials can be used besides gypsum board
Drywall is made without the addition of adhesives, which ensures the environmental friendliness of the material. This is how it differs from others that replace it:
- OSB, chipboard and gypsum board;
- plywood;
- PVC panel;
- SML and PGP plate.
Drywall is a universal material, thanks to which arches, partitions and space divisions can be quickly made. It is often used during redevelopment. It is not difficult to work with, it has excellent performance characteristics, low price and environmental friendliness.
HANGED
Useful
See what “HANGED” is in other dictionaries:
hung - hung, hung Dictionary of Russian synonyms.
hung adj., number of synonyms: 2 • hung (2) • ... Dictionary of synonyms hung - hung, adj. from “to hang” (to hang everywhere). walls hung with paintings, and hung, pr. from “to hang” (to cover with a piece of cloth). A door hung with a curtain... Dictionary of difficulties in pronunciation and stress in modern Russian
hung up - hung up; briefly form an, ana (from the head) ... Russian spelling dictionary
hung - adverb; cr.f. zave / shan, zave / shana, shano, shany (from hang) ... Spelling dictionary of the Russian language
hung - for/vesh/a/nn/y (from for/vesh/a/t) ... Morphemic-spelling dictionary
hung - hung, adverb. from “to hang” (to hang everywhere). walls hung with paintings, and hung, pr. from “to hang” (to cover with a piece of cloth). A door hung with a curtain ... Dictionary of difficulties in pronunciation and stress in modern Russian
hung - hung, hung Dictionary of Russian synonyms. hung adj., number of synonyms: 2 • hung (2) • ... Dictionary of synonyms
hung - hung, hung, covered Dictionary of Russian synonyms. hung adj., number of synonyms: 3 • hung (2) • ... Dictionary of synonyms
mask - and, gen. pl. juice, date scam, w. 1. A special overlay with an image of a human face, an animal muzzle, etc., put on a person’s face. Bear mask. Cat mask. || Cover for the upper part of the face with holes for the eyes, worn for... ... Small Academic Dictionary
CURRENT - CURRENT, curtained, curtained; hung, hung, hung. prib. suffering past vr. from hang (do not mix with hung!). A bed covered with a chintz curtain. Ushakov's explanatory dictionary. D.N. Ushakov. 1935 1940 ... Ushakov's Explanatory Dictionary
Source