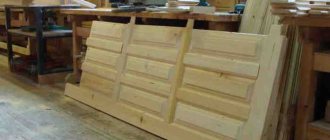
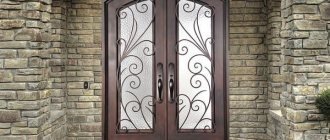
Interior doors in our modern understanding have long ago transformed from ordinary structural elements of partitions into full-fledged interior details. Before ordering canvases, the apartment owner analyzes the products of many manufacturing enterprises and selects exactly what he needs from a wide range.
However, for comfort, coziness and convenient long-term use, beauty and practical materials alone are clearly not enough - hinges play a huge role here. Silent and easy opening of a door is one of the main criteria for its ease of use when living indoors.
Many domestic enterprises offer an integrated approach to solving the problem of filling a doorway, and install hinges at the production stage according to the customer’s decision. But this does not always happen for various reasons, and from time to time the owner of the premises is forced to turn to professionals or install the hinges with his own hands.
Recommended Procedure
In order for the process of inserting loops to go without complications, you need to establish a procedure and follow it.
Masters advise to act according to the following plan:
- Prepare materials and tools.
- Decide on the direction of opening the door and the presence of suitable hinges.
- Make the correct markings. First - on the door leaf, retreating 20 cm from the top and bottom.
- Attach a loop and trace along the contour. Cut with a sharp knife and make a cut with a router or chisel and hammer.
- Place the hinge card into the recess and secure with self-tapping screws.
- Applying the canvas to the vertical beam, make markings on it, taking into account the upper gap of 3 mm.
- Make a selection for the hinges on the box in the same way.
- Deepen the hinges and secure with self-tapping screws.
Preparing the necessary tools
The installation process is unthinkable without a set of certain materials, tools and equipment necessary for the job. So, before starting installation you should prepare:
- door hinges.
- screwdriver and set of screws.
- pencil (necessary for marking).
- a set of wooden wedges for leveling the structure.
- building level.
- hammer and chisel.
Once you have made sure that the work area has the tools and materials listed above, you can begin installing the door hinges.
Features of working with different types
Installation differs depending on the type of fittings. Types of mortise hinges :
- detachable;
- universal.
Detachable hinges are easier to install, since the two parts are installed separately, after which the door is hung. This type is used when you have to frequently remove the interior door, for example, when moving furniture. Divided into left and right. When purchasing them, you must take this point into account. Detachable hinges require clear markings, without the slightest errors.
It is more difficult to install a universal hinge, since the hinge is fixed to the box after the second part is secured to the canvas. Therefore, the door must be held in weight or use stops. This type is one-piece. If you need to remove the door, you will have to unscrew the hinge.
According to the installation method, mortise hinges also include hidden hinges. It can be difficult for a non-professional to install them, because the body with a hinge is placed inside the canvas. Using a router, a deep seat is made. Installation requires extreme precision.
Mortise models: types and installation
Mortise hinges are similar in appearance to overhead awnings with a card structure. The difference lies in the method of fastening and detachable plates.
Popular types of such loops:
- Brass. They have an aesthetic appearance and are in great demand. There are two types of canopies in the retail chain: chrome-plated and polished.
- Brass plated. They are made from several alloys. To give an aesthetic appearance, brass, bronze and gold plating is used.
- Steel. The most reliable and high-quality type of fastening. They are not subject to grinding, therefore they have a long service life. To preserve the aesthetic appearance of the canvas, they are cut into the end of the door frame. The recess and configuration of the recess corresponds to the thickness and shape of the plates.
Tools for insertion and how to work with them
To insert hinges into an interior door, the following tools are required::
- sharpened pencil;
- ruler, square, tape measure;
- sharp knife;
- chisel;
- hammer;
- level;
- door leaf holders and stops;
- screwdriver or set of screwdrivers;
- awl;
- drill.
Professionals prefer to use templates and a milling machine. This equipment makes the work easier, and the result is an even selection for the loop map.
Many masters use Pavel Soldatov's template . The procedure for setting it up:
- The template insert is placed over the hinge with the required gap between the door leaf and the cylinder.
- The stepped notch determines at what mark the first setting on the template should be set.
- Find a similar stepped recess on the left side of the template. The lower green edge of the template is shifted to the same level of the stepped notch as the mark on the insert. The position is fixed using a thumbwheel.
- The same is done with the stepped recess on the right side of the template, setting the desired step mark. Fixed with a lamb. This sets the depth of the loop.
- Determine the distance from the top edge of the canvas. The standard is 20 cm. The template insert is placed in the slot. It is fixed with magnets on the template. It is impossible to make a mistake with the location, because... one of the corners of the insert is beveled.
- The right stop is moved until a special flag rests against the insert on the side of the inner slot. The position of the stop is secured by a side wing. The distance from the top edge of the flag to the edge of the moved stop is exactly 20 cm.
- The template with the fixed right stop is moved to the top of the canvas. Fix with a clamp.
- From the flag to the stop of the copy sleeve 4 mm. For a milling machine, it is required to install a guide bushing with a diameter difference with the cutter of 8 mm. For example, a cutter is 12 mm, a sleeve is 20 mm. The difference is 8 mm (4 mm on both sides).
- The hinge map may differ slightly from the stated size (be, for example, 99 mm instead of 100 mm). The template provides the ability to insert a loop of actual size. A loop is placed in the slot of the template insert. If it is smaller than the slot, the left stop moves in its direction and is fixed. Simultaneously with the stop, the edge to which the copy sleeve will be adjacent is shifted. After making sure that the loop fits in without play, the left side of the template is also secured with a clamp.
- Place a router on top of the template until the cutter rests on the blade. Fix the machine. Adjust the depth to the thickness of the metal of the card loop by placing it between the stop and adjusting screws.
- A hose from a vacuum cleaner is connected to the plastic dust extractor and milling begins.
A plunge router is used to cut the hinges.
If you don't have a template, you can do without it. In this case, the location of the loops is marked, outlined with a sharp pencil and cut with a knife.
It is preferable to use a small router bit, in which case you will need to cut less material by hand in the corners of the recess.
Progress:
- The depth is set. To do this, a loop is applied to the base of the router, and the cutter extends to the thickness of the metal. There is a lever on the body for adjustment.
- The parallel stop is installed. The milling cutter is applied to the door in such a way that the cutter is placed on the contour of the hinge. The stop is pressed against the edge of the canvas and secured with wings.
- A test sample is made inside the loop contour to check that the depth is set correctly. If necessary, adjust the immersion depth.
- The upper and then the lower edges of the loop are sampled, after which the excess material between them is removed. In this case, the stop will not allow the cutter to go further than the side line. As for the ends, you need to be careful not to go over the edges. It is recommended to leave a margin, which can then be adjusted with a chisel.
- Using a chisel or knife, give the rounded corners a straight shape and trim the ends. The card should fit into the resulting recess with little effort.
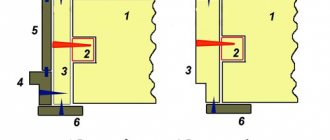
After installing the card on the canvas, move on to the box. The location of the loops is transferred to it. To do this, the canvas is combined with a loop beam, taking into account the upper gap of 3 mm. A mark is made. Having attached a loop to it, circle it around the perimeter and cut it with a knife. If the stand is flat, without a protrusion, then there will be no difficulties when working with a router. The sampling is done in the same way as on the canvas.
If there is a protrusion (thrust quarter) on the hinge beam, then it will interfere with the operation of the router ; the sole will lie on the plane with only one side. In this case, some wizards offer the following method:
- The timber with markings for the loop is placed on the floor.
- The same beam is applied parallel to it at a short distance.
- Between them, pieces of slats are laid in such a way that the sole of the machine rests well on both beams and has support.
- The entire structure is fixed with mounting tape on both sides so that the posts do not move apart during operation of the router.
- Set the immersion depth of the cutter equal to the thickness of the card + the size of the protrusion on the stands.
- A recess is cut.
- Use a chisel and hammer to smooth out the edges and corners.
How to choose door hinges
Before you begin installing door hinges, you need to purchase them in the required quantity. This is not as easy to do as you might think at first - hangers are divided according to the size of the perceived load, the quantity on the canvas, the materials used, the type of fastening and other criteria:
- The main thing that affects the number of loops is the weight of the fabric. Moreover, when closed, the door is tightly fixed in the frame and framed by load-bearing elements on all sides. When the canvas is opened, the load on the hinges increases sharply - a pair of forces is formed - pulling forces in the upper part, and compressive forces in the lower part. These loads inevitably act on the hinge landing rods, and as a result of incorrect selection, they can break or become deformed.
- At the same time, in any position, the screws holding the door hangers work for shearing, and their strength is also important. As a rule, each standard hinge has template holes for the device from 4 to 6 screws, and the hardware itself is included in the kit. Before purchasing, they must be inspected visually, and if their strength is in doubt, it is better to additionally purchase other hardware made from high-strength steel.
- For ease of operation of heavy, massive products, it is better to use hangers with ball bearings, which absorb the main load and minimize the friction force.
- If you are installing hinges yourself, it is better to ask a consultant about products with the possibility of minor straightening, since the lack of professional tools often leads to fatal mistakes. The best solution for a novice craftsman would be to purchase hinges with adjusting washers and oval holes for fastening. All this will ensure the possibility of play in the already mounted element and eliminate additional expenses in case of inaccurate fixation.
- When installing a door to a bathroom, you should remember that this is a room with high humidity conditions, and all metal elements may be subject to corrosion. Therefore, for this type of space it is better to purchase hinges with a special coating, either stainless steel or brass.
- Particular attention should be paid to the design of the door, first of all, to its thickness, since the contact surface of the hinge should not protrude beyond its end. It is best to choose products with a width 3 - 4 mm less than the thickness of the canvas itself. In this case, it will be possible to hide the fastening elements, while ensuring the aesthetic appearance of the door.
Rice. 2. Professionally installed gimbal
Any professional consultant in the store has special tables for selecting door hinges depending on the listed parameters. This will help you quickly select the structural elements of interest with the maximum degree of reliability and in the required quantity.
Marking
The location of the upper and lower hinges is marked on the door leaf. To do this, use a tape measure or ruler to measure 20 cm from the top and bottom edges. To avoid mistakes, craftsmen draw an arrow indicating where the loop will be directed from the mark. The arrows are directed towards the center of the door end.
Place the loop map against the mark and trace its outline with a sharpened pencil. The hinge part must not touch the door leaf.
It is not recommended to simply measure the length and width of the card and draw a rectangle with this data on the end, since the card may not have a strictly rectangular shape - it may be beveled or trapezoidal.
The loop will fit perfectly into the groove made along the contour. In order not to confuse the loops during installation, they are signed with a marker B (top) and H (bottom).
Types of hinges for interior doors
The modern market for fittings for interior doors is filled with a huge number of hinge options, like any other fittings. All door hinges
can be divided into several categories, for example, according to the installation method, there are mortise, overhead and screw-in hinges. Based on functionality, there are adjustable and non-adjustable hinges. The opening of door hinges can be right, left or universal. Let's take a closer look at all types of hinges for interior doors.
Mortise card hinges
These are the most standard hinges that are the most common. They are as simple and reliable as possible; installation, maintenance and replacement can be done without special skills and tools. The shape of card hinges is straight, angular (for floating doors), figured, rectangular or with rounded edges. Such hinges are found in different materials: brass, steel, stainless steel; and different colors: bronze, antique bronze, gold, chrome, polished chrome, matte chrome.
Overhead hinges
(also called “butterflies”) - an analogue of standard mortise hinges, they are distinguished by the absence of the need to insert the hinge halves into the canvas and the box.
This feature of overhead loops is achieved using a special design; the halves are folded into one another, instead of being side by side. It used to be that butterfly hinges were only intended for light frame doors, but modern versions of this product can be installed on almost any door, the load on the hinges is regulated by their number. Overhead hinges are excellent for film doors, because there is no need to violate the integrity of the door covering, which reduces the likelihood of peeling off the decorative coating, moisture ingress and destruction of door block elements. Another advantage of butterfly hinges is that they are easy to install; you just need to correctly mark the installation locations and drill holes for the fastening hardware.
Screw-in or screw-in hinges
like invoices, they do not require insertion; they are screwed into holes drilled in the canvas and the box, but such holes are made in the factory using special jigs. These devices allow you to make the most accurate holes at the correct angle relative to the surface. The peculiarity of these hinges is that they are used in floating-type door structures; they are adjustable and non-adjustable.
Hidden hinges
a more complex mechanism compared to conventional hinges. The main feature of hidden hinges is the absence of a visible hinge joint in the closed position of the door block. There are many sizes and designs of this product that are based on a multi-joint mechanism. Some models have the ability to adjust the gaps between the door leaf and the frame.
Removable or universal (non-removable) hinges
for interior doors - there are no fundamental differences in practicality and durability; if you need to remove a leaf with fixed hinges, then it won’t take long to unscrew 8-10 screws, given that such a need may arise very rarely, or may not appear at all. There is an opinion that universal hinges are more reliable due to the larger number of bearings, but often universal ones use bushings instead of bearings, which roughly compares or even reduces their service life compared to the removable version of door hinges.
Inset
The hinges are cut in stages:
- Use a sharp knife to cut the outline. If the coating is laminate, then it is removed with a chisel inside the cut out contour. It turns out to be a small step. Then, when working with a chisel, the tool will not come off; it will be buried and rest against the step.
- If veneer is glued, then it is carefully removed from the area under the hinge. If you do not cut through it first, then when working with a chisel, you can unwittingly damage the veneer in adjacent areas and accidentally tear it off.
- In order to find out the depth of the future groove, place the loop card sideways to the end and draw a line with a pencil, noting the thickness. It is to the thickness of the metal that the recess will need to be made.
- The chisel is placed against the edge of the recess, resting it on the “step”. In this case, the short side of the working part is directed towards the material being produced. By hitting with a hammer, the material is sampled to the required depth.
- After making the sample, attach a map and use an awl to mark the locations of the screws. In this case, the center is slightly shifted in the direction opposite to the loop cylinder. Later, the screw with its head will move the loop towards this edge and the loop will fit most tightly.
- Use a thin drill to drill holes for the screws. It is not recommended to screw them directly into the door, as the door leaf may split.
- When placing a hinge in a gap, many craftsmen advise not to bury the card flush, but to leave a protrusion of the card of about 0.5 mm. This is done so that the door can be adjusted during installation by recessing the hinge a little deeper and leveling the gaps.
Types of canopies
A variety of door hinges allows you to choose which way the door will open. Therefore, in order not to regret the decision after its installation, it is important to decide in advance on the type and operating principle of the hinges.
Hinges are a fairly simple device that allows you to do all the work yourself.
Butterfly loops
They are the most practical for interior doors. Butterfly loops got their name because of their characteristic shape - when open, they resemble the wings of a butterfly. When folded, the canopy is one card thick. This is achieved thanks to a special shape ─ when closing, one “wing” of the butterfly is precisely marked into the cutout of the second.
When installing such hinges, it is very important to select suitable screws. Since the two parts of the butterfly’s “wings” will be in direct contact with the wood, you should use screws whose heads will be ideally hidden in a special groove in the hinge. With the right choice, the sash will close well and no additional difficulties will arise during its use.
Experts do not recommend installing butterfly canopies on large and medium-heavy doors, since the thin metal and the very openwork of the structure are more suitable for using them as a decorative element.
Simple mortise
This is the most widely known type of awning. It is used in almost every home. It consists of two parts and is secured with ordinary wood screws.
Since doors can vary in size, such hinges must also meet operating requirements.
Invoices
Structurally, they are not much different from the previous ones, but there are still some differences. The main nuance that should be taken into account when installing these canopies is the installation method. If the previous option is simply attached to the end of the door, then for this type of hinges it is necessary to make special recesses (embed in). This is necessary in order to hide the fastening plates and create a smaller gap between the door frame and the jamb.
Installation
Having screwed one part of the hinge to the door leaf with self-tapping screws, proceed to inserting the other part into the hinge beam. Different masters carry out this stage in different ways.
- First way . Mark the location of the hinge on the box until it is inserted into the opening. To do this, place it on the floor, place the door leaf inside and, taking into account the upper gap of 3 mm, mark the location of the hinges.
- Second way . When the box is inserted into the opening, the door is placed against it, placing stops underneath. Align to the desired height, taking into account the upper gap, and mark the loops in this position.
- Third way. Although experienced craftsmen do not shift the loops from the originally made marks during the insertion process, they still measure the location of the cards embedded in the canvas just in case.
- The measurement is taken from the top edge of the fabric to the beginning of both loops. For example, the top edge of the top hinge is located 20 cm from the top edge of the door, and the top edge of the bottom hinge is 170 cm from the top edge of the door.
- Then marks are made on the loop beam for the upper edges of the second parts of the loops. In this case, 3 mm is added to the obtained values for the upper gap. In this case, marks are placed at a distance of 20.3 cm and 170.3 cm, respectively.
- Draw arrows indicating in which direction from the mark to embed the loop. Both arrows will point down, as the top edges of the loops are marked.
- Then the second parts of the loops are cut in according to the same pattern.
- This method is convenient when the master works alone and there is no one to help him hold the canvas for method number 2.
Types of door hinges
Before installing the door structure yourself, you need to read the step-by-step instructions for performing installation work and select the best option for the product. At the same time, the door block is selected not only according to the appearance and design of the room. Be sure to take into account the parameters of the opening, according to which the dimensions of the door itself are selected, as well as fastening elements and other fittings.
It is equally important to study the recommendations of specialists on how to correctly embed hinges of different designs on an interior door. Each individual version of these fasteners differs in installation technique.
For example, Italian hinges, which have a hinged design, are most often installed on door blocks made by European manufacturers.
Screw-in canopies, which use pins instead of plates, are used for canvases of low mass. Hidden type products are used for expensive models of door blocks. Such hinges are distinguished by the presence of special hinges that are recessed into the material of the door leaf.
Straight or card attachments have a special type of plate on the sides. This is the simplest mounting option.
There are also angular models that differ from straight ones only in the shape of the plates. Fastening elements of this type are most often installed on pendulum-type door structures.
Common mistakes
- Incorrect determination of the door opening/closing direction. This is an important initial stage that needs to be treated with great care.
- If you mix up the parts of the detachable hinge, the part with the rod will be at the bottom and the door will not be able to hold on.
- Marking on the hinge beam without taking into account the upper gap. If you do not provide a gap of 3 mm and measure 20 cm from the top of the counter, then the door will rub against the top bar and close with difficulty.
- A too tight fit of the hinge cylinder to the door leaf leads to poor closing of the door.
- Screwing in self-tapping screws without first drilling a hole for them. In this case, the canvas may crack and split.
- Installing the loop and fixing it with self-tapping screws at the location of the knot. You cannot screw screws into a knot, because the wood in this place may crack. If a knot is found on the canvas, then the loop is slightly moved to a safe place.
If you follow the recommendations and pay attention to possible mistakes, even a novice master can install a mortise hinge.
Installation of corner “card” hinges
My friends, all the steps for installing these hinges are similar to simple hinges. The only difference is in the shape of the loops themselves.
One of the sides is made in the form of a 90° angle. Typically, interior doors have a technological gap and when closed, the leaf enters the frame, but if it is necessary to separate a cold room from a warm one, then doors with a rebate are used.
The narthex is a small protrusion along the entire length of the leaf that bridges the gaps, thereby significantly increasing the insulating properties of the doors.
Standard sizes and selection of hinges for interior doors
There are several standard hinge sizes for interior doors. If we consider card loops, they differ in three dimensional characteristics: the thickness of the half, the height of the half and the width of the open loop. The thickness of door hinges
is found in three sizes: 2; 2.5 and 3 millimeters. This characteristic does not greatly affect the reliability of the product; even a 2 mm loop is unlikely to ever bend or wear out.
The height (length) of door hinges
comes in two main sizes: 100 and 125 millimeters.
The latter are distinguished by a longer hinge pin, which makes them more resistant to wear and subsidence. In terms of width,
there are two types of hinges for interior doors - 62 and 75 millimeters. Narrower hinges are used on doors with a thin leaf - 33-34 millimeters so that the embedded hinge protrudes from the door block at a minimum distance in the closed position.
Based on these sizes, you can find any combination of them in the finished product. The most popular sizes of card-type door hinges:
100×75×2,5 100×62×2,5 125×75×3
The dimensions can be found in the designations on the factory packaging of the loops, or measure the product with a ruler. The packaging also indicates the opening side of the hinges: right - R, left - L, universal - BB, overhead - 2BB.
Selection of sizes and number of loops
for interior doors is carried out in accordance with the recommendations of the door block manufacturer, since it is the manufacturer who knows the configuration of this product and its requirements for fittings. If such recommendations are not provided, you can use the universal table of the number of mortise and overhead hinges relative to the weight of the door leaf.
| Web/Loop Weight | Mortise 100 mm | Mortise 120 mm | Overhead 100 mm |
| <40 kg | 2 pcs | 2 pcs | |
| 40-60 kg | 3 pcs | 2 pcs | 3 pcs |
| >60 kg | 3 pcs | 4 things |
Card products - easy installation
Card type hinges (corner and simple) are very easy to install. Moreover, this operation can be performed in two ways. The first is suitable for awnings, the two parts of which are characterized by different shapes. Hinges of this type fit one into another when closing the interior door. Due to this, they are installed directly on the surface of the canvas.
Card type loop
To install such canopies, you will need universal screws and an electric drill. There are two nuances here:
- If the hinges are placed on a heavy door, you must pre-drill holes in it, only after that you can start screwing in the screws.
- Hardware can be screwed in immediately, without first making holes for them, if you are dealing with lightweight structures made of plastic or wood-fiber material.
The second installation method involves slightly recessing the awnings into the door. In this case, when closing, they will never stop the canvas (when using the first installation method, this situation arises quite often).
It is recommended to make the notches for the hinges with a regular chisel. Simply use it to cut off the material on the opening and on the door itself to the depth of the canopy being installed. And then attach the latter to the area where it is installed and secure it with fasteners. Corner products should be mounted and secured in the same way. Place one half of them on the end of the door leaf, the second - on the door.
How to install hidden hinges on a door with your own hands
Surely you chose to install hidden hinges for a reason, and this is the right choice.
Here are the qualities you can use after installing the hinges:
- absolute security: even with the best intentions, intruders will not be able to enter your home by cutting off the hinges, since hidden products are hidden from outside interference;
- high strength: hidden hinges can withstand the weight of not only wooden, but also heavy metal entrance doors - no restrictions on installation;
- decent reliability: standard hidden-type hinges, with proper care, will serve you for many decades - perhaps even longer than the door itself;
- aesthetics: hidden hinges cannot be seen from the outside of the door, making door leaves look more attractive, especially for wooden ones.
Before marking, you should decide exactly how many hidden hinges will be installed on the door. If the sash is of medium weight and consists of wood, you can use two hinges, but on a heavy steel door it would be a good idea to install three or even four hidden hinges to reduce the load on each of them individually and extend their service life.
Mark the door leaf for the hinges:
- mark a distance on the door leaf 200-250 mm from the top and bottom edges and put dots in these places with a pencil;
- then place the centers of the hidden loops at these points and trace them along the contour;
- if you plan to install a third loop, it should be mounted strictly in the middle between the two outer ones, and the fourth – in the center relative to the two adjacent ones.
Mark the door frame for the hinges:
Before marking, you should decide exactly how many hidden hinges will be installed on the door
- place the door leaf in the opening of the door frame, and using a building level and wooden pegs, secure it in a strictly parallel position to the frame and perpendicular to the floor;
- mark at the end of the door frame the places for inserting hinges opposite the similar ones located on the door leaf;
- Place the hidden loops at the marked points and circle. The door can be removed.
After the door frame and leaf have been correctly marked, you can safely pick up the tools and start inserting.
How to install hidden hinges correctly on a door
The first step is to prepare a small recess for the hinge overlay, which should be made manually using a chisel and hammer. The notch is knocked out by carefully tapping along the outer contour. The depth will depend on the thickness of the loop you need to measure.
Next, special recesses are made to install hidden hinges. This operation is carried out using a drill and a special milling attachment. Before forming the recesses, carefully measure the height of the hinge without the lining - this is exactly the depth of the hole you will make in the box.
To do this, turn on the drill and, using gentle pressing movements, mill the end of the door strictly along the internal contour outlined in the previous step. After reaching the required depth, move on to the next contour and beyond.
Do not rush when cutting out recesses - one wrong or careless movement, and the door leaf can be irrevocably damaged. It’s better to spend a little more time, thereby saving a lot of money on buying another door. Recesses must be made not only in the door leaf, but also in the frame, in a similar way. The entire operation, if performed carefully, will take you no more than one hour.
After you have cut out the required number of recesses, clean their internal surfaces from knots so that they do not interfere with installation.
Direct insertion of hidden loops is carried out as follows:
- insert the loop into the resulting recess and seat it firmly in the socket;
- use a screwdriver to drill holes for the screws;
- insert the screws into the holes formed and carefully tighten them, at the same time making sure that there is no distortion - the hinge should be installed evenly;
- Repeat the above steps with all hidden hinges to be installed.
To change the vertical skew of the door leaf, turn the corresponding bolt on the hidden hinges using a hex key
The installation of hinges on the door frame is carried out after the door leaf has been placed and firmly secured in the opening of the frame using wooden wedges. The process of attaching the hinges is no different from the above. After installation is complete, proper adjustment of the hidden hinges is necessary. So let's figure out how to do it.