A large selection of ready-made furniture, pleasing the consumer, is overshadowed by the impressive cost of designs or difficulties in selecting a model that fully satisfies requests. For many, searches on selling sites and trips to furniture stores end not in a successful purchase, but in the clear realization that making the desired cabinet is easier than buying it. The reason may be either the very high cost of the item you like, or the lack of furniture from a trusted manufacturer on sale. Making an individual order to a specialized company is also not a cheap pleasure. Users of the FORUMHOUSE portal are not afraid of difficulties and undertake to make furniture themselves, and share their successful experience with like-minded people.
Universal furniture – wardrobe
A type of cabinet furniture with a sliding door system is a sliding wardrobe, one of the most popular models that will fit equally well into a nursery, a bedroom, or a hallway. Coupes are not only stylish, compatible with almost all areas of interior design, but also practical - they take up less space than swing models.
The design of the cabinet depends only on the wishes of the home owners and the parameters of the space allocated for it.
If there is a niche in the house, you can make a built-in wardrobe that does not require external racks - the door system will be attached directly to the ceiling, floor and walls. Also, instead of a niche, they use the blind part of the room in the house, building a closet from wall to wall along the entire height at the end of the room.
The ancestors of the coupe were built-in, not even closets, but doors that covered niches and slid to the side along guides using attached rollers, which spread in America in the middle of the last century. In our country, wardrobes with a sliding system appeared in the late nineties, but the peak of popularity occurred in the 2000s and continues to this day.
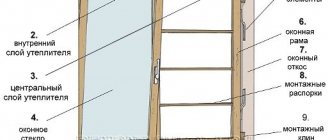
The sliding wardrobe door system consists of a set of parts:
- Frame - an aluminum or steel profile around the perimeter of the door leaf, providing rigidity (not a mandatory element, but its presence is desirable).
- Guides - rails or tracks, the upper and lower ones differ in design.
- Accessories – rollers, stops, push-off systems, latches, etc.
Based on the type of fastening, sliding doors should be divided into two types - those supported on the lower guides and those fixed on the upper track. In terms of stability and durability, systems with bottom support win; they are more common than top door fastenings. Everything you need to make a wardrobe is sold in construction hypermarkets; you can select the elements of the system to suit your preferences and initial data.
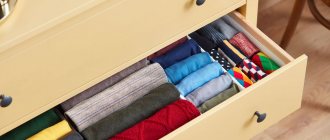
The filling of the closet depends on its purpose - most often these are convenient shelves for bedding and things, additional drawers for linen, compartments with rods for wardrobe items: outerwear and shoes. However, at the owner’s request, behind the sliding door there can be anything, for which numerous shelves are made. The number of doors depends on the dimensions and functionality of the structure; usually there are two or three doors, but four or more can be installed.
Selection of accessories
The various elements related to the fittings must be attractive and of high quality. Their design and colors should match the style of the cabinet. The accessories include:
- guides, stoppers and rollers to create a sliding system that makes it possible to comfortably open or close the cabinet;
- profile, which can be steel or aluminum;
- fastenings for shelves or other storage systems, and it is advisable to buy a tie system consisting of a flipper and a rod instead of outdated shelf holders;
- fasteners for connecting parts of the cabinet, which include screws, self-tapping screws, confirmations, nails for furniture and fastenings for rods.
Designing sliding wardrobes is considered a rather specific process. During its implementation, it is necessary to take into account the dimensions of the future structure, its design and the place where it is planned to install it. The reliability, durability and durability of the resulting furniture depend on the correctness of the design. Initially, drawings of the main parts of the structure are made, after which an assembly project is formed.
Rollers
Guides
Profile
Accessories
Materials
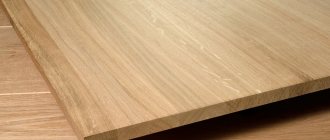
Today, the bulk of wardrobes are made from laminated chipboard (LDSP). It differs from ordinary chipboard in its protective and decorative coating, a laminated layer with a surface that imitates various types of wood. Laminate not only increases the decorative effect of the material, but also protects it from external influences, and protects us from formaldehyde used for gluing slabs together. For the production of furniture, chipboard of two classes is used - E1 and E2. The first class emits a minimal amount of resins and is conditionally safe, while the second is prohibited as a raw material for furniture in children's rooms. To minimize the harmful effects of resins, cuts on cabinet parts should be sealed with a special edge. One of the forum members was convinced of this by contacting the government agency.
ISMaksFORUMHOUSE Member
There is a lot of talk about the fact that furniture emits harmful substances - you need to roll up all the ends of the parts and there will be no emission (checked, the furniture was handed over to the SES).
The laminated edge prevents resin release, preserves the cut from external influences and improves the appearance of the product, but is somewhat inferior to the plastic edge in terms of practicality and durability. Plastic cladding has higher strength and rounded edges, which significantly reduces the likelihood of chips and scratches. The standard sheet height is 1830 mm, the width is 2440 mm, 2500 mm, 2750 mm, 2800 mm, depending on the manufacturer.
The facade of the cabinet can be made either from the main material or from a more decorative one - mirror, glass, hardboard, plastic, with inserts. Unlike swing doors, the maximum leaf width for a sliding door is practically unlimited, but one that is too wide may warp over time, and one that is too narrow will begin to pop out of the guides. The optimal width is 90 cm for steel systems, there are also aluminum ones - 120 cm each. But when choosing a facade, the limitation is not so much the size of the doors as their weight - door systems are designed for a certain load, and a square of chipboard and a square of glass, hardboard or plastic, weighs differently. If you exceed the permissible limit for the guides, they will quickly fail.
Models of cabinets made of natural wood are less in demand, since even those made from laminated boards, and not from solid wood, are much more expensive even if manufactured independently.
More information about furniture made from natural wood is described in the article “Do-it-yourself wooden furniture and utensils - Shrek style from a portal participant.”
How to make a cabinet yourself
At home, to create a sketch of a future design, you can use your own drawing skills, transferring the desired functionality and dimensions onto paper. Or you can call for help with a built-in graphic editor, such as SketchUp and the like, or draw a drawing in an online designer. Before drawing/drawing the project, you will need to correctly take the dimensions of the niche with a tape measure (for a built-in one) or decide on the parameters based on the future location and functionality.
It is necessary to take into account the dimensions of the sheets so that when cutting there is a minimum of waste. The sliding door system creates certain restrictions on the depth of the cabinet - a typical mechanism requires a distance of about 100 mm of free working space. Therefore, when designing, not only the thickness of the sheet is taken into account, but also the clearance for the system. If the closet has a compartment for outerwear, the calculations take into account the minimum depth of 50 mm, plus space for the mechanism. If possible, it is worth adding another 10–20 mm so that the doors move freely and things do not wrinkle.
Creating an Assembly Drawing
When the diagrams regarding the main parts of the future cabinet are ready, a direct assembly drawing is generated, from which you can obtain information:
- dimensions, appearance and parameters of the frame itself;
- type and features of the sliding system design;
- the number of shelves and other items filling the cabinet;
- materials used to manufacture the structure;
- approximate cost estimate for the process.
It is advisable to develop such a project using an appropriate computer program, for which only the main parameters of the future design are entered and calculations are automatically made and a drawing is made. If you have experience and skills, you can make a drawing or diagram on paper with your own hands, for which you use a pencil and other office supplies.
Sliding wardrobe from lexanik85
Forum member lexanik85 used the designer and created a three-door model with dimensions of 2500x2000x700 mm. The cabinet is partially built-in - the shelves of one of the compartments are mounted on the wall, the top one is a guide, to the ceiling, instead of a plinth there is a rail under the bottom guide to compensate for the unevenness of the floor. Side intermediate racks - fixed to the floor, wardrobe - with side and top shelves and a main compartment for hangers with clothes, without drawers.
After creating the project, the following materials were purchased:
- Beech-look laminated chipboard – 4 sheets, sawed on site.
- Plastic edging tape (length of one strip 2800 mm).
- Fasteners – plastic furniture corners, hardware.
- Door system – upper and lower guides, rollers (“Alpha”).
Services for cutting parts are usually provided by trade organizations that sell materials and accessories; you can also contact a furniture company. This simplifies the process of creating a cabinet, although it makes it somewhat more expensive. If you have the necessary tools and work skills, and the parts are straightforward, you can cut them yourself and without instructions.
Lexanik85 began assembling the cabinet by attaching the plastic lining to the external parts, after which he used a level to mark the position of the shelves and corners and mounted the first compartment to the wall and the side vertical stand. Then he continued to expand the structure according to the project.
lexanik85 Member FORUMHOUSE
The first step was to draw a project using an online wardrobe designer, after which I went to a construction supermarket to get the material. In total, with all the materials, fasteners and other things, I spent no more than 15 thousand rubles on everything.
The forum member prudently asked to bring the leftovers after cutting along with the parts, and assembled them into a compact computer desk with hanging shelves.
Sliding wardrobe from toly23
Forum member toly23 decided to get a wardrobe instead of a formal cabinet. After monitoring the market, my wife and I came to the conclusion that it was better to make the cabinet ourselves. The sketch was drawn by my wife, the design is complicated: not only shelves and a hanger for outerwear, but also several drawers of different sizes. To avoid having to redo it, toly23 calculated all the dimensions and selected the fittings taking into account the gap under the door system.
toly23 FORUMHOUSE Member
I specifically looked for handles (measured by height) that were low and didn’t even catch when closing the mirrored door. The drawer in the right section is a pull-out drawer for bedding, it pulls out perfectly and doesn’t get caught in the doors. I found a calculation of doors for cabinets on the Internet, and I managed to make everything myself.
The cabinet is full - with a base, sides and top, with three doors, the middle one is mirrored, the side one slides in, as the child loves to frolic with the ball. Unlike the previous case, the parts were cut out independently, and improvised tools, clamps and a glass cutter were used for direct cutting.
The forum member ordered the doors from a furniture company, with an aluminum frame. The total cost was around 18 thousand. If you look at catalogs of ready-made models with similar functionality, the savings become obvious.
toly23 began the step-by-step assembly with the frame - first the frame and the top shelf, then the vertical racks and shelves in the compartments, installation of the hanging rod, assembly of the drawers. The final stage was the installation of a door system with a middle mirror door, which was carried out after the installation of the cabinet in the nursery.
Petrovich 32 also made itself a sliding wardrobe of a similar design. It further complicated the task - it also has a mezzanine compartment that can be closed separately from the main compartment. The product has successfully passed the strength test for the sixth year without any complaints.
Online constructors
Simple and fast, no download or installation required. For such services to work, you just need to install or enable the use of the Adobe Flash Player plugin.
Online calculation
The Moscow company presents a detailed calculator for calculating a wardrobe. Although it was created so that the visitor could place an order, you can still “assemble” your cabinet there and see the drawings and costs.
In the top right menu, in the “templates” frame, ready-made options for a wardrobe or bedside table are offered.
If none of this works, enter your parameters.
First, the main parameters are prescribed - width, height, number of sections and the presence of a mezzanine. The cabinet is now divided into segments, each of which is designated by numbers. Next comes the choice of material. Then - filling by segments. For this purpose, a digital designation for each segment has been introduced. For each, you can set the content - leave it empty or select shelves, drawers or a bar, indicating their number. Now let's move on to the doors. Set the number of horizontal divisions or leave them as a continuous sheet.
Conclusion
It is not only the material side that forces forum members to take up the instrument. Making cabinets with your own hands is a way to get an exclusive, high-quality product that will fit well into the decor.
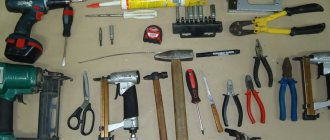
The topic of making sliding wardrobes with your own hands is discussed on the forum, and you can find out what tools you may need for home carpentry from the article “Furniture workshop for beginners...”. If you want to experiment with natural wood, you should read about gluing technology - furniture panels are stronger and cheaper than solid wood. In a video about the manufacture and assembly of a sliding wardrobe, a designer who is professionally involved in creating furniture shares the intricacies of the process.
Subscribe to our Telegram channel Exclusive posts every week
Furniture design software
Now from all this you need to get a detailed picture, it must be to scale, because... It is necessary to display the number of shelves, drawers, as well as the ratio of the sizes of the compartments.
In principle, a sketch can be drawn by hand, the main thing is that you yourself understand what should be where.
But if you have the time and desire to understand furniture design programs, then I recommend the PRO100 program, it is very easy to learn and will not require a lot of effort and time from you to design. On the Internet you can easily find a portable broken version of the pro100.
There are also other furniture design programs in which you, if you wish, can also design your own wardrobe:
- Woody
- KitchenDraw
- bCAD
- Aster
- K3-Furniture
- Basis furniture maker
- BestCut
- Cutting2