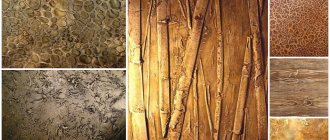
Painting the room in bright or pastel colors can transform the interior and breathe new life into the apartment. In most apartment buildings, the wall structures are made of concrete. Wallpaper is not always the best design solution. Using paints, you can imitate brickwork, granite, wood, paint a wall with a picture or decorate it with patterns.
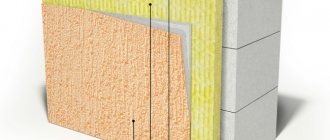
Concrete wall
How to paint concrete walls: tips and tricks
Painting concrete walls is not an easy task. It will not be possible to complete the work in a few hours. You should carefully prepare for this process: choose a roller, brush, choose paint, color scheme, protect the floor and furniture from contamination.
Practical advice from the experts:
- Do not apply paint to an unprepared surface. Small grains of sand, dust and stains will be visible on the painted surface. Unevenness can be smoothed out using sandpaper, and stains can be wiped with a wet cloth;
- Priming is an important step in painting that is very often skipped. The adhesion of paint to a reinforced concrete surface is better after applying a primer mixture;
- adding color will give the paint the desired shade. To do this, dilute a drop of color in a small amount of the coloring composition and look at the result. If you are satisfied with it, then repeat the same steps with more paint;
- dilute the paint with special means. But before that, you need to study the instructions so as not to spoil the material. Water-dispersed paints are diluted with water, and oil-based paints are diluted with drying oil;
- The correct selection of tools will eliminate uneven distribution of paint and its overuse. For hard-to-reach places, purchase brushes;
- Surfaces should be painted with strokes in one direction. Apply the second and subsequent layers after the previous one has dried. It is better to carry out the work in the daytime, when it is still light and there are no direct rays.
Do-it-yourself whitewashing of walls
You can do this work in three ways:
- brush,
- roller,
- spray or vacuum cleaner.
I would like to note right away that it is better to whiten brick walls, as well as various non-smooth and rough surfaces with a brush, or even better, with a sprayer or vacuum cleaner.
How to whitewash walls with a brush
- Stir the solution thoroughly.
- Paint a small stripe around the perimeter of the wall with a brush. Do this carefully and slowly. The main task is not to stain the surfaces of the mating ceiling and floor.
- Apply the first layer of whitewash using smooth movements from bottom to top or vice versa, leaving no excess on the surface.
- Let the surface dry.
- Apply the second coat from right to left or vice versa so that brush strokes are not visible when drying. Otherwise, the wall will look untidy.
How to whitewash walls with a roller
If you do not have experience working with a brush, as this requires relevant experience, it is better to work with a roller to get a flawless surface.
- Stir the solution thoroughly.
- Paint a small stripe around the perimeter of the wall with a brush.
- Pour some of the solution into the roller tray.
- Apply the first layer with a roller using smooth movements from bottom to top or vice versa, carefully rolling over the surface.
- Let the surface dry.
- Apply the second layer from right to left or vice versa.
The surface painted with a roller usually takes on a pleasant matte finish.
How to whitewash walls with a vacuum cleaner or sprayer
The easiest way is to bleach using a spray or a regular vacuum cleaner. If you do the work with your own hands correctly, you will end up with a very high-quality result.
- Stir the solution thoroughly.
- Fill the prepared jar with the solution.
- Close the jar with a lid, after moistening it in water so that it fits more tightly to the edges of the jar.
- Insert the vacuum cleaner hose into the corresponding hole in the cover.
- Turn on the vacuum cleaner.
- Shake the solution in the jar.
- Close the air valve in the vacuum cleaner lid with your finger or press the spray lever.
- Apply the solution to the surface of the walls, observing the following conditions: do not allow drops to form, make smooth circular movements (not jerkily), keep the spray nozzle at a distance of 70-100 cm from the surface.
To achieve the desired result, apply 3-4 layers.
When applying the solution with a vacuum cleaner or sprayer, minor defects are hidden, as it is applied in a thicker layer.
Preparation
Before painting, the room needs to be prepared. At this stage, uneven surfaces should be removed, rough spots should be smoothed out, and cracks should be filled with putty.
If there are cracks
There are many reasons for the occurrence of cracks: settlement and subsidence of the soil under the building, the presence of attached buildings, errors in the design of the building, wear and tear of materials. It is not difficult to eliminate this defect if there are no serious reasons for their occurrence.
Small cracks are rubbed with mortar using a spatula. PVA glue is added to the solution. After sealing, a reinforcing tape is attached to the surface. Medium cracks are pre-cleaned from dirt and dust. The cleaned recess is moistened with water. It is then filled with solution. A metal mesh with 50*50 mm cells is placed on top of the leveled structure. Now it is possible to close the cracks with polyurethane foam.
Cracks
Without finishing
You can paint concrete wall fences without preliminary preparation with a roller, sponge or spray gun. But, before applying the paint, the wall is coated with a primer.
How to paint walls:
- Protect furniture and floors from splashes and drops;
- Tape the door handles with tape, insulate the wires from sockets and switches;
- Clean out uneven surfaces using sandpaper;
- Cover the wall with a primer mixture and do not touch it until it dries;
- When the primer mixture is absorbed and dry, you can paint the walls. It is better to apply the helmet in two layers, but only after the previous one has completely dried;
- Use a brush to paint areas that are difficult to reach with a roller.
With finishing
The set of tools for painting fences with trim consists of:
- spatulas;
- screwdriver;
- hammer;
- level and plumb;
- tape;
- grout;
- containers for primer and putty;
- brushes;
- roller
Tools
This is the minimum required set, which can be increased depending on the condition of the wall, hidden defects and the scope of work.
Old wallpaper can be removed with a spatula, the whitewash can be washed off with water, and old paint can be removed with special means. Don't forget about personal protective equipment. After removing the old coating, all defects will be visible. They must be thoroughly cleaned of dust and dirt.
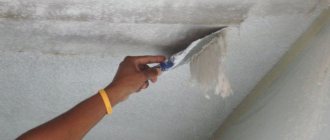
After all these steps, you can proceed directly to finishing - puttying the surfaces. You can create a level base for future painting using gypsum finishing putty. This material should be used with caution. Once in the respiratory tract, gypsum settles in the lungs and leads to terrible diseases.