Electric ignition
Recessed rotary switches and control panel locking
Safety shutdown
Cool oven door and body
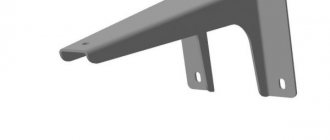
Pull-out oven trolley
Residual heat indicators
If the theater begins with a hanger, then the kitchen begins with the stove. And, at the same time, a stove in the kitchen is much more important than a hanger in the theater. Why? Because a correctly chosen stove is the housewife’s right hand in preparing culinary masterpieces, as well as the key to safety in the kitchen. How can a coat hanger boast such importance in a theater? But in this article we will talk not about status, but about security. Because safety is one of the main requirements for a high-quality kitchen stove, oven or hob, and, I must say, the main reason after functionality that affects the cost. So, what attributes have caring manufacturers given these kitchen appliances to protect us from big and small troubles?
Gas control system
The “gas control” system is a protective system on gas stoves, hobs and ovens that automatically shuts off the gas supply if the flame goes out for some reason - if your milk or soup has run out, for example. How does this magical system work? A temperature sensor next to the burner, called a thermocouple, obeys the laws of physics and produces a small electrical current when exposed to the flame. The other end of the thermocouple is connected to a safety valve with an electromagnet that responds to the heat of the thermocouple. If the flame goes out, the thermocouple stops producing current, therefore the magnet is not excited and the valve blocks the gas supply. In stoves, “gas control” can be provided only on the burners or only in the oven, or maybe both, which is even better from a safety point of view. Of course, its presence affects the cost of the device, but is it worth saving on safety? I think everyone knows the consequences of a gas leak.
View models of gas stoves with gas control system
Diagnosis of failure
Like all technical solutions consisting of several components, gas control can fail. This is easy to diagnose. For example:
- gas is supplied even without the process of ignition and combustion;
- the burner switches off automatically;
- the flame start time (from pressing and turning the knob to the start of combustion) increases.
It is worth noting: some gas control elements require strict adjustment. That is, clear placement and configuration. Therefore, it is recommended to hire specialists to repair a gas stove. Especially if the manufacturer's warranty has not yet expired.
To prevent the gas control from failing, you must follow the rules for operating the stove: you need to keep its surface clean, regularly disassemble and wash the burners . At home, with minimal skill in using hand tools, you can clean the thermocouple.
To do this, remove the hob. In some models of stoves, the burner can be disassembled to access the thermocouples. After this, the element is cleared. This must be done carefully so as not to deform or displace the thermocouple.
If the user does not have experience in disassembling hobs, it is recommended to seek help from specialists. An additional motivation for this decision will be the listing of simple facts: gas control may not work due to incorrect installation of the thermocouple, loose connections, jamming of moving parts, wear of electromagnetic coils.
You may be interested in: how to fix electric ignition.
Electric ignition
Another device designed to simplify and secure working with gas kitchen appliances is electric ignition. The name of the system speaks for itself - the flame is ignited using an electric current when a special button is pressed or when a switch is turned, when a spark is generated as a result of closing the circuit. Electric ignition eliminates the need to use matches and minimizes the risk of getting burned.
View models of gas stoves with electric ignition function
Nuances
The mode and operating principle of gas control has some nuances:
- For each ignition, you need to wait 15–20 seconds until the required temperature is reached.
- If the ignition time increases, it means that the electric couple is clogged or dirty.
- It is unacceptable to independently change the operation of the system in an attempt to reduce the ignition time.
- The reason for lack of ignition is not always the gas control sensor. Sometimes fuel may not flow into the burner due to clogged holes.
To avoid problems and fines, be sure to call a professional if there is any problem with your gas equipment.
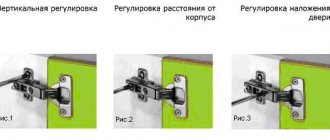
Recessed rotary switches and control panel locking
Recessed switches are typically found in more expensive ranges and hobs and are ideal for those with small children. Their biggest advantage is that they prevent accidental activation of the device, since they only work when extended. So no one can accidentally turn the switch and start a fire. Some models of stoves and ovens have a locking function for the control panel. With its help, you can block the inclusion of burners and ovens, which is also useful if there are small children in the house. And also, to protect children from burns, the oven door locking function will not be superfluous.
Ovens with recessed switches
Go to catalog
see also
Comments 49
Thank you for the article. I was about to search the internet, but found it here in time and closed the other tabs. For one thing I learned that there is such a community here. I had a suspicion that there were capillary temperature sensors and I don’t understand what kind of gas opening drive, but everything turned out to be my favorite electric one, tomorrow I’ll try to restore one burner. A vague thought is still floating around: is it possible to somehow connect the timer with closing the gas? I’ll think about it, maybe I’ll invent something, I’ll post a mini-post here.
Please. What else is there a timer for? My method works, I haven’t disassembled the stove since the publication, but one burner is still stuck, I’m too lazy to disassemble it.
Well, here's my update: in our case, it turned out that the problem was not with the electrics, but with the electromagnet being faulty. I didn’t do anything further. They wrote here about disassembling the faucet, but this is generally difficult, to remove the faucet you need a 7 wrench, to disassemble it you need a 13 wrench (plus it doesn’t turn easily, I didn’t force the installed one), plus after moving the faucet on the gas the tube needs to be washed out, because... Even strong movement without removing it can cause a leak! I measured the current through this circuit, 100 mA through a heated thermocouple both on the working and on the faulty faucet. Let's re-post here the designations from the tap so that they are there. A 6489 CE 20703/179 I tried to look for a new one, several codes come up, the price is about 2 thousand, almost directly from Italy)) And, I must say, our electrics are clumsily arranged, the timer is not connected with the burners in any way, but I would like to sometimes set the shutdown time, because there is no multicooker. There is an option to increase the wiring of thermocouples, install “dry” normally closed relay contacts in each circuit, which can be controlled by a special circuit either from a piezo (then any sound will trigger it) or from a certain segment of the indicator (then only from a certain timer). But this is a fair amount of witchcraft, and even “dry” relay contacts can worsen this snotty design.
graphite lubricant. but it’s better not to smear anything there. I had it worse - at minimum heat one burner turned off. I had to disassemble the part where the connector is put on and bite off a couple of turns from the spring. Since then, everything has been working perfectly for 4 years.
I didn’t see any springs there)
did you understand? )) there is a simple electromagnet, when the sensor heats up, a current flows and the rod is attracted and opens the gas. when the heating current disappears, the rod is thrown back by a spring to its original closed position.
Now I understand what we're talking about. I don’t want to go there yet, it works. But thanks for the valuable thought
There’s a lot of bullshit in the comments, I’m tired of reading. Thanks for the report, that’s what I was guilty of. I'll do it one of these days. to bookmarks
You're welcome. I hope it helps
I have almost the same stove, the “ignition” has stopped working, what could be the problem?
I can't say it works for me
copper grease for calipers
Are you guessing or have you tried?
I didn’t try it on the stove, but I smeared the nozzle connectors on the car, everything is fine
gee. 1 Why the hell should I coat the connectors on the injectors with copper? 2 does not confuse the two orders of magnitude (TWO ORDERS) of voltage difference, and the order of current difference?
The contacts were burning. Pasta doesn't care about voltage
tension doesn't care about pasta! If a drawdown of 1 volt is not noticeable at the nozzle, then 1 tenth of a volt puts an end to flame control. no lubricants required! there you just need normal contact. All.
Cool oven door and body
The cool door and oven body are designed to protect against burns and damage to furniture. By installing additional glasses, from one to three, the door heats up significantly less, which not only eliminates the possibility of getting burned, but also reduces heat loss and, thereby, saves energy. To keep the oven body cold, a flow of cold air is used, which, passing through special sinuses, cools the walls of the device. This will save the furniture from damage, especially if the oven is built-in.
View all models of built-in ovens
Hob material
For a gas or combination hob, there are three options: enameled steel, stainless steel, tempered glass.
Gas on glass is fashionable, beautiful, impressive. Cleaning is easy - use special glass cleaners. You cannot use abrasives: even though the glass is tempered, scratches may form
I would like to point out that sometimes there is a glass-ceramic coating that looks like glass, but is more expensive. The use of glass ceramics in gas hobs is unjustified
And in electric stoves, glass-ceramics are good because they have excellent thermal conductivity; heating elements are installed directly under it.
Residual heat indicators
Residual heat indicators are installed in electric hobs under the ceramic surface and are designed to warn users of the possibility of getting burned. The warning system works like this: when a burner is turned on, the corresponding indicator lights up; it continues to light even after it is turned off until the temperature of the burner becomes safe for humans.
As they say, there are things that do not depend on a person, they are called accidents. But care can be taken to keep them to a minimum. Therefore, when choosing a stove or oven, pay attention not only to the functions and amount of energy consumed, but also to the safety systems. You can also read about security technologies in our articles:
Electric ignition to help you Choose a hob
View and buy a kitchen stove in the Tekhnostudio online store
Alternative option
Well, yes, there is also an alternative option, in some cases simpler - completely disabling this system. Personally, I think that this should be a last resort if you can’t buy the spare part you need (thermocouple or solenoid valve).
There are several options here; I’ll rank them from the simplest and most hands-on to the more serious:
- Find a way to temporarily fix the gas control button in the pressed position - tuck something in, screw it in, etc.
- Almost the same thing, but more beautiful - cut off the button in the right place, press it inward and glue some kind of plug into its hole with super glue. It will look civilized from the outside, the problem is solved.
- Disassemble the plate, disassemble the cylinder and remove the spring/valve. It is possible to fix it there somehow, such as wrapping electrical tape around it, fum tape, gluing it, etc.
But it’s better, of course, not to be stingy, not to be lazy and fix it: as you can see, it’s not that difficult!
Turning off the gas stove during repairs
Household gas and gas appliances are a source of increased danger. Improper handling may result in fire or even explosion. Gas equipment is installed in places strictly defined by the design of the residential premises; their movement is possible only in agreement with the supervisory authorities.
Disconnected gas stove
During renovations in the kitchen or simply when moving furniture, the gas stove must be turned off. In this case, operating standards and regulations must be observed.
Legislation
Owners of living space and responsible tenants are responsible for the correct and safe installation, connection, disconnection and operation of gas equipment in accordance with Article 210 of the Civil Code of the Russian Federation.
The issues of disconnecting gas equipment are covered in detail in the Construction Norms and Rules of Gas Supply 2.04.08-87. If you decide to carry out the shutdown on your own, you must involve qualified specialists certified by Gas Supervision and having a certificate.
Safety regulations
A domestic gas leak may cause a fire. When gas and air are mixed in certain proportions, an explosive mixture is formed. The slightest spark is enough to cause a strong explosion, which can lead to casualties and the destruction of a building. Inhalation of household gas can also lead to severe poisoning. Therefore, the following requirements for safe handling of gas equipment should be strictly observed:
- Completely de-energize the kitchen and exclude the use of any self-powered electrical appliances, including smartphones.
- Open the windows completely.
- Turn off the tap on the supply pipe, disconnect the stove from the network by removing the plug.
- Prepare the plug. It is possible to use a bottle cap of a suitable diameter.
- Prepare a soap solution in a small container.
- After disconnecting the fitting, immediately insert the plug.
- Check it for leaks by lubricating it with soapy water.
- If you notice whistling sounds, bubbles or smell gas, you should immediately call emergency services.
When connecting the stove after repair, you should also check ALL connections.
Tools and equipment
Fittings, hoses, and gaskets for gas stoves have a long service life, so you should not skimp on their quality. You should buy them only in well-known specialized stores. Buying components of unknown origin secondhand can lead to an accident. Bronze products have the best quality, safety and service life; hoses should be made of reinforced rubber with a yellow stripe.
Gas key
As tools, you can use adjustable pliers, a universal gas wrench, or special ones No. 1 and No. 2. When installing gas stoves connected to the electrical network, use a special dielectric insert in the pipeline. It eliminates current leakage through the steel pipes of the gas main. To seal the joints, flax tow on paint is used, as well as more modern materials - FUM tape or Teflon thread.
Work progress
First of all, you should close the tap on the riser. Further:
- Fix the nut on the tap with wrench No. 2, tighten the union nut with wrench No. 1 and turn it smoothly.
- Lubricate the opening of the pipe with a soapy solution; there should be no bubbles.
Turning off the gas stove
If possible, the valve should be left as old; it is better to hire a specialist to install a new valve.
Turning off the gas stove
Next, use a gas wrench to unscrew the nut on the flexible connection. If the plate is not changed, the nut is left in place. Next, you need to unscrew the coupling on the pipe. Over the years of operation, it can “stick” to the pipe, then it is cut off with a hacksaw or an angle grinder. Next, you need to move the stove away from the wall and ensure constant ventilation of the room.
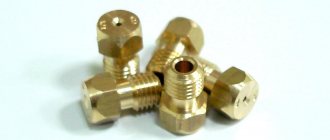
Installing the plug
During the work, the supply pipe from the gas main will need to be securely plugged. Special plugs with a rubber or plastic gasket can be purchased at a plumbing store.
½” supply pipe plug
After installing the plug, check its tightness with a soap solution. If bubbles are detected, remove the plug and seal the thread. During repair work, the valve is wrapped with a piece of film or non-woven material. This will prevent dust or paint from getting into it.