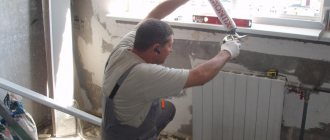
The kitchen, where culinary masterpieces and family-favorite dishes are regularly prepared, day after day, is a high-risk area for any finishing materials, furniture, and decor. Hot steam, high air humidity, splashes of boiling fat, juice and water - this is an incomplete list of threats that render furniture facades and walls unusable. To protect expensive furniture and walls from the negative consequences of active work in the kitchen, experts recommend installing a “kitchen apron.”
This term refers to the area of the wall between the bottom row of cabinets and built-in household appliances, and the bottom covers of wall cabinets. This area is subjected to the most testing during cooking and washing dishes, as it takes the brunt of the impact. It is especially important to protect the walls near the stove and sink, as well as the part of the countertop where ingredients are prepared. The smooth material, resistant to external influences, protects them from the formation of difficult to remove stains and fungus, allowing the housewife to spend less time on cleaning. In addition to purely practical functions, it plays the role of an original accent, helping to create a certain atmosphere in the room. Modern glass and plastic panels with colorful photo printing are especially expressive.
In order for the panels to adequately perform the functions assigned to them, it is necessary to choose the right material and height of the kitchen apron. We will tell you in this article what aspects to pay attention to when choosing.
General rules for installing a kitchen apron and the secrets of the masters
When choosing suitable materials, finishing walls or installing panels, you should adhere to a number of recommendations from experienced specialists:
- The width and length can vary widely, depending on the selected furniture set, the layout of the room and interior style, and the physique of the hostess. So, for petite ladies, the height should be reduced to make access to the upper cabinets easier. However, it is necessary to observe the established distances between the hood and the hob and the recommended minimum height;
- a small overlap of 2-3 cm significantly improves the appearance of the space between the cabinets, but a larger width is impractical;
- During the cladding process, the type of finishing materials is taken into account. So, for example, you shouldn’t cut porcelain stoneware or tiles; you can simply increase the overlap. MDF panels are purchased exactly to size. If the owners preferred skins (glass panels with beautiful patterns or picturesque scenes), then cutting is strictly not recommended. Re-hanging the cabinets will be easier and less expensive;
- When choosing a finish, it is recommended to focus on the interior style and the presence of an upper tier of cabinets. Some trends, such as loft or Provence, allow for the complete absence of wall cabinets, or replacing them with open shelves and dome hoods. In this case, the entire wall, up to the ceiling, is decorated with one material. Or create a creative mixture of different finishes;
- the minimum permissible height is 45-55 cm. When this parameter is reduced, safety rules are violated, the lower parts of the wall tier suffer greatly from hot fumes and greasy soot, and the view of the worktop is severely limited. In addition, this arrangement creates the effect of a cluttered, closed space;
- Modern designs are characterized by horizontally elongated upper cabinets with doors that open upward. For such a headset, you can increase the protective space to 75 cm;
- often owners of apartments and houses prefer two- or three-tier structures that cover the entire wall to the ceiling. This allows you to significantly save space in a small room, and in a spacious one it looks very harmonious and stylish. For such a set, the distance from the tabletop to the bottom edge of the upper tier of 100-110 cm looks natural and creates a feeling of spaciousness and freedom;
- Glossy, mirror-smooth surfaces are easier to clean from grease, dried streaks and soot. That is why masters recommend abandoning undoubtedly beautiful, but impractical relief textures.
If hanging structures are not provided, the wall in the work area can be completely finished with tiles, mosaics or various panels. However, an option with horizontal or vertical division and different finishing materials, highlighting an area with an open hood, is also interesting.
Self-adhesive film
Another inexpensive way to protect your wall from drips. The film is sold in various colors, is easy to glue and can withstand several years of use. High-quality material is not afraid of sunlight and can withstand washing with soapy water.
But if the wall was not leveled and sanded before facing, self-adhesive will make the defects even more noticeable. Also, before gluing, it is necessary to thoroughly wash and degrease the surface.
Important: The film is easily removed, but often leaves behind an adhesive layer.
Kitchen apron: types of materials and dimensions
To protect part of the wall next to the work area, finishing from a variety of materials is used:
- ceramic tiles, porcelain stoneware;
- glass, metal, stone or ceramic mosaic;
- tempered glass, mirrors;
- polished metal;
- natural and artificial stone, brick;
- MDF, heat-resistant plastics.
All types of raw materials have their advantages and disadvantages. For example, PVC and MDF are easy to install and dismantle, and their cost is low. After 4-6 years, you can update the interior of the kitchen by simply replacing the boring covering with a new one. But tiles or expensive natural stone are installed for long periods of time, so you need to choose them carefully.
In addition to the material and beautiful design, it is necessary to correctly calculate the dimensions of the products. If there are usually no difficulties with mosaics or tiles, then solid plates of wood, stone or metal require careful measurements. It is necessary to take into account and mark the location of sockets in the apron area, fasteners for the gas pipe, household appliances, as well as the configuration of this section of the wall. If you have doubts about your own abilities, it is better to call a professional measurer, because the slightest mistake can lead to serious financial expenses. Or is it worth staying with a standard furniture set, all the parameters of which are well known to apron manufacturers.
Mounting methods
It is not necessary to involve specialists to install the apron. This process is quite simple, so you can do it yourself. There are various ways to install an apron. The choice of a specific technology and the complexity of the work depends on the specific material.
On slats
Alternatively, the apron can be mounted on a wooden frame made of slats. The lathing will allow you to ignore even significant unevenness of the walls. For work you will need wooden planks with a section of 10x40 mm. The slats are mounted every 40 cm. It is necessary to ensure that the frame elements do not protrude forward and that their surface is in the same plane. The apron is attached to the slats using self-tapping screws. As an alternative to slats, you can use a metal profile. Almost any materials can be attached to the lathing - MDF or chipboard boards, sheets and panels made of plastic, metal options.
To the kitchen baseboard
The easiest way is to secure the apron using a plinth. The element is built between the apron and the work surface, as well as between the upper cabinets and the apron, closing the gaps and turning the structure into a single whole. It prevents moisture and dirt from penetrating into the gap between the wall and the countertop. Installation of the apron is carried out after installing the headset. It is temporarily fixed, after which the baseboards are installed. These elements are fastened to adjacent surfaces using self-tapping screws, which are subsequently closed with decorative plugs.
For liquid nails
This fastening method is suitable provided there is a perfectly flat base. If the previous apron was made of tiles and the elements of the old covering do not fall off, you can glue the new material directly onto it.
At the preliminary stage, you should prepare the wall. You can remove dust and strengthen the surface using a primer.
In order to secure the apron, you need to apply liquid nails to it or to the wall, then attach the finishing element to the base and hold for a few seconds. It is more convenient to apply the adhesive to a horizontal apron rather than to the wall.
If the size of the panel is larger than the planned distance between the countertop and the upper cabinets, then it must be secured before installing the set. To do this, liquid nails are distributed on the back side of the panel and glued to the wall. To prevent the panel from sliding, you need to make a support from a metal profile or wooden slats.
If the apron is smaller, install the cabinets first. After gluing the apron, you need to install the baseboards. They will protect the joints from moisture penetration into the material. If there is no skirting board of the desired color on sale, you can choose a contrasting option.
How materials affect the height of the apron
When calculating the dimensions, it is necessary to take into account the type of material from which it is made.
- MDF boards are easy to cut, their joints are hardly noticeable, and the sections are sealed with veneer or tape. Therefore, ideal accuracy may not be observed.
- Glass decorative models are made to order, according to measurements, so their configuration and dimensions can be any.
- Trimmed tiles look unsightly, so you need to choose the right sizes. The standard options are squares with sides of 10, 20 and 30 cm, or narrow rectangles 5 cm wide. A space of 60, 80 cm wide is left for them. But for a gap of 0.5 meters, the tiles will have to be selected very carefully.
Decorative rock
Suitable for aesthetes and connoisseurs of brutal textures. Natural stone is the most durable, but has a high cost. A more affordable option is artificial agglomerate, as well as colored concrete that imitates shell rock.
In addition, the apron can be laid out from budget gypsum tiles “like stone” or “brick”, but their textured and porous surface must be protected with varnish or glass. You can lay such an apron yourself.
MDF kitchen apron
The simplest option, convenient for self-installation. They can be “mounted” on special glue or staples. What are the advantages?
- Great selection of designs and colors.
- Resistant to moisture and shock.
- No joints and excellent masking of wall surface imperfections.
- Easy maintenance and replacement available at any time.
Disadvantages: fragility and sensitivity to high temperatures. Also, you should avoid getting water inside the panels.
Original ideas on how to close the wall behind a gas stove: photo
Many people are inclined to experiment. And when starting a home renovation, they can make unexpected and creative decisions, in addition to standard materials, using other available materials for the apron. Sometimes these experiments turn out to be very successful and give the room an original look. Such creative ideas for designing kitchen “aprons” and “screens” include the following suggestions.
How to close the wall behind a gas stove:
- Wine corks
Original
They look very original in the interior of the kitchen, giving it an eco-style, which is certainly the main advantage of such a coating. Easy to install and giving room for imagination in choosing patterns and shapes. You can use corks cut lengthwise or crosswise into several pieces. But, again, they do not match with all furniture. In addition, it will take a very long time to collect or search for source material. The disadvantages of this coating include the sensitivity of the material to high temperatures, steam, moisture and odors. It is advisable to cover it with resistant glass.
- CDs
From discs
A very elegant kitchen “apron” is made from old CD discs, whole or broken into pieces. The holographic film covering the surface of the discs creates a fantastic reflective effect and visually enlarges the room. Of course, this type of coating is not durable, since the discs tend to fade and become deformed over time, but for several years you will be able to enjoy the fabulous look and play of light in your kitchen.
- Pebbles
This is where to put pebbles from the sea.
This improvised material is more accessible to residents of coastal cities; for others it may be more expensive than natural stone. An “apron” or “screen” made of pebbles looks very original, especially if it is laid out from multi-colored stones in the form of a pattern. But this work is very painstaking and requires skill. However, if you decide to do it, you will be rewarded with a very environmentally friendly and practical coating that is easy to clean and looks impressive. Among the disadvantages, it should be noted that it is not compatible with all furniture.
- Shards of tiles and dishes
Well, very original!
Small fragments of tiles or dishes can also make an original and quite practical kitchen “apron” - here it all depends on your design abilities. Such a coating will be non-staining, resistant to high temperatures and easy to clean.
Simple and practical tips on how to protect your gas stove and the wall behind it
- To keep your gas stove clean, do not forget to use special foil covers, which can be purchased at any hardware store. In this way you can protect your expensive and beautiful coating.
They can be easily changed if necessary
- There are also caps for handles that will keep them clean. After all, the handles are extremely difficult and inconvenient to wash. By the way, this method will also help protect them from inquisitive children.
And the handles of your gas stove are always clean
- Also, do not forget to use special linings for the gas stove itself, made of thin special glass. They are washable and much more durable than foil. Although it can also be used to cover a gas stove as an economical option.
Note
: As you can see, the variety of options for covering the wall behind a gas stove is extremely large. Don't be afraid to experiment. But always take into account not only the attractive appearance, but also practicality and your personal requirements!
Kitchen apron made of plastic
Products made from PVC, ABS, HDF plastic are resistant to moisture and can withstand short-term temperature increases. They are distinguished by their magnificent appearance and ease of installation and dismantling. Just like products made from MDF and chipboard, they last no longer than 5-7 years.
Slate
Painting a kitchen apron with black chalk paint is not only a practical, but also an original option. The wall will be easy to clean, since chalkboard paint is resistant to long-term external influences. You can draw on the apron, leave notes, write menus and recipes.
Before painting, the surface must be leveled. The composition should be applied in three layers to achieve an even coating. One liter is enough to cover a two-meter apron in two layers.
There are many ways to design a kitchen apron - they all have their advantages and disadvantages. Before choosing a material, you should consider your financial capabilities, as well as cooking methods and the availability of a dishwasher. People who rarely use the sink and stove can not worry about the performance properties of the apron and show their imagination without limiting themselves.
Ceramic tiles or porcelain stoneware as a material for a kitchen apron
A traditional, familiar option for wall decoration in the kitchen. Has a number of advantages:
- excellent resistance to moisture and high temperatures;
- withstands the effects of acids, alkalis, household chemicals;
- strength, durability;
- easy to clean from any stains, the ability to use abrasive cleaning agents;
- a huge range of sizes, colors, decorative patterns.
Disadvantages include the complexity of installation and the need to purchase additional materials - tile adhesive, corners, grout. Replacing old tiles will also require some work.
Which coating is better for the kitchen: tile, laminate, linoleum, wood?
It is not easy to choose which flooring is best for the kitchen among the current variety: parquet, tiles, laminate, linoleum, modern self-leveling floors and so on. In addition, there are a number of requirements that must be met, because the kitchen is a room with high humidity, with frequent temperature changes, and even with high traffic.
Criteria for orientation
Before choosing a specific material with which to cover the floor, you should decide what you need to require from it. After all, floors should last as long as possible without causing any trouble.
Moisture resistance
Splashes often fly in the kitchen: either from a pot of boiling water or when washing dishes. Moreover, something can simply spill, so the floors must be waterproof - otherwise there is a risk of the screed becoming damp and mold appearing. In addition, droplets of water can often be seen on water pipes, or the pipe may even burst - for this reason, additional waterproofing is done along the water supply.
Low hygroscopicity
Hygroscopicity is the ability to absorb something. Due to the fact that the material absorbs dirt, grease or water, two problems arise:
- stains must be scrubbed with force and abrasive substances, which spoils the appearance of the coating;
- Fungus and mold may form.
Impact resistance
The kitchen is a room where there are many heavy and sharp objects. Ideally, the floors should be able to withstand the fall of a cast iron frying pan or cauldron from a height of one meter. Abrasion resistance is also considered an important factor, since the kitchen is a very trafficked place: food is prepared every day, and all household members go to the refrigerator.
Traces from furniture, such as chairs, may also remain. Dirt and moisture will get into microcracks and scratches, which can cause damage to the entire coating or the appearance of mold.
Hygiene
Since warm and humid environments are a haven for germs and bacteria, floors should be thoroughly cleaned. What can interfere with quality hygiene? Seams and irregularities (for example, with relief tiles). Water can get into them and mold can form. In addition, such flooring may simply come off at the seams.
An important area is the floor next to the stove, where grease deposits often form, which must be washed with strong cleaning agents. The coating must be ready for this.
Slippery
Frequent splashes and spilled liquids are dangerous not only because of possible mold and damage to the coating - it is also traumatic if the floors are slippery. This most often applies only to tiles, so if you want to make a tiled floor, you should give preference to rough surfaces.
Resistance to temperature changes
Heated floors are often installed in the kitchen to make being in the room comfortable. But even without such technologies, temperature changes often occur in the kitchen when the oven is turned on, a window opens for ventilation, and so on. The coating must cope with such loads.
Design
The choice of designs in modern construction stores is huge: you can buy tiles made to look like laminate and laminate made to look like tiles. But it is worth considering that a dark floor greatly narrows the room, and dust is also more noticeable on it.
Tile
One of the most popular coverings for the kitchen and hallway. Although tile is considered a cold material, you can easily put a warm floor underneath it - and the problem of cold feet is solved. The tiles are easy to clean and practically do not absorb grease and dirt. But it also has several disadvantages:
- seams - in addition to the fact that dirt collects in them, this also loses its presentable appearance;
- A perfectly flat floor is required; it is difficult to install and dismantle when replacing.
There are several factors by which you can choose high-quality tiles that will last for many years:
- wear resistance is indicated by the letters PEI and then by Roman numerals from one to five. For the kitchen, due to its trafficability, it is worth choosing a minimum of PEI IV;
- resistance to cleaning agents is indicated in Latin letters from AA to D. Due to grease deposits on the stove, preference should be given to tiles with classifications AA, A, B;
- moisture absorption (or moisture resistance) depends on the tile manufacturing method - extrusion or pressing. The first option has a porous structure, while the second is more dense and durable, so it is the second option that you should focus on. If we talk about specific designations, then these are AI, AII, BI, BII;
- the coefficient of friction shows how protected the tile is from abrasion. The higher the number, the better, optimal values are 0.4–0.75;
- the grade affects the quality of the tile; it is indicated both by numbers and color - I-red, II-blue, III-green. The first grade, accordingly, is the best. The quality of the tile, its evenness, and the amount of defects in the box depend on the variety;
- the surface can be of several types - glossy, polished, matte, rough, embossed. You should give preference only to the last three options due to the possibility of slipping of the first ones. At the same time, you should not choose highly textured tiles, so as not to spend a lot of time cleaning them.
Linoleum
Also a popular material for kitchen flooring. When people talk about linoleum, they most often mean the synthetic version because of its many advantages.
Standard apron offers for the kitchen
Typical kitchen designs include the following dimensions:
- the height of the cabinets together with the table top and plinth is 85-90 cm;
- the distance from the floor to the bottom edge of the hanging tier is 1.4 - 1.5 meters;
- the height to the bottom cover of the cabinet with built-in hood is 1.7 meters. In the case of using open dome and inclined systems with an outlet into the ventilation hole, this cabinet is not used at all. In this case, it is necessary to take into account the established standards for slabs. So, from the gas hood to the hood there should be at least 75-80 cm, and from the electric hood - 65-70 cm. For the induction model, the distance is even smaller - from 45 cm.
The necessary data is calculated using a simple formula: a – b + 2 = Y, where Y is the height of the apron; a – height of the bottom edge above the floor; b – tabletop height; and 2 cm is left for tolerances. Accordingly, the standard width of the product will be about 60 cm. This is the most optimal size when finishing a section of wall with ceramic tiles, since standard models with edges of 15, 20 and 30 cm fit into it without cutting. The length of the apron is always 2-4 cm longer than the total length of the tabletop in the work area.
What should you consider when choosing?
First you need to decide on the style in which the apron and the kitchen as a whole will be made. Indoors, you need to consider lighting as sunlight makes colors brighter and lighter. Indoor lights make colors feel warm, while halogen lights give the feel of cool colors. If the renovation is done on your own, then it is worth familiarizing yourself with the basics of color in order to avoid color overlap (for example, blue shades under indoor yellow light give a green tint). Large sizes are suitable for a large kitchen, and accordingly, small ones will look harmonious in a small kitchen. The square shape looks familiar and if you want to add originality, it is better to use round, hexagonal, triangular or irregular geometric tiles. Light colors visually enlarge the kitchen and allow you to emphasize the furniture, while dark colors visually make the kitchen smaller
Bright contrasting colors draw attention to the apron, and bedding to the furniture. A smooth shiny surface will brighten the room, while a matte surface will make the room smaller. The contrasting color of the grout will attract attention, and the color of the grout will make the surface visually seamless. Tiles for the apron must be purchased with a reserve, adding 5-10% for a simple installation method and 15% - 20% when laying diagonally, combined or in a complex pattern. Also, a reserve is taken in case of a fight, unsuccessful pruning, defects and for the future, if the apron needs to be repaired. All materials for covering the apron must be purchased in one batch and in the same shade.
This may also be interesting to read: How to choose floor tiles for the kitchen?
Watch more useful tips on choosing in the video:
Why is it better to build a house than to buy a ready-made one, especially if this house was built for sale.
Dmitry 78 published a blog entry in Unusual problems and their solutions., December 22, 2021, blog entry
Why is it better to build a house than to buy a ready-made one, especially if this house was built for sale.
The beginning of this story was absolutely ordinary.
In a newly purchased residential building, one heating radiator was not heating. The plumber who had been called before “improved” this radiator by removing the control valve and stupidly installing a plug in its place. Remember how Celentano repaired the car in The Taming of the Shrew, since then he has had many followers
Graphite paint
In black and white or Scandinavian style kitchens, slate backsplashes look harmonious. Waterproof paint is applied to degreased and primed plywood in several layers. After drying, the surface has a slightly rough, matte texture. In addition to the usual black color, you can look for deep green, blue, brown, etc. Chalk lays softly on a painted surface and is easily washed off with a damp cloth.
A slate apron is perfect for writing a grocery list or your favorite recipes. Kitchen-themed drawings and wishes for household members, made in original fonts, look interesting.
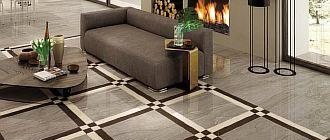
Geometry options
With the help of geometric elements on the floor, you can not only make the kitchen more expressive and aesthetically pleasing, but also change its perception in space.
If the room lacks accents, then large-format zigzags and squares, rhombuses and other geometric attributes will add dynamics to the design of the room.
And vice versa: small abstractions perfectly expand the space and add air to the room.
External wiring
Rewiring isn't just about pulling out the old cables and carefully laying new wires in their place. Usually the wires are bricked up to death, so the walls are re-drilled for a new cable.
A meter groove costs an average of 500 RUR, and hidden replacement of wiring increases the cost of work by 20-30%. External wiring is budget-friendly, but at home you don’t really want to see plastic cable ducts like in the office.
Electricians advise reducing the cost of gating in the following way: lay new wires in corrugated ceilings, secure distribution boxes there, and gib only in places where the cable descends to sockets and switches. Such external wiring is covered with a suspended ceiling, and in order to protect the apartment from fire, corrugations made of self-extinguishing PVC are chosen.