ZigBee, Z-Wave, Wi-Fi, Bluetooth - which technology to bet on? Which brands produce the most practical solutions? Which gateway, sensors to choose and what to look for for those who want to simplify everything?
We asked Vadim Eremin, head of the Gadgets and Innovations department, to talk about his experience in building a smart home. Below is only what has been tested from our own experience. But first, a few words about protocols and standards, and then about manufacturers and specific models.
Content:
Anyone can create and configure a smart home, within a very modest budget and without much effort. Thanks to modern wireless technologies, you don't even have to change your electrical wiring to add smart functions to control lighting, heating, video surveillance, cleaning and much more.
Naturally, the more smart systems you want to get, the more difficult and expensive it is to equip your home. But the advantage is that you can gradually expand the smart home scheme in your apartment, adding elements as needed. The main thing is to choose a universal “heart” to which it is easy to connect new sensors and devices.
Villa in Cyprus, Svetozar Andreev studio
0
A luxurious villa on the Cypriot coast (from a collection of projects on the Houzz website) was made for a Russian businessman by a Russian architect - in principle, nothing surprising. Despite the apparent asceticism, the house is crammed with modern technologies from foundation to roof. Huge, wall-length windows allowing you to admire the landscape are equipped with automatic screens. At the request of the residents, they can even go into the wall, leaving an open opening for complete merging with nature. Cyprus is hot in the summer, so the problem with the microclimate was solved with the help of a modern ducted air conditioning system. You can control it from your mobile phone. Lighting, security, glazing and heating are controlled in the same way. The owners plan to install wind generators and tidal power plants to make the house energy independent.
×
Beginning: thinking through the system
So, you should start by drawing up a diagram. You can automate systems such as:
- lighting;
- heating;
- indoor/outdoor video surveillance;
- gas safety;
- Fire safety;
- audio;
- watering;
- hydration;
- cleaning.
At the planning stage, it will become clear how many systems and different devices you will have: sensors, sensors, switches. After this, you need to select a single control unit that supports the number of elements you have chosen (it is better to take it with a reserve for the future). In other words, it is called a hub, gateway or concentrator. This block collects signals from all devices, sends them commands, and carries out control.
To organize a smart home, you will need to connect all these devices to the hub via Wi-Fi or Bluetooth and control them through a single interface. This approach is the simplest and most universal, since all configuration will be carried out in one application
Attention! When choosing a hub, it is advisable to know which systems and devices you will use in order to check their compatibility in advance.
Using a single hub is a convenient way, but it is possible to build a system without it. If you don’t want to figure out how to “make friends” between different devices, you can use autonomous systems. But in this case, the smart home will be controlled in different applications. The more systems, the more applications.
Advanced users can create a smart home with their own hands based on a PC. But this option cannot be called budgetary and simple, so in this article we will not talk about its construction.
How to choose the right option?
The market is represented by a large number of manufacturers providing services for any budget and needs.
Therefore, if your needs are limited only by finances, and if they are limited, you should decide which functions are really needed and which ones you just want to “have” or show off to your friends.
The type of room may impose certain restrictions. So, in the case of an apartment or house with finished finishing, a wireless communication scheme may be required, but it is more expensive and less reliable than a wired one.
In any case, even if you overpay a little by ordering unnecessary functions, the costs will be more than recouped by a completely different level of comfort, which will certainly appeal to all family members. And you won’t have to regret a single penny spent.
DIY smart home lighting
Lighting is the system with which we usually start designing a smart home. Since we are talking about a budget option for intellectualizing an apartment, the easiest way is to replace ordinary light bulbs. There are smart LED light bulbs on sale that fit standard E27 sockets. These light bulbs, connected to a single control unit, can be dimmed (change brightness), turned on or off remotely, and set to operate on a timer.
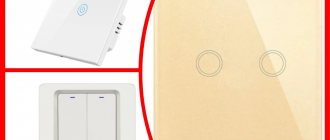
You can add wireless switches to wireless lamps. They do not require wiring and can be located anywhere. Each key controls one lamp or set.
You can also include any lighting fixtures compatible with the hub: night lights, chandeliers, sconces. Control is carried out according to the same principle as with light bulbs.
Bathroom in France, Agence Glenn Medioni
0
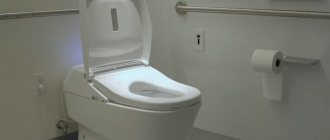
In front of you is a “smart” bathroom. It is beautiful in itself, but the main miracles are not striking. Firstly, the shower has an automatic soap dispenser. This is one of those things that everyone dreams of, but no one dares to install in their own home. Secondly, a smart fountain faucet easily remembers the owner’s habits. What temperature does he like, what pressure? Just pressing one button is enough to get a full bath of “correct” water. All communications are hidden in the floor.
Heating and temperature control
A properly designed smart home can turn the heating on/off, adjust the temperature of the heated floor and regulate the operation of air conditioners according to established scenarios. For example, the system can turn on the heating an hour before you arrive, automatically turn off the air conditioners when you leave the apartment or when the room temperature reaches a certain level, and so on.
To control the temperature in the house, specialized thermostats and temperature sensors are installed. They can be easily controlled remotely via the app. There are also voice-controlled thermostats, so you can just give a voice command to turn on the air conditioning or turn off the heating.
Apartment in Moscow, bureau of Alexandra Fedorova
0
In this spacious apartment, where a young family with a child lives, nothing betrays the presence of high technology. But it's not that simple. The owners disguised a large TV and speaker system under black glass and suede panels - they can be controlled remotely. Although what is of particular interest to us is not the technology, but the wall between the bedroom and the bathroom. Part of it is finished with porcelain stoneware, and part consists of glass. This is “smart glass” - if you press the control button, it turns from transparent to frosted. The miracle partition allows the owners to admire the fireplace both from the bedroom and while lying in the bathroom. The bio-fireplace is built into a cabinet against the wall.
Smart video surveillance
Smart video cameras are a great idea for smart home security. With their help, you can monitor what is happening inside the apartment, as well as the front door and the surrounding area. The application allows you to connect to the camera remotely at any time.
Such devices can be used as a video baby monitor for a child, for monitoring pets, or just for safety. Some models have a video recording function that is triggered by movement. This way you will always know what is happening inside the house, as well as outside it.
If, in addition to video cameras, you install motion sensors, door and window opening sensors, you will get a full-fledged security system.
Cottage in the Moscow region, ORT-interiors
0
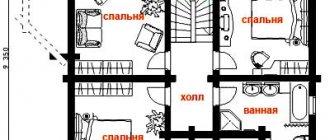
The owners of this cottage - a businessman from Siberia and his wife - initially wanted to buy a ready-made building in the Moscow region. After looking at a large number of options, they never found their dream home. Then the couple decided to build it from scratch in a cottage village near the village of Bunkovo. “Smart” in the cottage are: heating (boilers, heated water floors, floor convectors), ventilation (climate control), water supply, bathhouse and pool complex, alarm system, electricity and low-current network (LCS, audio-video, intercom, telephone, TV). 96 “light groups”, 16 equipped zones for watching videos and listening to music, eight surveillance cameras, a home cinema, satellite dishes... In general, few people in Russia combine so much different equipment in one system (and maybe no one). All this “stuffing” has been serving regularly for seven years and has not been modernized.
Other smart home ideas
More and more devices are constantly appearing on the market that can be controlled remotely. You can assemble a smart home to suit all your interests and needs: select a controlled audio system, start remote watering of the lawn, connect a device for air purification and humidification to the hub, clean with a robot vacuum cleaner, anywhere in the world.
How to do all this and configure it? Nothing complicated:
- connect the selected device to the network;
- connect it to your application;
- control from a distance.
As you can see, building a smart home is really easy, and using it is even easier. And the best part is that you can start with a minimum budget for the most necessary systems, gradually adding useful features.
Do you want to receive news regularly?
Leave your email and receive the latest articles from our blog. Subscribe so you don't miss anything
You have successfully subscribed!
Subscribe
5
(Votes: 1, Rating: 5)
Construction of walls from OSB boards
OSB board is most often a three-layer, oriented wood board, which is made using chips and synthetic resins under high temperatures and pressure.
The quality and cost of OSB boards may vary depending on its class. Typically, a high-quality slab consists of approximately 90-92% wood chips from deciduous or coniferous trees. The chips are selected according to the general standard; the length should be about 15 cm, and its thickness should be about 0.7 mm.
These chips, depending on the layer, are laid in different directions and filled with resin. The output is usually a three-layer, and less often a four-layer board, which in its properties significantly exceeds analogues such as MDF, chipboard, and, of course, fiberboard.
Among private developers today, the most popular and widespread OSB board is the third class, which has the best ratio of its price and hardness.
In addition, OSB board can be considered an improved type of wood, which has all the advantages of ordinary wood, including a high level of environmental friendliness, but without some of its disadvantages (such as all kinds of knots, as well as changes in the direction of wood fibers).
The scope of application of such plates is extremely wide and can be used:
- As the main material for the construction of buildings of any type;
- For installation of walls, floors, ceilings;
- In the form of roofing panels;
- As built-in formwork, when carrying out concrete work;
- In the form of a scaffolding structure;
- For creating pallets, boxes, and shipping containers;
- To create garden furniture or buildings.
If you want to build walls yourself from OSB boards, you will need at least 2 assistants. The optimal number is 4 people. It is important that at least one of them has experience in the construction and assembly of frame houses. Other “hands” will be required to feed and hold the slab while fastening it.
Stages of construction of walls from OSB boards
- A waterproofing layer (most often roofing felt) is laid on the foundation. After which the lower trim is arranged;
- Then the racks and corners of the walls are attached, after which a diagonal fastening is made, protecting the structure from “folding”;
- The next step is the installation of the top trim;
- Then the floor and floor beams are laid;
- The next step is to install the frames of the window and door openings;
- Then the rafters are placed and sheathed;
- The floor and ceiling are covered;
- Sheathing is done with OSB panels;
- Sealing extensions are installed at the corners and joints of the panels.
When constructing a residential building yourself, the walls outside and inside are sheathed separately. Insulation is laid between the layers of OSB, wires and life support systems are laid.
Some tips from developers:
- Self-tapping screws cannot be screwed into OSB boards well. It is advisable to pre-drill holes for them with a slightly smaller drill diameter;
- For normal heat exchange, it is advisable to leave a 3 mm wide gap between the panels and racks around the perimeter of the floor. And between the plates themselves - 2 mm. To the floor covering 10-12 mm. Gaps during finishing can be closed with skirting boards;
- The floor panels are laid on the beams across their location. There must be at least 3 cross members under each OSB board. After which they are connected on a beam along the length of the end of the sheets and both edges are secured with self-tapping screws. The pitch between the floor beams should be 500-600 mm.
Other services
From any screen of your personal account you can go to other Rostelecom services. To do this, click on the icon next to your profile in the upper right corner, as shown in the image, and then select the appropriate module. The following options are available:
- personal account of a Rostelecom subscriber (Internet, television, telephony);
- interactive television Wink;
- Rostelecom Lyceum service;
- “Bonus” program;
- “My rights and benefits” program.
Devices
Now let’s look at the “Devices” section, which performs the most important function of the personal account of a smart home from Rostelecom. Each gadget comes with a card that displays the following information:
- type of gadget;
- status;
- binding to the room;
- battery charge level;
- control. For example, the level of illumination from a light bulb.
My devices
go to the “ My Devices ” section using the corresponding link in the left navigation menu of the site.
In this section you can view all the equipment connected to your system: controllers, video cameras, Z-Wave, and so on.
How to add a device
- Follow the web link: https://lk.smarthome.rt.ru/devices .
- Use the “menu”Add device“.
- It is important to note that the first step is to connect the controller. Without it, Z-Wave devices will not work. If you do not do this, you will only be able to connect video cameras.
- Select your device type and follow further instructions.
How to connect the camera
- Select the “ Video Camera ” item in the instructions from the “ How to add a device ” subsection.
- Now specify the device connection method: wireless or via Ethernet cable.
- Further instructions depend on the selected method: Wireless connection: Unpack the camera and connect it as described in the user manual.
- Wait for a beep indicating that the camera is ready to scan.
- Click “Continue” in your personal account and specify the wireless network to which the gadget is connected.
- Click “Get QR code” and scan it from your video camera.
- All that remains is to click “Code recognized” and see the connected device in the corresponding section.
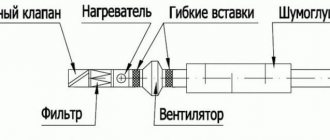
- Connect the gadget following the instructions included with the gadget. It is important to note that for video cameras with a PoE injector, the wire length should not exceed 90 meters.
How to connect the controller
As mentioned earlier, without a controller you can only connect the camera. If you are interested in a Z-Wave technology device, you will have to connect it following the following instructions:
- First, unpack the controller and connect power to it. To do this, it is recommended to use the instructions.
- Go to the “ My devices ” section and click “ Add device ”.
- Select “Connect a Z-Wave device“.
- First the system will try to find the controller. If it is not there, it will prompt you to connect. Click “ Connect controller“.
- Connect the controller to the router and use the link “Continue“.
- Now you need to enter the MAC address of the device. You can find it on a sticker on the back of the controller. The combination has the format AA-AA-AA-AA-AA-AA.
- All that remains is to click “ Connect ”. If everything is done correctly, you will be able to connect Z-Wave gadgets.
Z-Wave devices
Z-Wave is a modern protocol for smart devices used by PJSC Rostelecom. These include the following types:
- smart plug. Able to control the supply of electricity and control its consumption;
- smart light bulb. Allows you to control the brightness and color of lighting;
- opening sensor. Records the opening and closing of doors and windows;
- Motion Sensor. Determines the movement of objects in the visibility area;
- leakage sensor. Controls humidity levels;
- smoke detector. Detects smoke, turns on the siren and sends a notification to the user's phone.
Sensors can be paired with other smart devices to automate their operation. For example, you can link an opening sensor and a light bulb. Every time someone opens the door in the room, the light will come on. You can come up with many such scenarios.
How to connect a Z-Wave device
- Select “ Connect a Z-Wave device ” in the “ Add device ” menu of the “ My devices ” section.
- Specify type.
- Prepare your device by following the on-screen instructions. It is individual for each device.
- Use the link “Start adding“.
- If everything is done correctly, the system will automatically connect the smart home and the specified device. Now you can edit his card.
Device card
As mentioned earlier, each device has its own card. It displays the following information:
- brief information;
- information received from sensors;
- control buttons;
- sensor statistics and update time;
- latest events;
- current scenarios where this gadget is used;
- manufacturer;
- model;
- serial number.
The following items are configurable:
- device activation (working or disabled);
- the room to which it is attached;
- his name.
Video camera card
A separate card is used for video cameras. It displays the image from the camera in the form of a convenient player. The following functions are available in it:
- rewind and forward;
- pause and resume playback;
- transition between live broadcast and recordings saved in the archive;
- screenshot;
- recording a fragment and its subsequent saving;
- turning on a siren or strobe light, if supported by your model.
You can hover over any button to find out what it does. If necessary, you can share the link to the broadcast so that the image from your camera is available to other people. The web address itself is configured according to the following parameters:
- “life period” of the link. After it expires, it will stop working for everyone;
- enable or disable broadcasting. The link will continue to work, but the broadcast can be paused. Visitors will see a corresponding notification about this;
- update link.
You can also customize the device itself. To do this, click on the gear icon in the upper right corner and select “Edit Camera”. The following information and options are displayed here:
- specifications;
- binding to a room in a smart home;
- camera name (can be edited);
- tariff plan;
- enable or disable live streaming;
- turning the microphone on or off;
- interface settings;
- operating mode;
- stream width and shooting quality;
- rotate (if supported);
- Software Update.
Events
“Events” is the next section of the personal account of a smart home from Rostelecom. The following information is displayed here:
- events that occurred over the past 24 hours;
- calendar and time;
- filters for convenient event search.
Events are divided into the following categories:
- All;
- system: authorization in the system;
- any transformations in lists of devices, sensors, scripts, and so on;
- change in the user card;
- controller firmware;
- editing house, device, user cards;
- disabling the controller;
Home screen
Immediately after registration and authorization, each user is taken to the home screen of the Smart Home system from Rostelecom. Here you can work with widgets, track the latest events and go to other modules of your personal account.
Widgets are divided into two categories: gadgets and scripts. In the first case, you will see detailed information about the device you are using, including its current status. The second category allows you to create your own scripts for controlling gadgets.
How to add a widget to your home screen
If you want to add a widget, it is recommended to follow the following algorithm:
- Click “Add widget“ as shown in the screenshot below.
- Select the widget category and the appropriate items. If the list is empty, you must first connect devices or create scenarios.
- Click “Add” and save the result.