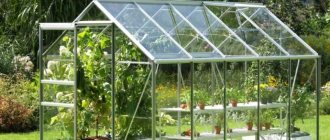
Greenhouses with geothermal heating are an original method of using energy from renewable sources and the elementary laws of physics. The scope of application of this alternative type of energy is quite extensive, but most often it is used for heating livestock farms, poultry farms and greenhouses. The use of natural heat sources makes it possible to obtain significant savings and, consequently, reduce the cost of agricultural products. Calculations of a geothermal heating system for each object are made individually.
What is the essence of geothermal heating
First, ask yourself a simple question - what is the main task of the heating system?
The answer is obvious - in maintaining the air temperature in the room at a level that, in the case of a greenhouse, would be comfortable for the crops growing there. This is especially important in the winter, when, due to a sharp drop in temperature, the greenhouse effect alone is not enough to create the desired temperature regime. The situation can be corrected only with the help of third-party heat sources that bring the air to the desired temperature. And it is obvious that heating should not only be sufficient, but also convenient and economical. After all, if heating costs are excessively high, then greenhouse plants will literally turn out to be “golden”.
Innovations in the field of energy saving and heating often cause only skepticism among people. New methods appear almost every day, but few of them take root. Some turn out to be too expensive, some are inconvenient, and others are completely inaccessible to the average person. But not with convection geothermal heating systems. Everything is completely different here.
Although the heating system itself is very complex in design, and in most cases it is impossible to build it yourself, the costs for it are fully justified. And that's why:
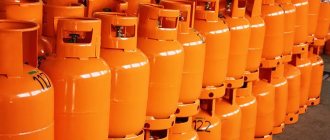
· It is completely autonomous. You do not have to replenish energy reserves, add solid fuel to the boiler, change gas cylinders, etc. Geothermal energy is renewable;
· It does not require operating costs. Do it once and forget it. Convection heating does not require any subsequent maintenance, repairs, etc. Consequently, there are no costs for all this;
· It has served for more than 50 years. If constructed correctly, the service life of the heating system will be at least half a century;
· It maintains an optimal microclimate all year round. In winter, the temperature in the greenhouse increases, in summer it decreases. Geothermal heating ensures self-regulation of air temperature;
· It automatically regulates the air humidity level. Everything is the same as with temperature. Thanks to a well-thought-out ventilation system, the humidity in the greenhouse is always maintained at an optimal level;
· It increases the carbon dioxide content. And, as you know, it is necessary for the normal functioning of all green crops.
The operating principle of a geothermal heating system is based on the laws of nature. As is known, the deep layers of soil, located several meters from the surface of the earth, have a constant temperature. In winter it is about 6-8 degrees, in summer – within 10-12 degrees. And this turns out to be quite enough to ensure a basic comfortable temperature in the greenhouse, increased many times over by the sun’s rays and the greenhouse effect.
We suggest you familiarize yourself with How to soak volnushki at home
In summer, the air in the greenhouse cools, and this prevents plants from overheating and withering. In winter, on the contrary, the air becomes warmer. In general, a constant temperature within the greenhouse is maintained throughout the year within the range of 25-28 degrees. This is the optimal temperature regime for the vast majority of vegetables grown in mid-latitudes.
We also note that thanks to active air exchange, the soil becomes something like a heat accumulator. During the day, heat accumulates in the soil, and at night it is evenly released into the air.
Greenhouses using geothermal heating systems have already been successfully tested in dozens of countries around the world. In particular, it is these greenhouses that have recently begun to be erected en masse in Greenland. And although the island is completely covered with ice, which never melts, its residents are provided with vegetables and even exotic fruits all year round. Of course, additional heating sources are also used in Greenland greenhouses, but the costs of providing it are minimal.
Converter system installation
Creating a converter system that performs will require the purchase of:
- Solid fuel boiler.
- Pipe
- Battery sections.
- Expansion tank.
- Valves.
It is recommended to place the solid fuel boiler in a separate room, since in this case there will be no need to enter the greenhouse once again. Fuel is added to a modern converter unit twice a day. The boiler models offered for heating private houses and greenhouses are fireproof, and therefore can be left running all night.
It is necessary to install the pipe system, starting with the main pipe, which can be laid under the ridge of the roof, creating a slight slope towards the final end of the room. At this point, a wiring is made, from which 4 pipes with a diameter of approximately 50 mm will come out. These pipes must run along the side racks. Also along the side walls of the room there are radiators into which heated water is conducted.
2-3 bumpers are led from the main pipe to the sides of the roof. Their task is to prevent snow from accumulating on the glass. To make it possible to regulate the supply of hot water and the temperature in the room, radiators and individual pipes are equipped with valves.
All pipes returning to the boiler room are collected together. Water is supplied to the solid fuel boiler through a single pipe with a diameter of 75 mm. The expansion tank is installed above the heating boiler. It must be connected to the main pipe at the highest point of water passage.
Water and air heating of greenhouses. alternative systems
You can use greenhouses all year round only if you take care of a good heating system. More and more people prefer to grow vegetables for their table on their own. Unfortunately, in our time, only this can guarantee the environmental purity of products. Besides, it's a good business.
By arranging closed beds on your site, you can not only eat fresh vegetables and fruits all year round, but also supply them for sale. However, in order to operate the greenhouse, it is constantly necessary to take care of its heating.
To heat the greenhouse, you can use different systems: water, air, biofuel or solar energy. Preparing the greenhouse for the season, organizing heating systems and their types will be discussed in this article.
Possibility of using heating systems
An event such as soil heating is important for agriculture and for many other areas where it is necessary to extend the vegetative period of plants to the maximum possible. For example, in addition to greenhouses, greenhouses and hotbeds, the devices can be used to warm the soil on football fields, lawns, construction and other sites. With the help of our soil heating systems, you can easily grow even vegetables all year round, getting early harvests with minimal labor costs.
Water heating of a greenhouse
The layout of the heating system largely depends on the size of the greenhouse
A system of hot water pipes and radiators is a widespread heating option for greenhouses. Large diameter pipes are also often used, without installing radiators. This allows you to save on materials.
Water heating of greenhouses can be organized according to different options and schemes. Usually the simplest one-pipe wiring is used. The circuit runs along the perimeter of the greenhouse, and the return line is buried in the ground.
Moreover, if the greenhouse is not large (up to 3 m wide), then it is quite enough to mount the pipes along one of the walls or in the center. Installing water heating for a greenhouse with your own hands does not present any particular problems.
It is enough to purchase pipes (usually galvanized or metal-plastic), lay them at a slight angle and connect them to the boiler or to the general heating system. The last option is acceptable if the greenhouse is located in close proximity to the house.
Otherwise, the heat loss will be quite large and it would be more logical to organize autonomous heating. For this purpose, a small boiler room is organized in the vestibule or near the greenhouse, where a boiler is installed.
Construction of industrial greenhouses: heating and lighting
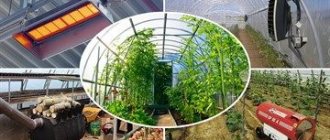
Heating an industrial greenhouse always becomes a pressing problem during the cold season. Each owner of a greenhouse complex is looking for his own way out of this situation. Some solve the problem with the help of anthracite coal, some are satisfied with the air heating system, others are introducing small and large Russian and global heating technologies of the new generation.
Lighting in large structures is no less important. Especially if the greenhouse “works” even in winter
For lighting equipment, new LED lamps and fixtures are installed, starting to turn them on as soon as the seeds germinate. Don't forget about the irrigation system.
Irrigation systems are:
- Drip;
- Autonomous;
- Ordinary;
- Air.
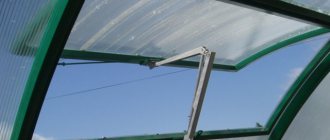
Ventilation also plays an important role. Recently, taking into account 2021, an automatic ventilation system with the installation of curtains has been actively used. You just need to set the sensors correctly, and the circuits will do everything for you.
Geothermal convection and its benefits
Of course, many people do not take innovative methods of alternative energy saving seriously, believing that free energy does not exist. But there are some exceptions to the rules, and convection geothermal heating systems are an example of this:
- during operation, the geothermal system does not incur any costs;
- the system has complete autonomy;
- does not require maintenance or periodic repairs;
- Maintains the required climate throughout the year;
- service life more than 50 years;
- Thanks to uniform ventilation and automatic humidity control, a balanced and soft microclimate is obtained;
We suggest you familiarize yourself with Planting daylilies in the ground in spring
Advantages and disadvantages
The objective advantages of geothermal heating can be considered:
- excellent efficiency;
- a solid service life (a heat pump lasts 2-3 decades, and geological probes last up to 100 years);
- stability of operation under almost any conditions;
- lack of connection to energy resources;
- complete autonomy.
There is one major problem preventing geothermal heating from becoming a truly widespread solution. This, as reviews from the owners show, is the high price of the structure being created. To heat an ordinary house of 200 square meters. m (not so rare), it will be necessary to build a turnkey system for 1 million rubles, up to 1/3 of this amount costs a heat pump. Automated installations are very convenient, and if everything is configured correctly, they can work for years without human intervention. Everything depends only on the availability of free funds. Another disadvantage is the dependence on the power supply of the pump unit.
Advantages of geothermal heating for a greenhouse
When choosing a heating method for a greenhouse, like any other room, the main criterion is high performance and maximum efficiency. These are the requirements that a geothermal heating system meets. In addition, it has a number of other advantages, namely:
- Absolute energy independence - geothermal installations can operate using the thermal energy of water, air and even soil.
- No operating costs or maintenance required.
- Durability – the average service life of such a system is approximately 50 years.
- The ability to maintain an optimal microclimate in the greenhouse all year round thanks to the ability to adjust humidity, etc.
- Environmentally friendly – no harmful emissions into the environment during operation.
- The ability to easily heat a large room up to 150 square meters and provide warm water supply if necessary.
How to build a thermos greenhouse - step-by-step instructions
Step-by-step instructions with visual photos will help you decide on materials, understand the order of construction of a buried greenhouse, and, as a result, make a compact dugout for your dacha using your own resources.
Step 1: preparation of materials and tools
The main structural elements of a greenhouse buried in the ground: walls, frame and roofing.
Thermoblocks are mainly used for walls. The building material consists of polystyrene foam walls connected by jumpers. The blocks are used as formwork, and after installation they are filled with concrete. The result is a durable and insulated wall.
Thermoblock for the construction of a recessed greenhouse
The roof frame is constructed from metal profiles or wood. The first option will provide adequate strength and wear resistance, but processing metal structures requires skills in working with a welding machine. It is easier to make a frame from wooden slats and treat it with protective impregnation.
The following are used as shelter:
- film - low cost, but limited service life - 2-3 years;
- glass – fire resistance, sufficient transparency, but the “sheathing” is fragile and expensive;
- polycarbonate - impact resistance, ductility, resistance to UV rays, service life - up to 10-15 years.
Cellular polycarbonate for covering greenhouses
The optimal solution for an underground thermos greenhouse is 6 mm thick cellular polycarbonate.
In addition to the materials described, to build an underground greenhouse with your own hands you will need:
- reinforcement, cement, crushed stone and sand for the foundation;
- polystyrene foam boards and reflective film for additional thermal insulation;
- plaster mixture;
- fasteners: screws, nails, nuts.
Required tools:
- jigsaw;
- bayonet and shovel shovels;
- concrete mixer;
- hammer;
- pliers;
- Master OK;
- tape measure, plumb line and level.
Pit preparation
Step 2: how to make the base of the greenhouse
The basis of the greenhouse in the ground is the foundation in a prepared pit. Therefore, the first stage is marking the site for an underground greenhouse and carrying out earthworks.
As a rule, the area of underground construction is 10-50 square meters. m. It is very difficult to handle such a volume on your own, so it is better to use the services of an excavator. The walls of the dug pit must be leveled with a shovel to achieve the desired dimensions.
At this stage, it is worth considering the need and methods of an additional heating system - whether a communications supply will be required.
The next stage is laying the strip foundation. It can be replaced with concrete blocks. If the thermos greenhouse is partially buried in the ground, then the base rises to the full depth of the pit or slightly above the middle.
Sequencing:
- Prepare wooden formwork - place wedges at a distance of 30 cm inside the perimeter of the pit. Make sides from the boards. Immediately mark the place under the door - do not pour the foundation here.
- Mix gravel and sand in equal parts and fill the trench. The thickness of the “pillow” is 10 cm.
- Weld the reinforcement block. The reinforcing frame must consist of at least 4 rods.
- Install the armored belt on the sand and gravel backfill. It is necessary to remove the metal protrusions - they will fix the thermal blocks and the base of the canopy will be attached to them.
- Combine sand, cement and crushed stone (5:1:3), add water and knead the solution.
- Fill the formwork with the prepared mixture.
Installation of formwork for concrete pouring
Work continues after 25 days - the foundation should gain strength. At the end of the period, the formwork can be removed and the concrete base treated with bitumen mastic to protect it from moisture.
Step 3: constructing the frame
To increase the height of the underground greenhouse, thermal blocks are placed through which metal rods from the foundation are threaded. The voids in the blocks are filled with concrete. The entrance is framed with wooden beams.
The height of the walls of a recessed thermos greenhouse is at least 50 cm. This value is enough so that in winter snowdrifts do not clutter up the covering material and do not interfere with the flow of light.
Raising the walls of a thermos greenhouse above ground level
Before constructing the frame, the greenhouse is thermally insulated. The inner part is lined with foil insulation - due to the reflection of sunlight, heat accumulation will increase.
Next, we begin to install the roof. If you are making a greenhouse with your own hands for the first time, then it is better to make a wooden support frame:
- Prepare the parts of the rafter system and treat the wooden blanks with an antiseptic.
- Connect the rafters and reinforce them with metal corners.
- Form a support from the rafters and place a ridge beam under them.
- Connect the outer rafters to the beam using self-tapping screws.
- Install jumpers on the front support between the flashings and rafters.
- Paint the wooden frame.
Thermal greenhouse roof truss system
Step 4: Covering the Greenhouse
Polycarbonate is fastened using:
- roofing screws;
- connecting profile;
- self-tapping screws with a thermal washer made of polymer.
The sequence of covering an underground greenhouse-thermos:
- Using a sharp knife or jigsaw, cut a polycarbonate sheet to the size of the roof. It is important not to damage the stabilizing coating.
- Place the workpiece on a flat surface, mark the attachment points with a marker and drill holes.
- Glue the ends of the polycarbonate with sealing tape.
- Attach the canvas to the frame with the stabilizing side facing outwards and, holding it, screw in the screws. Fasteners must fit perpendicularly into the polycarbonate.
- Join adjacent sheets through a connecting profile.
- Secure an iron roofing angle along the ridge beam.
Covering the thermos greenhouse with polycarbonate
In the roof of the underground greenhouse it is necessary to provide folding windows for ventilation.
Step 5: setting up a thermos greenhouse
Organization of the internal space of an underground greenhouse includes:
- laying out beds;
- framing paths;
- creation of a fertile layer;
- electricity supply.
The number and size of the beds depend on the width of the thermos greenhouse. Layout nuances:
- the maximum width of the ridge is 1-1.2 m - if this indicator is exceeded, it is not convenient to care for distant plantings;
- if space is limited, 2 beds are laid out along the longitudinal walls, in the center - a path with a width of 50 cm;
- if three parallel planting strips fit, then the permissible center width reaches 1.5 m - crops can be cultivated from versatile passages.
Layout of beds in a sunken greenhouse
Due to the high humidity in a recessed thermos greenhouse, uncovered earthen paths quickly become slippery, and after watering, puddles form on them. Improvement of passages:
- Install limiting sides - height 5 cm above ground level.
- Line the paths with bricks, pieces of blocks or wooden boards.
Raised beds 25-30 cm high are suitable for a pit greenhouse. The framing is done with strips of flat slate, metal or wood. Pegs are installed to support the border. Fertile soil is poured inside the formed box.
Possible soil mixture options:
- sand, soil, humus, peat (1:1:3:5);
- chopped straw, peat, cow dung (1:2:1).
Finally, electricity is installed, the door and locking hardware are installed, and lighting fixtures are installed.
How to equip a greenhouse for heating?
The installation of a “warm floor” in a greenhouse is carried out in compliance with certain rules
The choice of heating method depends primarily on climatic conditions. The simplest option is to install a heat pump to heat the greenhouse. However, in order to preserve plants and provide them with comfortable conditions for growth and fruiting, it is also necessary to ensure that the soil is warmed up.
To do this, the soil is removed to a depth of about 40-50 cm, hydro- and thermal insulation material is laid, then the drainage is filled in, a chain-link mesh is laid and soil is filled in.
Soil heating elements are located in the drainage layer. These can be air ducts or pipes with hot water, organized according to the “warm floor” principle.
Only the temperature of these heat conductors should not be very high, so as not to damage the roots of the plants.
Heating system design
At its core, the design of a geothermal heating system is quite simple. It consists of two contours located under the soil layer and on the surface. With the help of the first, thermal energy is collected, i.e. it is a heat exchanger. Its installation is carried out either in non-freezing reservoirs at an appropriate depth or in the ground, below its freezing point.
The secondary circuit pipes are filled with water or water with the addition of an appropriate amount of antifreeze. The energy collected by the coolant is supplied to a heat pump equipped with two heat exchangers; geothermal heating works precisely from the energy obtained in this way.
There is also an option when a well is drilled to a depth of about 100 m for geothermal heating; this option is much more effective, but drilling to such a depth is very expensive.
Who is suitable for a greenhouse with geothermal heating?
A design of this type is suitable for those gardeners and gardeners who have been growing vegetables and fruits in greenhouses for many years and do not plan to give it up. The advantages of the system are revealed over time, so if you are not going to garden on an ongoing basis, then it is better to give preference to classic electric or gas boilers.
Convection heating will also appeal to entrepreneurs who grow vegetables and fruits for sale. Thanks to minimal energy costs, the cost of production is sharply reduced, and this, in turn, allows you to receive more profit from sales.
Do it yourself: what and how
If you are going to install geothermal heating yourself, then it is better to buy the external circuit ready-made. Of course, we are only considering ways to horizontally position the external heat exchanger: under the surface of the soil or under water. It is much more difficult to install a vertical well collector yourself if you do not have the equipment and drilling skills.
A heat pump is not a very large piece of equipment. It will not take up much space in your home. After all, in size it is comparable, for example, to a conventional solid fuel boiler. Connecting the internal circuit of your home to it is not a difficult task. In fact, everything is done in exactly the same way as when organizing heating using traditional heat sources. The main difficulty is the design of the external circuit.
This arrangement of the house relative to the pond is more common. The main thing is that the reservoir is no further than 100 meters from the cottage
The best option would be to use a reservoir if one is found within a distance of no more than 100 meters. It is necessary that its area exceed 200 square meters, and its depth - 3 meters, which constitute the average freezing parameter. If this body of water does not belong to you, then obtaining permission to use it may become a problem.
If the reservoir is a pond that is on your property, then the matter becomes simpler. The water from the pond can be temporarily pumped out. Then work on its bottom can be done easily: you will need to lay the pipes in a spiral, securing them in this position. Excavation work will only be needed to dig a trench, which will be needed to connect the external circuit to the heat pump.
After all work has been completed, the pond can be filled with water again. In the next hundred years, the external heat exchanger should work properly and not cause trouble to its owner.
If you have at your disposal a plot of land on which you just have to build housing and grow a garden, it makes sense to plan a horizontal ground-type heat exchanger. To do this, you should make a preliminary calculation of the area of the future collector, based on the parameters already indicated above: 250-300 square meters of collector per 100 sq. m. meters of heated area of the house.
Calculation of functional indicators
The main technical parameter characterizing the operation of the heating system is the number of calories of thermal energy released into a certain closed volume. Detailed calculations and calculations for geothermal heating of greenhouses are available only for projects based on the operation of heat pumps. Due to the lack of regulatory frameworks for geothermal convection systems, one can only be content with the standards provided for by SNiP 23-01-99 and SNiP 2.04.05-91.
We invite you to familiarize yourself with Horse Colors » – Source of Good Mood
To ensure efficient operation of the system, the following rule should be followed: the density of underground air ducts must be at least 2.7 m per square meter of useful area of the greenhouse. A decrease in this indicator will make the system less efficient, and a denser placement of underground utilities will give the advantage of a more stable climate with less amplitude of temperature fluctuations.
Sequence of work
Heat supply from underground sources must be created according to a strictly developed algorithm. Since water and air systems have limited use, most practically used options involve drilling wells. And this is another reason why you can’t do everything yourself. Only special equipment allows you to penetrate to a depth of 20-100 m, where the necessary conditions for heating are created. Plastic pipes designed for a pressure of about 6 bar can be used as probes.
To increase the efficiency of the system, they use piping of 3 or 4 lines, the end sections of which are connected in the form of the letter U. Heating along the contour is very important, thanks to it it prevents cracking of pipes in severe frost. This heating is carried out through a wire stretched into the center of the channel through which current is supplied. If it is not possible to use energy piles, horizontal receivers have to be used. A platform with dimensions of 15x15 m is prepared for them, the soil is removed from it to a depth of 0.5 m.
This entire area is needed for laying some kind of probes. Electrical mats or pipes that exchange heat are often used. To increase the efficiency of the heating system, pipes are laid out in a spiral or in the form of a “snake”. It is impossible to say for sure which is better - ready-made complexes produced in series, or self-assembly. In the first case, the compatibility problem is automatically solved, but in the second, flexibility increases and the potential for modernization increases (although more attention must be paid to design).
Amateur builders can move away from a standard heat accumulator by replacing it with a concrete screed. Geothermal heating in such a system allows you to do without significant temperature fluctuations. You can conduct experiments with different coolants, as well as install compressors with varying performance. By properly calculating the loads and correctly distributing heat across the consuming circuits, you can make the system 15-20% more efficient. At the same time, power costs are noticeably reduced.
Horizontally placed pipes are laid to a depth of 50-300 cm. To keep the area of the lines as small as possible, they are made in the form of turns. But between two separate lines there must be at least 200 mm. Any construction work must be preceded by a determination of the thermal output of the soil. If it is less than 20 W per 1 sq. m, there is no point in a geothermal circuit. To ensure the drainage of groundwater, the bottom of the pits is covered with a layer of sand. Pipes based on cross-linked polyethylene perform well.
Glass, polycarbonate or film?
The choice of heating method is also influenced by the material from which the greenhouse itself is made. Thus, in film structures, heat sources are used with greater caution. Because this material is very easy to damage. And they are usually not used year-round, but only in the off-season for earlier planting or germination of seedlings.
More often, greenhouses are made of glass or polycarbonate. Polycarbonate is a cellular translucent polymer that can withstand heavy mechanical loads.
Thanks to its structure, it maintains indoor temperature much better than glass, plastic or other similar materials. It also compares favorably with glass in terms of price.
Glass is the most permeable to sunlight, and therefore to the accumulation of natural heat. But for use throughout the calendar year, it is necessary to install double-glazed windows, which is quite expensive.
How to save on energy consumption?
I have already written more than once about the two-tariff system, when nighttime electricity consumption allows you to save a lot. In the case of a greenhouse, this option also saves you from high costs. Additional heating in a polycarbonate greenhouse is needed at night, and during the day, even in March, the greenhouse heats up to 25-30 degrees.
Sources
- https://DachaMechty.ru/pochva/podogrev-grunta-v-teplitse.html
- https://profobogrev.ru/services/obogrev-grunta/
- https://mr-build.ru/newteplo/teplyj-pol-v-teplice.html
- https://7dach.ru/Alensel/obogrev-teplicy-svoimi-rukami-3194.html
- https://SadDa.ru/obustrojstvo/uglerodistyj-shnur-dlya-obogreva-teplic.html
- https://sto82.ru/sovety-i-opyt/podogrev-teplicy-elektrokabelem.html
- https://electricdo.ru/podogrev-pochvy-v-teplice-kabelem.html
- https://svet-komfort.ru/otoplenie/podogrev-zemli-v-teplice.html
- https://SadDa.ru/obustrojstvo/obogrev-grunta-v-teplice.html
How do you like the article?
Technical base necessary for the implementation of the project. preparation for work
First of all, it is necessary to ensure the possibility of placing the excavated soil in close proximity to the greenhouse being constructed. In addition, if it is not practical to excavate the soil manually, the possibility of access by excavator equipment should be arranged. The main consumables used in the construction of the GTK heating system are river sand, fine crushed stone, rubble brick, plumbing pipes with a diameter of 110 mm and joint connections for them, as well as foamed polystyrene boards.
Material costs can vary greatly depending on the designed density of the system, but you should start from $120-140 per square meter of finished greenhouse. It is worth noting that the warmer the climate in the region where the greenhouse is constructed, the lower the density of underground communications should be.
Let's sum it up
Don't be intimidated by the impressive scope of work. Experience shows that from the zero cycle to the installation of filters it takes about 3 weeks, which, taking into account the half-century operation of the system, is simply insignificant. Such schemes are widely used in regions with a frosty climate, among the leaders is Greenland, whose vast territory is always hidden under a layer of snow. Remember that once you spend 3 weeks, you will not devote another minute to the system. For correct operation, no external influences are required; it is enough to only occasionally clean clogged mosquito nets.