An armored belt for aerated concrete should not be built according to the principle “the wider and thicker the better.” The right decision is to strictly follow the design parameters and solutions. If the developer is familiar with design, you can calculate the reinforcing structure yourself. If the project and the necessary knowledge are not available, then it is necessary to be guided by general average practical recommendations.
According to their purpose, there are two types of reinforced belts: for strengthening the roofing system and for constructing floors.
For roofing
The rafter system of any building rests on a mauerlat, firmly fixed to the wall of the house.
Load-bearing roof elements cannot be attached directly to aerated concrete. The fastening of the Mauerlat with studs to the blocks will eventually become loose under the influence of wind loads, which threatens the collapse of the roof as a whole.
There is a need for a reliable connection between the walls and the roofing system - this is the main function of the armored belt. To do this, anchor elements and embedded parts are inserted into the monolithic belt before the concrete sets. In addition, the durable monolith of the belt absorbs, distributes, and compensates for loads from the weight of the roof, rafter system, snow, and wind.
Main functions
In general, the purpose of the roofing armored belt is determined by the following functions:
- evenly distributes the loads from the impact of the roof on the walls;
- binds the top of the wall into a rigid structure;
- reduces the risk of wall cracking during shrinkage;
- promotes reliable fastening of walls and roofing systems;
- serves as a support for attic and attic floor beams.
The design of the roofing reinforced belt is a continuous strip of monolithic reinforced concrete, arranged around the entire perimeter of the top of the load-bearing walls.
Construction methods
There are three ways to install armored belts for roofing on walls made of aerated concrete:
- Using formwork made of wooden panels. Inexpensive, fairly simple, but labor-intensive method.
- Application for enclosing formwork structures of thin partition blocks
- Installation from special U-shaped products. An ideal option, if not for the very high cost of such blocks.
The methods can be combined in terms of the joint use of partition products and wooden panels.
Geometric parameters
The length of the belt is the perimeter of the wall on which it is erected.
The width of the tape varies from 200 mm to 400 mm, equal to the thickness of the walls. But a reinforced belt over the entire width is, as a rule, excessive in terms of strength. Therefore, its width can be reduced, but insulation materials can be added to the design.
The height and width of the belt should ideally be accurately calculated to match the loads.
The height of the armored belt is at least 15 cm, the average sufficient parameter is 30 cm.
Reinforcement rules
The construction of any structure involves preliminary design with precise calculations of all structures and individual components for the loads perceived during operation. But when building a house from aerated concrete on their own, many developers prefer to save on the project. This is not entirely the correct approach, but the decision is made by the developer and this is his right.
In the absence of calculations, reinforcement is carried out on the basis of similar practical experience, taking into account a number of basic criteria:
- The material for longitudinal reinforcement is a periodic profile rod with a diameter of at least 10 mm.
- Products of maximum length with the least number of joints are used.
- To form the frame, transverse reinforcement with a diameter of 6 mm or more is used.
- The average fixation step for transverse rods is 300 mm.
- To fasten the rods together, soft knitting wire is used.
- In corners, the longitudinal reinforcement is bent at a right or required angle with an overlap as far as possible from the corner.
Scheme of reinforcement of the corners of the armored belt
- The reinforced frame in the formwork is set strictly horizontally in level.
- The reinforcement must retreat from the internal walls of the formwork by at least 3 cm - this is a protective anti-corrosion layer.
- The joints of the longitudinal rods are made with an overlap of 30 cm.
- The distance between the horizontal rods is selected depending on the width and height of the belt, taking into account the thickness of the protective layers.
The necessary anchors and embedded parts are installed in the formwork and fixed to the frame after its final installation. The length of the part of the anchor protruding from the concrete belt must be no less than the thickness of the Mauerlat, taking into account the size of the nut and washer.
Important! The reinforced frame is tied directly into the formwork. This is due to practical considerations due to the difficulty of lifting a heavy reinforcement cage to a height.
The importance of choosing the right height and thickness
The reinforced belt along the external walls simultaneously performs several important functions:
- increasing the strength of the building;
- increasing the stability of the structure;
- protection against deformation of the building;
- formation of a monolithic frame that prevents the formation of cracks;
- increasing the rigidity of the building;
- increasing the resistance of the structure to temperature changes.
If the size is chosen incorrectly, the building may suffer: cracks will appear, the structure will lose stability, which can lead to its destruction.
For floors
The reinforced belt for the installation of interfloor floor slabs is made in a similar way to the roofing belt, but has some features.
A rigidity line between floors is arranged for reliable installation of overlapping structures. These can be reinforced concrete or lightweight slabs, wooden or other panels and flooring - a belt is necessary in any case.
Calculation of the reinforcement belt between floors is carried out depending on the type and weight of the floor. For heavy slabs, load calculation is required.
One of the main parameters of the belt design is the area of support of the floor slabs on the concrete strip of the belt - the larger it is, the more reliable.
The minimum width of a monolithic belt for floors is 20 cm, height is 15 cm.
Embedded studs
Sometimes, in order to secure the Mauerlat, studs with a diameter of 12 mm or more are pre-installed on the armored belt, protruding 3-4 cm above the Mauerlat. The installation step of such studs is 100 cm: they are attached to clamps with knitting wire.
As for the question of the feasibility of making a Mauerlat in the presence of a reinforcing belt, then indeed, theoretically, the rafters can be fixed to the belt. However, in practice this will require a significant number of additional measures. So it’s much easier to go the traditional route of using a reinforced belt under the Mauerlat.
General principles of the armored belt design
The basic operations for constructing an armored belt are similar for all its types. This includes formwork, reinforcement, insulation, and concrete pouring.
Insulation
With all the advantages of the armored belt, it also has a significant disadvantage - heat leaves the house through the monolithic tape, and condensation forms on the inside of the belt. That is why, simultaneously with the construction of the armored belt, its insulation is carried out.
The most popular way for builders to preserve heat is to create a “layer cake” directly in the structure of the belt. For this purpose, the formwork provides space for installing insulation. It can be polystyrene foam, mineral wool or other material with a combination of minimum thickness and maximum thermal protection efficiency.
Concreting
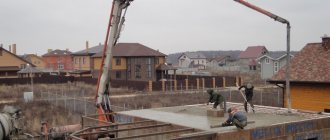
Pouring the reinforced belt can be done with ready-made concrete or a self-prepared mixture.
Concrete should be ordered from the factory with a grade no lower than M200. The composition of this brand includes: cement M400 – 1 part; sand - 3 parts; crushed stone - 5 parts. Similar proportions should be strived for when mixing concrete directly at a construction site. When making concrete yourself, you need to pay attention to the amount of water in the mixture - its excess leads to a decrease in the quality of the monolith.
When mixing, you should be guided by the standard water-cement ratio: approximately 5-7 volume parts of water per 10 parts of cement.
To obtain an easy-to-use plastic mixture, it is necessary to add plasticizers to it.
Compaction of the concrete mixture in the formwork is a mandatory process. It is performed by the vibration method using a deep, platform or rack-type construction vibrator. In the absence of such equipment, compaction is carried out by piercing the liquid concrete mixture with a shovel bayonet, crowbar or reinforcing rod.
An extremely desirable condition for concreting: the process of pouring the mixture into the formwork should be continuous along the entire length of the reinforced belt for an aerated concrete wall.
"Pie" of the armored belt
Important! For almost all buildings made of aerated concrete, a monolithic reinforced belt of at least 20 x 15 cm (width x height) will have sufficient parameters. These are the minimum dimensions both for the belt between floors under lightweight floor slabs, and to enhance the reliability of fastening the roofing system.
An example of constructing an armored belt on a 40 cm thick aerated concrete wall (view from the inside):
- panel board or any other formwork;
- layer of reinforced concrete 20 cm thick;
- 5 cm polystyrene foam insulation, or a material of identical dimensions made of mineral wool used in the “wet facade” technology;
- partition block, installed flush with the outer surface of the wall, 15 cm.
Allowed variations:
- instead of formwork made of wooden or other panels, you can use aerated concrete blocks, cut lengthwise to a thickness of 5 cm;
- replacing formwork panels with sawn blocks will lead to a reduction in the width of the belt by 5 cm, which is fully consistent with practical recommendations;
- in this case, the speed of installation of the protective fence for the concrete belt increases, and the inner surface of the wall will be smooth, not requiring additional finishing operations
The construction market offers many options for standard sizes of aerated concrete blocks. To reduce sawing by hand, it is worth purchasing products with different geometric parameters in the quantities required for aerated concrete formwork. This is what developers do when they do not want or cannot use the U-shaped blocks offered by the industry.
U-blocks
The use of aerated concrete products in the form of a tray for the installation of reinforced belts is the best solution, but not in the case of a strictly regulated construction budget. Good, but expensive, although in many countries with a developed construction industry such blocks are extremely popular and relatively inexpensive.
The installation technology comes down to simple installation with glue or cement-sand mortar, followed by filling the tray with reinforcement and concrete.
The maximum thickness size is 40 cm, which is sufficient for any aerated concrete buildings.
There are practically no disadvantages (except for the price).
Calculation of a reinforced base for a roof
The process of reinforcing the base under the Mauerlat begins with planning and calculations. It is necessary to calculate the dimensions of the armored belt. According to building standards, it should be equal to the width of the wall, and not less than 25 cm. The recommended height of the reinforced base is around 30 cm. The armored belt and the mauerlat laid on it should encircle the entire house.
If the walls are built from aerated concrete, then the top row is made of stone in the shape of the letter U, which creates the formwork. It is necessary to lay reinforcing elements in it and fill the entire structure with cement mortar.
Before starting the actual construction work, it is also necessary to prepare the necessary tools and building materials. To create a reinforced base for the roof you will need:
- Concrete mixer for high-quality mixing of cement mortar;
- A specialized vibrator that accelerates the cement mortar in the formwork, preventing the creation of air voids in the structure;
- Materials for the construction of formwork;
- Fittings.
Grillage
Initially, you should determine the depth of the foundation. This parameter depends on the type of soil, the depth of its freezing, as well as the depth of groundwater. Then you should dig a trench around the perimeter of the future house. This can be done manually, which is long and tedious, or with the help of an excavator, which is quick and efficient, but entails additional costs.
Now you need to form a sand cushion, the height of which should be 50–100 mm. If it is necessary to backfill sand more than 100 mm, it must be mixed with crushed stone. This activity may be necessary to level the bottom of the trench. Another way to level the bottom is to pour concrete.
Making a frame for the grillage
Then the reinforcement should be laid. During the construction process, under normal conditions, you need to use reinforcement of 4–5 cores, the diameter of each rod should be 10–12 mm
It is important that when pouring the grillage for the foundation, the reinforcement does not touch the base. It should be buried in concrete
Thus, the metal will be protected from corrosion. To achieve this, the reinforcing mesh should be raised above the sand cushion, placing brick halves under it.
Strip foundation grillage
If you are building a house on heaving soil or where the groundwater level is high, then the grillage should be made more durable. To do this, instead of reinforcing mesh, you should use a reinforcement cage. He imagines 2 meshes consisting of 4 wires with a diameter of 12 mm. They should be laid below and above the armored belt. Granular slag is used as a base instead of a sand cushion. Its advantage over sand is that over time, granulated slag turns into concrete.
For the grillage, M200 concrete should be used. To ensure that the filling height corresponds to the specified value, install a beacon in the trench - a metal peg equal in length to the height of the grillage. It will serve as your guide.
What will you need?
The installation of a reinforced protective structure is technologically carried out in several different stages from formwork, frame and pouring of concrete mixture or installation of special cellular U-blocks. All operations require the use of various tools and devices by the performers.
To perform the entire range of work on pouring a reinforced concrete monolith, the developer
will need the following tools and equipment :
- measuring instruments: ruler, angle, level, tape measure and plumb lines;
- concrete mixer;
- electric drill with attachments;
- Bulgarian;
- impact wrench and screwdriver;
- hammer, sledgehammer and mallet;
- spatula, trowel and grater for foam blocks;
- hook for tying wire;
- bucket-row;
- capture;
- regular saw and electric saw;
- wall chaser;
- paint brush;
- anti-corrosion impregnation for steel frames.