There comes a time in the life of every passionate craftsman when equipment for a home workshop smoothly migrates into all rooms, cluttering up the space, and the time comes to think about creating a special room.
Equipping a home workshop is an inevitable solution for everyone who cannot imagine life without manual work. Such a room will not only become a place to store the tools and equipment every man needs, but can also become a place for the implementation of ideas, and sometimes also a source of income.
Many craftsmen who, in practice, had to deal with setting up a workshop in an ordinary city apartment, were convinced that it was quite difficult to do this. A full-fledged workroom will require at least 3-6 free square meters of space, and not all neighbors are ready to put up with a constant source of noise nearby.
But, if you do not plan to produce furniture on an industrial scale, but just want to equip a place where you can carry out minor repairs on equipment, design, work with wood or engage in creativity, then finding a secluded corner in the apartment for a mini-home workshop is quite possible.
Workshop in a city apartment: reality and possibilities
Opening your own business often begins with setting up a workshop.
If you have your own garage or private home, this is not a problem. A significantly larger number of pitfalls await those who want to use either an apartment or part of it for these purposes. What limits your plans? The main difficulties are considered:
– The floor on which the housing is located: it’s good if it’s the first floor, sometimes it’s possible to set up a workshop on the second floor (most often this is an option with a blank wall of a multi-story building), and it’s almost impossible to set up a workshop on the upper floors of the house.
– The condition of the electrical wiring in the apartment: in old-type houses, with a limited cross-section of power cables, a mechanical workshop will most likely remain only in dreams. Since the power simultaneously consumed by the machines can cause not only a fire in your own apartment, but also cause problems with power supply for neighbors, at least in the staircase.
– Noise and vibrations accompanying the operation of equipment: existing safety standards prohibit the installation and use in multi-storey buildings of machines and mechanisms with a noise level of more than 55 dB, and a vibration velocity of more than 3.2 m/s.
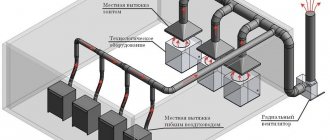
– Condition of the supply and exhaust ventilation system: during the operation of most types of equipment, an increased level of dust occurs, and sometimes gases, which, if removed unsatisfactorily, can cause discomfort and contribute to the occurrence and development of allergic diseases.
Thus, setting up even a small mechanical workshop - for example, a turning or milling shop - in the conditions of an ordinary city apartment is impossible. But there is no reason to be despondent, because there are still quite a few acceptable solutions, which we will consider.
Urban Workshop Options
What they have in common is the low material consumption of all components and the absence of all of the above side effects during operation.
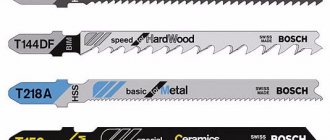
Engraving workshop. The areas of practical use of surface engraving processes are very extensive. First of all, this is the design of gratitude and memorial inscriptions on various household items - from banal rings to tableware.
You will need a miniature drill, as well as a set of tools that will allow you to grind, strip and polish products.
When choosing a drive for an engraving machine, preference should be given to an electric one: it does not make much noise and will also allow you to more quickly regulate the operating mode. For our purposes, a tabletop machine like Multicut 500-0609-1.5 is quite suitable.
The engraving machine can be installed in the cabinet of a regular two-pedestal desk, which will be placed directly under the window in the room. It is necessary to install an exhaust hood above the work area, which is then connected to the supply and exhaust ventilation system.
A little about lighting. A home engraver needs a powerful and highly directional light flux, which is best provided by LED lamps with a power of at least 8 W. One of them is mounted directly above the engraving machine, and the second - along the axis of the master’s workplace, for adjusting and marking the product before work.
A safe or cabinet for storing current orders and finished products will complement the decor of a mini-engraving workshop.
Watch workshop. Despite the significant number of offers of this kind, in some urban areas it is difficult to find a watchmaker. To organize a business of this kind, you will need very little space, and in this case there is no noise or vibration at all. True, you will have to spend money on effective lighting, specialized tools and high-quality optics. Note that even complex diagnostic equipment for checking watch mechanisms is compact and silent. To fulfill quick requests, it’s a good idea to have a small area for at least one client who urgently needs to fix a minor watch breakdown; You can always find such a place even in a two-room apartment.
The small-sized watch workshop includes the following set of tools and furniture:
– Hard table with a thick top. A special Swiss-made table will be expensive, but you can also choose a similar domestic one, in which you can equip elbow rests with adjustable travel from 0 to 30...40 0;
– Devices and components (the Minitool company operates on the Russian market, the range and prices of which will satisfy any novice watchmaker);
– The same as in the previous example, LED lamps located above the workplace.
Electrical repair shop. The constantly growing number of household electrical appliances leads to a corresponding increase in the demand for minor repair services. Who has ever had to, for example, replace cartridges in multi-arm Chinese chandeliers, or replace worn brushes on electric motors of vacuum cleaners? A compact workshop of this type will be able to quickly eliminate these and similar faults in devices for which the warranty period is missing or has already expired. To perform such work, energy-intensive machines and tools will not be required, and the production area is comparable to the size of an ordinary two-pedestal desk. Noise and vibration during repair work will not exceed the standards for the practical use of the equipment being repaired for its intended purpose.
A wooden floor, reliable grounding - and such a workshop can be opened in an ordinary city apartment. The main condition is the desire and minimal specialized experience of the future master.
TOP 20 best photos of workshop renovation
Many people nowadays work not in office offices, but in their own apartment. And workshops and home studios are usually the places where original ideas arise and work is in full swing.
The arrangement of workshops in a house or apartment is based on the principles of naturalness and environmental friendliness, as well as practicality and comfort. Practicality is an important thing for a home studio.
And each of you can choose interesting options for decorating the room by looking at our selection of “TOP 20 best photos of workshop renovation.”
When decorating the interior of your workshop, you need to take into account the direction of your activity. Think about every little detail, because it is possible that future masterpieces of world art will be created in this room.
Where is the best place to set up a workshop?
You can select a corner for a tool anywhere in your apartment or house. But it is much more difficult to attach a workbench with a vice, a small woodworking machine, an angle grinder, an electric planer and other equipment.
In the absence of a separate room and a small amount of tools, you can find a place in your own apartment. Of course, you are unlikely to be able to equip a full-fledged carpentry workshop in a small apartment, unless, of course, there is a special room for this.
Therefore, it is worth finding another place for tools and machines.
A tool working in a home workshop, while in an apartment, will disturb household members and neighbors (they can only work for a short time and occasionally). In addition, the required voltage for the tool to operate will cause power outages.
When working with wood, shavings, sawdust and fine wood dust are formed, which are very difficult to remove after work. The possibility of a spark or short circuit during operation of the machine creates a fire hazard in the apartment. Therefore, the workshop with equipment should be moved to a non-residential premises.
If woodworking equipment is profitable and is only partially used, and there is so much of it that it is no longer possible to place it at home, then look for a separate place for this.
First of all, this applies to machines and other equipment for which sufficient space is allocated for work. It could be:
- basement or attic;
- an unused veranda or kitchen in a private house;
- a small rented or private garage with electricity;
Making plastic trees
The abundance of plastic waste always makes us look for ways to reuse it. One way to use empty plastic bottles is to create plastic trees and plants. That is, palm trees, pine trees, tall cacti, and so on. All you need for the job are the bottles themselves, brown and green, stakes, wire, scissors, screws and a little imagination. There are plenty of master classes on creating such trees on the Internet, and some craftsmen go further, creating colored monkeys, parrots and other fauna from plastic. You can offer your products through online bulletin boards and working to order. In rural areas, rumors about new craftsmen spread quite quickly.
TOP 20 best photos of workshop renovation from our portal
When choosing a place for a workshop, it is worth considering the minimum without which you cannot work fully.
Ideally, the workshop space should be divided into several functional areas:
- shelves or rack for small tools and accessories;
- place for machines next to the outlet;
- a corner where cleaning tools and a container (bucket or box) for production waste will be stored;
- shelf and hanger for workwear;
- various attachments for the workshop;
- wall cabinets for small fixtures and parts;
- free area for finished products;
- a place to store materials and raw materials for work.
In the center near the work surface and workshop you need to have a lot of space for free movement (at least two people). The area occupied by a workbench or machine is multiplied by two, calculating the coefficient of the minimum working area. In addition, you will need space for free movement, small tools and changing working equipment - this is another plus of 2-3 m 2.
As for the lighting, it should not be scattered bright, but in no case should it hurt the eyes so that they do not get tired when working. It is good if there are many windows in this room, since natural light is considered the best.
If you want your workshop room to look beautiful after renovation, pay attention to our photos.
Production of wooden flowerpots
Wooden flower pots are a fairly easy item to make and can sell for a high price. Simple outdoor flowerpots are created without professional tools and from the remains of timber and clapboard lying around after renovation. On the Internet you can find examples of how to make flowerpots using firing, treating them with an antiseptic and water-based varnish with dyes. Naturally, to speed up the work you will need at least a circular saw and grinders, but there is nothing super complicated in the technology.
TOP 20 best photos of workshop renovation
Many people nowadays work not in office offices, but in their own apartment. And workshops and home studios are usually the places where original ideas arise and work is in full swing.
The arrangement of workshops in a house or apartment is based on the principles of naturalness and environmental friendliness, as well as practicality and comfort. Practicality is an important thing for a home studio.
And each of you can choose interesting options for decorating the room by looking at our selection of “TOP 20 best photos of workshop renovation.”
When decorating the interior of your workshop, you need to take into account the direction of your activity. Think about every little detail, because it is possible that future masterpieces of world art will be created in this room.
Where is the best place to set up a workshop?
You can select a corner for a tool anywhere in your apartment or house. But it is much more difficult to attach a workbench with a vice, a small woodworking machine, an angle grinder, an electric planer and other equipment.
In the absence of a separate room and a small amount of tools, you can find a place in your own apartment. Of course, you are unlikely to be able to equip a full-fledged carpentry workshop in a small apartment, unless, of course, there is a special room for this.
Therefore, it is worth finding another place for tools and machines.
A tool working in a home workshop, while in an apartment, will disturb household members and neighbors (they can only work for a short time and occasionally). In addition, the required voltage for the tool to operate will cause power outages.
When working with wood, shavings, sawdust and fine wood dust are formed, which are very difficult to remove after work. The possibility of a spark or short circuit during operation of the machine creates a fire hazard in the apartment. Therefore, the workshop with equipment should be moved to a non-residential premises.
If woodworking equipment is profitable and is only partially used, and there is so much of it that it is no longer possible to place it at home, then look for a separate place for this.
First of all, this applies to machines and other equipment for which sufficient space is allocated for work. It could be:
- basement or attic;
- an unused veranda or kitchen in a private house;
- a small rented or private garage with electricity;
- an empty room in the basement of a multi-storey building;
- a special extension to the house;
- one of the rooms of a private house with a separate entrance.
If there is no alternative, in the form of a garage or outbuilding, a small number of power tools can be placed right at home. Such a home workshop may be located:
- on the loggia (equipping one wall with shelves);
- on a specially equipped balcony (it’s good if there are two of them in the apartment);
- in a pantry with good lighting (on shelves);
- in the spacious hallway (highlight the built-in wardrobe);
- in the hallway on mezzanines and in built-in wardrobes (effective, but not very convenient);
- in a niche equipped for storage, located under the stairs of the first floor.
TOP 20 best photos of workshop renovation from our portal
When choosing a place for a workshop, it is worth considering the minimum without which you cannot work fully.
Ideally, the workshop space should be divided into several functional areas:
- shelves or rack for small tools and accessories;
- place for machines next to the outlet;
- a corner where cleaning tools and a container (bucket or box) for production waste will be stored;
- shelf and hanger for workwear;
- various attachments for the workshop;
- wall cabinets for small fixtures and parts;
- free area for finished products;
- a place to store materials and raw materials for work.
In the center near the work surface and workshop you need to have a lot of space for free movement (at least two people). The area occupied by a workbench or machine is multiplied by two, calculating the coefficient of the minimum working area. In addition, you will need space for free movement, small tools and changing working equipment - this is another plus of 2-3 m 2.
As for the lighting, it should not be scattered bright, but in no case should it hurt the eyes so that they do not get tired when working. It is good if there are many windows in this room, since natural light is considered the best.
If you want your workshop room to look beautiful after renovation, pay attention to our photos.
Creating people from fittings and pipes
One of the popular gifts for men recently has become the so-called pouring men (or dispenser men) made from fittings and plumbing pipes. Sometimes you can see something similar, for example, lamp men in the steampunk style, in all sorts of loft establishments and bars. What is especially surprising about this idea is the process of transformation: when several rather inexpensive materials suddenly turn into a unique gift that can cost 5-7 thousand rubles, or even more than 10. If you google the topic, you will see that similar gifts are given to representatives of completely different professions. There are already football player dispensers with balls and waiter dispensers with trays, border guard dispensers with border posts and traffic police dispensers with traffic police batons on the market. If your city or town doesn’t have such an idea yet, then perhaps it’s your turn to implement it.
Workshop in a city apartment: reality and possibilities
Opening your own business often begins with setting up a workshop. If you have your own garage or private home, this is not a problem. A significantly larger number of pitfalls await those who want to use either an apartment or part of it for these purposes. What limits your plans?
The main difficulties are considered:
– The floor on which the housing is located: it’s good if it’s the first floor, sometimes it’s possible to set up a workshop on the second floor (most often this is an option with a blank wall of a multi-story building), and it’s almost impossible to set up a workshop on the upper floors of the house.
– The condition of the electrical wiring in the apartment: in old-type houses, with a limited cross-section of power cables, a mechanical workshop will most likely remain only in dreams. Since the power simultaneously consumed by the machines can cause not only a fire in your own apartment, but also cause problems with power supply for neighbors, at least in the staircase.
Making kites
You don't need expensive materials to make kites. Usually these are wooden slats or metal tubes for the frame, paper or fabric for the “body,” as well as fishing line, fasteners and a winder for “connection with the ground.” Finding tutorials on how to make your own kites is not difficult. As your experience grows, you can find your style and gradually raise the price tag. Kites do not need to be sold, but can also be rented out, for example, for wedding photo shoots.
How to choose a room for carpentry
The ideal location for setting up a carpentry workshop would be a separate barn, garage or specially built room. You can consider an option in which the carpentry workshop will be located in a building block container (a used product is quite suitable for the workshop, since new block containers are quite expensive). The area of the block container is a little more than 14 m². Therefore, its usable space can easily accommodate not only a workbench and a shelf with tools, but even several small carpentry machines. There will be enough space for storing wood and organizing a small painting area.
The option with a block container can be considered if you take a fairly serious approach to the arrangement of the workshop and if you have serious intentions related to the volume of work performed here. If your carpentry work is on a modest scale, then an alternative in the form of an empty garage or shed is quite capable of meeting your needs.
In order for a home workshop to meet the minimum requirements for comfort and safety, its area must be at least 6...10 m² (it all depends on the amount of equipment you plan to place in the workshop). This should be taken into account if you are going to build a special room for a workshop. If you plan to adapt an existing building of suitable size for a workshop, then use it. A small carpentry workshop can be quite convenient. On six squares you can place not only the carpenter’s main tool - a carpenter’s workbench, but also a couple of the most popular machines: a sharpening machine for tools, as well as a drilling machine for processing wood, etc. And 40-50 sq.m. - This is practically a workshop.
This is what a regular FORUMHOUSE user writes about the size of the carpentry workshop.
10 squares is enough. Arrange and work comfortably - from 25 square meters, comfortably and impressively move with a cigar from machine to machine - from 40-50 sq.m.
And here is a photograph of the interior of his workshop, which measures 11 m².
Production of furniture for pets
One of the trends of recent years is unusual furniture for pets. These are all kinds of booths, beds, running wheels, slides, scratching posts, cat hammocks and much more. The production cost of such products is small (usually within 1-5 thousand rubles), and large premises for a workshop and warehouse are not required. The abundance of new products in this industry is amazing, but in an effort to surprise the buyer, we must not forget about the animals themselves. So, for example, cats usually like closed spaces, tunnels, hills, and the ability to watch from a shelter from additional windows. The main thing in this area is to choose your niche and your style. For example, you can specialize in creating wooden houses and castles for rodents, where the competition is not so great.
Basic requirements for a carpenter's workshop
It is not enough to understand how to build a carpentry workshop or how to choose a suitable premises. When setting up a carpentry workshop, you need to remember five important factors, the presence of which guarantees convenience and safety while working inside the future premises:
- fire safety;
- effective sound insulation;
- high-quality lighting;
- proper ventilation;
- efficient and safe heating.
Let's talk about all this in more detail.
Fire safety
To ensure fire safety, the workshop premises must have grounding. All machines and equipment should be connected to a common grounding circuit. A powder fire extinguisher, which is an essential element of a carpentry workshop, must be installed in a well-accessible place. The fire extinguisher must be rated ABC (for all flammable materials and electrical equipment) and have a capacity of 4.5 kg (10 lb). A container of sand, equipped with fire extinguishing equipment and installed near the entrance to the workshop, will give you an additional guarantee of safety.
Soundproofing
If the carpentry workshop is located near a living space, sound insulation in it is of great importance. To ensure this, you can use standard means, which include the use of special finishing materials, double-glazed windows and door structures.
Good lighting is half the success of your carpentry workshop! This is not only comfort for your eyes, but also a necessary condition for work safety. Indeed, in conditions of insufficient visibility, injuries when working with electric and other woodworking tools occur much more often. And in order to avoid them, in addition to general lighting in the workshop, it is necessary to use additional lighting for the workplace (machine, workbench, etc.).
The electrical cable that you run into the workshop to connect electrical equipment and lighting fixtures must have a suitable cross-section to withstand heavy loads. Wiring should be placed in metal conduits or pipes to help prevent fire in the event of a short circuit.
Ventilation
Even the simplest forced ventilation installed in a carpentry workshop will make your work much more comfortable and safer. Thanks to ventilation, you will not have to inhale wood dust, which can cause irritation of the respiratory tract and even diseases.
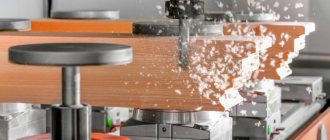
If you plan to install woodworking machines in the workshop, then installing a suitable chip ejector is an issue that requires a mandatory solution. Otherwise, the room will always be a mess, and all efforts aimed at ensuring fire safety will not have the desired effect. After all, wood dust, scattered in large quantities in the air, can ignite like gunpowder from the slightest spark.
If you plan to work in your future workshop all year round, then heating the room is an issue that should be taken very seriously. The warm air in the workshop will have a beneficial effect on your well-being, performance and the condition of the power tool. And only in such conditions is wood able to retain its best qualities.
It makes no sense to connect such a room to centralized heating (with rare exceptions). Therefore, installing an oil heater will be considered a completely worthy way out. Alternatively, you can use fan heaters or more modern infrared heaters. These devices will quickly heat a small room and, if the room is well insulated, will create a cozy microclimate inside the workshop.
Carpentry workshop layout
If, before creating a room for a carpentry workshop, you took into account the minimum requirements regarding the internal area of the facility, then you will definitely have enough space to organize its main zones:
space for machines;
space for a workbench and assembly table;
racks (shelves) for tools;
space (corner) where equipment for cleaning the workshop is stored;
container for waste and garbage (wooden box, etc.);
attachments for storing hacksaws, tape measures and other tools;
hanger (wardrobe) for workwear;
wall cabinets for small tools, fasteners and other parts;
storage space for wood and finished products.
An assembly table, like a workbench, is an essential element when planning a carpentry workshop. Here's what one of our forum participants thinks about it.
An assembly table is a must. The simplest one is to cut one sheet of chipboard in half (according to the layout - lengthwise or crosswise) and fold two thicknesses (fasten with screws).
It is advisable to mount large items and equipment on walls or install them near them. This will free up some of the internal space for freer movement. In order to calculate the minimum area of free space near a machine or workbench, it is necessary to multiply the area occupied by this device by 2. Tools and equipment used together must be located next to each other.
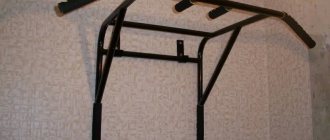
In order to save free space in workshops, some of their owners resort to little tricks: they build convenient folding workbenches. The working surface of such a device is mounted on the wall, and its unscrewing legs are stored in any convenient place. On the bottom surface of the workbench you can easily make mounts for storing a wide variety of tools.
This is the workshop layout suggested by user Sitnikoff.
I figured out the live arrangement in Visio, without the exact dimensions of the machines and equipment for the 5.6*6.2m option. Everything fits in and even more.
The room shown in the diagram has impressive dimensions, and not everyone can afford such dimensions. The general concept of arrangement of equipment and accessories shown in the figure will be clear to all interested.
Here is more detailed information about the proposed project. Everyone can find something useful in it. You will learn what to make a floor from in a carpentry workshop, what to build walls from, what the foundation will be like, etc.
For now, I’ll write about the design of the building for the carpentry workshop:
The structure is a frame made of boards 150x50 mm. HSD 2.8m x 5.6 x 6.2. The height of the attic is 1.2 m.
Build on a shallow strip foundation.
Insulation - mineral wool or basalt 150 mm thick.
Cover the outside and inside with OSB board.
The outside of the slab is covered with clapboard.
Floors - concrete, then EPS (50mm), warm water floor in a concrete screed.
Floors – ceramic tiles.
Heating is from a stove (I don’t know whether to buy a metal one or install a small Dutch oven), it is possible to connect a heated floor to the route running from the house to the bathhouse.
The roof of the attic will be insulated in the same way as the walls, since there will be no ceiling (in case something will have to be hung or placed within reach), i.e. I am planning a dome in the workshop.
The roof covering is metal tiles (especially since there is some reserve left after the house and bathhouse).
The door is a metal double-leaf insulated door with a width of 120 cm (80 + 40).
Windows – plastic double-glazed windows measuring 150 x 60 cm under the ceiling – 6 pcs.
Window opposite the door 100x150 cm – 1 pc.
I do not rule out the presence of skylights in the ceiling (I want light) - 4 pcs.
Electrical equipment - 220 V in plastic boxes.
Dust removal and ventilation system (you will probably have to place several boxes around the room to connect the tool to the dust removal system).
Drying
Tree
needs to be dried
, and dry it
according to a certain method
. Wood is usually sold at “natural moisture content,” meaning it contains about 25–40% moisture. If you make something from such wood, then as it dries the product will warp and crack. Regardless of how many layers of varnish you apply to it. Generally speaking, wood is a living material and is subject to seasonal changes in air humidity, which is why its linear dimensions fluctuate throughout the year: in length (along the fibers) the fluctuations are extremely insignificant, and in width a piece of wood can swell and shrink by tens of millimeters, depending on the overall size of the product.
Therefore, the main rule is that the wood must first be dried to 8 - 12% humidity, only after which it can be used.
How to dry wood in an apartment? Carefully fold the boards as far away from the radiators as possible, arrange the layers with bars of the same width and press something on top. It is advisable to coat the ends with paint, since this is where moisture evaporates most intensively and cracks may appear along the boards. It’s great if you can buy chamber-dried wood that has already been dried; this will help you avoid numerous defects if you start drying it yourself.
Basic rules for organizing space in the workshop
Each machine, workbench and other equipment must have free access from three sides.
The free space of the workshop should prevail in quantitative ratio over the space occupied by machines, cabinets and other items.
The floor in the workshop must be smooth and dry, and under no circumstances should slippery materials be laid on its surface.
The waste container must have 2 compartments (the first is for storing wood waste, the second is for storing other waste).
A small supply of drinking water, as well as a fully stocked first aid kit, should be kept in a visible place.
Those who want to watch a video on how to combine an ordinary garage with a carpentry workshop can familiarize themselves with the material prepared by a professional carpenter and a regular participant in our forum. A video about how to properly equip a cabinetmaker's workplace is advisable for everyone who is planning to make a comfortable and multifunctional workbench with their own hands. You can get fresh ideas regarding the arrangement of a carpenter’s home workshop in the section “A word about the carpentry workshop...”. And you can participate in the discussion of issues related to the manufacture of wood products by visiting the forum section “Carpentry for Home and Garden”.
Handmade boxes
A popular business idea among both men and women is the creation of handmade boxes. The box is a small-sized product, so you can make it at home, working, for example, as a business in a garage. Boxes are made from wood, plywood, jute, cardboard, stone - and they all have their own subtleties and wisdom. To begin with, you can buy ready-made blanks from Aliexpress or the Crafts Fair and practice decorating, and then you can fully master the entire production technology. As in any field, it is advisable to create a unique selling proposition. For example, a business in unusual wooden boxes is suitable for those who live near unusual types of wood.