If your house is just under construction, then it’s time to think about quality roofing. Perhaps you are planning to choose a hard surface like profiled sheets? In order for the ventilation of a corrugated sheet roof to be properly organized, you should follow the recommendations and avoid mistakes. Redoing anything will be technically problematic.
The covering on the roof can deteriorate or even collapse due to external factors. It would be nice to think about protection from uncomfortable temperatures, moisture accumulation, penetration, and other unpleasant things that threaten your roof. If you do not make the right decisions about the air exchange on the roof, then in the worst case, the load-bearing system in the attic will suffer. In general, there is nothing complicated.
In our article you can familiarize yourself with the design of a roofing pie for roofing made of corrugated sheets. You will receive advice from which you will create a set of optimal solutions.
Attic ventilation: overview of current schemes and methods of their implementation
Not using a spacious attic as an additional room is at least wasteful, and that is why ventilation of the under-roof space is so necessary.
Are you planning to use the attic space as a living space, but don’t know how to make it comfortable? I will talk about how attic ventilation works. With proper installation of a system for replacing stale air with fresh air, you can make the attic suitable for all-season comfortable living. In addition, instructions for installing ventilation systems will be useful to you, even if the attic in a private house is not intended to be used as housing.
Four reasons for attic ventilation
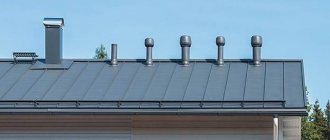
An example of arranging vents for supply and exhaust ventilation on a modern roof
- Comfort of living in the attic. Clean fresh air is one of the main conditions for comfortable living indoors. Therefore, if the room under the roof is used for living, normal air exchange must be taken care of at the roof design stage.
- No condensation. Effective air exchange helps prevent the appearance of condensation on the windows, which is important if the roof space is used as an attic.
- No mold. Timely replacement of warm, humid air with fresh air prevents the appearance of mold on building surfaces. That is, if the air does not stagnate in the attic, mold will not appear in the corners, regardless of what materials are used for finishing.
- Long service life of the roof. Excessive air humidity has a detrimental effect on the condition of the roofing material. Moreover, if moist air is not removed from under the roof, condensation will accumulate on the vapor barrier, which can reduce the service life of the insulation. A properly organized ventilation system will increase the service life of the roof without the need for repairs.
Ventilation of attic spaces, as it happens
The best option is a supply and exhaust system that works according to a natural principle, as shown in the diagram.
Vents are installed under the overhangs of the truss roof, through which an influx of fresh cold air is ensured, while warmer, humid air will go through the dormer windows or other technological openings in the upper part of the gable or slope.
The preferred option when using modern roofing materials is to install counter-lattice with ventilation gaps. At the same time, air exchange in the insulated attic space is arranged separately, through a supply and exhaust system.
Keep in mind that attic ventilation must be planned and built as a complete system. That is, the project needs to provide for an air exchange system both in the attic and in the under-roof space, as well as insulation of pipes and insulation of other communications. In addition, ventilation design must be carried out taking into account the type of thermal insulation materials used.
Types of attic ventilation
The disadvantage of the system is its excessive dependence on the temperature outside the house. That is, in the warm season, ventilation will be weak.
The advantage of the forced system is that it does not depend on climatic conditions: exhaust air will be removed with equal efficiency in both winter and summer.
Ways to vent air outside
Under the ridge strip on a pie made of corrugated sheets or metal tiles, you create an air vent covered with a mesh with your own hands. The ventilation device is such that condensate formed during the cold season will not flow into the room, but will flow out onto the slope.
The peculiarity of the solution is that the windows are always open, regardless of the time of year. In order to prevent the entry of animals and birds, decorative grilles are installed over the windows.
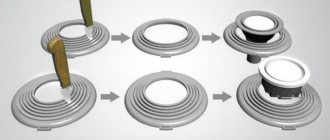
The advantage of special aerators over a conventional pipe embedded in the roof is a special design that prevents the formation and penetration of condensation into the room.
Valves with manual and automated control are available for sale.
Attic ventilation: overview of current schemes and methods of their implementation
How to ventilate an attic? Read about installation diagrams and methods in the article
Functionality of a hipped roof
Despite the certain complexity of design and arrangement, hip roofs are very functional.
- The absence of vertical walls and reliable fastening of modern roofing materials to the rafter system ensures high resistance of the hip roof to strong air flow. Therefore, their construction is recommended in regions characterized by strong winds.
- Roofing hips (corner ribs) have increased rigidity compared to a gable roof, and are therefore resistant to adverse weather conditions (heavy rainfall, “caps” of snow).
- Large overhangs, which can be installed along the entire perimeter of the hip roof, will reliably protect the building’s façade from getting wet.
- Thanks to the equal and sufficiently large surface area of the roof slopes, the attic, equipped under a hip roof, warms up evenly, creating a comfortable temperature regime in the room.
The cost of erecting a hip roof is higher than that of a gable roof. Designing a rafter system is more complex than traditional systems, and therefore requires the involvement of specialists with the necessary knowledge.
The under-roof space of a hip roof is significantly smaller than the volume of attic spaces of single- or gable roofs. Therefore, in attics built under a hip roof, it is somewhat more difficult to place furniture and household appliances.
Schemes and options for attic ventilation
The specific type and scale of the ventilation system (to be more precise, its selection) for the attic depends on several factors. When planning a scheme for how to ventilate an attic, you need to take into account the following factors:
- whether it is a residential attic or not;
- whether it is insulated or not;
- how often people will be there;
- what is its size (is the room large or not).
There are no universal ways to organize a ventilation system for an attic; in each specific case, one should proceed from the factors listed above.
Natural, with aerators
The effectiveness of the natural type of ventilation for the attic directly depends on how accurately (“according to the textbook”) the insulating materials were laid. The basic and mandatory rule for laying insulation materials is to leave ventilation spaces in the interlayer segments of the material used and directly in the under-roof area.
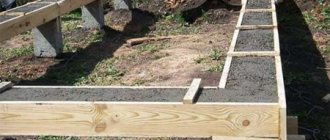
Ventilation of the attic should be done at the stage of roof construction
Simply put, there must be free ventilation space both between each layer of insulation used and directly under the surface of the building’s roof. The mechanism of natural ventilation is based on natural (which is natural) draft.
Natural draft easily provides a constant flow of fresh air from outside. In this case, the total area of the ventilation ducts should be about 0.2% of the entire attic area. In most cases, it is advisable to use a ventilation installation option in which the ventilation ducts are routed through the gables.
Natural, with dormer windows
When implementing this method of ventilation and installing dormer windows, you should be guided by the standards prescribed in SNiP 2-26 and SNiP 21-01. These standards state:
- installation of dormer windows is allowed only when the roof slope is at least 35 degrees;
- the minimum dimensions of the doors should be 0.6x0.8 meters;
- The regulated dimensions of dormer windows are 1.2x0.8 meters.
The shapes of dormer windows installed in a private building can be of various shapes, and ultimately depend on the general style of the building. The installation of dormer windows is carried out using frames at the stage of roof construction, together making up a single structure.
A ventilation system based on the use of dormer windows significantly improves the aesthetic appearance of the roof, as well as improves its basic functionality. In most cases, for a pitched roof, the best option is to use windows with 1 inclined plane.
The installation scheme is quite simple: 2 beams are attached at the distance required by the regulations and then fixed by vertical posts, which are joined at the top by a jumper. Then the outer sides should be covered with cladding, and at the end a decorative grille (in any style at the discretion of the building owners) should be installed along the side of the facade.
Forced, with exhaust fan
Considering the relatively small area of the vast majority of attics, they do not need forced inflow. In approximately 95-99% of cases, installing a forced exhaust system will be sufficient.
How to make an influx depends on a number of circumstances, but in most cases the classic scheme is suitable. In the classical scheme, the supply system is organized through gaps, windows (through micro-ventilation or simply opening a window, through a comb), window valves, or through the air duct system, if there is one.
Attic ventilation system diagram
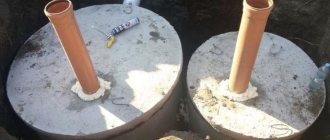
How to remove a pipe through a roof made of corrugated sheets
Any home heating system, with the exception of electric, involves venting chimneys onto the roof to release combustion products into the atmosphere. Let's look at how to remove a chimney through corrugated sheeting.
- First you need to make sure that the chimney pipe is located correctly - the exit point should be in the darkened northern side, where little sun reaches.
- The shape of the pipe and the size of its cross-section are selected, taking into account the climatic conditions of the area, the topography and the temperature of the outlet gases.
- Then they are determined with the height of the pipe according to SNiP.
- They make the pipe themselves, or buy a ready-made one and carry out installation.
Video: pipe passage through a corrugated roof
Height of ventilation shafts according to SNiP
When calculating the height of ventilation shafts, take into account:
- the elevation of the pipe relative to the highest point of the roof and adjacent buildings;
- total length of the smoke channel;
- head size;
- design height.
Requirements and standards according to SNiP:
- for a flat roof the minimum height is 1 m;
- if the chimney is located at a distance of less than 1.5 m from the ridge, its height should be 0.5 m greater than the top point of the roof;
- provided that the chimney is located within 1.5–3 m from the ridge, the head of the pipe should be located at the level of the roof break;
- when the chimney is installed at a distance of more than 3 m from the ridge, its upper part should be on a conventional line drawn from the ridge along the slope at an angle of 10o.
The height of the rise of the chimney pipe head depends on its location relative to the ridge
If there are outlets of other ventilation ducts nearby, the height should exceed the others by 20 cm.
Video: how to calculate the height of the chimney
Roof ventilation in a cold attic
In any room where there is no ventilation, a normal microclimate is impossible. Insufficient air exchange causes air stagnation and high humidity; at the next stage, mold begins to grow on structural elements and fungus starts to appear. All these factors negatively affect the structure; over time, it will begin to deform and lose its purpose. In a private house, the room under the roof can be warm or cold.
Differences between cold and warm roof ventilation
In the first case, the ventilation duct is installed over the entire area of the slope using sheathing and counter-lattice. Warm air masses enter the under-roof space at the eaves, rise and exit through the aerator in the roofing strip. Condensation also escapes through it.
Many owners of private houses, where the room under the roof is not heated, wonder whether roof ventilation is necessary in a cold attic, because no one lives there? Such a system should exist in this case as well, since it will ensure the safety of the structure itself.
Only for an unheated room it is arranged differently. In this case, vents are created in the under-roof eaves for cold air to enter, while warm air goes into the aerator and dormer windows in the attic of a private house.
Arrangement of roof ventilation for a cold attic
For the attic space this is the eaves level. Here you need to create holes
It is very important to correctly calculate the size of the vents in the attic, so that the inflow and outflow of air is the same. Often, owners of private houses use perforated soffits
To create an outflow of air from the attic, there are roofing elements such as aerators and a ridge. The direction of flow is determined depending on the characteristics of a particular house:
- if the roof of the house has two slopes, ventilation ducts are made on the gables - loose lining of the overhangs or holes in the wall, the area of the ducts should be 0.2% of the area of the attic space,
- if slate or ondulin is used as a roofing material and no vapor barrier has been used, then no additional structures are needed, since the air will circulate along the waves of the coating, the ridge will serve as an outflow element,
- if the roof of the house is flexible or made of ceramics, a “turtle” (valve) is formed,
- The system of two gratings has shown itself to be good, one is installed with holes pointing downwards, the other can be adjusted,
- on a hip roof, ventilation can be created using two holes, one of which is located at the bottom of the lining, the other at the top of the ridge,
- also on a hip roof, provided that the overhangs are wooden, you can place beams with a gap of several millimeters.
Sequence of work
- Calculation of air exchange. According to SNiP, in cold attics, as in basements, dormer windows or vents are necessary for air flow. Their total area should be 1/400 of the total area of the room.
- Selecting an air outflow and inflow system. After performing the calculations, you need to choose a system that will be optimal for your home: an aerator or a ridge, windows or vents. Next, a diagram is drawn up, that is, how many ventilation elements there will be, their sizes, how they will be located.
- Execution of work. When creating an attic ventilation system, you should strictly adhere to the diagram.
Let's summarize
From the above it is clear that the work is not difficult for a home craftsman who knows how to hold a tool in his hands and strictly follow the project recommendations. But it is still better to entrust the development of documentation to specialists. They will make calculations of the size of the vents in the attic, their location and quantity, according to the characteristics of a particular room. A professionally created project will save you from mistakes and shortcomings, the consequences of which can be disastrous.
Roof ventilation in a cold attic
The need to create effective roof ventilation in a cold attic is associated with the formation of the necessary level of comfort in residential premises. Otherwise, heat loss and the formation of condensation are inevitable, followed by the appearance of fungus and mold, and even deformation of the house.
If the attic is converted into an attic
A simple attic can be converted into an attic to expand the living space. In this case, the roof is usually re-roofed. Insulation and roofing materials are replaced with higher quality ones. More efficient ventilation of the roofing pie is being installed. However, if the roof was originally laid very well, you can improve it a little without disassembling it.
Any roof has at least a very small gap in the sheathing. It needs to be turned into a ventilation duct. This is achieved by installing special pipes in the roof plane through which the steam will ventilate. Closer to the ridge of the roof, holes are made with the calculation of 1 pipe per 50 sq. meters of roofing. Each such element must be protected from precipitation. As a result of installing a pipe vent system, ventilation on the roof will become more intense.
Purpose of roof ventilation
Roof ventilation is designed to remove moisture from the space located between the external moisture-proof material: tiles, corrugated sheets, slate, and internal roof structures.
The main functions it performs:
- preventing the accumulation of unventilated air under the roof. This is especially true for houses with residential attics,
- preventing the formation of frost and ice in roof cavities,
- timely removal of moisture and dampness from the attic space.
The need to install roof ventilation systems is determined by fluctuations in daily air temperatures, as a result of which condensation forms on the inside of the roof: in the winter in the form of frost, and in the summer - dampness.
This problem can be partially solved thanks to the construction of a so-called “roofing pie”, which includes a layer of vapor barrier. However, waterproofing layers cannot always and not everywhere prevent the accumulation of dampness under the roof.
The moisture formed inside the “roofing pie” leads to a sharp drop in the efficiency of its operation. Since mineral wool slabs are usually used as insulation, under the influence of dampness they become compacted and lose their thermal insulation properties. In winter, moisture accumulating under the roof turns into ice and, expanding, gradually destroys the attic structures. In the warm season, dampness leads to the formation of fungus and mold, which can spread throughout the entire building.
Roof ventilation can eliminate all these problems.
Installation of a flat ventilated roof
In the case where the building is equipped with a flat roof, a ventilated roof is of great importance. This design itself is subject to a greater need for drying the base, since it copes worse with removing precipitation. Using bitumen roofing felt (or other options based on it) as a finishing material also does not provide the most reliable protection. As a result, we can say that the possibility of free air circulation is a prerequisite for operation.
The general algorithm for installation will be as follows:
- First, the concrete base is prepared - the old coating is dismantled, the base is leveled, all other defects (cracks, potholes, chips) are eliminated, and it is also covered with special antiseptic solutions.
- A layer of vapor barrier is laid on top of the base. It is important to consider that when working with rolled materials, it becomes necessary to sequentially lay several cuts. To ensure maximum protection, it is important to overlap at least 15 cm, and seal the joints with assembly adhesive tape.
- The next layer is a mineral wool-based slab insulation. It is necessary to ensure air circulation. Special aerators are inserted inside the material - small tubes designed to ensure air circulation under the layers.
- Next, a cement-sand screed is performed.
- Then a layer of bitumen-based waterproofing material is laid.
- After this, a layer of polyurethane mastic and a final layer of finishing material are applied.
One of the characteristic disadvantages is that such a ventilated roof has poor resistance to mechanical loads, and therefore often needs to be repaired.
Device
With a cold roof
This is the simplest case of solving the problem, since the attic space allows large volumes of air to move freely. Vents located under the eaves, under the ridge strip, in the gables allow air masses to circulate due to natural convection:
- cold air is drawn into the attic from the outside through the eaves vents;
- warm air rises from the ceiling of the living room up under the roof and exits through ridge vents.
Of course, in this way it is impossible to completely level out the temperature difference between the roof surface from the outside and inside, however, it is usually not enough for condensation to form on the inside of the attic.
As a rule, the number of vents located at the top and bottom of the slope of pitched roofs of a simple configuration is the same. The only condition under which normal air circulation is ensured is that the total area of the vents should be about 0.33% or ⅟300 of the area of the slope.
For a warm roof
Attic ventilation is somewhat more complicated. In such a structure, air cannot circulate freely, since it is almost entirely occupied by attic spaces.
Air circulation in the residential attic, located in the under-roof space, is ensured by a convective flow directed from the eaves towards the ridge. In order for it to pass this path unhindered, additional space is created in the roofing pie between the layers of heat and waterproofing using counter-lattice and sheathing. The gap must be at least 5 cm high.
Then a ventilated circuit is formed in the space under the roof, that is, they provide air flow, as well as its exit with vapor:
- tributary: eaves overhang along the bottom of the roof, then attic windows (above them), valley or others where the contour is interrupted;
- exit: ridge, attic windows (under them), junction points, that is, where they need to be made specially.
Attention! It is important to ensure continuity of the circuit to eliminate the formation of “stagnant zones”, places where condensation may accumulate
attic ventilation
Overview of ventilation systems
When setting up ventilation, sometimes it becomes difficult to select components. Let's look at the most popular manufacturers whose products deserve attention.
Roof ventilation "Virplast"
WirPlast equipment is used for various purposes - installation of room ventilation or sewer outlets (sewage system), as a kitchen hood, for installing antennas or components of solar panels.
Advantages:
- easy installation due to the built-in spirit level, which eliminates any errors;
- complete tightness on the roof;
- stylish design;
- a variety of models for all types of coverage;
- 10 year warranty.
WirPlast ventilation equipment is of high quality, which is confirmed by a ten-year guarantee for all products
Roof ventilation "TechnoNIKOL"
TechnoNIKOL ventilation systems are available in two variations:
- for ventilation of the under-roof space;
- for forced air circulation in attics and attics.
Advantages:
- aesthetic design and affordable price;
- increased reliability and impact resistance of all elements. Achieved thanks to additives introduced into the composition of the base material HDPE;
- easy installation with detailed instructions.
Roof ventilation Vilpe
Vilpe products are developed by the Finnish company SK Tuote Oy. Excellent as forced ventilation systems installed both during the construction stages and during renovation.
Advantages:
- made of impact-resistant polypropylene and therefore not subject to corrosion;
- resistant to ultraviolet radiation and climatic changes;
- environmentally friendly material, withstands constant temperature changes from -40 to + 80 °C and occasional surges from -55 to +120 °C;
- Wide variety of colors and modern design.
Vilpe roof ventilation is made from impact-resistant polypropylene and can withstand large temperature changes
Roof ventilation Kronoplast
The success and demand for Kronoplast products is due to the fact that the company produces almost all parts for the ventilation of a private home - under-roof ventilation, kitchen outlets, vacuum cleaner outlets, sewer risers, etc.
The main feature of this product is 100% impermeability of all exits on the roof, without which full ventilation is impossible. Roofing elements are available for any coating in six basic colors.
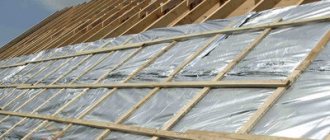
Ventilation of roofs made of metal tiles and corrugated sheets
If the builders are conscientious, then under the corrugated sheeting (metal tiles) they should have laid waterproofing - some appropriate rolled material. For what? In cold weather, condensation forms on the inside of the metal, which flows in real streams... guess where. In addition, moisture can penetrate through the roofing material itself and also flow onto the ceiling. In addition, steam penetrates through the ceiling and condenses on the metal tiles/corrugated sheets and also flows down - no longer as steam, but as water...
So: we put waterproofing under metal roofing materials, and ventilation must be provided between the roofing material and the waterproofing membrane so that moisture can quickly be removed from the surface of the waterproofing.
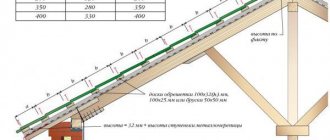
It is technically simple to make roof ventilation from corrugated sheets or metal tiles: using a counter-lattice:
The counter-lattice is 25x50 mm slats attached to the rafters on top of the waterproofing. The counter grille provides the gap necessary for roof ventilation.
It is necessary to lay waterproofing under corrugated sheeting or metal tiles, even if the attic is not planned to be warm, that is, insulation will not be laid between the rafters. And you also need to make a counter-lattice. And if you have a warm (living) attic or attic, roof ventilation using the method discussed above is especially important.
Features of the hip roof rafter system
The described roof is assembled from the following elements:
- Mauerlat/floor beams (used as support for rafter legs);
- Ridge purlin (this element affects what configuration the roof will be);
- Ordinary side rafters (required to connect the ridge and load-bearing walls);
- Diagonal (corner, slant) rafters;
- Central rafter hip;
- Narozhnikov (the so-called shorter rafter legs, with the help of which the slanted rafters and the mauerlat are connected);
- Struts and racks (used as additional supports);
- Crossbars (rafter legs are connected together);
- Sprengels (used as additional support for the diagonal rafters).
If hanging rafters are used when arranging a hip roof, then there is no need to install a ridge girder. It can be replaced by central trusses - rafter legs interconnected by crossbars. As for the rafter system in the center of the roof, it is done in the same way as in the case of the construction of a gable roof.
To ensure that all sizes fit perfectly, professionals recommend making roof trusses on the ground, starting from a pre-designed template. When installing a truss, it is important to check each structure regarding its vertical location. In order for the hips to have the correct geometry and be symmetrical, the outermost trusses must be at the same distance from the end walls of the house.
After the row is installed, bars or boards are installed from the formed system, which connect the trusses. Next, slanted rafters should be attached to the outer trusses, which rest on the corners of the structure. The next stage is the installation of the central hip rafter and the frames.
How to make attic ventilation in a private house
At the stage of designing a future home, it is important to think not only about the convenient layout of the premises
Comfort in the house cannot be ensured for a long time if you do not pay attention to such an important point as attic ventilation in a private house
This is no less important than insulating the attic, because the lack of properly designed ventilation will lead to the fact that living in the house will soon be uncomfortable, and the service life of the house will be sharply reduced
Lack of ventilation can lead to a shortening of the life of the roof due to the appearance of mold on it, and you can’t hope for a comfortable stay in the house itself. In the summer, when the roof heats up and its temperature becomes more than 100 degrees, the house will be very hot, and at low temperatures, condensation will form in the attic. because of which the wooden roof structures will rot.
The main purpose of the ventilation system is to ensure heat exchange. The temperatures of the air and the roof mix, and as a result a comfortable microclimate is created in the house.
Let's take a closer look at the situation when attic ventilation is poor or non-existent.
In winter, some of the heat from the room still leaves even through high-quality insulation. At the same time, the roof heats up, unevenly, only above the room. Here the snow begins to melt and flow down to the edge of the roof, where it remains cold above the eaves. The ice that forms on the roof overhangs does not allow the melted snow to drain, and it begins to penetrate under the roof. To prevent this from happening, it is necessary to ensure that the temperature throughout the roof is equalized and moisture is removed - this is why attic ventilation is needed.
Options for internal hipped structures
Let's take a closer look at what types of hip rafter construction there are and how they differ significantly from each other. A classic hip roof looks like this:
This is how hip slopes are assembled from sloped rafters:
Sloping rafters can be cut to the same height, and then the whole structure is much stronger:
The construction of a Danish half-hip roof already looks like this:
And finally, the most complex hip roofs also require precise calculations:
By the way, when it comes to a small gazebo, here you can take a risk and bring to life even such an unusual project with beautiful rafters:
What is attic ventilation and why is it needed?
Air exchange in the under-roof space is important at any time of the year. In summer, ventilation helps to avoid overheating of the house from the roof covering, which is heated in the heat, especially if the latter is made of metal materials.
In winter, the heat and moisture emanating from the house contribute to the formation of frost and, as a result, dampness. Without intensive ventilation this problem cannot be avoided.
If, in addition to the lack of ventilation, the heat-insulating layer is not made well enough, in winter the roof can heat up to above-zero temperatures, leading to the melting of the lower layer of snow and the formation of an ice crust and icicles during the thaw period.
Without air exchange in the space under the roof, the microclimate throughout the house is disrupted: on sunny summer days, living spaces will quickly heat up, and from autumn to spring, condensation will accumulate under the cladding. Accordingly, without the release of steam, which is formed as a result of the life activities of the inhabitants of the house, the humidity will increase in the rooms.
But the main danger of the lack of air exchange is that the wooden elements of the roof will wear out much faster than their allotted time. Moisture accelerates the process of rotting, fungus and mold.
Therefore, it is impossible to do without ventilation of the under-roof space.
In addition, it is important that air exchange is efficient. What you need to consider when arranging ventilation in the attic:
- The area of the holes should correspond to the area of the attic. The ideal ratio is 1 to 500 (1 sq.m. of ventilation per 500 sq.m. of space).
- The entire internal space of the roof must be involved in air exchange. If the air stagnates in certain areas, condensation or frost will form.
- The ventilation system must have two channels: air enters through one, and goes out into the street through the other.
The most difficult stage of the work is the calculations. Too many or too many vents are just as bad as too few vents. This task is best left to specialists.
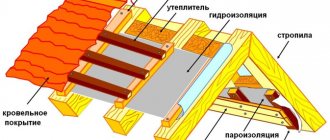
Where does moisture come from in the roofing “pie”?
The roof of a residential building is a complex system consisting of a wooden frame, roofing, as well as layers of waterproofing, vapor barrier, and thermal insulation. In general, a high-quality roof is a sealed package. But moisture still gets onto the wooden elements and insulation. The fact is that air containing water vapor penetrates inside the roofing pie. When the temperature changes, steam settles in the form of condensate on the surfaces of the inner layers.
Even through the most reliable vapor barrier made of steam and waterproofing, some air still penetrates inside the “pie”. In addition, air can enter through "breathable" wall materials such as porous blocks, wood or cellular concrete. Therefore, condensation cannot be avoided. This phenomenon is especially pronounced during precipitation or fog, when the concentration of moisture in the air increases noticeably.
Cottage roofing pie Source pinterest.com
Is attic ventilation necessary and why?
It is imperative to install a ventilation system in the attic space, since it allows you to solve several very serious problems with the microclimate at once. At the same time, you can equip it yourself with a relatively small budget for work.
Consequences of lack of ventilation in the attic
Proper attic ventilation solves the following problems:
- Elimination of excess moisture and prevention of the appearance of dampness in thermal insulation (insulation) materials. That is, ventilation protects thermal insulation materials from wear and functional damage.
- A significant reduction in the likelihood of the appearance and accumulation of colonies of fungi and mold, which creates additional protection for wooden roofing items (and also protects the health of those living in the building).
- Protection against the entry of overheated air masses into the building during periods of extreme heat (heat) in the external environment (outside).
- Protection from moisture accumulation, and, as a result, protection from corrosive phenomena that can damage metal structures.
- Protection against the appearance of icicles under the eaves in winter (especially in severe frosts).
- Significant savings on electricity required for optimal heating of the attic during the winter and, sometimes, autumn periods (in general, during the cold season).
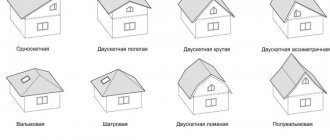
Pitched roofs
Pitched roofs differ from flat ones in that air flows enter through the lower overhangs and exit through the ridge, and with them all excess moisture that accumulates under the roof space in the insulation is removed. Ventilation in this case can be forced, for which roof fans are installed; a lightweight coating is recommended, preferably having a wavy texture. The roof can be insulated or non-insulated; the roofing pie differs only in the presence or absence of a heat insulating layer. Residential buildings require insulation; in this case, mineral wool in the form of slabs is excellent; they are very easy to install, provide an insulated coating, and the absence of cold bridges.
[my_custom_ad_shortcode1]
Exhaust ventilation type
The positive answer to the question of whether ventilation is needed in a wooden house is based on many years of experience in the construction and operation of private households. The organization of air flow is the basis of the principles of exhaust ventilation. Air intake must be ensured unobstructed. Natural supply ventilation supplies the house with air from the street. Main advantages:
- efficiency;
- simplicity of the ventilation system design;
- availability.
Exhaust ventilation in a private wooden house is provided for at the design stage. It is a central main line with branches that are designed to ensure the outflow of air from all rooms of the house. To increase operating efficiency, exhaust ventilation is equipped with fans mounted at the entrances of the ventilation ducts. The power of fans varies, so it is selected based on the volume of the room. The fans are economical; there are models with automatic operating modes.
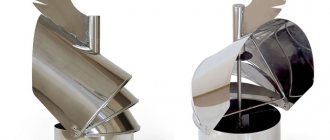
Types of aerators
Ventilation gaps can be equipped with various types of aerators. The number of such devices depends on several factors:
- slope area;
- characteristics of the aerators used.
If the roof has a complex structure, calculations for aerators are made at the design stage. Roof aerators are divided into continuous and point. The first type of such devices is designed to ventilate the entire under-roof space. If it is necessary to ventilate a certain area, a point aerator is installed. Such products are divided into 2 groups:
- pitched;
- skating.
Pitched ones are installed to enhance air flow and are necessary in the following cases:
- If the roof has a complex shape with a large number of bends that prevent moisture from escaping.
- When the length of the slope is large enough for the ridge aerator to facilitate efficient air removal.
- If the roof is covered with bituminous material. In this case, roof ventilation is necessary, since when the roofing material is heated, harmful fumes appear.
Ventilation system installation
Before installing an attic ventilation system, you need to make a project and calculate all the necessary parameters.
At the same time, at the design stage, you should carefully measure the entire attic of a residential building and write down all the important dimensions and parameters required for the calculation and installation of the ventilation system.
If the choice falls on a forced-type system, it is important to choose a fan that is appropriate in power. During installation, you should follow a certain procedure:
During installation, you should follow a certain procedure:
Based on the diagram, mark all ventilation elements, including valves and exhaust pipe. Make holes in the roof using a special tool. For supply valves, through holes must be made in the cornice or pediment
It is important to consider that the supply valves are located below the exhaust valves. Install the required valves. The cracks must be sealed. A pipe cover is installed on the roof and firmly secured
Before installing the pipe itself, you need to make sure that all joints are securely sealed. The pipe must be installed strictly in a vertical position, taking into account all required distances. A fan is mounted on the pipe inside the room, and a deflector is mounted outside. After this, the system can be used.
A test for air exchange in the room is carried out over several days.
Correct installation of ventilation will ensure the most efficient supply of fresh air and optimal removal of exhaust air. Any violations during installation of the structure will significantly reduce the efficiency.
Distinctive features of roof ventilation
Ventilation of the corrugated roof is arranged in a natural way. In the area of the eaves overhang, the air passes into the space under the flooring, then freely goes up to the ridge itself and is removed using a tent ridge. If the ridge is no more than ten meters, go through the end. When providing sub-deck roof ventilation, special slats are installed on the waterproofing layer, the lower of which near the eaves is 50% thicker than the others. Waterproofing, as a rule, does not reach the ridge, in order to guarantee quality ventilation and unobstructed steam escape. To prevent water from flowing in from the outside, the ridge is sealed with a “top roll” system. It is realistic to install a ventilation ridge under the corrugated sheeting.
DIY installation
Before you start arranging the attic ventilation with your own hands, you need to create its design, carefully consider the layout of its components, and write down on paper the sequence of work. During the preparation process, it is imperative to inspect all areas of the attic space, take the necessary measurements, and note the design features of the attic. When performing forced ventilation, it is necessary to select an exhaust fan with the appropriate technical characteristics. Sequence of installation work:
- In the diagram, according to the established designations, the fixation points of the valves and the area for laying the exhaust pipe are marked.
- You need to drill holes in the roof using a drill or hammer drill. These works are carried out very carefully so as not to damage the layers of the roofing cake, the design of which includes roofing, sheathing, waterproofing, insulation and vapor barrier layers. Holes for supply valves are made in the cornice or pediment. You should definitely take into account the placement of supply and exhaust ducts. The first ones are equipped below.
- Valves are being installed in the wall. A tube is inserted into a pre-drilled hole, which is covered with a grille on the street side. A filter is installed on the inside and the valve body is attached. All these elements are included in the valve delivery kit. The gaps between the structural elements and the wall surface are carefully sealed.
- On the roof surface where the hole for the pipe is drilled, the lining is securely fixed, and the quality of sealing of the connecting sections is checked. Next, the pipe is installed strictly vertically. It is imperative to maintain all calculated distances.
- A fan is mounted to the pipe on the inside of the building, and a deflector is mounted on the outside. The ventilation system is ready for operation. The effectiveness of its work is tested over the course of several days.
It is important to understand that properly equipped attic roof ventilation is one of the conditions for comfortable living in a country house. When arranging it with your own hands, it is imperative to comply with established building standards, design it together with the structure of the house and equip it at the stage of erecting the roof of the building.. https://www.youtube.com/embed/VGCQE8ZgaSE
Ventilation outlet installation
Before installing ventilation outlets on a roof made of corrugated sheets or metal tiles, purchase the following tools and consumables:
- scissors and hacksaw for metal;
- drill and screwdriver;
- marker;
- construction level.
To make the ventilation outlet to the roof airtight, you will need silicone sealant.
Before starting work, make sure once again that the passage element is present.
It is most convenient to purchase a fully equipped ventilation outlet, for example, from Wirplast or TechnoNIKOL. Carefully read the instructions for your model.
Work progress
The first step is to make a hole in the roof. The passage through the roof is one of the most important points in installing a ventilation outlet for corrugated sheeting. The quality of the passage determines whether the roof will leak where the Wirplast ventilation outlet is installed, whether the factory coating of the metal will be damaged and whether rust will appear.
Next, you need to install the pipe hermetically so that air escapes only through it and moisture does not penetrate into the cracks. The design of the TechnoNIKOL d110 ventilation outlet is such that, with proper installation and assembly, a reliable design is created that meets all requirements.
- The kit includes a template that is applied to the roof in the place where the Wirplast ventilation outlet is planned. The template is outlined with a marker;
- Using a drill, holes are made along the line, as close to each other as possible;
- Using metal scissors (you can use a hacksaw), cut out a hole corresponding to the template. You cannot use an angle grinder! Sparks and heat destroy the polymer layer of metal tiles, creating areas for corrosion;
- The passage element is installed in accordance with the instructions for it;
- The place where the pipe passes through the roof is coated with sealant, after which the O-ring is put on. It is screwed on with screws. The passage element of the TechnoNIKOL ventilation outlet is inserted into the sealing ring in accordance with the latches;
- In order for the upper casing of the passage element to rigidly hold the pipe, it is trimmed, leaving a hole a quarter smaller than the diameter of the pipe. Some manufacturers pre-assemble the pass-through element, delivering it ready for installation;
- Before firmly screwing the pipe with screws, check the vertical position with a building level;
- Decorative and protective elements are attached.
Now from below, from the attic, check the accuracy of the installation and treat all damaged layers of the roofing pie with sealant.
When installing the Technonikol d110 ventilation outlet or any other model, do not forget:
- Carefully follow the sequence indicated in the instructions;
- Work carefully and take your time.
Once you have installed a ventilation outlet through the roof, you can independently make a ventilation outlet for the metal tiles of the house and antennas through the walls. Do not forget that the lifespan of the roof depends, among other things, on the quality of installation of ventilation outlets and pipes.
A video about installing a pass-through element will help you do all the work without errors.
Functions of attic ventilation
A residential attic cannot exist without good air exchange
During particularly hot periods, the ventilation system eliminates stuffiness, but in winter it effectively prevents cold and moisture from entering the room. That is why an important point is the correct installation of the ventilation system with your own hands, because:
- the system eliminates moisture and prevents the formation of dampness in the insulating material - it is thanks to ventilation that the heat insulator maintains its functionality for many years, preventing the penetration of heat and cold;
- with properly created ventilation, the formation of fungus and mold is minimized, thereby eliminating the possibility of premature destruction of wooden roof elements;
- in extreme heat, it prevents hot air from entering the house;
- prevents the accumulation of moisture, thereby preventing corrosion that negatively affects metal tiles;
- eliminates the formation of icicles under the eaves in severe frosts;
- saves energy resources, thereby reducing the costs required to heat a residential attic in winter.
Sewerage passage through the roof. Installation of ventilation passages through the roof
A properly installed roof duct assembly must meet the following requirements:
Tightness. The connecting flange must be carefully sealed to prevent water leakage into the attic.
There are no obstacles to the drainage of rain or melt moisture. This is especially important in the spring and autumn, when the water remaining in the surface cracks freezes at night and expands them, compromising the tightness of the passage and the integrity of the coating.
Thermal insulation of the passage unit eliminates the appearance of condensation that destroys the rafters, roofing and other elements of the system.