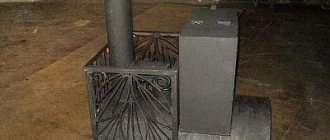
Although the potbelly stove has a history of more than a century, it has not ceased to be a very popular heating device for small rooms.
Potbelly stove from a gas cylinder
Such a stove is made not only from solid sheets of metal, but also from various metal objects that can withstand the heat from an intense flame - it could be a barrel, a flask, a pipe or an old gas cylinder.
It is especially popular among avid motorists who, even in winter, cannot refuse improvements to their car, spending all their free time in garages. The gas cylinder has an ideal shape, it’s practically a potbelly stove, you just need to improve it slightly: cut off the excess, drill the necessary holes and add a few pipes! Let's take a closer look at how to make a potbelly stove from a cylinder?
A potbelly stove made from a gas cylinder can have a vertical or horizontal arrangement. Some craftsmen even make such stoves from two cylinders, placing one of them in a vertical position on top of the other, which is oriented horizontally.
Video: homemade wood-burning stove made from two cylinders
However, there are many models, and after considering different ones, you can choose the one that seems more convenient to use and acceptable in ease of execution.
Naturally, to make a potbelly stove from a cylinder you will need some tools and materials, as well as certain skills in working with them.
What do you need to prepare?
From the tools you need to collect:
- welding machine (200A);
- grinder – “grinder”, preferably with discs with a diameter of at least 180 mm;
- electrodes;
- circles for grinding and cutting metal;
- hammer cleaning slag from welding;
- a brush with metal bristles;
- folding meter, tape measure, chalk or marker for marking;
- drill and drill bits of the required diameters;
- chisel, regular hammer and pliers.
From materials , in addition to one or two gas cylinders, you must purchase:
- a sheet of metal, at least three millimeters thick - it is useful for constructing a hob and ash pan;
- ready-made cast iron doors, or you can also make them yourself from a metal sheet or a piece of metal cut from a cylinder;
- chimney pipe;
- corner or thick reinforcement - they will be needed for the manufacture of legs and grate. The latter can be purchased ready-made (from cast iron) or constructed using holes drilled in the bottom of the cylinder.
It should be noted here that both a standard gas cylinder and a small cylinder are suitable for the manufacture of such a stove.
As mentioned above, a cylinder stove can be vertical or horizontal. You can choose the one you need based on the amount of space allocated for installing the potbelly stove and the ease of its operation.
Preparing the balloon
Proper preparation of the cylinder is a very important step before starting work, especially if the potbelly stove is made from a container that recently contained gas. Residual gas may remain inside, and when cutting, which is accompanied by sparks, the cylinder may explode.
- Therefore, you first need to unscrew the valve located on top of the cylinder and clear the passage for the remaining gas to escape - this procedure will take some time. It is better to leave the container open overnight in the open air or in a well-ventilated non-residential area, or even better - fill it with water to the very top.
- Next, the container is turned over and the resulting condensate is drained. It has a very unpleasant odor, so this process should also not be carried out in a room where people live.
The washed container no longer poses any risk of explosion when working with it, and you can safely begin the cutting process.
Required materials and tools
Naturally, to make such a potbelly stove you will need a gas (propane) cylinder. You will also need a metal pipe for making a chimney pipe, a rod of fittings for the grate, an angle or channel for making legs, metal hinges for the firebox doors and ash pan, as well as sheet metal with a thickness of at least 3 mm for making an ash pan located outside the cylinder body (removal is optional , but preferred).
And you will also need consumables: cutting and sharpening wheels (one sharpening wheel is enough) for the grinder, 3 mm electrodes (one package). If the product is to be painted with heat-resistant paint, you will need a metal brush to prepare the surfaces of the oven.
Required tool:
- plumbing tools (open-end wrench for unscrewing the cylinder valve, hammer, chisel, file, clamp, etc.);
- grinder for cutting holes in the cylinder and other work;
- welding machine;
- measuring instrument (ruler, tape measure, square, level);
Vertical stove made from a gas cylinder
Take a regular unnecessary gas cylinder
- When making this model, the cylinder is installed in its usual position, the neck is completely freed, then markings are made using a tape measure and a marker.
Possible marking option for a vertical potbelly stove
- Next, using a grinder (or using a gas or plasma cutter), holes are cut for the firebox and vent.
Cutting openings for doors
- The next step is to install a grate between the combustion chamber and the ash pan. Since this element of the required shape and size is difficult to find, it is made from reinforcement. It is cut into pieces of the required size and welded to a pre-marked place.
The grate can be made from reinforcement
- Next, the doors are installed—cut pieces of metal are perfect for making them. They are installed on hinges welded to the cylinder body.
- It is necessary to install latches or latches on the doors - they must securely hold the doors during combustion.
- At the top of the cylinder, if desired, you can arrange a small cooking surface. It is always useful for making coffee or tea or frying eggs. This panel is made of metal sheet.
A surface like this just begs for a hot water tank.
- The photo shows a version of the preparatory base not just for a hob, but for installing a container on top for heating water, made like a samovar. The pipe coming out of the firebox will pass through a container of water, heating it.
- All seams used to weld any parts of the stove must be sealed.
- The chimney pipe can be installed in the top of the stove or in the side wall. The chimney is discharged from the room through the wall of the building or the roof.
This arrangement of the gas cylinder helps to save space, as the stove turns out to be compact and neat. It is especially suitable for a garage or a small room in the country.
Selecting the design of a wood stove
Outdated and inefficient heating equipment is gradually becoming a thing of the past, which also affects homemade stoves. Nowadays, no one needs primitive iron boxes with a pipe and doors that devour firewood without good heat transfer. A modern potbelly stove should be economical and heat the room well. Therefore, advanced craftsmen are constantly working to improve steel furnaces.
To achieve the most efficient operation of a wood-burning heater, it is necessary to solve 2 questions: how to increase the efficiency of a potbelly stove and the burning time from one load, without increasing the quantity and price of the materials used. We present 3 homemade options where these tasks were successfully solved and implemented:
- three-pass stove made of two propane cylinders;
- pyrolysis stove with an air-fire-tube heat exchanger and a secondary chamber;
- A very popular design is “Bubafonya” with top burning of wood from a gas cylinder.
For reference. The first 2 units were developed, made and tested by our expert Vitaly Dashko, who kindly provided his photos and video materials.
If you are comfortable with a welding machine and have the necessary tools, then there will be no technical problems with production. Below we will present drawings and explain the technology of how to make a potbelly stove from a gas cylinder using all three options. But first, make your choice by reading the review of these stoves.
To make a stove you need a welding machine, a grinder, plumbing and measuring tools. You will need several clamps, at least 2 pieces
Three-way potbelly stove - operating principle and pros and cons
The master gave this homemade stove the playful name “Collider” because of its unusual appearance and good heat transfer. This wood-burning stove is made from two standard 50-liter propane cylinders welded to each other at an angle of 90°, as shown in the drawing. The operating principle is as follows:
- The first tank, laid horizontally, plays the role of a firebox and is accordingly equipped with doors and grates. An impressive portion of firewood is placed in it and set on fire.
- The second vessel is an air heat exchanger with internal partitions that slow down the flow of flue gases and force them to change direction three times and give off more heat. At the end, combustion products leave the heater through the chimney pipe.
- To increase the heating surface, both parts of the housing are equipped with additional ribs.
- An ash pan made of sheet metal is welded to the firebox below, the door of which regulates the supply of combustion air.
Sectional drawing of a homemade three-way wood-burning heater
Note. With the same success, instead of cylinders, you can use a steel pipe for a potbelly stove with a diameter of 300 mm and thin walls (4-5 mm).
The estimated power of the “Collider” is 10 kW with an efficiency of about 55%, which allows you to heat a room of up to 100 m² - a cottage, a greenhouse or a large garage (box). Practical tests have shown that in the mode of maintaining heat in a heated room, 1 load of firewood lasts for 1.5-2 hours. If you use a heating unit in a house with a smaller area (25-50 m²), the combustion duration will increase to 3-4 hours. Anyone who understands the topic will understand that for a homemade potbelly stove this is good economics.
Photo of the finished Collider stove with heat exchange fins
This long-burning stove has one downside - its strange appearance. But it is compensated by numerous advantages:
- ease of manufacture;
- quick warm-up and decent operating time from 1 load of solid fuel;
- the design is cheap, you only have to buy comfortable handles and also a pipe for the potbelly stove if you don’t have propane cylinders;
- due to the size of the firebox, long (80 cm) and massive logs are placed in the stove, which contributes to the duration of combustion;
- the unit can be made with a hob, as shown in the photo.
The "Collider", like any potbelly stove made from a gas cylinder, welded by yourself, can be supplemented by installing a water circuit, regulating the air damper in the ash pan door and an external fan. The dimensions of the stove can be changed in any direction by selecting smaller tanks or pipes of a different diameter.
The operation of a potbelly stove used to heat a 100 m² cafe is described in the video:
Review of a pyrolysis oven for 2 chambers
This small wood-burning stove, made from a 24-liter gas cylinder, was named “Pyaterochka” after the number of air heat exchanger pipes. It operates according to this principle:
- As in the previous case, the cylinder laid on its side serves as a combustion chamber, and an ash pan is attached to the bottom. The role of the grate is played by slits cut in the wall of the vessel.
- There is an opening at the top of the tank where 5 vertical heat exchanger pipes are adjacent. Hot flue gases move along them and thus release some of the heat into the room.
- From the heat exchanger, combustion products enter the secondary chamber, where heated air is supplied separately through a separate tube. Thanks to this, the combustible gases formed in the firebox are burned and release additional heat, after which they are directed into the chimney.
Drawing of a long-burning pyrolysis potbelly stove with a gas afterburning chamber.
The results of practical tests of the heater are as follows: a room of 30 m² is heated to 20 °C for 1 hour, after which one laying of wood is enough for 1.5-2 hours, depending on the operating mode. Approximate power – 5 kW. As you can see, in this design the burning time is reduced due to the reduction of the firebox, but the stove is very compact and will fit in any room. Yes, and it heats up quite well.
Advice. Do you want to increase the burning time to an average of 4 hours? Then study the drawing of another option, which shows the same pyrolysis potbelly stove, made with your own hands from a 50-liter gas cylinder. The design of the heating units is identical, the only difference is in the volume of the tanks used as a firebox.
This is what a two-chamber homemade stove looks like.
2 rods are welded on top - you can put a saucepan or kettle with water. Thanks to the efficient burning of wood, the Pyaterochka stove is more economical than the Collider, although it is more difficult to assemble. In terms of the cost of materials, the difference between them is small - the first has 2 cylinders, the second has 5 pipes with a diameter of 57 mm and a length of 40 cm. A separate advantage of the stove is the ability, after heating, to burn wet wood and any debris without losing heating intensity. The remaining advantages are the same - low cost, ease of use and the possibility of modernization.
Another good piece of advice. It is quite natural that after replacing a small cylinder with a standard one (50 l), you want to increase the power of the heater and add 2-3 more pipes to the heat exchanger. Remember that the flow area and chimney draft should increase accordingly. Otherwise, you will waste materials and time, because due to insufficient draft, the outer sections will remain cold and the furnace power will not increase.
An enlarged version of Pyaterochka from a large 50 l cylinder
Top burning stove "Bubafonya"
By and large, “Bubafonya” cannot be classified as a potbelly stove, since it has a radically different operating principle. But it is impossible to ignore this stove due to its wide popularity due to the burning time from 1 load of wood from 6 to 10 hours. At the same time, the heater is famous for its numerous shortcomings, which we will discuss later.
The operation algorithm of the Bubafonya long-burning stove shown in the drawing is as follows:
- The fuel tank is a 50 liter propane cylinder standing vertically. Through a hole in the top cover, an air supply pipe enters inside, ending with a thick metal disk. Steel strips are attached to the bottom, distributing air in all directions.
- When the firebox is filled to the top with firewood, the heavy disk presses it down and causes it to sag as it burns. Ignition is also done from above, and only then the pipe with the load is lowered.
- The combustion air supply is regulated by a damper installed at the upper end of the pipe. The chimney pipe is cut into the side wall of the cylinder under the lid itself.
Drawing of a top combustion furnace and arrangement of air distributors
Note. The place where the pipe passes through the lid is not sealed and secondary air is sucked in there, which helps to burn out the flammable gases above the disk when the oven is properly heated.
The strengths of “Bubafoni” are a decent operating time, simplicity and the possibility of conversion into a top-combustion boiler (a stove is made with a water jacket, which is described in a separate material). But the weaknesses forced many garage owners to abandon such potbelly stoves:
- the stove cannot be loaded until all the fuel has burned;
- if the damper is closed, the firebox will not go out and will smolder for a long time, because secondary air enters it;
- without good draft, the heater smokes into the room;
- in the slow burning mode, the stove heats weakly, and the chimney pipe becomes intensively clogged with soot;
- To enter normal mode, the unit must warm up well, which consumes ¼ of the fuel.
On the left in the photo is a close-up of the air damper, on the right are homemade heat exchange fins from profiles for installing gypsum boards
For reference. To burn off soot in the chimney, you need to run the Bubafonya at maximum speed every time you light it.
Finally, let's sweeten the pill a little. Despite all the shortcomings, a long-burning stove made from a gas cylinder does not lose popularity; in addition, it successfully operates on sawdust and various flammable debris.
Horizontal potbelly stove
Horizontal potbelly stove from a cylinder
- Another version of a stove made from a cylinder, which is placed horizontally, also has its advantage - you can install a large hob on it, which will be able to not only warm tea, but also cook lunch.
- In order for the structure of the potbelly stove to stand steadily, a reliable stand is welded for it from a corner, and after completion of the work, the finished stove is secured to it using spot welding.
- Work on the cylinder also begins with markings, after which a square hole is cut for installing the door and a round one for installing a chimney pipe. You may have to work with a round hole if you don't have a cutter. The “grinder” is not an assistant here, so first, drill holes around the circumference, then work with a chisel and hammer, and then final finishing with a file.
- Holes are drilled in the bottom of the future furnace, which will play the role of a grate, and under it a box is welded from a sheet of metal into which the ash will be poured.
In the role of a grate - rows of drilled holes
- The same chamber will be a blower, so an adjustable door is installed on it so that the air flow can be reduced or increased to establish the desired draft.
You can make the door yourself...
- You can make the door for this stove yourself by scalding a part cut out of a cylinder, or you can install a ready-made cast iron part that already has a frame. The second option will be easier to install, and it is already equipped with a latch to securely close the firebox.
...or buy ready-made ones in the store
- After installing the door, the potbelly stove is fixed on the stand or legs of the required height are welded to it.
- Then a pipe is welded onto which the chimney pipe will be installed. It can also be discharged through a wall or roof.
What types of burners are there?
If a gas burner is considered from the point of view of the method of controlling thermal power, then all models can be divided into the following categories:
- Single stage . In this case, gas supply (switching off) occurs automatically, based on a rheostat signal.
- Two-stage . The burner has the design ability to switch to an economical mode. This process is regulated automatically.
- Burners with floating adjustment . The burner power can be changed smoothly, from 10 to 100 percent.
Burners are divided according to the method of air supply:
- Atmospheric . In this option, no electricity is needed; air flows to the burner under the natural action of draft. The efficiency is not very high, no more than 90 percent. This is a simple design: a pipe with holes into which fuel is supplied. It works in open combustion chambers. They can be quickly converted, if necessary, to use liquid fuel; the service life of such burners is very long. However, such burners impose increased safety requirements.
- Supercharged . They are also called blower or fan burners. This is a rather complex design. Air is supplied to the burner by a fan; in this case, the combustion chamber is closed. Efficiency exceeds 95 percent. Stoves with such burners do not require bulky chimneys. At the same time, the furnace operates stably even at low gas pressure. However, they produce a lot of noise and are volatile.
- Diffuse-kinetic . The air is partially pumped into the combustion chamber, the rest is supplied directly to the flame.
Important. In capital devices with high heat capacity, at high furnace power, the burner can overheat. It is recommended to install a model that is resistant to high temperatures.
Will a small bottle suffice?
You can also work with a small balloon. It is made according to the same plan as a horizontal stove.
- But in this version, instead of drilled holes in the bottom of the stove, a cast iron grate is installed. A window of the required size was cut out for it.
Installation of a cast iron grate
- The blower in combination with the grate is welded as follows.
Ash pan made from a piece of channel
- Next, the legs are welded onto the ash pan box, the structure is turned over and the chimney pipe is installed on top and secured by welding.
- After completing work on the potbelly stove, it is installed in a permanent place and the chimney is taken out into the street.
Advantages and disadvantages
The prevalence of potbelly stoves is due to a large number of its advantages:
- High efficiency. The heat generated does not escape into the pipe.
- Ease of manufacture, installation and operation.
- Cheapness. You can make such a “heater” from scrap materials.
Despite the large number of advantages, the equipment still has disadvantages:
There is a wide variety of boilers and other heating equipment, so it is not recommended to install cylinder stoves in residential areas. They are optimally suited for greenhouses and non-residential premises, such as a garage.
Video: How to make a super wood-burning stove from a used cylinder
The proposed options are only a small part of what was invented by folk craftsmen. Look how the craftsman combined brickwork and a gas cylinder in one potbelly stove:
If you have an understanding of working with the tools described above and all the necessary materials, you can try to make this convenient and sometimes irreplaceable stove yourself. By making it yourself, you can save quite a large amount, and also make an already unnecessary gas cylinder function. The most important thing is to approach this work responsibly and do it slowly, checking every action.
Principle of operation
Water circuits are rarely connected to gas stoves. The room is heated directly by heated air from the stove. The only difference with a solid fuel stove is that natural gas is used, not wood.
Advice. It is very easy to install a water circuit with a heat exchanger or a water tank in gas furnaces; sometimes a system is connected that allows warm air masses to be discharged into adjacent rooms.
There are options for gas stoves combined with a solid fuel unit or powered by electricity. There are universal burners that run on diesel fuel if the need arises.
Important. All installation and repair work related to gas fuel must be carried out exclusively by representatives of a specialized organization that has the appropriate permit.
Correct kindling
The process is actually simple
...but only if you have experience working with a potbelly stove. A beginner should do the following:
- Crumple the paper and place it on the grate.
- Place birch bark and brushwood on top of the paper.
- Then place two small logs. Firewood is an important element for a potbelly stove. They should be used at least for warming up.
- You should set the paper on fire with the blower half open. He is responsible for controlling draft in the furnace. There is no need to put a lot of firewood into the stove at once. The main thing is to control the traction force.
Why do you need a brick?
When a potbelly stove gets red hot, it poses a great danger. Even if you take into account all the fire safety tips, you can simply get burned on this structure. In addition, the oven cools down quickly, which is its disadvantage. Many people came up with the idea of covering the structure with bricks because:
brick retains heat for a long time, which accumulates and gently releases it to the room;- It is very problematic to burn yourself with a brick;
- the appearance of the potbelly stove becomes much more presentable with good cladding.
How to do it?
First of all, you should take into account the advice of professionals:
- — the brick must be laid on a clay or special adhesive solution;
- — it is necessary to make several air channels so that air penetrates into the room;
- - the first time after cladding, the potbelly stove should not be heated at full strength in order to strengthen the fastening seams between the bricks;
- - any brick can be used - fireclay, ceramic, but not facing.
The masonry technology is classic with a sling. First, the two side walls are covered, then the back. The front remains open. If you have design ideas, then you can realize your fantasies, everything is in your hands.
Video description
Video demonstration of how a stove gas burner works:
- For boiler.
Industrially manufactured heating units are equipped with burners of a given power, and therefore the consumer does not have to make any adjustments. It’s another matter when the boiler has to be assembled from separately purchased components.
In this case, it is necessary to take into account the type of combustion chamber of the unit - closed or open. The type of gas burner suitable for the appropriate operating conditions will depend on this indicator. Power, serviced area, need for automation and other important factors are also taken into account.
- Universal models.
Removable burners designed for installation in any suitable equipment. For example, they can be equipped with boilers and furnaces operating on solid or liquid fuels. At the same time, for maximum efficiency and productivity, such installations are equipped with a powerful air supply system, filters, gearbox and automation.
How to properly make a chimney?
To ensure maximum stability in the operation of a stove structure made from a cylinder, it is imperative to arrange high-quality draft.
To achieve this goal, the cut of the stove chimney pipe must be installed at a certain height. This is slightly higher than the edge of the mounted grate. When connecting a gas chimney to the side, it is necessary to ensure that the length of the strictly horizontal section is approximately 400 mm. At the very bottom of the vertically located part, it is worth organizing high-quality removal of accumulated moisture, as the drawings show.
- At the same time, it is recommended to use certain measures regarding the removal of incoming heat from the chimney part. There are two methods for carrying out this process:
- A horizontal section is being installed at a slight inclination of 35 degrees. Immediately after this, the channel turns upward and leads out. A completed or purchased heat exchanger of a special samovar category is installed on the chimney element; The pipe, which leaves the furnace at a special angle and then passes through the rooms, will be able to transfer warm air. Thanks to this, overall efficiency indicators become higher, while at the same time fuel consumption is seriously reduced.
- A heating system based on water fuel will provide the opportunity to install about 2 or 3 radiators in a country house or garage and provide them with heat. Such a device is characterized by simplicity in the manufacturing process, that is, a special water jacket is made in the chimney section, which has two high-quality pipes.
The circulation process present in the water circuit, which is mounted on the body of the stove chimney from a cylinder, will have to be adjusted in a forced manner. A household circulation pump is ideal for this purpose.
Blueprints
Drawings must comply with the following parameters:
- Door. It should be at least six centimeters from the bottom seam line of the cylinder. Also, the door must be designed in such a way that even medium-sized chopped firewood can easily enter it. If this does not happen, then you will have to constantly chop each log into smaller firewood. The most optimal door sizes are ten centimeters high and twenty centimeters wide.
- Next, we move on to the hole for installing the future chimney. It should be marked on the side of the cylinder opposite the door. This hole should be made a little lower from the top seam line. It should be no more than ten centimeters in diameter.
- After this, you should make a small hole for air ventilation. It needs to be drawn slightly below the top of the cylinder. The diameter of such a hole should be from two to three centimeters.
- The chimney pipe should be about eight centimeters in diameter and up to three meters long.
Trouble-shooting
Having a boiler at home brings many advantages, but it also has a number of disadvantages, and the user does not always know what to do correctly. Boiler faults are common to many types. It is important to promptly determine the cause of these faults before calling emergency services. List of the most common and most likely faults.
First of all, if the boiler does not start, you need to check the circuit components:
- network voltage;
- faulty boiler fan switch or motor;
- damaged boiler cables;
- false triggering contacts of automation or commissioning equipment;
- availability of water, whether the gas boiler is powered to the minimum required level specified by the equipment manufacturer.
If the boiler failure is not caused by any of these problems, the following procedure:
Pay attention to the noises made by the boiler, because they are often the first witnesses of destruction. They can also be due to hot water trapped inside the firebox or due to the presence of air in the heating system due to clogged air ducts.- Pipe rupture. It usually occurs due to problems with a jammed boiler feed valve, various scale-forming deposits in the boiler, or a malfunction of the condensate drainage systems.
- Failures due to exceeding the pressure and temperature readings, their corresponding sensors can trigger, for example, due to a broken thermometer or, conversely, which is especially dangerous as a result of real overheating of the boiler.
- The heating circuits are not working, possibly due to poor quality of feed water and scale formation in the boiler pipes.
- A problem occurs with the burner (flame breaks, gas accumulation causes detonation and explosion).
How to improve heat transfer
Before you make a potbelly stove from a gas cylinder using waste or wood, it’s worth figuring out how to increase its efficiency. It is better to study this point in advance, since due to it you can significantly improve heating and reduce fuel consumption:
- Welding two cylinders. The horizontal part is welded to the vertical firebox, thereby increasing the heat transfer area.
- Adding bends to the chimney. Due to this, hot air leaves much more slowly, which increases heating efficiency. The main thing is to choose the number of bends so as not to worsen traction.
- You can figure out how to make a long-burning potbelly stove from a gas cylinder. It is distinguished by the presence of an afterburning chamber, due to which the consumption of firewood is reduced and efficiency is increased. But the design is much more complex.
- Often pipes or a U-shaped profile are welded to the edges, which increases heat transfer.
- Another option is to install a mesh frame and fill the space around the stove with stones.
Advice!
You can cover a horizontal potbelly stove with bricks and you will get an improvised stove.
There are other options - constructing a metal frame that is welded to the outside of the cylinder. The easiest way is to decorate the surface of the wall near which the potbelly stove stands with tin or reflective material to direct heat into the room.
Rules for safe installation of a metal stove
A potbelly stove heats up much hotter than a brick stove, so all flammable objects should be kept at a sufficient distance from the stove. If the floor in the room is wooden, it is installed only on bricks or metal sheets. The metal, in turn, is laid on an asbestos sheet with its removal 35 cm or more from the edges of the stove. In the front part in front of the firebox it should protrude 5.5 cm. Asbestos can be replaced with felt impregnated with clay. You can also install such a screen to reflect heat on concrete.
Important!
A working oven requires supervision. You should not leave the room where the potbelly stove is heated for a long time.
Installing a potbelly stove on a brick base
Trial fire
After the potbelly stove is made, you need to test it in action. The first fire will show all the defects. The oven must be heated before painting. The test is carried out in the following order:
- We light the stove with a small amount of fuel. The first stage lasts 30-40 minutes.
- If smoke is not visible anywhere, next time we make a full load and heat the stove. Our goal is to fade the old paint.
If smoke gets in somewhere, these places need to be sealed. After testing, the oven must be coated with heat-resistant paint.
