The issue of water supply will probably always be relevant, especially in rural areas. And often the problem of water supply is solved by erecting a well that performs a direct function (in other words, providing the area with water), but at the same time it must be reliable and durable. To prevent it from freezing in winter, it should be properly insulated even before the onset of cold weather. There are many different insulating materials suitable for this purpose. You just need to know how to properly insulate a well for the winter.
- 1 In what cases is insulation required?
- 2 Method one. Cover insulation
- 3 Method two. We thermally insulate the upper ring of the structure 3.1 We use polystyrene foam for the “under the fur coat” ring
- 3.2 We use polyurethane foam for the ring “under a fur coat”
- 4.1 Video – House installation
- 7.1 Video - Insulating a well
What you need to know about water and wells in winter?
Our guaranteed depth without freezing is approximately 150cm. The layer of earth below has a constant positive temperature. This is the basis for the use of heat pumps and non-freezing recessed eco-greenhouses.
Springs at a depth of one and a half meters and below seem icy in summer, but in fact they also have a low positive temperature. Springs and fast-flowing rivers do not freeze even when they reach the surface.
Therefore, in a sand well with a good debit, water will not freeze even in severe frosts and without shelter. With medium, a crust of ice may form, but the water flow will be sufficient for selection through pipes. The water in a sand well with low flow rate and in a clay well does not freeze in winter. But if the walls of the well freeze, water from the vein in winter simply will not be able to get into the well. Until spring.
Step-by-step instruction
Depending on the design of the well shaft and the frame, the covers can be made in the form of a circle or a rectangle; when opened, they can be completely retracted or hinged. Let's take a closer look at how to make a well cover with your own hands.
Wooden cover
But it should be taken into account that the tree needs protection from aggressive external influences - dampness, temperature changes, sunlight, wood-boring insects. To do this, the structures are treated with antiseptic substances and paints and varnishes. In this case, a wooden well cover can last for decades.
The most suitable tree species for installing a cover are deciduous. These are linden, birch, oak. You will need boards 2 cm thick, or “inches”, 150 mm wide, as well as 4x4 cm bars. The simplest design of a well cover is a regular wooden shield covering the neck from above. We measure the width of the well's neck, and according to its dimensions we knock together a shield: we tightly pack boards onto the base of 2 bars. If necessary, the shield is shaped into a circle using a hacksaw or electric saw.
After this, the wooden structure is coated with antiseptics, stain, and the top is covered with varnish or paint for outdoor work. Also, for ease of opening, the lid is equipped with handles. To prevent water from freezing inside the well, it is recommended to insulate the lid by attaching a sheet of polystyrene foam, felt, or other suitable heat-insulating material to the inside.
Combined option: metal and textolite
Creating a cover made of metal and PCB will require a lot of effort. The combination of such materials will create a strong and durable structure. During the work you will need an angle grinder, a welding machine, and a drill. The frame of the structure is assembled from metal elements - tubes or corners. Plates of polymers – textolite or hardboard – are sewn onto it.
The procedure in this case looks like this:
- Corners or tubes are cut in accordance with the diameter of the well, so that the frame completely covers the neck, or is located on it as on a foundation.
- The ends of the corners are cut with a grinder at an angle of 45° for ease of joining.
- A square frame is welded from the prepared corners, and the welding seams are cleaned with a grinder.
- Holes are made in the resulting frame by drilling or welding, and it is attached on top of the well using dowels.
- Next, another frame is welded from corners or tubes - under the hinged lid. Its size should be such that it fits tightly, but without undue effort, inside the main frame. For rigidity, we reinforce the lid with another corner, placing it diagonally.
- Then we fasten the two resulting frames together with a hinge joint.
- The lid is sheathed on the outside with a sheet of polymer and equipped with a handle.
- To protect metal structural elements from corrosion, we paint them with protective varnish or water-repellent enamels.
Reinforced concrete structure
Most often, this technology is used to install a protective cover over a well shaft made of concrete casing rings. Installing a reinforced concrete cover on top of a well is a fairly simple option, however, sometimes it requires the use of a crane.
A standard concrete cover is heavy. And if the well neck is located high from the ground, then installing it manually will be problematic. And installing a small-diameter concrete cover will require the efforts of several people.
Therefore, it is recommended to install the cover simultaneously with the installation of casing rings. This will simplify the work, while at the same time saving on additional calls for lifting and installation equipment. The connecting seam between the concrete cover and the upper casing ring is sealed with cement mortar. A hatch with a ring is installed in the opening of the lid. Previously, well hatches were cast from cast iron, but today you can purchase inexpensive, and at the same time light and durable polymer-sand models.
Recommendations from experts + video
All of the above options have their negative and positive qualities. Therefore, when choosing a particular technology, you should take into account their features, as well as the level of your own skills in handling construction tools and the availability of free time. The photographs show some options for constructing well covers, as well as the stages of their manufacture and installation.
Helpful2Not Helpful
How to prevent the water in the well from freezing in winter?
When constructing a well, you should insulate the upper rings above the surface of the ground and in the ground to a depth of up to a meter, as well as the lid. The underlying heat of the soil and water is usually sufficient to prevent freezing. If the rate of water flow is low, care should be taken to ensure that there is a sufficient water level in the well and that the walls at the level of the water vein are not exposed when drawing. In this case, with severe frost and poor insulation, the soil may freeze from the walls of the well and block the water. How to ensure a sufficient volume of water in a well with a small debit is described in detail in the article If there is little water in the well.
You can cover not only roses with snow, but also wells
By the way, look closely at the green cover in the photo above. This is the so-called modern type of well, which, other things being equal, almost does not freeze. The old classic look of the well top not only lost its functionality. It is much more difficult to insulate it than a new one. That is, it makes direct sense to change the design of the well, and use the old top to create a decorative well on the site.
Method one. Cover insulation
This technology is not complicated and consists of installing an additional cover inside the structure itself at ground level. We remind you that water from a well can be obtained in two ways - the old fashioned way, that is, using buckets, and using an electric pump. This article discusses exclusively the modern method.
You should start by preparing everything you need. Prepare for work:
- plywood sheet;
- glue;
- wire;
- a plastic pipe, which is necessary for ventilation;
- insulation, the thickness of which will be at least 5 centimeters (foam is ideal for this);
- polyurethane foam.
After this, proceed directly to the construction process.
Step one. Take a plywood sheet and cut out a couple of even circles with a diameter similar to the diameter of the structure itself. Make two holes in each circle - one for the hose and the other for ventilation.
On a note! Ventilation in this case is mandatory, since without it the water will soon begin to smell unpleasant, and its taste will noticeably deteriorate.
The diameter of the drilled holes is insignificant - no more than 6 centimeters, otherwise frosty air will be able to penetrate through the resulting cracks. It is more convenient to drill holes at one edge. Next, make 4 more holes for the wire around the perimeter of the second circle.
Step two. We continue to insulate the well for the winter. Cut a third circle of the same diameter, but this time from foam. Glue it to the bottom circle using high-quality wood glue, and fix the third circle on top. Once the glue has dried, place the ventilation pipe into the prepared hole. You can use polyurethane foam to seal joints.
Step three. The work is almost finished, all that remains is to make a special ring from the wire. To do this, take it and wrap it around the first ring, thereby fixing its circumference. After this, attach the wire to the ring, fixed in the four holes of the lower ring. Pass the hose into the required hole, and then lower the finished “sandwich” onto the ground line. The lid will be held in place with a wire, the well will be properly ventilated, but the water will not freeze.
If the well runs out of water in winter, how long will it take to fill it?
In underground springs there is water all year round (item 1). If it does not fill up because the walls of the well and the soil are frozen, the flow of water will resume as soon as they thaw.
If the problems in paragraphs. 5, 6 and 7 arise constantly and are not solved by insulation and/or changing the design of the finial, there is a radical solution. No, this is not a new well. This is a top in the form of a small building. A beautiful closed gazebo, if the well is in sight, or an outbuilding. This completely replaces insulation, plus it eliminates freezing of the soil at some distance around the well. As a result, water supply improves in winter and you get additional MAF. And if there is a need for some work (for example, replacing a hose, pump, etc.), they can be done in warmth and with light. An example of such a top is given at the end of the article about modern well design.
Reports of our work
- Insulation of the source shaft. Marfino November 8, 2016
- Insulation of the shaft and cover. Village Goluboe September 28, 2016
- Mine insulation. Bolshoye Snopovo August 23, 2016
- Guarantee of the quality of our services
- Samples of contracts for our services
- Service areas
Order in 1 minute Online consultation
What is the best way to insulate a well?
Extruded polystyrene foam (pink) - it bends well, the thickness is suitable, the price is reasonable. If the well has a plastic cover, you can blow it out from the inside with foam. Now insulation in the form of foam cylinders has appeared on sale - they stick to concrete without cracks, but prices are still high. I don’t recommend polystyrene - it crumbles unpleasantly. Even if it doesn’t fall into the water, collecting them around the site is not a pleasant task. There is also good news - the functionality of a modern well has made the upper ring above the ground unnecessary. This means that the issue of insulating both the walls and the lid has been significantly simplified.
Thank you for your attention. It's time to drink a cup of aromatic tea. From that same unfreezing well...
Method two. We thermally insulate the upper ring of the structure
Every specialist will tell you that in order to prevent freezing of a well, you need to reduce the thermal conductivity of its upper ring. This method of thermal insulation is performed in two ways:
- by means of polystyrene foam;
- using polyurethane foam.
Let's look at the first method first.
We use polystyrene foam for the ring “under a fur coat”
Here you should prepare the following consumables for work:
- polyurethane foam;
- paint;
- plaster;
- insulating blocks made of polystyrene foam, which are connected using a tongue-and-groove system.
On a note! According to this technology, the first ring on top will be completely insulated, while the second only partially. Now to work!
Step one. Work should begin with preparatory activities. Dig a pit 20 centimeters wide and approximately 0.5 meters deep around the ring. Then thoroughly clean the surfaces from dirt and install the first “fur coat” ball. At this time, make sure that the density of all connections is maximum! Blow out the joints with foam to seal them. Having finished with the first level, proceed to assembling the second and gluing it to the ring. Blow out the gaps that have formed between the layers with foam.
Step two. Next, begin plastering the surface of the rings. This will protect the foam from the negative effects of the sun's rays, which, as we know, worsen the thermal insulation properties of this material. After the plaster has completely dried, apply paint to it - this will prevent the finish from getting wet.
Step three. All that remains is to fill the pit and thoroughly compact the earth.
Penoplex, we insulate the foundation reliably and correctly
We recommend that you read our article on insulating the foundation yourself. You can find out more here
We use polyurethane foam for the ring “under a fur coat”
If you chose polyurethane foam as insulation, then follow these steps. First, dig a similar pit (as in the previous method of insulating a well for the winter), and then build a wooden frame around the first ring. But this is in general terms; let’s analyze the procedure in more detail. Prepare the following materials for work:
- paint;
- dowels;
- polyurethane foam sprayer;
- collapsible metal formwork;
- plaster;
- a piece of plastic film;
- wooden bars.
Step one. Traditionally, start by digging a pit, but narrower (maximum 10 centimeters). After this, install bars around the first ring in increments of approximately 40 centimeters. Cover the edges of the trench with formwork made of thin sheet steel, which will exactly follow all the contours. Cover the formwork with the prepared film. For what? This is explained by the fact that the adhesion of foam plastic is very significant, and therefore dismantling the formwork is impossible.
Step two. Having finished building the formwork, you will notice that a void has formed between it and the ring - this is what needs to be filled with insulation. Upon completion of pouring, the polyurethane foam will increase in volume, and the trench will therefore be filled as densely as possible.
After this, you need to wait until the material is completely dry. As soon as this happens, dismantle the formwork. Plaster the finished surface and apply a layer of paint to it. Fill the void left after formwork with earth and compact it thoroughly.
On a note! It is also advisable to cover the well with a lid, which was described in one of the previous paragraphs of the article.
Bypass drain system
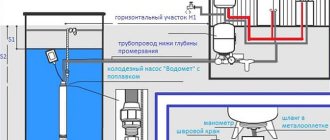
The drainage system can be provided in the house using a bypass. The bypass is installed directly in front of the automation and hydraulic accumulator. It is designed in such a way that when the pump is turned off, water drains from the pipe to the check valve, but remains in the internal system. A tap is installed on the bypass line itself. When it is opened, water is drained from the internal system too.
A check valve is usually installed on a horizontal section of pipe. A tap is installed on the bypass line; when it is opened, water is also drained from the system.
Why freezing wells is dangerous
It is a mistake to think that well insulation is only necessary when it is used year-round. Many summer residents and seasonal residents of country houses sincerely do not understand why insulate a well that no one uses in winter anyway. Meanwhile, such seasonal wells also need effective thermal insulation!
Otherwise, a variety of problems may arise that make the operation of the well difficult or completely impossible:
- the formation of an ice plug in the water supply system;
- displacement of the rings resulting from the expansion of frozen water in the surrounding soils;
- failure of the ice plug and damage to pumping equipment;
- divergence of the joints of reinforced concrete rings when water gets between the seams.
Wells that are not protected from low temperatures require repair work much more often. And in terms of financial costs, repair measures are often more significant than carrying out one-time insulation work.
If a water supply system based on a well is installed in a suburban area, then in addition to the shaft itself, it is necessary to insulate the pipes to protect the supply line of the system from low temperatures.
Types of well houses and their tasks
The primary task of a well house is to protect water from various substances - dust, leaves and other similar contaminants. This requires a tight-fitting lid. Open wells are only possible for technical water - for irrigation. Water from them cannot be used for other purposes. So if you plan to at least wash dishes, the well must be closed tightly.
The lid on the well must lie tightly
Protection from precipitation of any kind is also necessary: rain and melt waters carry with them very dirty water with fertilizers dissolved in it, animal waste, various debris and impurities. If it gets into the well, it can cause serious contamination. To protect against precipitation, they make a canopy, most often a gable one - this makes it easier to remove precipitation.
Another purpose of the well house is to protect from strangers or, in any case, to ensure safety for children. To do this, they make latches or cut in locks.
Option for a closed well house
To make it easier to raise water, they install racks and gates - in the simplest case, a rotating log with a handle to which a chain is attached. And all this together should still please the eyes of the owners, but at the same time require minimal care.
Open or closed
As you can see in the photo, the well house can be open or closed. It’s cheaper and easier to make an open one: the well ring can be trimmed with stone or wood, the lid, racks and canopy can be made of wood or metal - whatever will cost less. A minimum of materials is required for this structure. There is only one “but” - in winter the water in such a well can freeze. If you don't plan to use it in cold weather, no problem.
But for winter use, an insulated well house is required. But even then it can be made open:
- buy a polystyrene foam “shell” for the well - they are of a suitable size, secure it, and then lay the finishing on top of it;
- The overlap of the ring and the lid should be made of several layers of wood, and the boards should be laid in different directions, overlapping the joints.
Closed well house
Another option is to make an enclosed house. It is slightly larger in size than a well ring. The existing air gap is already a good heat insulator, but the protection can be further improved by filling the gaps with foam, for example.
What to make from
Choosing an appearance sometimes takes a long time. The fair half of humanity especially “suffers” from the desire to decorate a well, going through numerous design options and spending a lot of time doing this. In fact, everything is simple: if you have a house and a well is located nearby, you should decorate it in the same style and, if possible, in the same color. Agree, it looks good.
It is better to decorate the well in the same style as the house
What to do if the house is brick or plastered? Choose a finish that matches the style of the site. If this is one of the first buildings on the site, just do it as you like.
The question often arises: to make it from metal or wood. Wooden ones certainly look beautiful. But without proper care, they quickly lose all their attractiveness and become gray and ugly. If you are not afraid of the prospect of regularly, at least once a year, updating the protective coating (remove the old paint, then paint it again), make it from wood. If this is not for you, make it from metal. The entire structure or just the frame is your choice. What’s bad about this option: a frame made of galvanized metal profiles, covered with siding. Especially if the house is decorated in exactly the same way.
Siding well house
As you understand, there are a lot of options. First choose the type - open-closed, then materials and finishes to your taste, understand the design, make a house for the well with your own hands.
The best thermal insulators
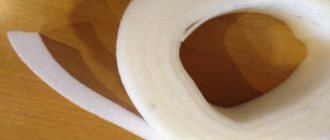
According to their thermophysical characteristics and availability, the best thermal insulation materials are: polystyrene foam, polystyrene foam, roofing felt, film, polyurethane foam or hard plastic segments.
Another inexpensive thermal insulator is penofol - insulation with a foil surface. Its advantage is ease of installation, but its disadvantage is instability to mechanical damage.
| Material | Advantages | Flaws |
| Polyurethane foam | Tightness, resistance to deformation and destructive effects of moisture, high performance, durability. | The need for annual painting of the insulating surface layer. |
| Expanded polystyrene | Waterproof, frost-resistant, easy to install, durable, affordable price. | Lack of resistance to ultraviolet radiation. |
| Mineral wool | Good thermal insulation, affordable price. | Low water-repellent properties. |
More expensive options are solid wood, brick, but in this case you can get insulation and decorate the well shaft.