Level, level, plane builder - with the advent of the “laser” prefix, these useful devices for precise orientation in space acquire a modern sound and at the same time a significant cost. Despite the fact that any of the devices can significantly make the life of a builder, repairman, or simply a thrifty and homely owner, many are in no hurry to purchase “professional” models, mainly because of the high price. However, expensive equipment for one-time use (for example, leveling walls) can be completely replaced with a homemade device. To do this, you must first understand the structure of the level or plane builder.
Principle of operation
The basic element of any device whose name includes the word “laser” is an emitter of highly targeted monochromatic (one-color) radiation. The phenomenon is based on forced radiation, which, depending on the power, is perceived differently. Low-power laser emitters based on red, red-orange, yellow-orange and green diodes make it possible to produce a point or beam of light. At a high level of pumped energy, a laser beam can turn into a weapon - it can set fire to materials that absorb radiation well.
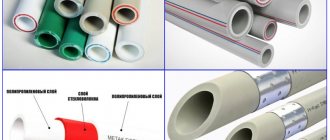
Devices used in everyday life and construction and repair work operate on laser diodes of the red, yellow-orange and green spectrum; blue and violet ones are much less common (such models are much more expensive). To concentrate light radiation, biconvex lenses are used, as well as other optical devices that allow the beam to be converted into a plane.
Household appliances have a standard circuit shown in the illustration. Design variations are related to the power of the emitter and additional accessories.
Move a mark
Let's figure out how to move the elevation mark using a level. For example, we need to make a benchmark, based on which the excavator operator will dig a pit, two meters deep below the floor level of the building. The value of the floor height is what we need to indicate to the excavator operator.
We install the rail at the reference design point, the height of which corresponds to the design height of the building’s floor, that is, zero, and take a reference. When independently developing a project or when → linking an existing project to the area, the height of this point is set using a peg or a mark is set on some fixed surface (brick fence, tree, pole, etc.). Or such benchmarks (marks) are set by a surveyor accompanying the construction site. Let, for example, it turn out to be 162.
Directly at the site of the future pit, we drive in a peg and, placing the rail close to it, again take the value, let it be equal to 179. The difference will be 17 centimeters. We set aside 17 cm from the bottom of the batten up the peg, mark the value with a marker or pencil. By driving another peg nearby so that its top coincides with the notch, we get a clearly visible landmark, after which the peg with the notch can be removed.
Laser-based level and level design
Laser levels and levels use the principle of directly indicating a target - a point or line on a surface. They can be tracked directly (in relatively low light) or through the eyepiece of the device.
In addition to a point or line (the trace of the intersection of a light plane with a solid opaque surface), levels and levels allow you to obtain a cross-shaped pointer, as well as simultaneously use two or more emitters.
Due to the scattering of the laser beam into a plane, such devices are often called “laser plane builders”. In general, the set of functions of the device depends on the number of emitters and optical devices for concentrating or scattering the beam.
The operating principle of the level. Installation of the device
The principle of operation of the level is extremely simple: the optical axis of the device is located strictly horizontally and does not deviate when the device is rotated, being constantly in the same horizontal plane.
Let's take a closer look at how this quality can be used in practice.
We begin work by installing the device. We extend it and install the tripod. When working on soft soil, we press the points that end the “legs” of the tripod into it.
By adjusting the length of the “legs”, we set the tripod to a convenient height for work, trying to ensure that its upper platform, where the level is placed, is horizontal.
We remove the level from the protective case and install it on a tripod, securing it with the tripod screw.
Now you need to align the level so that its optical axis is strictly horizontal. For this purpose, the tool is equipped with a round bubble level located on the frame. By rotating the verniers on the legs of the device, we position the air bubble strictly in the center of the level (see Fig. 1).
Now, no matter how we rotate the device tube, the optical axis will be located horizontally.
Working with a level at a construction site
Substitutes for professional equipment
In homemade devices, a special laser emitter is replaced with a conventional laser pointer. With sufficient power and quality, as well as the presence of two or more attachments that allow you to transform the laser beam, such a pointer is quite suitable for making a laser level with your own hands. You just need to take care of sufficiently strong and convenient fastening and installation of the pointer in a strictly defined position with the possibility of displacement.
As can be seen in the illustration, a telescopic tripod with a convenient mount that allows the holder to be rotated is used to mount the professional device. Since such tripods are often found in the households of amateur photographers, they can be easily adapted to make a tripod for a laser level with your own hands. If you don’t have a tripod, you can make a simple stand based on a stick or timber with a support at the bottom, use a container of water or a hanging mechanism. These options will be discussed in detail below.
Method No. 4
Making a cross level will require a more responsible approach. You will need:
- two laser pointers;
- video camera tripod;
- CDs;
- rotating electric drive (for example, from an unnecessary player).
The level of complexity of creating this device is higher, but it is ideal for construction and renovation, furnishing premises, especially for assembling kitchen cabinets.
The work progress will be as follows:
- The two CDs are glued together to increase their overall thickness and prevent the pointer from catching when rotating.
- Both laser pointers are attached to the disks with electrical tape or tape.
- The player is placed on a tripod, which should rise freely vertically and horizontally.
- Discs with pointers are placed in the player and rotated along an axis.
- The lines that appear on the wall are marked with a block and a pencil.
How to make a laser level on a tripod
If you have a tripod and a construction bubble (“spirit level”) level, creating a device comes down to installing a tripod and attaching a level to it with a laser pointer fixed on it. The illustration shows a level with an existing groove for the pointer, but in fact the fastening is simply done using clamps, wire or even tape.
The most difficult part is the correct orientation of the laser beam. To do this, it is advisable to insert a piece of hard rubber or foam between the pointer and the surface of the level, securing it with clamps or elastic bands, as shown in the diagram.
Here 1 is a pointer, 2 is a piece of dense and moderately elastic material, 3 is clamps or elastic bands. After setting the bubble level strictly horizontally (this can be done on any flat surface), the laser pointer turns on. By cutting the insert and tightening the clamps tighter or looser, we carry out a kind of adjustment of the level (of the future). Once parallelism between the horizontal plane and the laser beam has been achieved, you can mount the resulting device on a tripod in any convenient way.
Voting for the best tripod for levels
Which leveling tripod would you choose or recommend?
BST-S Stabila 18456
0.00 % ( 0 )
GeoMax ZTW100
16.67 % ( 1 )
ShM-IIB-350 MIK Micron 115990
0.00 % ( 0 )
BOSCH BT 250 PROFESSIONAL
33.33 % ( 2 )
Leica TRI100
0.00 % ( 0 )
ADA instruments Light S
0.00 % ( 0 )
ADA instruments Elevation Silver
16.67 % ( 1 )
RGK S6-N
0.00 % ( 0 )
GEO S6-2 CONDTROL
0.00 % ( 0 )
BOSCH TP 320
16.67 % ( 1 )
ELITECH 2210.000300
16.67 % ( 1 )
RGK F130
0.00 % ( 0 )
Matrix 35089
0.00 % ( 0 )
Support in the form of a rod, float device or suspension
As already mentioned, in the absence of a tripod, we use improvised means - a barbell made from a broom handle, a shovel or just a piece of timber, or a container of water.
The structure of the rod is very simple: a beam or stick is attached to a piece of board or OSB board (plywood) strictly vertically and so that the structure is stable. You can check the angle between the support and the rod with a building square, but it is better to use a regular building level. Spacers can be used as support, as shown in the diagram below. A block the size of a bubble level with an attached pointer is mounted to the top of the rod - and the device is ready.
If you place a large container on the floor, filled almost to the brim with water, and place a level with a laser pointer on a flat piece of foam, you will also get a quite suitable support for a homemade level. In addition, in a container with water, the device can rotate freely, “drawing” a plane along all the walls of the room. Interestingly, for such a “float” level you don’t even need a bubble level. With an even piece of foam plastic on which the pointer is rigidly and strictly horizontally fixed, the laser beam will move only horizontally - due to the impeccable evenness and horizontality of the water surface. Simple steps for making such a laser level with your own hands and its operation are shown in the video.
The suspension is even easier to install. A beam is attached to a chandelier hook or other similar mount on the ceiling of the room using a rope or thin wire. A laser pointer is fixed on the beam so that the light beam is directed to the floor (if floor marking is needed) or to the walls. Next, by rotating the resulting level from the pointer, we obtain a light point or line on the desired surface. In the illustration, a tripod is used as a mount for the hanging level, and the pointer itself is fixed in a hole drilled in a beam.
Additional devices and equipment
In addition to the device itself, for work we will need the already mentioned tripod, as well as a special measuring rod with divisions and numbers printed on it. The divisions are stripes of alternating black or red stripes 10 mm wide.
The numbers on the rod are marked in increments of ten cm, and the value from zero to the end of the rod is in decimeters, with the numbers expressed in two digits. So, 50 cm is designated as 05, the number 09 indicates 90 cm, the number 12 indicates 120 cm, etc.
For convenience, the five centimeter marks of each decimeter are also united by a vertical strip, so that the entire strip is marked with signs in the form of the letter “E”, straight and mirrored.
Older models of instruments give an inverted image, and they require a special rack with inverted numbers.
Auxiliary devices for the level
A passport is attached to the level, which must indicate the date of its last check and adjustment, or, as surveyors say, “verification”. Levels are checked at least once every three years, in special workshops, about which another entry is made in the passport.
Additions to the homemade laser level device
Additional details and the use of not one, but two or more laser pointers will help increase the accuracy of the device. One of the simplest improvements is the use of a bubble level with two pointers, mounted on a rotating flange with markings, which will help you rotate the device to an arbitrary angle. In order for the system to work properly, it is important to accurately align the axes of the laser beams and secure the flange strictly horizontally. The convenience of the system is that it can be mounted on a tripod or rod.
By changing the position of the levels and the number of pointers, you can get a laser marker that provides a light cross.
If your household already has an optical level, you can use it as a stand to add a laser pointer. An example of such a design is shown in the photo.
The scheme is extremely simple: a bar with a “bundle” of a construction bubble level and a laser pointer attached to it, rigidly mounted on the level’s stand.
For those who have a tripod for a camera or video camera at their disposal, we offer a diagram of a do-it-yourself level made from a tripod with adjustable legs, brackets and the same “bundle” of level + pointer.
Level device
Let's look at what a regular optical level consists of and how it works. The main part of the device is an optical tube with a lens system capable of zooming in on observed objects with a magnification of twenty times or more.
The pipe is mounted on a special rotating frame, necessary for the following functions:
- tripod mounts;
- setting the optical axis of the level to a strictly horizontal position, for which the frame has three height-adjustable “legs” and one or two (in models without automatic adjustment) bubble levels;
- precise horizontal aiming, which is carried out with paired or single handwheels.
In some models, the bed has a special dial, a scale that allows you to measure or construct horizontal angles.
On the right side of the pipe there is a handwheel designed to adjust image sharpness.
Adjustment to the operator's vision is made by rotating the adjustment ring on the eyepiece.
When looking through the eyepiece of a level telescope, we will see that in addition to bringing the object observed through the device closer, the level superimposes a system of thin lines on its image, called a reticle or reticle. It forms a cross-shaped pattern of vertical and horizontal lines (see Figure 1).
Useful tips for creating homemade levels using laser pointers
Despite the convenience, compactness and low price of self-made devices, they have two main disadvantages: relatively low accuracy and a short period of operation with constant use of laser emitters. The first issue is solved by setting up the device. To eliminate the second drawback, experts advise replacing the coin-cell batteries in laser pointers with an external power source. It is important to select a source with the required voltage. Typically it is 4.5 V, but may vary for different models.
When buying a laser pointer for a level device, you should carefully select its power and the color of the emitting diode. The best option is a green beam, it is less harmful to vision and is better visible even in relatively bright rooms.
By slightly increasing your budget, you can purchase a simple laser level with or without a tape measure. In this case, you can attach a ready-made device to any base, rather than a combination of a bubble level and a laser pointer.
Often these devices already have places for mounting on a tripod or tripod.
You can also use a laser tape measure as a source of laser radiation.
One more nuance: if a ready-made tripod (tripod) is used to install the laser, a useful addition to it will be a strip with markings or an ordinary metal (wooden, plastic) ruler. This will allow you to raise or lower your homemade level to a certain height without additional measurements. By the way, it is convenient to make the tripod itself from PVC pipes.
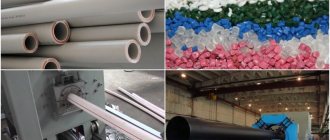
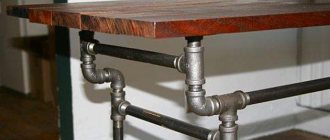
DIY optical level tripod made of polypropylene pipes
To use an optical level comfortably, it requires a tripod; sometimes you need to mark a horizontal line somewhere on the wall, while the level stands on the floor; you have to come up with stands for it. Of course, tripods are sold, their cost depends on the height and type of construction, and starts from 1500 rubles (the smallest one), and given the fact that you will use the tripod very rarely (trust me), there is no point in spending money on it, or not at all So, it’s a pity to buy an expensive tripod, so I decided to make it with my own hands from polypropylene pipes, and at the same time try out a welding machine for these pipes.
Of course, if you think that you will use a tripod very often, and even more so you need to carry it with you, then it is better to choose a factory-made one, or there are a lot of such tripods, you can look at this link.
Okay, let's proceed directly to manufacturing, for this we will need:
- PP pipe (D 25 mm, 2.5 m) - 1 piece
- PP pipe (D 20 mm, 2.5 m) - 1 piece
- Tee PP 25 mm – 3 pieces
- Pipe holder 25 mm - 5 pieces
- Hot glue gun
- How to cut pipes, I had a reciprocating saw
- Polt or pin that is screwed into the level (from below)
Almost everything is assembled
We cut the pipes to size, I chose the size of the support legs about 30 cm
Let’s figure out what it will look like, we need to keep the proportions somehow
We warm up the machine for welding polypropylene, bought by the way in Leroy Merlin for 800 rubles, it seems to cook well, the water supply system at the dacha was installed using it, there have been no leaks so far.
Welded tees
When I welded the central tee to the pipes, I bent them slightly down towards the floor (relative to the tee itself), so that the center was slightly raised, this makes it easier to use the tripod on an uneven surface. The arrows show where to bend.
I also bent the legs down so that the side tees would also rise from the floor, as a result the level stands on four points of support (points), and not flat
I welded the central tube into which the 20 mm pipe will fit, because the tripod is telescopic.
I cut the pipe by 25 mm, at a height of 1 meter, inserted a pipe with a diameter of 20 mm into it (in the store I immediately measured it to fit into each other), cut it completely inserted, and left a few cm.
Next, you need to secure the bolt with the thread up, in the tube on which a level or something else will be attached. I did this using a heat gun, a very convenient thing to have around the house. You can buy it at a hardware store or order it from China (cheaper and more choice)
I soldered the bolt into the pipe and it holds well. This is what happened
I attached an optical level to a tripod and extended it to its maximum, resulting in an impressive height. The closet in the background won't let you lie.
I tried it with the level on, it is self-leveling, it calibrated to the horizon without problems, as evidenced by the green color of the power button.
Field tests already at construction site
Based on actual use, I can say the following:
It is better to take stronger pipes, these are quite flimsy, and the level may wobble if pulled out higher, which is why it may not be calibrated at all.
There is no need to install pipe holders at the ends of the legs; due to the fact that the pipes are curved relative to the tees, they stand normally.
The cost was about 200 rubles.
For those who don't have a laser level but want one
I bought my level at Leroy Merlin, it’s not expensive, it cost 2500, it’s a very useful thing, I don’t regret the purchase. For those who do not have such stores in the city, and the greed of sellers is off the charts, you can order from China, I will leave here a link to the search page on Ali, specifically Laser levels, read the reviews before buying. Inexpensive levels are household ones, they are not visible in daylight, you can only work indoors even during the day, their range is several meters. In general, see for yourself.
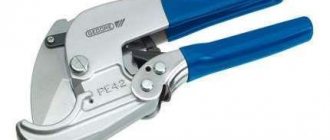
And I almost forgot, these scissors are used for cutting polypropylene and metal-plastic.
I bought it in Leroy Merlin, for 400 rubles, for those who don’t have the opportunity, you can buy it on Ali, I made a selection of inexpensive ones, link to Ali.
That's all I have, thanks for your attention. Ask questions, I will answer as soon as possible.
Device setup
To set up a homemade laser level, you can use different methods, but one of the simplest is to use a mirror. The diagram below shows how this technique is used.
After the initial installation of the device, the laser is turned on and at the point where it falls on the wall (any other suitable plane), a small mirror is attached using a piece of plasticine. Using a level, achieve a strictly vertical (perpendicular to the planned position of the beam) position of the mirror plane. After this, the laser is turned on again. If the incident (emanating from the device) and reflected beam coincide, the adjustment is considered to be of high quality. If a match does not occur, change the position of the laser emitter until the desired result is achieved.
To set up a laser device that has a line rather than a point as a target designator, a target-rail is used (it is convenient to use a metal profile for drywall). In the place where the light line is reflected on the vertical surface, press the target (rail) and use a level to check its horizontalness (or verticality, depending on the position of the laser).
There is a quicker way to check if the settings are correct. The diagram shows how, using a bubble level and a stretched cord, the horizontality of the lines connecting the laser emitter and the screws on the wall at the point of impact of the beam is checked.
What can tripods and rods be made from?
There are several options for making the tool: from a telescopic, polypropylene, aluminum tube, or from a metal profile.
Available materials are used as a basis; some parts (for example, the head) can be purchased separately. In any case, making the design yourself will be cheaper than buying it in a store.
What tools and materials will be needed
To manufacture the device you will need the following tools and materials:
- pipe with the following parameters: cross-sectional diameter 27 mm, wall thickness 1 mm;
- handle for telescopic roller;
- glue “Moment” (you can also use a glue gun);
- part of the rug;
- Screwdriver Set;
- self-tapping screws;
- stationery knife;
- head from an inexpensive tripod;
- metal corner 40*100 mm;
- plastic clips for Ø 25 and 20 mm – 2 pieces each;
- drill;
- sealant gun (can be old);
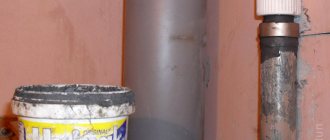
- coupling (needed for support from below);
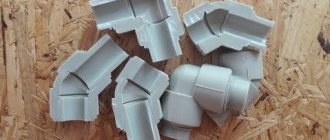
- polypropylene tee (32 mm);
- screw 4-6 mm, wing;
- plastic screws (5/8 thread).