Tiled flooring for the kitchen and bathroom is practical and durable, but is it possible to lay tiles on existing wooden floors without resorting to large-scale construction work? The answer will be yes. In this article we will study in detail all the nuances of the “cooperation” of such different materials.
Lay tiles on a wooden floor
Disadvantages of finishing wood with ceramics
Ceramic products adhere well only to a solid, durable and immovable base. Violation of any of these requirements leads to their peeling, cracking, chipping and mowing of tile joints. Tiles cannot be laid on a wooden floor for another reason: these materials have completely different characteristics - hygroscopicity, coefficient of thermal expansion, vapor permeability. Therefore, combining them without damaging one of the materials is quite difficult.
Let us list the problems that arise with such floor finishing.
- The structure of a wooden floor with joists cannot boast of absolute immobility - the boards “play” under load, and the tiles rigidly glued to it begin to break.
- All wooden floor elements, including joists, are deformed and change their cross-sectional size under the influence of variable humidity, and such movements also negatively affect the integrity of the tile covering.
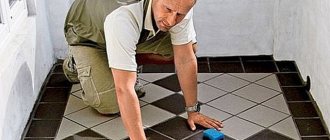
Mechanical damage to tiles is a common problem when laying them on a wooden floor Source carehomesuk.net
- The tree must “breathe,” but under an impenetrable ceramic shell it is deprived of this opportunity, and the base can quickly rot.
- The service life of wood and tiles is different; if the base begins to deteriorate, the coating will also be damaged, which will have to be removed to repair the main floor.
Therefore, before laying tiles on a wooden floor in a wooden house, you need to try to eliminate all possible problems, carefully strengthen and level the base, and protect it from destruction.
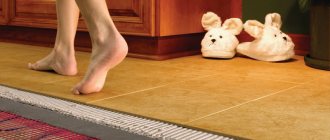
In addition, these materials have different heat capacities. Warm wood is pleasant to the touch, it is comfortable to walk on it with bare feet, which cannot be said about tiles or porcelain stoneware. You can make it warm by installing a heating system under the ceramic coating, but it will create additional problems associated with temperature changes that greatly affect the stability of the wood.
Heated floor system under tiles Source bitrix24.ua
Based on the above, the question of whether it is possible to lay tiles on a wooden floor cannot be answered unambiguously. If this is necessary, then it is possible, but first you will have to prepare the foundation very well, having first inspected its condition.
The essence of the problem
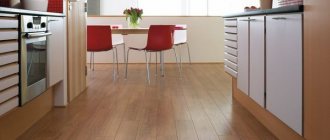
Everyone knows about the necessity and practicality of a tiled floor in the kitchen, and therefore there is no need to convince anyone of this. If the subfloor in the kitchen is a concrete screed, then there are no particular difficulties in making such a covering. But what about those whose kitchen floors are made of wood and have lasted for many years? It should be noted that this task is completely solvable on our own.
What is the problem? Wood is a material that changes its size quite easily: it swells, compacts, that is, it is capable of expanding and contracting under the influence of moisture, temperature, and mechanical loads. Wood can rot, crack, etc. At its core, a wooden floor and a tile covering are poorly compatible structures. Ceramics require a rigid, durable base. Any vibrations, deformations and vibrations of the base lead to peeling of the tiles and disruption of the integrity of the coating. And wooden flooring is characterized by its tendency to deformation and oscillatory displacements.
Thus, to ensure a reliable tile covering on a wooden base, it is necessary to solve the following problems:
- increase the durability of wood;
- strengthen the wooden base;
- eliminate oscillatory movements;
- ensure surface evenness.
All this requires a particularly careful approach to the preparation of the wooden floor and special events. In principle, a reliable base for tiles can be provided in 3 ways:
- dry screed, i.e. the use of sheet materials;
- wet screed by pouring concrete;
- express method using moisture-resistant drywall.
Strengthening the load-bearing structure of the floor
The first thing to do is to completely open the floors, exposing the joists and floor beams. You can exclude this stage only if the house is new and you know for sure that the wooden “skeleton” of the floor is laid correctly - with all elements treated with an antiseptic, a damper gap is installed between the joists and the wall, and frequent steps are taken between adjacent joists.
If the house is more than 2-3 years old or you are not sure that the technological requirements were observed when installing the floor, it will be possible to lay tiles on a wooden floor only after it has been inspected and the structure has been strengthened.
Rotten beams may be found under the floor that will not withstand the weight of the ceramic coating Source imhonn.ru
Having opened the subfloor, the following activities are carried out:
- dismantle old rotted or cracked logs, laying new ones in their place;
- between the ends of the logs and the wall a compensation gap of about 10 mm is left;
- at a step of more than half a meter, intermediate logs are laid, which is necessary to increase the load-bearing capacity of the supporting structure and prevent sagging of the boards between the beams;
- align the upper edges of the lags in one plane, cutting off the protrusions and installing linings;
Leveling using a building level Source oteplicah.ru
See also: Catalog of companies that specialize in finishing materials and related work
- treat the frame on all sides with antiseptic impregnations in 2-3 layers, drying each one.
When deciding whether it is possible to lay tiles on a wooden floor from dismantled boards, they are inspected for rot and damage and discarded. Instead, lumber of the same thickness is prepared.
Advice! All wooden elements of the base must be dry. If the humidity is more than 18-20%, they will begin to deform when dried.
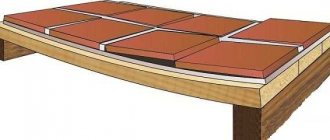
Before attaching the boardwalk, you can fill or lay insulation in the space between the joists that is not afraid of moisture - expanded clay, expanded polystyrene, polyurethane foam. To ventilate the boards, leave at least 1.5-2 cm of air space between the insulation and the flooring.
When laying antiseptic-treated boards on the joists, they also leave gaps:
- between the ends and the wall – 10 mm;
- between boards - 3-4 mm.
This is necessary so that when the wood expands, tension does not arise at the joints.
The decking is fastened with galvanized screws or nails, 2 pieces at each intersection with the joists.
If the floor is supposed to be leveled with a planer or sanded, the fastener heads are recessed into the wood Source chudopol.ru
Preparation of tools and materials
To ensure ease of work you will need:
- tools for inspecting and repairing a wooden floor - an awl or a thick needle for assessing the density of wood, chisels and knives for filling cracks and removing shallow spots of mold and rot, a plane for trimming, a hacksaw (grinder, jigsaw), a grinder or sandpaper on a block for cleaning surface layer, hammer, nails or self-tapping screws (screws);
- compositions for wood processing - antiseptic, waterproofing, antipyrine;
- mixture or sheet materials for screeding, wet or dry. When using sheets, fasteners are also required;
- primer according to the type of base;
- adhesive composition for installation, taking into account the substrate material (concrete or slabs), suitable spatulas with a smooth and/or serrated edge;
- tiles with a suitable design purchased in advance, taking into account a 10% reserve in area;
- composition for grouting joints.
Video description
How to dry level a wooden floor under porcelain tiles, see the video:
If the base is not stable enough, it is better to lay the dry screed in two layers with the joints offset. It is advisable to calculate so that the joints fall on supporting elements - joists or floor beams. For free expansion, small gaps 2-3 mm thick are left between the sheets, which are filled with elastic sealant after installation.
After cleaning from construction debris and wet cleaning, the finished screed is primed and dried. Ceramic tiles on a wooden floor are glued with polyurethane glue, which does not crack due to movement of the base.
In damp rooms, the wooden base needs additional protection from getting wet, so after priming it is covered with waterproofing in several layers, extending onto the walls. The seams between the sheets and the joints with the walls are additionally taped with reinforcing tape.
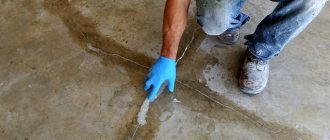
Preparing the base
Laying tiles should begin with preparatory work. Wood requires additional processing so that the tiles do not crack or deteriorate during installation. Not only the quality of the floor, but also its aesthetic appearance will depend on the quality of preparation of the base.
When processing wood, you should strictly follow all instructions in order to save yourself from the need for repeated repairs. After installing the wood, at least two years must pass (the shrinkage period lasts approximately this long) before you can begin laying ceramic tiles.
Checking the condition of the coating
The first thing you should take care of is checking the condition of the coating. If the installation of wood was completed a long time ago, after some time the material could begin to rot or dry out. It will be impossible to lay tiles on surfaces covered with a layer of fungi, mold and other bacteria.
Video description
How to properly waterproof wooden floors in bathrooms and other wet rooms is described in this video:
Wet screed
A wet screed is used when it is necessary to lay a heated floor carpet under the tiles, as well as to increase the service life of the finishing coating and waterproofing of the floor in wet rooms. Cement-sand screed creates a monolithic foundation without joints with high load-bearing capacity.
But it itself creates a large load on the wooden base, so the concrete layer should not exceed 3-3.5 cm. A smaller thickness is also undesirable, since a thin screed is fragile and can crack.
Scheme for laying tiles on a wooden floor using a wet screed Source derevostroika.ru
Choosing tiles
The floor should be tiled with anti-slip tiles. Matte textured varieties of floor tiles with a corrugated or rough surface are perfect.
You will have to discard thick tiles - a wooden floor is not resistant to high loads. The same applies to large-area ceramic elements - their installation will require more glue or mortar, which means the facing layer will be more massive.
It is better to opt for thick but light floor tiles, which will match the color and design of the main style of the room.
It should be taken into account that large tiles in small bathrooms will visually reduce and conceal the space.
Video description
An example of installing a wet screed on a wooden floor in a private house is shown in the video:
The main disadvantage of this method of preparing the base is that the screed must be completely dry and gain strength before laying the tiles. This process lasts at least three weeks, and with high air humidity and temperatures below +10-15 degrees it can last even longer.
Tiles can be laid on a cement screed using regular tile adhesive, but it is better to use polyurethane adhesive. After the glue has dried, the seams are filled with epoxy grout.
Selection of adhesive composition
For work on wooden bases, only special types of adhesives are suitable, which contain components with high elasticity. They must withstand the linear expansion of the boards, preventing the tiles from moving from the base and cracking.
These parameters correspond to the products of the following brands:
- Unis – super elastic adhesive and super polymer;
- Knauf Flex;
- Ceresit CM17, etc.
If a concrete screed was made on top of the floorboards, it is permissible to use a classic mortar based on sand and cement.
Among the non-standard methods offered by folk craftsmen, we can mention liquid nails and liquid glass (silicate glue)
In some cases, homemade mixtures of nitrocellulose varnish with polystyrene foam dissolved in gasoline or acetone are becoming popular.
Read more about tile adhesive for the bathroom in the article - How to choose adhesive for tiles in the bathroom Important! When using homemade glue, there is no guarantee that the cladding will last long and be strong.
Briefly about the main thing
Ceramics are quite difficult to “make friends” with wood, especially when it comes to covering a floor that experiences constant vibration loads. Wood expands and contracts under the influence of varying temperatures and humidity, while ceramics have little or no effect. Therefore, before laying tiles in a wooden house, the floors should be strengthened, leveled, protected from moisture and ensure their stability. This is done using a dry or wet screed, onto which the finishing coating is subsequently mounted.
Ratings 0
Layout options for floor tiles in bathrooms
The classic rule for ceramic flooring is to lay it out from the middle of the room towards the walls. This allows you to finish each row against the wall with a large piece of tile, more than half its width/length.
The bathroom and toilet are initially the smallest rooms in a cottage or apartment. At least 2/3 of the floor area is occupied by a toilet, shower stall and/or bathtub, washing machine and floor cabinets, washbasin pedestals and laundry baskets.
Therefore, special layout schemes are used here:
- on the floor, not the middle between the walls is marked, but between the free wall and the plumbing or household appliance that is permanently standing on the tile;
- Under the bathtub, washing machine and toilet, the cladding is started randomly.
An example of a tile layout in a bathroom.
Defects in the geometry of rooms, including bathrooms, are masked by diagonal layout schemes. For example, if the walls are not parallel, it will not be noticeable.
Thus, there are several technologies and construction materials that make it possible to tile a wooden floor and ensure a long service life of the coating. All of them are available for independent implementation in a country house or city apartment.
Advice! If you need bathroom renovation specialists, there is a very convenient service for selecting specialists from PROFI.RU. Just fill out the order details, the experts will respond and you can choose who to collaborate with. Each specialist in the system has a rating, reviews and examples of work, which will help with the choice. Looks like a mini tender. Placing an application is FREE and does not oblige you to anything. Works in almost all cities of Russia.
If you are a master, follow this link, register in the system and be able to accept orders.
Arrangement of a waterproofing layer
You can install waterproofing immediately after using latex impregnation, without waiting for it to harden. The waterproofing layer has important functional significance, so you should not neglect the basic nuances and principles of its arrangement.
We recommend watching - How to waterproof a bathroom under tiles?
Damping layer
Any rolled materials can be used as a waterproofing layer:
- parchment;
- glassine;
- bitumen paper;
- paraffin paper;
- thick polyethylene.
The materials are laid overlapping and secured with tape. For better protection, it is necessary that the layer extends at least 10 cm onto the walls.
To prevent deformation and moisture penetration, a layer of damper tape is used. It withstands temperature changes typical for a bathroom, prevents heat loss and reduces noise.
But the shock-absorbing properties of the damper tape are of particular value - it compensates for possible movements of the floorboards and fixes the coating.
Important! To maximize the compensation effect, the tape is laid on the subfloor with the elastic surface and the hard surface facing the ceramic tile side.
Laying porcelain tiles
Porcelain tiles are laid in two ways: with or without seams. Seamless technology is used when it is necessary to obtain a smoother surface. For end-to-end installation, it is recommended to use larger tiles, which reduce the number of seams on the surface.
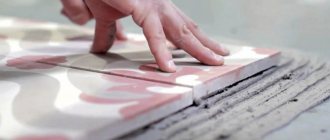
Step-by-step tile laying:
- Determining the center of the floor from which to begin laying the tiles. A regular cord is used for this. This tactic helps keep the center intact. Small fragments that need to be cut to size are placed along the edges.
- Using a spatula, glue no more than 5 mm thick is applied to the base under each individual tile and spread with a comb spatula, the tooth height of which must match the thickness of the porcelain stoneware being laid.
- The tiles must be laid on the adhesive no later than 15 minutes after its application, during which time it sets.
- The next tile is placed on the edge close to the previous one, after which it is lowered onto the previously applied glue, moving it slightly from the starting point, while pressing it down, and then tapping it with a rubber hammer.
- The equal width of the seams is ensured by crosses, which are inserted between the plates and are not removed until the adhesive mixture has completely dried.
- The levelness of the masonry is controlled by the water level. Measurements are taken after each tile is laid.
- When taking breaks between laying, the factor of subsidence of previously laid tiles should be taken into account. It is impossible to focus on it during subsequent laying, otherwise differences will form after the surface dries and shrinks.
- For grouting, tile adhesive or a mixture is used to fill the joints. Grouting is performed 2-3 days after installation. The choice of grout depends on the desire to give the coating neutrality or emphasize the pattern. In the first case, you should choose a grout that matches the tile, in the second, a contrasting shade.