If you get an electric shock from the stove whenever you touch it, this definitely indicates a breakdown. It shouldn't be this way. Many users notice a weak discharge, but continue to use the tile, but even this minor problem can damage the entire device or cause a fire.
Is your stove electrocuting? You need urgent electric stove repair. Our technicians will fix any breakdown of household appliances at the client’s home. We work in all districts of St. Petersburg every day, seven days a week. You can order a specialist visit by calling +7 (812) 324-97-77 at any time from 7:00 to 23:00 or using the feedback form on the website. If you submit an application before 12:00, the specialist will arrive on the day of your application.
Causes of malfunction
- No grounding. According to technical requirements, the electric stove must be connected to a grounded outlet; it must have 3 wires: zero, phase and ground. The latter is needed just to protect you from electric shock. Modern houses usually have a ground electrode. But in Soviet-built buildings, the sockets are two-phase; there is no grounding factor.
- Insulation wear. The entire electrical network inside the device is built on wires and contacts. The most important thing here is that each element is isolated. To do this, all wires are covered with a layer of PVC. This is a fragile layer of plastic that can be damaged during transportation. And over time, the insulation itself may collapse. If a live wire comes into contact with metal parts of the system, voltage will be transferred to the housing. When touched with wet hands, you will feel a small shock.
- The heating element is broken. The heating elements are located in all heating parts: in the burners and oven (there are from 1 to 4 heaters). Any tubular electric heater consists of a conductive thread and an insulator around it, which transfers heat, but not current. If the insulating material is damaged, the electric stove will generate current and become hot even when it is turned off.
- Water got in. If the stove is located next to the sink or the soup often boils out of the pan, liquid can get inside the system and close the circuit on the metal body of the device. The good news is that the fluid can be removed and the system sealed. There are no serious holes inside the wiring. But if, after water gets in, when you turn on the burner, the plugs come out, you need to call a technician and check the entire structure.
- Electrical network defects. If you have dismissed all the previous reasons, but it is still easy to get a blow from the stove body, perhaps the fact is that the phase and neutral wires were mixed up when connecting. You won't be able to fix this on your own.
Phase imbalance
Also, this problem, one way or another, may be associated with phase imbalance. Phase imbalance is an uneven distribution of loads between three phases, as a result of which the so-called “equalizing current” appears at zero.
If the electrical wiring is old, then the difference between the potentials at the zero terminal can reach 30 Volts or more, which is quite enough to cause an unpleasant electric shock.
Share article on social networks
Electric shock when touching the sink
Often, a breakdown of an electric stove can be indicated by an electric discharge from a metal sink nearby. Of course, the sink itself cannot give an electric shock, because there is no electricity in it. But if the wiring in the room is not grounded or the stove is broken, the sink will also become a source of danger. To avoid this, usually the sink and bathtub are grounded to the plumbing pipes using a metal rod. You can entrust this work to a plumber and electrician. But this does not eliminate the need to repair the electric stove.
The air in the house is not humid enough
If you wipe off dust from electrical appliances, but they still give an electric shock, the problem may be that the air in the apartment is too dry. Moisture in the air acts as a natural conductor and grounds the charge, and if there is not enough moisture, static electricity easily forms on the surface of objects in the house and dust accumulates. The most susceptible to this are devices with moving parts that constantly rub against each other, and devices that either heat up or cool down. The risk of static electricity buildup is greater in winter when the air generally becomes drier.
What to do? Carry out wet cleaning more often, wipe furniture and appliance housings with a damp cloth or antistatic wipes. To prevent static electricity from having a chance, the overall humidity level in the house should be between 50-60%. It can be controlled using a special ionizer-humidifier. The most effective are ultrasonic. They work on an area of up to 20 m², have an antibacterial tank coating for safe water spraying and have multiple humidity levels that can be switched. A more budget option is ceramic. They are small, do not connect to the network, but are attached to the radiator of the battery and, thanks to its heat, evaporate the water poured into the tank. Ultrasonic ones can be found in the electrical goods and ventilation systems department, and ceramic ones in the water supply and heating department.
Sent 14 August 2013 - 17:14
same problem =((they did the wiring... the technician bites =((( what should I do? HZ.. there is a 3-wire wire everywhere, the sockets are all connected to ground
What to do on your own
If you cannot touch the device without feeling a tingling sensation, you should not try to fix it yourself without special tools and knowledge. But there are several mandatory things that you not only can, but should do:
- Turn off the electricity. This is an ironclad rule: if you feel a blow from the device, turn off the power supply through the shield. And then figure out what happened.
- Check whether water has spilled on the device. Inspect the equipment, check the outlet. There should be no water anywhere. Wipe all parts with a paper towel and dry all parts with a hairdryer if necessary.
- Remove the plug from the socket. This should be done when the entire apartment is de-energized. Otherwise, you can get a serious discharge. When the power to the stove is turned off, you can return electricity to the house.
- Call a specialist. Even if you have an A in physics, you should not repair an electrical appliance without qualifications. At best, this will void your warranty; at worst, it will lead to irreparable damage to your equipment and even a fire. You should call the master from LenByt.
2. Static electricity builds up
Static electricity won't cause you much harm, but it can damage your electrical appliance. It is especially dangerous for computers. In addition, getting burned every time you touch a laptop or toaster is unpleasant.
Voltage can build up on the electronics housing for three reasons. First, the device is made of plastic. Then static electricity arises due to the friction of the parts inside it and remains on the body. The second is that dust accumulates on the body, which conducts electricity well. It is especially often found on case parts and monitors of desktop computers. This happens due to the fact that dust particles enter the power supply and receive a charge there, and then they are blown onto the case by the cooling system. Third, there is no grounding in the outlet to which you connect the device, and there is nowhere for excess voltage to go.
What to do? Wipe electrical appliances with antistatic wipes and purchase an antistatic mat or cover for them. Make sure that there is no dust on the electronics housing. And, of course, check the grounding in the outlet. If you did not install it yourself and are not sure that it has grounding contacts, it is better to replace it with another one. Consult with a consultant in the electrical goods department, and he will help you choose not only a socket, but also a plug, extension cord and a splitter for grounded wires.
For safe operation of electrical appliances, you can install a voltage stabilizer. It regulates the supply of electricity to avoid power surges even with increased energy consumption. In case of overheating of devices, it can start the fan, and in an emergency, turn off the power.
#3 Guest_AmaDamA_*
Sent 14 August 2013 - 16:29
A year before the repair, the equipment did not receive an electric shock, although there was no grounding either. And why then doesn’t all equipment “pinch”? Are there any grounding options that have already been repaired?
What will a repairman do?
The specialist will first carry out diagnostics using a megohmmeter and other professional tools. It is important not only to find a current leak, but also to check all parts for serviceability. Further:
- He will determine the cause of the breakdown and write it down on the receipt. This is an official document and conclusion.
- Check the outlet for grounding. Often there is a yellow-green wire in the outlet (the universal color for marking “ground”), but you need to check if it is working.
- Grounds the device. Important: the slab is grounded only if the house already has a grounding element. If the device is located in a building where there is no grounding structure, it is better to contact an electrician for help.
- Restores circuit insulation, cleans contacts from dust and grease deposits. Food particles often get on the contacts and wires of an electric stove, forming a coating that perfectly conducts electricity. To avoid problems, you need to clean these elements regularly.
- Replaces a broken part: heating element, capacitor, wires, etc. Our company uses only original spare parts from the brands Gefest, Electrolux, Gorenje, Kaiser, Indesit, Zanussi, Hansa and others.
- Will provide a guarantee on all work and components.
You can call an engineer by phone or online. We are ready to help every day from 7:00 to 23:00.
If grounding is not provided?
For a multi-storey building (residential, non-residential), developers usually create a single grounding loop.
Residents of houses in which grounding is not provided should approach solving problems in the same way. When all electrical appliances in the house are grounded, the optimal level of fire safety will be achieved.
And the creation of a single outline in a multi-story building will facilitate its official design. This is an important point, because grounding can be operated legally only after permission has been given.
To do this you need to perform a series of actions:
- Creating a project.
- Coordination of the project with Rostechnadzor and the company that supplies electricity.
- Creating a ground loop.
- Checking the functionality of the structure, which must be carried out by representatives of energy supervision authorities.
If the house is large and the total power consumption of electricity exceeds 100 kW, then when changing the design you will have to obtain an admission certificate. This document is unlimited and allows you to operate household electrical equipment.
Individual grounding for an apartment
Now let’s figure out what to do if the gas stove suddenly starts giving an electric shock, and the owners of other rooms in the house do not want to take care of safety. In this case, you can get out of the situation yourself. Why do you need to create individual grounding?
The protective ground loop must be located in the ground. Since only soil makes it possible to instantly distribute any amount of electricity
But it should be remembered that “partisan” actions cannot be taken. That is, a metal bucket buried under the window is not the right solution. Since this will violate the provisions of a number of documents: Chapter 1.7 of the PUE, which takes into account the requirements for grounding conductors, and, possibly, the terms of the agreement between the management company and the electricity supplier. Therefore, the procedure for creating grounding should begin with coordination.
If there are no obstacles from other interested parties, then a project should be created and approved by Rostechnadzor. And then you can start working.
Which, as in the case of a general circuit for the entire building, should end with the invitation of specialists from energy supervision authorities to carry out an inspection.
The design shown in the photo allows you to distribute any amount of electricity in the ground, and safely. When manufacturing it, it should be taken into account that the width of the electrodes should not be less than 40 mm, and the thickness should not be less than 4 mm
What the protective circuit should be like is stated in the PUE. Chapter 1.7 of which indicates that it is made from a number of required elements:
- A single-core PE conductor used to drain electricity when it leaks. It is a copper or aluminum wire.
- Grounding bus . Such a device is usually placed on each floor of the building. The protective circuits of individual apartments and other premises are connected to the main bus.
- Electrodes and plates (made of metal conductive corners, pins) in the amount of 3 pieces. The pins are connected to each other by plates at an equal distance from each other. Then they are driven into the ground near the building.
All conductive parts of the structure must be insulated. This is done to prevent electric shock from direct or indirect contact.
If you live in a private house and not in an apartment, we recommend that you read the instructions for arranging a grounding loop in the house.
Wires used to create protection against electrical leakage must have:
- cross-sectional area is the same as that of a phase wire with a cross-section of up to 16 mm²;
- cross-sectional area is not less than 16 mm², if the same figure for the phase wire is within 16-35 mm²;
- cross-sectional area is not less than half that of the phase wire.
That is, if voltage is supplied to a gas stove that generates current through a wire with a cross-section of 4 mm², then this indicates that grounding should be made from a 4 mm² wire.
How to replace the protective circuit?
A way out for residents of a house without grounding can be to connect a gas stove that is experiencing electric current to an RCD or automatic circuit breaker.
The photo shows a residual current device (abbreviated as RCD) and a difavtomat, which can provide decent protection against leakage currents if the specification does not provide for a ground loop
These devices are also protective devices that can protect the user from electric shock during a leak and maintain the functionality of the gas stove, like any other equipment.
But the peculiarity of the RCD is that it de-energizes an apartment or other room only when the leakage is dangerous. That is, this device will save life, health and maintain the functionality of all electrical appliances, but it will not allow you to avoid “pinching”.
We recommend that you familiarize yourself with the connection diagrams of the RCD and differential circuit breaker, and the procedure for performing the work.
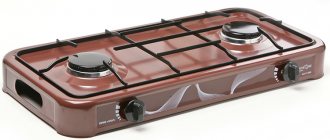
Why does a gas stove burner burn poorly?
Interruptions in the operation of the burner are the most common problem when using a gas stove. Signs of its occurrence are a change in the shade of the fire that comes out of the burner, as well as a sharp increase or decrease in its value. The situation when the flame breaks off or some strange sounds appear is also not considered normal. Let us remind you that gas stoves are famous for their noiselessness.
Typically, any malfunction of the device is a consequence of a number of things. The most common reasons are:
- violation of the internal structure of the unit;
- damage to the gas hose;
- lack of gas fuel;
- low gas pressure;
- Incorrect burner selection.
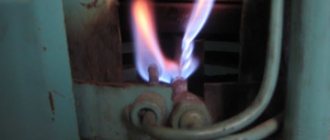
The burner does not burn well and makes sounds
The burner is an integral part of any gas stove, a key working element needed for cooking. Externally, it is the end of a gas valve. The burner is involved in mixing and preparing the air-gas mixture required for normal functioning. It takes on maximum thermal loads. Over time, due to thermal effects, the components of this assembly are deformed, their fit to each other becomes loose. All these changes are reflected in the combustion mode - it is disrupted because air entering through the organized cracks interferes with the process. The flame goes out. The operation of the burner begins to be accompanied by the production of soot, and the color of the emerging flame becomes red. Another consequence is that the device generates inappropriate noise.
It should also be remembered that over time there is a gradual narrowing of the holes (nozzles). The reason is that with prolonged use, carbon deposits form (it is formed by food residues, household detergents, and fatty particles). A dirty burner can simply be washed thoroughly. If it is deformed, the solution should be an urgent replacement.
Features of gasification of residential buildings
With the help of gas, you can successfully organize heating, hot water heating, and cooking in your home.
Gas equipment is reliable and diverse, and the cost of blue fuel is usually lower than using electricity, solid or liquid fuel for the same purposes.
In addition, gas lines rarely fail, but power outages are a common occurrence. The reserves of firewood, coal, diesel fuel and other similar energy carriers have to be constantly replenished.
The main problem with natural gas is its danger to human health and its ability to explode. Even a small leak can lead to poisoning or an explosion.
That is why the requirements for the installation of gas communications are very high; you should not even think about doing all the work yourself.
To properly introduce gas into a private home, use a special unit called a reducer to reduce gas pressure
To begin with, experts do not recommend saving on materials or system elements. Laying pipes of questionable quality and unprofessional installation are unacceptable.
Gas pipes almost always need to be laid open (except for underground sections of the pipeline). They cannot be hidden under any decorative elements to improve the interior.
It is not recommended to insert a gas pipe into the house through the thickness of the foundation; for these purposes, make a hole in the outer wall and insert a sleeve into it for protection
It is recommended to avoid installing detachable connections whenever possible. All places where pipes are connected must be located in such a way that the contact point can be inspected at any time and repaired if necessary.
Gas pipes must not be laid inside walls or deep into the foundation. This rule also applies to other elements, such as platbands, door frames, window frames, partitions, etc.
In some cases, it is permissible to lay a gas pipe in a wall niche, but this point must be clearly reflected and justified in the project. Special requirements are also imposed on the slope of the pipes.
Horizontal deviation of the line position is allowed by only 3 mm towards gas appliances.
Vertically, no deviations are allowed, but the riser may have a slight slope: no more than 2 mm per meter. It should not pass through living areas, toilets or bathrooms.
The gas riser should be located on the staircase; it is often routed through the kitchen.
You will also have to pay close attention to the installation of shut-off valves. Thus, the position of the central axis of the plug should be strictly parallel to the wall along which the pipe runs.
When choosing the position of the tap, you should make sure that the position of the shut-off device is not blocked by the wall. The gas pipe should be located at a distance of 100 mm from the ceiling and from the walls.
Gas pipes are fixed along the wall not closely, but at a short distance, so that communications remain accessible for preventive inspection and repair
The gap between the wall and the pipe can vary from the radius of the pipe to a maximum value of 100 mm. This clearance is necessary so that the structure can be easily examined.
A distance of 2.2 m should be maintained from the floor. Gas pipes are placed on special strong supports; sagging of the structure is unacceptable.
Therefore, you need to make sure that there are no gaps between the bracket and the pipe. All these important points are taken into account in the project, which must first be drawn up by specialist engineers.
Gas pipes should be laid no less than 30 cm from the electrical panel, and no less than 25 cm from open wiring. You should step back at least five centimeters from the hidden cable.
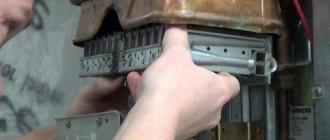
How to check the functionality of the lighter?
In order not to wastefully dismantle a potentially serviceable component, it is advisable to first check for a short circuit (short circuit).
This is easy to do with the help of a measuring device - a tester that supports the ability to measure resistance in the mOhm range.
Procedure for testing a lighter button for a short circuit using a classic electrical measuring instrument. Testing should be performed with the resistance measurement option in the “mOhm” range
On almost all models of gas stoves, ignition controls are connected by conductors through connectors. Therefore, each control element can be easily disconnected from the circuit for testing. After removing the plugs with conductors from the connectors, connect the tester probes to the released contacts of the button and monitor the readings on the scale.
If a short circuit has formed inside the button housing through the oxide junction, resistance measurements in the “mOhm” range will show some value in any case. When the device readings are equal to the absolute reference point (maximum resistance “mOhm”), there is no short circuit defect.
We also have other articles on our website about stove breakdowns and problems with burners:
Do-it-yourself gas stove repair: common malfunctions and ways to eliminate them Why is the gas burner noisy: analysis of the reasons + valuable recommendations for solving the problem Gas burner does not burn well: popular malfunctions and recommendations for eliminating them
There is no or poor contact on the grounding, grounding in the shield
Often, even in newly built houses with 3-wire cable lines, a situation occurs when there is a small voltage within a few tens of volts on the grounding conductor, and accordingly on everything to which it is connected.
It seems that the wiring in the apartment is new, and everything is assembled in junction boxes according to the diagrams with respect to “polarity,” but electric shock occurs everywhere you don’t touch.
The explanation may be very simple. In the apartment panel, all grounding wires are collected in a heap and connected to one common bus.
But it is just neither grounded nor zeroed! The electricians simply forgot to do this. This is where all the problems come from.
Or there is a break somewhere in the main ground wire from the circuit to your panel. Check the voltage in the panel between the ground bus and the phase. It should be stable around 220V. If the voltage “floats” in absolutely arbitrary parameters, then there is clearly a break somewhere.
Shielding
Shielding is the process of superimposing two electromagnetic fields on top of each other. As a result, a potential difference arises between the sources, causing, as a consequence, current breakdowns on the body of the electric stove.
This happens if the equipment is installed on a warm floor with an electric heating system.
To determine the presence of shielding, you need to ring the circuits of the heated floor, household appliances, identify the place where the shielding occurs, and then fix the problem.
How to fix it?
Most often, when gas ovens malfunction, owners are in no hurry to contact specialists, hoping to carry out repairs themselves. What kind of breakdowns can be repaired without danger with your own hands? This is discussed below in our article.
- Cleaning the regulator knob. Before starting repairs, turn off the gas supply. Troubleshooting begins with cleaning the taps. After removing carbon deposits, dirt and grease from them, clean the spring. Wipe the cork carefully so as not to damage it. Disturbing the surface will cause gas leakage. Use only a soft sponge. Next, the plug is treated with graphite lubricant without touching the holes. Remove greasy deposits from the stem with a knife. Afterwards, the handle is assembled in the reverse order of disassembly.
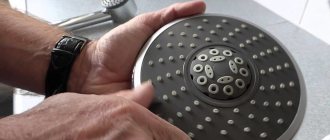
- How to fix oven doors. Over time, the oven door becomes loose, causing it to not fit tightly or not to close. To fix the problem, unscrew the mounting screws connecting to the stove. Having loosened them well, move the door in different directions until you find a position in which it is firmly seated on the hinges. To control, place a sheet of paper between the seal and the edge of the oven. If it does not clamp well, do the procedure again. After installation on the hinges, the bolts are tightened into place.
If it is noticed that the loss of heat is associated with damage to the seal located around the perimeter of the door, replacing it will not be difficult.
- Remove the old seal. In some oven models it may be attached with screws; to get to them, pull off the protruding edge of the rubber, in others it is glued.
- Wash the channel and door with liquid detergent. Clean off any old caulk or adhesive residue. Degrease.
- Install a new seal by starting from the top, then down and to the sides. Complete the process by bringing the edges together at the bottom center. If the elastic needs to be glued, choose a food-grade adhesive that is heat-resistant up to 300º.
Among other failure options.
Checking and cleaning the thermocouple. The oven burns as long as you hold the handle - then you need to check the thermocouple mount. In the lowest position it should touch the tongue. If the placement is incorrect, most models allow you to adjust with screws. It is possible that the thermocouple contacts are dirty and this is preventing the flame from being maintained. Try cleaning the part with sandpaper.
Replacing the heating coil. If the oven does not heat up due to the failure of the heating coil, you can replace it yourself. This plate part is sold in the electronics department. To replace, you need to remove the back surface of the case, release the spiral from its fastenings, and unfasten the porcelain beads. Then place the new spiral in its original place and secure it. Assemble the oven.
You can smell gas. If the stove is not working and you smell gas, it means there is a gap somewhere in the pipeline and there is a leak. Shut off the fuel supply and call emergency gas service. Further work may only be carried out by qualified specialists. To locate the leak, disassemble the device and apply soap suds to all gas pipe connections outside and inside the oven. Bubbles will appear where the fuel escapes. Check all regulators, knobs and taps. Remove the side panel of the slab and prevent leakage in the internal structure.
When does a person feel a charge?
In addition to synthetic materials, they are well electrified:
- amber products;
- fur items;
- human hair;
- ebonite and other types of plastic;
- paper.
In most cases, we are most likely to get electrocuted during the winter. This is no magic. It’s just that with the onset of the cold season, we increasingly wear woolen items, and there may be several of them. Another reason why we get electrocuted more often in winter is dry air. In winter it is much drier than in summer.