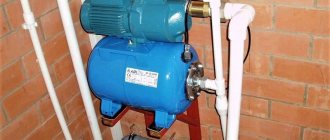
The main working element of an autonomous water supply system is the pumping station.
This term refers to a set of components that maintain constant pressure in the pipeline.
Their large number causes a variety of causes of technical malfunctions.
For example, many users are concerned about the question: why does the pumping station often turn on? What to do? There is no definite answer to this - several factors influence the rhythm of operation of pumping equipment.
Incorrect operation of the pressure regulator
One of the reasons leading to the constant switching on of the pressure pump is incorrect operation of the pressure regulator. To make sure that it is working properly, you need to do a number of certain actions.
The first step is to check the correctness of the readings of the built-in pressure gauge, if one is included with the pumping station. This can be done using a car pump with a built-in pressure gauge.
After making sure that the pressure gauge is “honest,” begin checking the adjustment unit:
- Remove the protective cover from it.
- Pump air into the battery cylinder through the safety valve, thus creating operating pressure in the system at the minimum acceptable level.
- By turning the screw on the large spring counterclockwise, lower the pressure threshold at which the pump automatically turns on.
- Bleed the air and pump it back up, repeating the procedure several times.
The automatic relay must operate when the minimum pressure threshold specified by the manufacturer is reached in the accompanying documentation - instructions or operating instructions for the pumping station.
Failure of the equipment operating mode can also be influenced by an overestimated maximum threshold set on the relay. It should be set at 95% of the maximum permissible pressure in the autonomous water supply system.
Don’t be lazy to check the condition of the machine’s inlet. If it is clogged with dirt, the equipment will not work properly. To eliminate this reason, it is enough to clean with a stiff brush.
Ejector or gasket problems
External ejectors are equipped with pumping stations designed to supply water to a private building from wells up to 45 m deep. In such cases, to equip an individual source, 2 pumps are installed, increasing the overall efficiency of the system by 30-35%. Additional equipment is mounted inside the water pit.
Ejector problems.
To carry out repair work, the ejector is removed from the shaft. Parts that have become unusable are replaced, the device is cleaned of clogging with solid particles of sand and other mechanical impurities, and the nozzle is freed from accumulated dirt. The updated device is then immersed in the well. The complexity of the process is determined by the deep location of the equipment in the autonomous pit.
Checking the injection pump
The pumping station will often turn on even if the pump is not provided with sufficient power. The pump impeller will not be able to develop the required power. In this case, the pump will not be able to create maximum pressure in the pipeline; in order to fill the pipes with water, it will have to work almost without interruption.
A power deficiency may be the result of a malfunction of individual parts of the pump - electrical or mechanical. Malfunctions of the power supply also contribute to this problem.
The main reasons for the lack of power:
- Salinization of the pump inlet and outlet pipes: can be eliminated by mechanical cleaning or rinsing with cleaning solutions.
- Oxidation of the contact surfaces of the terminal box: they should be cleaned with fine sandpaper, having first disconnected the pump from the power source.
- Unstable voltage in the electrical network: its fluctuations are checked while the pumping station is running. This drawback can be eliminated by connecting a voltage stabilizer.
Over time, individual components of the mechanical part of the pump wear out, which leads to a decrease in the maximum possible pressure level in the system. You can check the pump's capabilities visually by disconnecting it from the outlet water supply.
A weak stream of water at the outlet of the pump indicates a high degree of wear of its parts. Most of them cannot be repaired, so you will have to replace the entire worn-out unit.
The autonomous water supply system of a private house is carried out using a pumping station. Like any equipment, it can also fail, and in order not to constantly call a specialist, you can carry out some repairs to the pumping station yourself. We will analyze the main breakdowns and their elimination.
Recommendations for choosing and installing a pumping station can be found here.
Have you decided to install a water supply system in a private house yourself? Then the next topic will be interesting for you: https://aquacomm.ru/vodosnabzenie/zagorodnyie-doma-v/avtonomnoe-vodosnabzhenie/istochniki/kak-otregulirovat-rele-davleniya-nasosnoj-stancii.html. Step-by-step setup of the pump station pressure switch with your own hands.
How to change the membrane in a pumping station. Replacing the membrane in the pumping station
Frequent and short starts of the pump, uneven water flow (strong pressure alternates with weak), indicates that the membrane in the pumping station needs to be replaced.
With this malfunction, water comes out of the nipple instead of air. Since changing the membrane in a pumping station is not difficult, you can do it yourself, without involving specialists.
procedure
Before replacing the membrane in the pumping station, the device is disconnected from the power supply, then the pressure is released, that is, the taps are opened and everything is waited until everything drains, and the pressure gauge shows 0. Then the taps that go into the system are closed. Next, replacing the membrane at the pumping station is performed in the following sequence: 1. The device is disconnected from the system using a gas key. 2. Place a bucket under the tank in the place where the flange is located to collect the leaking liquid.
3. The flange bolts on the hydraulic tank are unscrewed, but not all of them. Two fasteners located diagonally are left and slightly loosened. This is done so as not to flood everything around. The drainage will be done slowly. When the flow stops, the last fasteners are unscrewed and the flange is removed. Slightly loosening the edges, merge the remains.
4. In containers with a volume of 100 liters or more there is a bulb holder nut on top. It should be unscrewed. 5. The spoiled pear is removed.
6. Most often, dirt settles on the walls of the tank, so it is washed well and wiped dry.
7. Take a new pear. It should be the same size as the old one. Particular attention should be paid to the diameter of the neck. 8. A threaded fitting (if available) is inserted, with the help of which the upper part of the part being replaced is attached to the body, and carefully tightened. 9. The new part is installed in the hydraulic tank.
10. If there is a fitting, installation is carried out in such a way that it fits into the hole intended for it. If there is a large pumping station, replacing the membrane will be difficult because you will not be able to reach the other edge of the container with your hand. In this case, you can use various available means, for example, first tie a rope to the holder and pull it through the hole. A nut is screwed onto the thread.
11. The neck is pressed against the flange and fixed. Installation and tightening of bolts is carried out according to the same rules as for car wheels.
12. The lid covering the nipple is removed and air is pumped in with the pump. This is done until the desired value is obtained. Its calculation is carried out as follows: the maximum pressure at which the system turns off is multiplied by a factor of 0.9. When everything is ready, put on the lid.
At this point, the replacement of the pump station membrane is complete. The device is connected to the pipes. Dry starting is strictly prohibited, otherwise the device will break down in a few minutes. Water must be poured into it. For this purpose, a special hole is provided on the pump. It is closed with a plug. It is unscrewed, water is poured inside and the plug is put back. The equipment is connected to the network and its functionality is checked. Then it is disconnected from the network, the pressure is released, and the indicators in the tank are checked with a pressure gauge. Next, the lower and upper pressure is regulated, that is, at what values the switching on and at which switching off will occur. The cover is removed from the adjustment block and, by tightening or unscrewing the nuts, the required values are set. The block closes. That's all you need to know about how to change the membrane at a pumping station.
Checking the pressure accumulator
The next step in finding the reasons for frequent pump starts is to check the serviceability of the hydraulic accumulator.
If the container is damaged, this will lead to water leakage and, as a result, to a catastrophic drop in pressure in the pipeline.
A highly stretched rubber membrane will have the same effect.
How to check the integrity of the tank? Press the valve nipple (it is located on the part of the battery filled with air). If air is released from it, the integrity of the container is not compromised. The appearance of water from the valve indicates damage to the membrane. It will have to be changed.
If the situation develops unfavorably, the only way out is to completely replace the entire battery.
Prevention
To prevent a breakdown of the hydraulic accumulator from taking you by surprise, you need to carry out periodic maintenance. It's easy to do:
- once every 3-4 months the tank is inspected for damage;
- Once every six months, you need to check the operation of the pressure gauge, pressure switch, and also check the air pressure level in the tank.
In addition, all experts recommend replacing the membrane in the accumulator every three years. Naturally, subject to its constant and uninterrupted use.
The fact is that the average service life of these products rarely exceeds this figure. Therefore, it is better to replace it in advance - this way you can protect yourself in advance from a sudden breakdown.
Previous articles Next articles
Related Posts
- 25.03.2017.
What is a hydraulic accumulator and how it works
- 25.03.2017.
How to choose a hydraulic accumulator and not make a mistake
- 25.03.2017.
Other Possible Causes
You have checked the pressure switch and adjusted it. The pump of your station develops the necessary power, and the battery is as good as new - and the installation continues to turn on after a short period of time or even works without a break... Leave the station alone and start inspecting the pipeline.
The pump will turn on frequently if one of the following problems occurs:
- Fistulas have formed on the pipes or their connections have become depressurized. The presence of leaks in the network inevitably leads to a loss of pressure.
- The supply pipe is clogged and clogged with debris, as a result of which its throughput has sharply decreased.
- The water level in the source dropped and its filling slowed down.
The search for leaks in hidden sections of pipelines is carried out by step-by-step inspection of individual network segments. The pressure in each of them must be monitored by installing a pressure gauge.
The area being tested can be considered intact if, in the absence of water intake, the reading on the pressure gauge remains unchanged for 10-30 minutes.
Frequent switching on of the pumping station can also be caused by blocking the check valve with some foreign object. The blocking element can be removed by disassembling and washing the water fittings. By the way, maybe, having disassembled the check valve, you will see that it has simply worn out and lost its tightness. Since this item is a consumable item, simply replace it with a new one.
Such a simple device as a storage tank for water supply actually plays an important role in the correct operation of the autonomous system.
How and why a well is pumped with water after drilling, you will learn by reading this material.
Impeller wear
If the pumping station operates without stopping for a long time, the service life is reduced due to premature wear of functional parts. A special impeller located inside the power unit is subject to mechanical damage under the destructive influence of solid impurities contained in the pumped water.
The impellers of cheap pump models are made of plastic. The cheapness of the material is offset by the reduced service life of the equipment, so it is better to install pumps with a metal impeller.
Abrasive particles enter the system due to the incorrect selection of a special mesh that traps sand during the drilling stage of the water shaft. The reason is the lack of a filter device at the inlet pipe of the pumping station.
Preservation during a break in operation
During long interruptions in the operation of the water supply in the house, it is necessary to completely remove water from the system, since it may freeze in cold weather. Frozen water, expanding, damages pipelines, membranes, and fittings.
During conservation, turn off the power to the pump and open the taps so that all water leaves the system. It is necessary to take into account the fact that water taps are often located above the pumping automation, so some of the water remains in the system. To completely drain, you need to disconnect the hydraulic accumulator from the water line.
Equipment design
The water supply pumping station includes the following elements:
Equipment design.
- pump;
- hydraulic accumulator;
- automatic control unit;
- pressure gauge;
- connecting fittings.
Using connecting fittings, the hydraulic accumulator is connected in parallel to the water supply system, i.e., the water pumped by the pump enters simultaneously into the water supply pipes and the hydraulic accumulator.
The pressure gauge is designed for visual monitoring of the pressure in the line.
