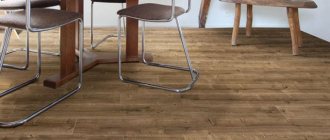
Laminate has earned people's love due to the fact that it is easy to install and is not very demanding on the quality of installation work. But sometimes the inattention or obvious amateurishness of the installers, or the features of this floor covering not taken into account lead to defects - creaking, knocking when walking, undermining the joints of the plates. Defects, as a rule, are interconnected and follow one after another. They can lead to damage to the integrity of the locks and final damage to the coating.
Creaks and knocking noises when walking
This defect occurs if the laminate is laid without gaps or is pressed tightly along the edges with a plinth or door trim. As it gets warmer, the linear expansion of the boards puts pressure on the walls, the boards rise. The large “bubble” that appears in this case bends when walking, the boards rub against each other, and creaking and knocking occurs over large areas.
Remedy
If such a defect occurs, you need to remove the baseboards and check the gap between the covering and the wall. It should be 8-12 mm. If the gap is smaller, you should increase it - go through the floor or carefully trim it with a vibrating saw.
Conclusion
Like any other problem, it is better to prevent the appearance of squeaking laminate flooring than to deal with it in the future in every possible way. But if, nevertheless, a creaking, crunching or other unpleasant sound when walking begins to gradually appear and become larger, it is necessary to immediately begin to eliminate them. Lost time will make the problem more serious, and the costs of solving it will be greater.
What is better, laminate or parquet board, read in this material. Find out which laminate is best for your apartment here.
Creak in a local location
If the noise is coming from one specific place, you should assume that there is a small hole there. Laminate always strives for a perfectly flat surface; if it is laid on an uneven base, the floor will make sounds when uneven. Diagnosis is quite simple - you need to find a smooth plaster rule, apply it to the floor and step on the creaking place. If a gap appears, then the cause has been found.
How to fix
Only dismantling the floor covering, substrate, and re-preparation of the base will help.
If the laminate was laid on wooden floors, the fasteners are recessed, and the coatings are sanded with coarse sandpaper. Evenness is controlled using a laser level or rule. If the coating “plays”, it needs to be strengthened and the amount of fasteners added. The surface can be covered with wide-format OSB boards or plywood - they will smooth out unevenness.
An uneven concrete base should be leveled by re-screeding or using self-leveling compounds.
A fragile or crumbling coating that deforms under load must be removed and a new one poured. In rare cases, a deep penetration primer will help.
How to fix it so it stops cracking and creaking
The first part of the article discussed the main reasons why laminate flooring creaks and crunches when you walk. And now we will talk about how to remove the squeak and fix the floor covering.
Trimming laminate
In a situation where, during installation, no gap was left between the wall and the covering, or it was made too small, the laminate will have to be trimmed. To do this, you need to remove the baseboards and trim the boards that are outermost to the wall either in length or in width (will depend on the installation method). Since the laminate is assembled using the puzzle method, the boards can be easily pulled out, cut and laid in place, thus ensuring the required gap size. In conclusion, return the baseboards to their place and rejoice at the problem being resolved.
Remove debris under the laminate (needs to be disassembled)
Having determined that the laminate is creaking due to the presence of debris, you will need to clean the base and the strips of material themselves. Solving the problem will be very difficult, since you will have to dismantle the entire floor, clean it and lay it in a new way. If the cause of the squeak is in the screed, the coating will again have to be dismantled. After removing the laminate, the surface of the screed should be thoroughly dust-free, apply a new layer of primer and lay down a substrate, preferably also a new one. In some of these situations, a plastic film is laid over the screed, which will prevent debris from directly touching the laminate.
When disassembling the laminate, be sure to number the boards. This will help with subsequent installation.
Leveling the floor: dismantling and laying again
When the cause of the squeak is an uneven base surface, it needs to be leveled. With local creaking, everything is not so bad. It will be enough to disassemble the coating in the problem area, find the unevenness and eliminate it. A solution that hardens very quickly will help level the floor. Apply it using a spatula. When the surface is completely dry, it will need to be sanded, then line the area with sheets of cardboard, return the backing and put the laminated boards in place.
Drastic measures will be required if there are numerous creaks and crunches. The covering will have to be completely dismantled and the base leveled. This can be done with a regular primer or “self-leveling floors”. If the substrate is very thick, it should be replaced with a thinner one, no more than 3 mm. After complete leveling, the laminate is laid in a new way and, if everything is done correctly, the creaking is eliminated.
It will be more difficult to get rid of the problem in a situation where a regular wooden floor was used as a base. You will have to remove the entire covering, along with the baseboards and thresholds. After cleaning the floor, you need to find problem areas, paying close attention to old, rotten boards that have been attacked by mold or mildew. If necessary, the boards are replaced with new ones. The boards that have come loose from the joists are fixed, and the entire floor is checked for defects. Then the boards need to be scraped, which will make the surface perfectly flat.
If scraping is not possible, the floor can be easily leveled using sheets of plywood. Its thickness should not be less than 10 mm. It is installed using glue and secured with self-tapping screws.
Other ways to fix the problem
When purchasing laminate flooring, it is better to purchase quality products from a well-established manufacturer. It will cost more, but the risk of squeaks and crunches will be minimized. To a greater extent, they are typical for poorly made laminate.
If the cause of unpleasant sounds when walking depends on changes in humidity, there is no need to worry. After some time, when the humidity returns to normal, the sounds will disappear on their own. the same will happen if the required gap is left. After 2-3 weeks, the laminate will find its optimal position and everything will work out.
If the technology is fully followed, a slight creaking in certain places should not be alarming, since after the required time it will stop on its own.
The glue used in the manufacture of the laminate protects the lock elements from the penetration of debris and dust. From this point of view, it will be better to use types of adhesive laminate, since they creak the least.
It is not entirely correct to use laminate immediately after purchase. It will be better if he lies in the room where he will be laid for several days. This way the material quickly adapts to the desired temperature. This is especially true in winter. The laminated coating sold is unlikely to be stored in warm rooms. The usual place is cold storage. Low temperatures make it impossible for the material to maintain the correct shape and it will be very good if the laminate lies in a horizontal position at room temperature for several days. Only after this can you start working with it.
Good quality of the coating will be indicated by the presence of recommendations for use when purchasing. A manufacturer who cares about the quality of his product and the reputation of the company necessarily gives advice on the use of the products he sells. The recommendations should be carefully followed and then many problems can be avoided.
Living room tables made of natural wood.
How to properly apply Venetian plaster video, see this article.
Wallpaper for a small bedroom: https://trendsdesign.ru/home/bedroom/sovremennye-idei-dizajna-dlya-nebolshoj-spalni.html
Grains of sand in castles
Grains of sand that get into the locks create an additional gap and, when loaded, produce a nasty squeak. Sand can get into locks for various reasons:
- poor quality production;
- violation of packaging during transportation;
- unprimed floor covering;
- carelessness of the handlers.
Remedy
To identify and correct the defect, you will have to disassemble the entire coating. Vacuum the base, prime it, re-lay the underlay carpet wiped with a damp cloth. Before installation, the locks of each plank are wiped or vacuumed to remove every grain of sand.
Have you ever encountered problems with laminate flooring squeaking after installation?
Yes
No
No indentation provided
Even very high-quality and expensive laminated flooring can make a crunching sound. One of the reasons why laminate flooring crunches is a violation of installation technology, that is, the lack of technological gaps near the walls. Like any covering consisting of wood, laminate tends to expand with changes in the microclimate in the room. Technological gaps near the walls, 1.5-2 cm wide, are designed to compensate for such expansion and keep the laminate in working order for a long time.
If you neglect this rule and lay the laminate close to the walls, then you should not be surprised why the laminate cracks. The panels begin to separate and rub against the baseboards, creating unpleasant sounds.
In addition, such a violation of technology entails an increase in the load on the joints of the panels, which also begin to creak when friction occurs.
Substrate mismatch
The base for the laminate must have certain shock-absorbing properties, but be quite strong in compression. Polyurethane foam sheets are excellent for these purposes. They have sufficient strength, elasticity, and are easy to install. However, for various reasons, sometimes there is a desire or need to replace the material with something cheaper, for example, foamed polyethylene. It is too soft, so the laminate locks will easily “sag” under the weight of a passing person. The defect can be corrected only by replacing the incorrect substrate with a more suitable one. You can learn about the right choice from experienced installers or sellers - they have probably already encountered the question and have everything they need on sale. The most popular solution is 3 mm polyurethane sheets.
Laminate flooring creaks due to uneven base
According to the instructions of laminate manufacturers, the difference in the base should be no more than 2-3 mm per linear meter. Some unevenness is compensated by the spread of the substrate. Over time, the laminate floor takes the form of a screed, but gradually a divergence occurs at the ends of the key joint and a fracture is formed. The panels no longer stick together and friction appears. We can hear clicks, creaks, crunches, depending on which parts and “how” they cling and rub.
In such cases, nothing can be done about this problem. Correcting the defect is only possible by leveling the base and laying a new laminate.
But this is not a matter of one day, years can pass, and you won’t even think about paying attention to a couple of squeaks. I had a case where they laid laminate flooring in a Khrushchev-era house. The customers did not need to level anything, because they planned to live in this apartment for 2-3 years and then sell.
The ground was very uneven. Therefore, I recommended buying Art Floor laminate with a UniClic lock. During assembly, there were practically no gaps and the person was satisfied. I wrote to him on VKontakte a few months later, he said that everything was wonderful.
Incorrect layout of boards
In order for the floor to have maximum rigidity, there must be a distance of at least 1/3 of the length of the board between the short sides of adjacent boards. In order to save money, irresponsible installers violate this rule and during operation it turns out that three or four joints converge at one point. The laminate will sag and creak even with a strong, level base - the substrate will allow it to be pressed in by 0.5 - 1 mm, which is more than enough.
How to fix
To correct the defect, you will have to work - you need to sort out the laminate so that the joints fall in the middle of adjacent boards, this is called staggered laying, or “deck”.
Tags
Laminate calculator for laminate Laminate vinyl laminate Why laminate creaksModern laminate have Laminate creaks Laminate creaks Laminate creaks Laminate creaks The time of installation is already after laying the laminate and laying a new one after laying through the installation of a floating self-installation or subsidence of the coating on the laminated covering can floor covering. o coating at
tilesproblemwallpaper
Universal methods for solving the problem
How to eliminate squeaking laminate flooring without disassembling it?
First of all, you need to carefully examine the flooring, walk around the entire room, noting the places where the unpleasant sound is heard. Perhaps, at the same time as the creaking, the edges of the board are raised.
Once problem areas are identified, work begins.
The process may require:
- paraffin candle;
- plastic spatula;
- matches;
- drill;
- medical syringe;
- silicone sealant;
- PVA glue.
Operating procedure:
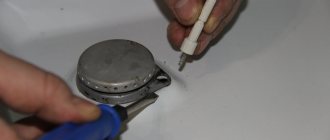
- Elimination of laminate flooring squeaks in certain areas can be done using molten paraffin. To do this, light a candle, wait for the paraffin to drain, and drip it onto problem areas of the coating. Using a plastic spatula, rub in the molten mass. If you don’t have a spatula at hand, you can use a plastic card - it will do the job just as well.
- How to fix creaking laminate flooring in the center of the room?
To do this, you need to drill a hole with a diameter of no more than 0.6 mm in the problem area of the coating, and, taking PVA into a regular syringe, fill it with glue. You can also use clear silicone sealant instead of PVA. After this, you should try not to step on the treated area of the floor for 2 days so that the glue or sealant is completely dry. One way to eliminate the cause of laminate squeaking
Process nuances
A drill is used to drill holes in the laminate, but it is important to follow the drilling technology: if you ignore the recommendations, chips and cracks may form on the coating, which may require its complete replacement.
To prevent this from happening, use twist drills made of hardened steel with a sharp, rather than standard, sharpening angle.
After filling the hole with the selected composition, you will need to mask the damaged area of the board. For this purpose, use special laminate wax, mastic, putty, epoxy resin or sealant. It is important to choose a product that best matches the color of the floor covering. The composition is rubbed into the damaged area, then the excess is removed and gently treated with fine-grained sandpaper, being careful not to touch the laminated coating. The final stage is treating the masked area with matte transparent wood varnish.
How to close the hole
At the next stage, PVA glue is squeezed out into the hole made with a sharp drill from a syringe if the laminate creaks. What to do and how to fix this problem without disassembling the coverage is therefore clear. However, after carrying out such a not too complicated procedure, the owners of the apartment have another completely logical question: “How to disguise a hole drilled in the floor?” You can do this using:
- putty or sealant;
- special wax pencil;
- epoxy resin;
- self-adhesive film;
- mastic.
At the final stage, you need to carefully remove excess masking material from the laminate with a clean rag and very carefully treat the repaired area with fine sandpaper. Then the part of the board with the closed hole should be polished with a cloth and covered with one layer of colorless matte varnish.
Special preparations
Special products can be used to eliminate defects on the laminate in the form of scratches. They are designed to camouflage defects and restore the appearance of the surface.
Furniture marker
Furniture markers make it easy to remove scratches on laminate flooring without complicated processing. The surface dries after using the felt-tip pen in a matter of seconds.
Advantages of the product:
- quick drying;
- moisture resistance;
- long shelf life;
- choice of shades;
- reusable;
- good camouflage;
- affordable price;
- quick correction of defects on the surface.
The marker can be erased from the laminate only with alcohol solvents.
Soft wax pencils
Wax pencils (crayons) are an easy-to-use tool that allows you to hide coating defects.
They are produced in different shades, which allows you to choose the closest color. You can purchase such products in stores that specialize in selling laminate flooring.
Pencil use process:
- Prepare the floor - wash and dry.
- Apply several layers of wax and rub it in with a soft, lint-free cloth.
This method of eliminating laminate defects has many advantages:
- long shelf life;
- low price;
- ease of use;
- at the place of application, the coating acquires water-repellent qualities;
- extending the service life of the laminate;
- efficiency.
The disadvantages of using chalk include the following:
- over time, the wax is erased from the surface of the laminate;
- This repair option can only be used for superficial, not deep scratches.
Before using a pencil in the middle of the floor, it should be tested on an inconspicuous area.
Super hard wax
In addition to soft wax pencils, extra-hard wax can be used to fill scratches. To use such a product, you need a special melter that allows you to change the consistency of the product.
How to use:
- Clean the scratch from dust and dirt.
- Smooth the edges of the scratch with the sharp side of a spatula.
- Degrease the surface.
- Melt the wax with a melter.
- Fill the crack with some excess, as the wax decreases in size as it cools.
- Hold for 30 seconds.
- Remove excess product with the ribbed part of a plastic spatula.
- If necessary, use other shades to restore the pattern.
- Sand the surface.
- After all work is completed, it is necessary to clean the melter and spatula from wax.
If the heating increases and the wax begins to smoke, the melter should be cooled slightly by turning off the heat.
putty
In the case where the scratches on the coating are deep, affecting not only the top layer, you will have to use a more radical approach to repair. If it is impossible to solve the problem with wax, putty (paste, putty) for the laminate is used.
Putties can come in various forms:
- Powdery.
- Paste-like (in a tube).
- Solid in the form of briquettes.
Like wax crayons, putty comes in a variety of shades. This allows you to restore the missing amount of coverage and make the repair area completely invisible.
Advantages of use:
- the ability to select colors from an assortment;
- preventing moisture from entering deep layers;
- Suitable for repairing deep scratches;
- a fairly long-term solution to the problem.
The disadvantages of use include the need for skill when applying the composition. When working with putty, it is necessary to cover the areas near the scratch with masking tape. This must be done so that the material used for repairs does not get on the laminate around the defective area - it will be very difficult to remove the putty.
To work you will need:
- masking tape;
- spatula (scraper) rubber or plastic;
- putty.
Operating procedure:
- Prepare the laminate surface.
- Apply masking tape around the affected area.
- Remove a small amount of putty.
- Apply the paste to the scratch.
- Rub in well.
- Remove excess with a scraper.
- Allow the time necessary for the composition to dry completely.
- Sand the treated area.
- Apply wood varnish, if desired.
If you have no experience in carrying out such work with putty, it is recommended to first practice on an unnecessary board, since the composition dries quickly.
Useful tips
You can avoid noise if you immediately follow all the necessary recommendations when laying the flooring.
Then later you won’t need to eliminate the causes of the creaking: After purchasing the laminate, you should not immediately start laying it. First you need to let it rest in the room in which you want to lay the coating. This is required for the laminate to take its final shape. When purchasing, you should choose only high-quality materials
Purchasing a low-quality coating can lead to further deformation of the floor, swelling or squeaking. It is also very important to carefully prepare the base. To do this, it must be well aligned.
The foundation must not be allowed to crumble in the future. Otherwise, the laminate will need to be disassembled. The substrate should be chosen correctly. There are two options: cork and foam. The cork backing has high wear resistance. It does not deform for a long time, but it should not be laid in damp rooms. In this regard, foam is more advantageous, but it also has a drawback - it can become deformed over time. Before laying the underlay and flooring, the floor in the room should be thoroughly cleaned. It is necessary to remove dust in a timely manner and, if possible, cut the panels in another room. It should be remembered that in any room, when laying laminate flooring, it is necessary to leave temperature gaps.