02/24/2020Repair0
For some reason, many people believe that it is normal to remove construction dust with a regular household vacuum cleaner and that nothing will happen to it. However, in reality the situation is much worse. In today’s article we will talk about when you can still remove dust with a household vacuum cleaner, as well as what consequences such decisions will lead to on an ongoing basis.
- 1 When possible
- 2 Why is it still impossible?
- 3 Tip
- 4 Conclusion
Main stages of general cleaning
In order to remove dust from your apartment efficiently after renovation, it is important to follow all the main cleaning steps in the correct sequence. If you ignore the order, the dust will spread throughout the rooms again, and such cleaning will be of no use, you will have to do everything again. Cleaning stages:
- Immediately after completion of repair work, all large debris is removed. Collected in large bags and tools. Bags should not be stored in the apartment. It's better to take it out of the house right away. Tools must be cleaned so that any remaining dust on them does not fly around the apartment.
- After large debris has been removed, you can proceed directly to cleaning up construction dust after repairs. First you need to remove the curtains and remove all free-standing decorative elements, flower pots, carpets, and so on. They are washed and cleaned separately. All non-woven items are immediately wiped with damp towels.
- Next, you need to make sure that the dust settles. To do this, spray all surfaces with water from a spray bottle. This includes working on the ceiling, walls, all shelves, window sills, furniture, baseboards, and so on. Dry dust rises from the slightest movement or blow of wind. Therefore, you must immediately close the windows and doors. While cleaning, you can continue to spray surfaces to prevent them from drying out.
- It is best to use a vacuum cleaner to remove dust after repairs. A broom or squeegee only raises dust, and it will settle again. In addition, it is more convenient to use a vacuum cleaner to clean walls, furniture and ceilings.
- After the construction dust has been vacuumed, it is necessary to do wet cleaning. This process will need to be repeated at least 2-3 times. You should start by treating with plain water. Water and matter need to be changed as often as possible, this way there will be fewer stains. Then let the water dry and walk again. For the third time, you can add detergents to remove all the stains.
- Finally, everything that was taken out at the very beginning is washed, washed, cleaned and returned to the already clean room. Now you can hang the curtains and open the windows.
One of the most important principles for cleaning construction dust is that at all stages cleaning is done from top to bottom. You should start from the ceiling, then move lower. Dust from the ceiling and furniture falls onto the floor, so it is always removed last.
Homemade cyclone from a household vacuum cleaner
The first method has been presented on the Internet and on YouTube for quite some time. You can easily find many videos with similar homemade cyclones.
However, they raise quite natural questions and skepticism among professional builders. Therefore, it should be noted right away that they are mostly suitable for removing wood chips.
But it is better not to work with cement dust with such devices. The second option is more tailored to it.
The main “trick” that will allow you to easily suck in kilograms of garbage, wood, and metal filings and not worry about frequently changing filter bags is a homemade “separator”.
It will then need to be constructed from several components. For the entire assembly you will need:
- regular vacuum cleaner
- thick plastic bucket with lid
A bucket of Shitrok putty is best suited here. It is harder to flatten it with a vacuum.
- plastic sewer pipe d-40mm
- polypropylene sewer outlet at 90 degrees with a diameter of 40mm
- 40mm crown or utility knife
First of all, drill or carefully cut a through hole for the tube in the center of the bucket lid.
Mark the third hole closer to the edges of the cover, where the stiffener is.
If you do not have a special crown, then first pierce the intended circle with an awl and carefully cut it with a stationery knife.
The edges will be uneven, but they can be processed with a round file.
Two sewer outlets are inserted into these holes. So that they hold securely and there is no additional air leakage, it is better to glue them.
To do this, first sand the edges of the tube with sandpaper or a file to create a rough surface.
Do the same operation with the lid.
After this, insert the tube into the inside of the cap and apply a thick layer of glue with a hot-melt gun.
Don't skimp on glue. This will help create a good seal in these places and tightly close all the cracks.
There is actually another option in which you can do without glue and fan pipes altogether. To do this, purchase rubber adapter couplings from Leroy Merlin.
They come in different diameters. Select according to the size of your hose.
For example, a tube from a 35mm hose is tightly inserted into a 40/32 coupling. But in a 40mm pipe it will dangle. We'll have to reel in something and collective farm.
On the tube that is located on the edge of the lid, place the sewer outlet at 90 degrees.
At this point, the separator design can be said to be almost ready. Install the lid with outlets on the bucket.
The air intake hose from the vacuum cleaner is inserted into the central hole.
And the piece that you will use to collect all the debris and dust is stuck into the corner joint.
It is desirable that the tubes contain sealing rings that match the size of the corrugated hoses of the vacuum cleaner.
This completes the entire assembly. You can plug in the vacuum cleaner and use it.
Here is a visual video of the inside of a bucket of a similar design. It clearly shows how sawdust is sucked into the separator, but cannot escape from it and get into the vacuum cleaner.
The operating principle here is as follows. Coarse dust sucked into the container falls to the bottom of the container. At the same time, it does not enter the area where air is pumped directly.
Three factors help in this matter:
- gravity
- friction
- centrifugal force
They then make the garbage rotate inside the bucket, pressing against its walls, and then fall to the bottom. And only the fine fraction goes directly into the dust collector of the vacuum cleaner.
Typically, such a cyclone in factory designs has the shape of a cone, but cylindrical specimens also often cope well with this task.
True, the higher the bucket, the better the installation will work. Much here depends on the correct combination of the design of the container and the power of the vacuum cleaner. Here is a sign from Chinese cyclones on the correct selection of hose diameter and unit power.
In cylindrical buckets, the tangential air flow enters not through the curved side wall, but through the flat lid. Assembling such a device is much easier.
Also, if you have several buckets, you can use them alternately. Just remove the lid from one and move it to the other. Moreover, this is even easier to do than in bulky cyclones.
Then, at the very end of the work, simply take out the filled containers at once. This is a great time saver.
If you have a powerful vacuum cleaner, instead of a plastic bucket for emulsion paint, it is better to use a metal tank of the same shape. Otherwise, the bucket will collapse and flatten it.
The power regulator helps in this matter. If, of course, it is present in your model.
Necessary tools and cleaning products
Before starting general cleaning, you need to prepare what to use to remove dust after renovation in the apartment - cleaning products and tools. It is better to prepare everything you need with a reserve. After all, it is advisable not to leave the room while cleaning so that dust particles do not fly away. Necessary:
- In order to collect and remove construction waste, you will need gloves, a respirator and many large bags.
- It is better to first put curtains, carpets and other items in bags or boxes and cover them with film. Place those items that have already been wiped with a damp towel separately from dusty curtains, carpets and other textiles.
- To spray dusty surfaces, you will need a spray bottle with a fine spray.
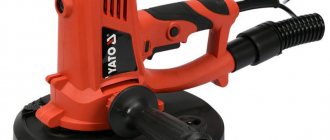
- Of course, the king of cleaning is the vacuum cleaner. To remove construction dust after renovations, you need an option with high suction power.
You cannot vacuum construction dust with a regular vacuum cleaner. Also, in addition to power, it is important that the waste collection container is made of plastic or paper. Fabric will not work. A construction vacuum cleaner will do the job perfectly. You don't have to buy it - it's quite expensive. Can be rented. If this is not possible, you can vacuum up construction dust with a powerful home vacuum cleaner.
For wet cleaning you will need:
- Water containers.
- Rags, sponges, pieces of cloth (cotton). Rags made from so-called “smart” material are also perfect. The dust particles seem to stick to it and do not scatter throughout the room.
- Detergents for floors, windows (alcohol-based) and walls.
If there is wallpaper or paint on the walls, the product must be appropriate. For tiles, the same as for windows is suitable. The most important thing here is that you can never have too many rags and water. It is necessary to change and wash as often as possible.
Rating of the TOP 15 best construction vacuum cleaners of 2021
| TOP 3 best construction vacuum cleaners in price/quality ratio for 2021 | ||
| 1 | KARCHER WD 3 Premium 1000 W | Find out the price |
| 2 | KARCHER WD 3 P Premium 1000 W | Find out the price |
| 3 | Bort BSS-1220-Pro 1250 W | Find out the price |
| TOP 3 best construction vacuum cleaners for concrete dust | ||
| 1 | ELITECH PS 1235A 1200 W | Find out the price |
| 2 | BOSCH GAS 18V-10 L Professional | Find out the price |
| 3 | ELITECH PS 1260A 1200 W | Find out the price |
| TOP 3 best construction vacuum cleaners with an automatic filter cleaning system | ||
| 1 | Makita VC2512L 1000 W | Find out the price |
| 2 | KARCHER WD 5 Premium 1100 W | Find out the price |
| 3 | Makita VC3011L 1000 W | Find out the price |
| TOP 2 best bagless construction vacuum cleaners | ||
| 1 | BOSCH GAS 18V-1 | Find out the price |
| 2 | Einhell TC-VC 1820 S 1250 W | Find out the price |
| TOP 2 best construction vacuum cleaners with aqua filter | ||
| 1 | KARCHER WD 3 P 1000 W | Find out the price |
| 2 | BOSCH UniversalVac 15 1000 W | Find out the price |
| TOP 2 best powerful industrial vacuum cleaners | ||
| 1 | Bort BSS-1440-Pro 1400 W | Find out the price |
| 2 | Bort BSS-1518-Pro 1500 W | Find out the price |
Construction waste removal
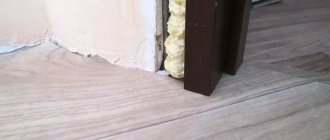
Removing construction waste is the first step of general cleaning. All construction waste must be placed in bags, hermetically sealed and removed from the house. In this case, the windows should be closed so as not to collect dust again. All large debris that can be collected manually is also immediately removed. These are pieces of concrete, polyurethane foam, polystyrene foam, and so on.
It is imperative to clean tools that will not be thrown away from construction dust. It is important not to miss anything, because as soon as a forgotten item is disturbed, the dust from it will fly everywhere. And dust removal after repairs will have to start all over again.
How a vacuum cleaner is sometimes used when drilling walls
When drilling walls with a hammer drill or drill, a lot of dust is generated, which you want to quickly remove.
And the first thing that comes to mind for many is to use a device called a “vacuum cleaner.”
People take a household vacuum cleaner, remove the nozzle from it, place the tube underneath and hold it suspended, not far from the future hole. After this, turn on the drill and, at the same time, the vacuum cleaner. All dust flying out during the drilling process is immediately sucked into the device - the owners cannot get enough of the cleanliness and order.
If long repair work is ahead, then it makes sense to purchase a special nozzle with a dust-retaining casing.
Cleaning surfaces from dust
To clean dust from surfaces after repairs, you need to act in stages. Namely:
- The surfaces are preliminarily slightly moistened by spraying water and a fine spray.
- Then collect the dust with a vacuum cleaner until the surface is dry.
- If the space is large, you can repeat the spraying.
- After this, the residues are collected with a damp cloth, which is rinsed in water each time and wrung out well. Because drops of water leave stains.
It is important that the material is clean and damp so that dirt does not spread and there are fewer stains.
When there is no more dust on the surface, go over it with furniture polish to give it a clean shine.
Cleaning wallpaper, walls and ceilings from construction dust
In the case of cleaning wallpaper, walls and ceilings, as well as surface treatment, you first need to make the dust damp. Cleaning stages:
- Treatment with water is done on all surfaces at once so that dirt does not fly away. If it starts to dry out, repeat the treatment with water again and again.
- Cleaning construction dust after renovation always starts from the ceiling. After all planes and surfaces are moistened, a vacuum cleaner comes into play. They start, of course, from the ceiling. To make it more convenient, you can stand on a stepladder.
- It is also better to wear goggles and a respirator. Since dirt from the ceiling will fall down.
- Next, they vacuum the walls, trying not to miss anything, and the floor. During the process, you can additionally spray with water to prevent the surfaces from drying out.
- Then all surfaces are washed with a damp cloth. For the ceiling, you can use a mop with a long handle, or stand higher. The procedure is repeated several times. The rag should be washed as often as possible, just like changing the water.
- To clean the wallpaper from dust after repair, use a slightly damp cloth so as not to damage the pattern. The main thing is that the water does not drip and does not leave streaks.
- The same goes for washing non-woven wallpaper after renovation. Even if the wallpaper can be washed, you should not overdo it with moisture. Otherwise they may move away from the wall.
- Along with the walls, the windows are also washed, only from the inside.
In the latter case, the steps are the same, but at the end it is better to use an alcohol-containing glass cleaner to avoid leaving streaks.
To remove ash
A separate vacuum cleaner just for ash removal is a really great thing. Comfortable country life involves a weekly bath, regular barbecues in the summer, and frequent toasting of marshmallows and bread in the fireplace in the winter - in general, quite a lot of ash is generated. But not everyone has extra money to buy this device and extra space to store it. Fortunately, a universal household vacuum cleaner does an excellent job of removing ash. Ash is usually removed in two stages: first, it is scooped out with a dustpan and then cleaned with a vacuum cleaner.
YurkaYurka FORUMHOUSE Member
I use a household vacuum cleaner, not special for ash. I put a paper bag, and there is no dust in the air. I scrape out the bulk with a brush.
Some manufacturers include a special filter for ash and large debris in the household vacuum cleaner kit; it is installed at the inlet of the vacuum cleaner.
Semyon Karas
The filter serves as a pre-separator so as not to heavily pollute the vacuum cleaner itself with ash. Suitable for collecting ash with a temperature not exceeding 40ºС for safety reasons. You need to understand that in the ash, along with fine dust, there may be large coals that look black and cold, but remain at a high temperature inside.
At first glance, it seems that the fireplace is being cleaned with a vacuum cleaner by absolute cleanliness freaks, but it’s not even a matter of cleanliness.
YurkaYurka
It's not about cleanliness, it's about convenience, speed and my laziness. In my fireplace, I can’t reach the back wall of the firebox with a brush, but I can easily use the trunk of a vacuum cleaner. And the tubular channels are blown out in a second, no need to fiddle with any brushes.
Floor cleaning
The floor is washed last, when all surfaces are cleaned of dust and all dust has fallen off. Necessary:
- First, use a large rag to collect everything that might have fallen. Particular attention should be paid to baseboards, corners and the space under the radiator and furniture. The more thoroughly this stage is completed, the less effort will have to be made further.
- Then wash in small areas again, constantly rinsing the rag. You will have to repeat twice.
- At the end, for shine, they are treated with a product suitable for the specific floor for parquet, laminate, tiles, and so on. Detergents are used only on the floor, on the walls only if there are tiles on them.
- After this, all surfaces must be allowed to dry.
- At this time, curtains, carpets and all other items are washed.
- When the floor is dry, you can put everything back.
A few simple rules will help make cleaning up construction dust after renovation easier, faster and more efficient:
- If during repairs you cover all unused surfaces with construction film and seal the edges with paper tape, after the film is removed, less dust will remain.
- Cleaning is done throughout the entire apartment. You need to start in the room farthest from the exit.
- The first steps (taking out the trash and vacuuming) must be done everywhere at once. Continue from one room to another, making sure to close the doors.
- When cleaning, it is better to work in rubber shoes that are easy to rinse or shoe covers. Constantly change them as they become dirty.
- When the cleaning of construction dust after renovation in a room is completed, no more people enter it until the cleaning of the entire apartment is completed.
- In the days following cleaning, the dust will still gradually settle. Therefore, it is advisable to walk over surfaces with wet wipes or damp cloth during the first week. Do wet cleaning of the floor.
- Having a humidifier will also help. Wet dust particles will settle on the floor rather than in your lungs. This is especially true for allergy sufferers and asthmatics.
Repairs are always associated with a huge amount of debris and post-repair work. None of them should be skipped to get the desired result. Cleaning is a monotonous and labor-intensive process, but it brings the result to perfection. After all the work done, you can finally enjoy the cleanliness and updated interior.
Who needs it
Professional vacuum cleaners are widely used in hotel services, trade, and the service sector.
Multifunctional devices are indispensable for:
Eliminating the consequences of repairs
General cleaning of any neglected premises
Weekly cleaning of difficult surfaces (long-pile carpets, natural stone, laminate)
A vacuum cleaner for cleaning is necessary for people planning to open their own on-site cleaning company, owners of restaurants, mini-hotels, boarding houses, and beauty salons. It will also be useful for owners of large houses that need frequent and thorough cleaning. The benefits of professional equipment will be appreciated by allergy sufferers, families with children, and pet owners.