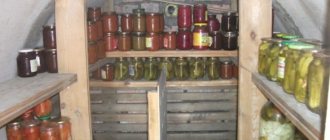
Despite the fact that today you can buy or order any furniture, many people prefer to make their own furnishings. Most often, furniture is made from wood (solid wood, panels, waste), which has been repeatedly discussed on the portal, but today we will talk about another universal material - concrete. In this article, the craftsmen of our portal pour concrete countertops for the office and kitchen, make a concrete sink, and implement other interesting projects.
The most common materials for manufacturing
The most common materials today used to make the working surface of a kitchen set are:
- fake diamond
- wood or chipboard
- porcelain stoneware
- concrete
Each of the materials described above has its own advantages and disadvantages. Before choosing the most suitable option for certain conditions, it is useful to know their main characteristics.
By following the step-by-step steps of making your own countertops, you can largely avoid mistakes.
Artificial stone for countertops
When deciding on the choice of material from which you can make a beautiful countertop, you should pay attention to artificial stone. A surface made from a similar material quite convincingly imitates real rock.
The main components for the manufacture of such imitation stone are polymer resins and high-quality cement. Special fillers are additional additives that give it sufficient strength.
An undoubted advantage is the ability to obtain a product of various configurations, which is an exact copy of the stone surface.
Making a kitchen work surface from artificial stone begins with the manufacture of formwork. It is advisable to use laminated plywood as a formwork material; it is most suitable for these purposes.
Eurobook sofa - 130 photo recommendations on how to make and assemble a comfortable and compact sofaAssembling furniture with your own hands - 105 photos and a detailed video of how various furniture elements are assembled
Do-it-yourself bookshelves - ideas for building shelves and shelves quickly and easily from scrap materials (155 photos and videos)
It is worth considering that the higher the accuracy of the mold manufacturing, the less time will be spent on additional processing.
Varieties
More than 20 varieties of larch have been identified. Of these, 14 grow in Russia. In our country, Siberian larch and Daurian larch are mainly represented, which are among the most common varieties.
Siberian larch (also called Sukachev larch) occupies about 13-15% among other varieties. It can be recognized by the branches extending from the trunk at right angles. Their ends smoothly rise upward. The tree is quite unpretentious and grows in an urban environment. It almost entirely has properties beneficial to humans (bark, needles, and resin).
Daurian larch is the most common tree. This is one of the most frost-resistant varieties. It grows on many soils, but not on excessively swampy ones with a large excess of moisture.
In addition to Siberian and Daurian, European and Japanese (kaempfera) are also widespread.
European most often grows in Europe (Central and Western). It should be noted that this variety has about 5 breeds (Horstmann Recurved, Kornik, Puli and others). This is the tallest variety: in the Alps the height reaches 50 m, the trunk diameter is more than 1 m. In Russia, European larch cannot grow to such parameters due to climatic conditions (here the maximum height will be 25 m, but this does not always happen).
Japanese larch got its name from the country where its characteristics were first discovered. Widely grown in Korea. Used for decorative purposes only. Characterized by a height of up to 35 m, in autumn the needles turn bright yellow.
In addition to the varieties mentioned above, there are also Kuril and Olga varieties. Hybrids have also been bred: Amur, Chekanovsky, Lyubarsky, Okhotsk. Nowadays, to improve the territory of a personal plot, you can buy varieties of decorative larch species specially bred by breeders from nurseries. They are considered, unlike wild species, to be dwarf trees (their height does not exceed 2 meters). These are the varieties “Puli”, “Kornik”, “Krejci” and others.
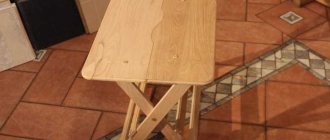
Tabletop made of laminated chipboard and wood
When wondering what kind of countertop you can make yourself, you can opt for wood, the most common material for making countertops. It compares favorably with other options due to the monetary component.
Disadvantages include poor resistance to mechanical damage.
Despite this, the use of high-quality hard wood will make it possible to make a high-quality product that will last for many years.
Natural migration
“We are already afraid to look at them, but soon we will bow to them and wash our feet.” Police Major General Vladimir Mikhalevich issued a prophecy about the future of Russia, which is already being divided with might and main by migrants.
After another mass fight between migrants in Moscow, society started talking about the need to urgently solve the problem with newcomers. A member of the presidium of the all-Russian organization “Officers of Russia,” Police Major General Vladimir Mikhalevich is sure: if we do not address this issue right now, we will lose the country.
They are dividing our country. We’re even nobody here anymore, and they’re sharing—not sharing with us anymore, but with each other. And they will not calm down,” the general expressed concern.
The critical mass has already been reached. And everyone understands this, it is impossible not to see it. At the same time, it seems that migrants no longer consider us to be people. They don’t even behave the same way at home as we do, allowing themselves to do whatever they want, but we can’t even give them a reprimand.
Look what's going on in the metro, especially in the evening. It feels like you are no longer in Moscow, not even in Russia. And look how defiantly they behave. Why is this so? Because we allowed them - both the authorities and society.
There is no good way here. You can’t use exhortations here,” Mikhalevich is trying to reach the authorities. He explained that the “guests” perceive each of our retreats as our weakness: “If we are weak, then they can continue to treat us like this.”
At the same time, a high-ranking police officer is confident that no new laws are needed - you just need to monitor the implementation of those that exist:
There is no need to invent anything new, we have everything. What are you doing here? Collected and checked. You had to work, are you labor migrants, do you have a work permit? Yes, I have. All work permits have been raised. They are at least 50 percent, I think even more, fictitious. We figured out who. Firstly, there is already criminal liability for these work permits; this is Article 327, a document granting the right. The right to work, but they don’t work. This is a fictitious document. We have everything in laws.
“If we start working, we will restore order,” Mikhalevich promised.
Step-by-step instructions for making a wooden tabletop
You can start working after selecting the required size bars from hard wood (beech, oak). The material for the future working surface must be dried to wood moisture to avoid warping in the future.
The next steps are:
- White table: 115 photos and videos describing the selection and construction of cool and easy-to-use tables
Corner sofas - 130 photos and videos on how to choose and where to place modern original corner sofas
- Do-it-yourself computer desk: 150 photos of making corner tables and features of the choice of materials
- Calibration of prepared bars.
- Gluing the bars into a single panel.
- Giving the resulting shield the required configuration.
- Cleaning and polishing.
- Treatment with protective compounds.
It is worth considering that wooden products must be covered with protective coatings.
Today, hardware stores offer a huge range of protective compounds for wooden surfaces. They do not allow moisture to get inside the fibers and give the surface additional hardness.
Coating process
Proper treatment of a wooden surface is the key to its long service life. This rule especially applies to kitchen countertops. In addition to the fact that you need to choose the right treatment product, it is also important to properly prepare the surface, apply protection and dry. The following describes the process of how to coat surfaces using oil compositions as an example.
The coating process follows certain rules.
Preparation of the product
The main thing you need to pay attention to when choosing a coating is its quality. A good protective agent will protect the wooden surface from mechanical damage and moisture and give it a shiny, renewed look.
The coating must be of high quality to provide the furniture with protection and a well-groomed appearance.
The product must also be prepared. Before treating a wooden countertop in the kitchen, the composition must be thoroughly mixed for 5 minutes.
The product must be mixed well.
Preparing the wooden surface
The first step will be to clean the countertop from all kinds of dirt and greasy marks. Next it is dried.
Before coating, the surface must be cleaned of dirt.
On a note! The wood moisture content should be no more than 12% according to DIN EN 13183-2.
To ensure that the oil adheres well and is absorbed, the wood is sanded, starting with coarser abrasives, gradually moving to finer ones. Also, after each abrasive, the coating is cleaned. You may need to putty it to remove deeper scratches. A special restoration kit based on wax is ideal.
The wood should be sanded so that the coating lays more evenly.
Application
The composition is applied with a brush or cloth, and the latter should not leave lint on the surface. It will take about 12 hours for the first layer to dry. Then you can apply the next one, and so on. The number of layers will directly depend on how the product is applied. Using a brush, two treatments are enough; a fabric coating will require up to 4 layers.
Use a brush or cloth for application.
When the product is well absorbed, the entire treated area is thoroughly wiped with a soft and clean cloth.
After the product has been absorbed, wipe the surface with a cloth.
Drying
Drying time varies from several hours to several days. Naturally based oils or mixtures containing acrylic require a longer drying period. They can also increase strength gradually. It is important not to use a freshly treated countertop for a while.
After applying the coating, it is important to let the furniture dry.
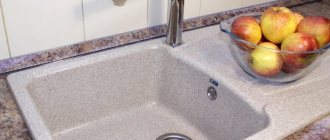
Porcelain stoneware countertop for the kitchen
A product made from this material is quite resistant to mechanical damage. The work surface made from it has an attractive appearance and a long service life.
On the Internet you can find many photos of handmade countertops. You can make such a tabletop yourself with a minimum of effort. The disadvantages of porcelain stoneware products include low resistance to impact.
Area of application of wood
Lining is made from larch, which will retain all the unique properties of this wood and will have excellent decorative functions. Larch is also used in the manufacture of Durisol building blocks - this is a new unique technology for constructing walls in modern house construction. Houses made from these blocks are distinguished by wear resistance, excellent noise and heat insulation characteristics. Today, Canadian larch in America is used for constructing various types of roads, as well as for the construction of buildings in the Arctic zone. Siberian larch is one of the best materials for the construction of ships, boats and boats, since the physical properties of this wood are very high for use in the aquatic environment. This material has beautiful noble shades, and that is why larch is often used for interior decoration, both in public and residential buildings. This finish is unique because it is not afraid of biological and atmospheric influences, and products made from this material will not be afraid of rotting and can withstand long-term general loads. A structure made entirely of larch can last 200 years or more. Wooden architecture has always been popular in Rus', and today in the Urals and Siberia you can see ancient wooden houses made of larch, which have survived to this day.
Concrete countertop for kitchen
This option is quite simple to make yourself. The characteristics of a concrete countertop are similar to artificial stone.
But it has a fairly big advantage - environmentally friendly materials such as cement, sand, and water are used in its production.
Details
Varieties
Such designs can be very different. They can be roughly divided into linear and corner countertops for the kitchen, which are not difficult to make with your own hands. It’s easier to make linear ones, since in this case you don’t have to take into account angular curvature, which often makes the workflow more complicated. This is extremely important for structures made of tiles, which will reveal any flaw in the walls by the mismatch of seams between the tiles. So, if everything is clear with linear structures, then corner countertops can have a laconic or complex shape. For example, the table may have smooth corners, which will ensure safety when moving around the kitchen in conditions of lack of space. Moreover, corner models according to the drawings can be made from 3 conventional figures - 2 rectangles and a square in the corner with a beveled corner. Depending on the type, it can be monolithic or prefabricated. Joining in products made of MDF and wood, chipboard can be seamless. It is believed that sawing became the most technologically advanced option, and therefore monolithic structures have become a rarity.
How to make a concrete countertop with your own hands
To give a homemade concrete countertop a beautiful appearance with a marbled texture, in addition to the necessary accessories, you need to consider the presence of a grinding machine. For the work, it is worth preparing plywood (chipboard), aluminum profiles, boards, crushed stone, sand and wire for reinforcement. Even during creation, you need sealant, drying oil, assembly adhesive and paint and varnish for concrete. First, make formwork from boards 4 cm thick. You need to cut the chipboard sheets to size, install the sides, and secure them with self-tapping screws. The places where plywood and beams are fixed are filled with silicone, which will prevent concrete from getting into the cracks. The formwork should be treated from the inside with drying oil so that the solution does not stick to the boards.
As reinforcement, you need to use wire with a thickness of no more than 0.8 cm. A lattice is made from it, slightly smaller than the formwork, and placed in a container into which glue is poured. The grating needs to be glued to the plywood, and after complete drying, you can pour in a concrete solution. To prepare, mix crushed stone, cement and sand in a ratio of 2:1:2. To improve quality, it is worth adding a plasticizer to the solution. The dye is added at the rate of 1 to 50, leaving a little for the finished tabletop. The excess is removed with a spatula, and then the countertop is covered with polyethylene for approximately 1 week. After drying, the surface should be sanded smooth and placed on an old kitchen table. Before this, the old tabletop needs to be removed and the body reinforced with timber supports. You can put the stove in a permanent place.
Manufacturing from chipboard
To make such a tabletop, prepare chipboard boards (this will be the working surface). When working, use 1st grade material with a minimum number of visual defects. To make the chipboard tabletop more durable, it should be made monolithic. Before you start marking the slab, prepare drawings with exact dimensions, holes for tiles and sinks. After this, transfer the dimensions onto chipboard sheets, cut the material with an electric jigsaw with knives of the required size. If it is not there, then use a sharp hacksaw. For smooth sawing and cutting without chips/burrs, stick masking tape along the sawing line. When working, you should use blades with fine teeth. The composite needs to be shaped by grinding the corners and ends, and then checking the surface for smoothness and evenness. If you notice unevenness, then sand everything “to the level”. You can use sandpaper for this.
Afterwards, you can begin to impregnate the composite, and then decorate the surface and produce finishing coatings. The tabletop is treated with protective coatings, and after drying, it is varnished several times. In this case, all new layers are applied only after the previous one has completely dried. Before processing, it is imperative to apply a primer layer to the composite. Only after all this can you paint the slab. A chipboard countertop for the kitchen is made by hand and treated with stain. This substance is suitable for processing particle boards, and this composition usually dries out after 10-12 hours. Varnishing is done with water-based paints, and the ends can be treated with melanin edge or veneer.
Tile covering
The tile countertop is laid on 2 plywood layers, and they must also be glued together. To improve the quality of the product, the slabs should be treated with waterproofing material. The convenience of the technology is the fact that the design can be made larger than the original one. At the initial working stage, measurements are taken and the material is selected so as to reduce the number of cuts. If you plan to update old countertops, then you can use a pedestal kitchen set. In other cases, painted chipboard should be used. It is worth cutting it with a circular saw (taking into account the required dimensions). After cutting the edge of the substrate, it is worth treating the coating with a moisture-resistant impregnation. You can apply oil putty, but first apply masking tape. Afterwards, the ends are sanded and treated with an oil-based paint and varnish composition. Assembly is carried out using metal corners, screws and dowels. Before you start tiling the countertop, you should coat it with a moisture-resistant impregnation using a paint brush with natural bristles. After that, drying oil is applied, and when the structure dries, you can begin finishing the surface with ceramic material.
It is best to use epoxy/acrylic based glue, as cement glue will not adhere well to the surface of the wood. Laying is done in a thin layer, distributing the mass of glue with notched spatulas. Work begins from the front side and leads to the rear edge (wall). New rows are laid end to end, and when working, special clamps or crosses are used. The ends should be decorated with mosaics or wooden slats. At the final stage of finishing the countertop, you need to grout the seams with a grout mixture. Afterwards, wait for the grout to dry and use a regular dishwashing sponge to get rid of the excess, polishing the finished surface.
Step-by-step instructions for making a concrete surface for a table
Using this method, you can realize the best ideas for handmade countertops. It allows you to get a different color range by adding a dye of one shade or another to a liquid solution.
The future shape of the finished product depends on the shape of the formwork. Therefore, before you begin assembly, you should carefully inspect the plywood for the presence of deep potholes and potholes.
Experts say a goose flying upside down is just showing off
This photo was taken at the beginning of the year by a Dutch amateur photographer.
The trick is that the geese turn their body upside down and turn their neck and head 180 degrees to their normal position.
Why are they doing this? There has been a lot of debate on this topic. It was assumed that this is how they protect themselves from land-based predators that can grab them by the paws, or that it is easier to fly in a headwind.
But experts have studied and given the answer: Geese simply show off in front of their relatives in order to become respected in their flock.
I can just imagine this picture: “Guys, look what I can do. Hoba!
Features of assembling formwork for countertops
Having previously marked the sheet of plywood, you can begin cutting the material. Sufficient accuracy when cutting can be achieved using a jigsaw.
It is advisable to use wooden blocks as side edges, fastening them together with self-tapping screws. After assembling the formwork, it is necessary to seal the joints. Silicone sealant is used as a sealant.
It should be noted that the higher the accuracy of marking and cut quality, the lower the sealant consumption will be.
To increase the strength properties of the finished product, reinforcement is used using metal rods with a diameter of 8 mm, or a ready-made reinforcing mesh with a cell of 5 cm.
Tile cutting device
It's been a while since I added anything here.
- Choosing the perfect sofa
- Upholstered furniture in Perm
Beds with soft panels at the head: stylish solution and comfort
Preface: why exactly this way, and not using a machine.
Firstly, I’m not entirely sure that the so-called wet tile cutter will cope with this task, and I’m sure that a cheap one definitely won’t cope, and an expensive one, let’s say from 50 thousand rubles. Maybe he can handle it, maybe he won’t.
Therefore, with such a daisy, I refused to buy an expensive machine because the work will not pay for such costs, and cheap rubbish is not needed.
This means we work the old way, proven and cheap.
In general, I have a tile cutter, it’s not the worst, it successfully coped with various tasks, but there was a problem with this porcelain tile. It (porcelain stoneware) breaks off along the cut line completely uncontrollably, it can clearly break, or the arrow can go to the side. The second problem is that the surface is very fragile, just like a glass surface; even behind the roller, chips can occur. A diamond cup can also chip even with a light touch. There is no need to talk about a diamond disc at all, the surface after it is jagged and chipped, which means that not every water-powered tile cutter can cope with such a task.
Pouring formwork with concrete solution
Concrete mortar is prepared by mixing sand, cement and crushed stone. To reduce the porosity of a concrete product, it is advisable to use a plasticizer.
Pouring pre-prepared formwork takes place in several stages:
- filling the formwork with concrete solution by 50-40 percent
- laying the reinforcing structure
- complete filling of the entire formwork volume
The final drying time for a concrete countertop is about a week. The finished, dry surface is sanded until a perfectly smooth plane is obtained.
Due to the fact that concrete has high hygroscopic properties, it would not be superfluous to cover it with moisture-proof compounds.
Types of oils by drying
Oil dries more slowly than varnish because it penetrates into the wood and the varnish polymerizes on its surface. But oils are different: depending on the composition, there are completely drying and non-drying ones.
We recommend: What is a sectional fence?
For initial impregnation of wood, a linseed oil coating is most often used. Adding tung oil to it speeds up the drying process. In this case, tung oil perfectly replaces metal driers (a substance that is added to the oil to speed up drying).
G-Nature natural countertop oil uses this exact combination. It also contains rosin as an excellent antiseptic and wax to give the surface a matte shine after polishing.
Epoxy resin table top
This type of material is initially liquid and is quite successfully used for making epoxy countertops with your own hands.
The undoubted advantage of this material is the original appearance of the finished product. With the right approach to choosing decorative elements, you can get a unique appearance of the surface.
Photos of do-it-yourself countertops
Tell your friends