From the author: Hello, friends! Home air heaters create warmth and comfort in the house when there is frost and cold wind outside. After installing a new heating system, apartment owners often do not know how to turn on the gas convector. Of course, you can study the instructions, but the best way is to see everything with your own eyes using a video or get information from experienced users. Additionally, you need to familiarize yourself with the safety precautions and operating rules of the device.
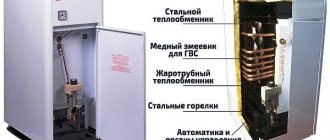
Gas convector device
The operation of the device is based on the law of natural air heat exchange. From the external environment, the device draws in oxygen necessary to maintain the combustion function. Gaseous substances harmful to human health escape through a special adapter.
Weather conditions do not affect the operation of the device. The smell of gas and combustion products is not felt due to the fact that the process takes place in a sealed chamber. A gas convector is a prefabricated structure consisting of a large number of parts:
- back wall,
- sealed housing,
- front casing,
- air exchanger,
- pipes, screeds,
- fastenings and mounting products.
The body is made of cast iron or steel with a heat-resistant coating. The decorative grille protects people from accidentally touching the hot surface of the device. Warm air passes through it, warming the room. The air exchanger is installed on the outside of the wall. The windproof design ensures trouble-free operation of the device.
The safety of the convector operation is maintained automatically:
- if the draft is weak or the ignition burner goes out, the gas supply is interrupted,
- set the desired temperature on the control panel,
- gas flows evenly, regardless of the pressure in the gas pipeline,
- The burner is ignited using a piezo igniter.
Warm floor
Home owners use heated water floors with their own hands, in two versions.
Warm floors evenly warm the room, increase the level of comfort and do not require additional energy costs, since the batteries and the floor circuit are powered from one boiler.
Self-installation of floors is quite accessible to owners who have carefully studied the principle of operation and the procedure for calculating heated floors. Before installation, you need to decide and purchase the necessary materials and components for the heated floor. During the installation of the circuit, strictly follow the rules and recommendations of specialists.
In principle, a warm floor can be created in an apartment located in a multi-story building. But usually connection to the heating system is prohibited. If there is permission, then connection will require an examination of the influence of heated floors on the operation of the system. Typically, this design requires the installation of a separate pump and mixing unit. These additional elements will maintain system pressure at the outlet. In private houses, heated floors and a do-it-yourself heating system in a private house are inextricably linked.
To organize a heated floor, mainly three types of pipes are used. The best option is metal-plastic pipes, which are relatively cheap, easy to install and durable. Copper pipes are used, but they are very expensive, as well. They are inconvenient to work with because they are rigid, but they are not afraid of freezing and are easily repaired.
Installation of a heating device
On the wall where it is planned to mount the convector, make a hole corresponding to the parameters of this model. The further actions of the masters are as follows.
- A coaxial telescopic pipe is inserted into the prepared tunnel.
- The wall must be made of material that is not subject to combustion. If the interior is made of wood, drywall or other combustible materials, it must be insulated.
- The pipe is installed perpendicular to the convector with a rigid fastening.
- The back of the device is screwed to it.
- The convector is attached to the wall.
- The telescopic pipe is positioned so that only the fungus is visible from the outside.
- The remaining cracks are sealed with heat-resistant foam and cement mortar.
It is necessary to ensure that emissions from the convector do not fall on footpaths, since the escaping gases have a high temperature.
Installation process
Dimensions of the in-floor convection heater and the niche for it.
If you want to install an in-floor convector yourself, we recommend that you think about the location for its installation during the construction stage of the building - this will make it easier to organize a niche of suitable depth. Moreover, the niche itself should be 1-1.5 cm larger (on each side) than the metal box of the device. At the same time, you need to make sure that the upper part, where the decorative grille will be located, is on the same level as the future floor covering.
We recommend that you first choose an in-floor convector, and only then work on the floors, so that you have the dimensions of the box in your hands
Please note that we will pour the final screed after installing the heating device. Once the niche is ready, you can begin installing the equipment. We fasten the trench convector box using the included fasteners
We check the correct installation using a building level - the heater should be located evenly in the niche, without distortions. Further installation involves connecting to a heating system or electrical network - for this, plastic pipes, flexible hoses or metal pipes of suitable diameter are used
We fasten the in-floor convector box using the included fasteners. We check the correct installation using a building level - the heater should be located evenly in the niche, without distortions. Further installation involves connecting to a heating system or electrical network - for this, plastic pipes, flexible hoses or metal pipes of suitable diameter are used
Once the niche is ready, you can begin installing the equipment. We fasten the in-floor convector box using the included fasteners. We check the correct installation using a building level - the heater should be located evenly in the niche, without distortions. Further installation involves connecting to a heating system or electrical network - for this, plastic pipes, flexible hoses or metal pipes of suitable diameter are used.
If you are installing a water convector, provide thin, shallow niches for laying pipes/hoses. When installing an electrical appliance, we recommend laying the connecting wires in cable ducts or pipes so that they can be replaced without problems. We recommend wrapping supply pipes with coolant in thermal insulation.
The radiator pipes will also be covered with screed.
At the next stage, we fill in the concrete screed - our DIY installation of the in-floor convector is nearing completion. The result of this stage should be a subfloor, with a metal box protruding slightly from it. Next, we complete the final leveling of the floor and begin laying the floor covering. At the last stage, we place a decorative grille over the box - it is best to choose it in the same tone as the color of the floors.
Do-it-yourself installation of in-floor convectors is complicated by the fact that you need to choose the correct dimensions of the niche so that the metal body of the device is located at the correct depth. Recommendations on this issue can be found in technical data sheets. The worst thing is if you have to carry out the installation in a house that has already been built - it is not a fact that it will be possible to make a niche in the subfloor, as this may affect its strength. In this case, it will be necessary to increase the height of the subfloor in all rooms.
Preparation for use
Before starting to operate the air heater, you need to check:
- gas burner manifold fasteners,
- tightness of gas connections,
- accuracy of thermostat operation,
- security system in the room and the device itself.
Attention! Never attempt to reset factory programmed settings. They are designed for convector operation on natural gas. To carry out the necessary adjustments (for liquefied gas or other types of fuel), contact a specialized service center.
Kinds
The principle of operation for all models is the same - they heat the air circulating between the elements of the heating devices. The heated air, becoming lighter, rises, and heavier, cooled air takes its place. Devices are divided into groups according to installation method, type of heating element, power, and additional functions.
By installation method:
- Ceiling - located almost at the ceiling of the room.
- Wall-mounted - need to be hung on the wall, just below the window openings.
- Floor-standing - can be placed in any desired place in the room, near the wall, in the center.
- Skirting boards - mounted in place of classic skirting boards along the walls.
- In-floor - immersed deep into the thickness of the floor, along large window openings, external walls.
Heating elements:
- Needle-shaped.
- Finned heating element.
- Monolithic.
Power - 1.5-2.5 kW. Models with larger and smaller characteristics are less common. A power of 1.5 kW is enough to heat a room with one external wall, an area of about 10-15 square meters. meters, 2.5-3 kW can withstand standard wiring.
Switching procedure
To ignite the pilot burner, you need to move the main regulator from the “OFF” to “ON” position. Press and hold the control knob for a few seconds until the pilot light comes on. Check to see if the wick lights after you release the control knob. If the light goes out, repeat the operation. To further understand how to turn on and operate the device, watch the video.
Set the temperature control to the desired position - from 13 to 38 degrees. Each of the seven values corresponds to a specific indoor air heating temperature. The gas convector can be left in standby mode when only the wick is lit and the main flame is extinguished. To turn off the device, just press the “OFF” button.
Attention! After the end of the heating season, the gas supply to the device should be completely shut off. To do this, close the valve on the gas pipeline.
Principle of operation
During the combustion of fuel in the furnace, a large amount of hot gas is released, which is discharged outside the heated room through a pipe. The economizer allows you to use the gas removed from the fireplace for additional heating.
A chimney convector works on the principle of a simple heat exchanger with natural convection of air masses. Cooled air is sucked into the convective holes of the outer tube of the product and, heated by the hot chimney pipe, gradually rises to the top, spreading throughout the entire room. Slowly cooling, the air masses descend and their path repeats again.
Precautionary measures
The use of household appliances requires compliance with safety precautions. Be careful and listen to the advice of manufacturers:
- You cannot use a convector that has a damaged viewing window,
- if the device goes out spontaneously, do not re-ignite it earlier than after 3 minutes,
- To prevent burns, the convector is protected with a protective grille.
It is strictly prohibited:
- dry things on a running appliance,
- turn the device on and off for children and people with limited legal capacity,
- operate the device with the outer casing removed,
- repair the device yourself,
- place flammable objects at a distance of less than 1 m from it,
- leave it on if signs of a gas leak are detected.
If there is an unpleasant odor in your home, take immediate precautions:
- turn off the gas supply,
- extinguish all sources of open fire,
- do not touch switches and mobile phones,
- ventilate the room
- urgently call the emergency gas service,
- Contact a gas convector service center.
Heater replacement
It is not difficult to repair convectors with your own hands if there are domestic heating elements inside. If they are open, then repairs can be made using the following method:
- Remove the spiral from the bar.
- Measure its length and wind a spiral of the same cross-section from nichrome wire.
- Place the spiral on the ceramic strips (put on ceramic safety beads).
- Place it back in its original place.
At the same time, we must not forget one feature of nichrome - when heated, the thread lengthens and sags, so during installation it must be slightly stretched to prevent dangerous contact with the metal parts of the body.
Closed types of heaters change in a similar way - the burnt-out spiral is removed from the hermetic glass flask, and a new one is inserted in its place
But first, it must first be washed in gasoline to remove the grease - only after this can you begin final assembly with all precautions
If a heating element is installed in the convector, then your task is to accurately determine its inoperability, and replacement is even easier than in other cases. A new heating element is installed in place of the burnt-out heater, followed by connecting the current-carrying wires.
Heating element repair
Features of use
The operating principle of the device is based on the physical phenomenon of convection. Streams of cold air penetrate through the lower grilles, heat up from the heat exchanger and rise to the ceiling. Constantly circulating air quickly heats the room. When installing convectors, there is no need to install heating pipes in the apartment.
Several convectors are installed in a large house. A main gas pipeline must be connected to each of them. One device heats a room with a volume of up to 130 cubic meters. It maintains a given temperature regime with a minimum gas flow rate - from 0.22 to 0.48 m3/hour, depending on the model.
The efficiency of the devices reaches 88%. In comparison, gas boilers operate with efficiency of up to 98%. The performance is improved for devices with fans, but at the same time the noise level in the room increases. When heating and cooling, steel convectors emit a characteristic crackling sound (the metal expands or contracts). Cast iron casings do not produce any sounds.
Gas appliances come in two types: wall-mounted and floor-mounted, fireplace type. They are fastened in the same way, have a common principle of operation, but the latter are larger in size.
Heating elements
If all the switches are working properly, the cord is intact, but the convector still does not work, then the fault may be a malfunction of the heating element. In modern convectors they are used from one to three at a time.
To check the integrity of such an element, we use an ordinary multimeter: we apply one probe to the mounting point, and touch the other terminals on the elements with the second one in turn. Often a layer of scale or foreign contamination prevents good contact. We clean all contacts and wiring wires to a sparkling shine and repeat the measurements. When the cause of the malfunction is identified, we try to repair the heating element; if this is not possible, it must be replaced.
Heating elements are used in two types - closed and open.
Open heating elements
This type of heating elements includes:
- a spiral stretched between strips made of ceramic;
- nichrome wire twisted into a spiral with strung ceramic beads;
- a ceramic rod on which a nichrome thread is tightly wound.
Separate blocks are created from open heating elements together with heat shields.
Open heating element
Closed heating elements
Such heating elements consist of a spiral enclosed in a sealed tube made of transparent glass, which perfectly transfers heat, but also serves as a dielectric. These also include hermetic tubular-type electric heating elements (TEH) - in them the spiral is enclosed in a steel shell, and the dielectric is quartz sand, tightly packed inside.
In many imported convectors you can find heaters that are formed by applying a conductive coating to specially tempered glass or a very thin wire woven into heat-resistant fabric.
Closed heating element
Such elements are not repaired, but replaced with new ones from the repair kit, if the manufacturer has taken care of this. If there are no spare ones, you will have to select from domestic ones - here you will need knowledge of the basics of electrical engineering. It is better to entrust such nuances to specialists from the service center, otherwise you will have to buy a new convector to replace the one that burned out due to your incompetence.
LPG convector
The air heater can be converted to operate on bottled (liquefied) gas. For this purpose, special nozzles and a gearbox are purchased. If there are several such convectors in the house, then a special room will be equipped on the outside of the house for storing propane cylinders.
A comfortable temperature in the house is achieved using the built-in thermostat. It prevents the air in the room from overheating, while gas is consumed more efficiently.
Important! Gas combustion products will not enter the airspace of the room if they are vented into the chimney.
Before buying an air heater, calculate the required power to heat the volume of the room in which you plan to install it. Be sure to take into account the height of the ceilings, otherwise the device may not meet your expectations. The best location for convectors is under the windows. In this case, cold air does not have time to penetrate into the room.
Sometimes these devices are used as an additional source of heat in severe frosts. Approximately 0.095 kg of liquefied gas is burned per 1 kW of heat transfer power per day. Keep in mind that a cast iron heat exchanger in a gas convector lasts much longer than a steel one. Its service life can last up to 50 years, but such a device costs much more. Manufacturers provide a factory warranty of up to 5 years. Make sure that when purchasing the device in the store, all documents are filled out, including the warranty card.
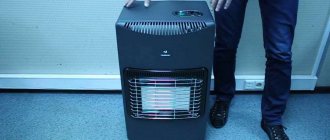
Malfunctions of infrared heaters
Quite often, users encounter the following problem: the heater has stopped working. Sometimes it's just carelessness. It is worth checking the presence of gas in the cylinder. Perhaps a simple replacement of the cylinder will help solve this problem.
Infrared heaters are distinguished by their durability and are considered practically indestructible. During operation, these devices maintain the original volume of oxygen in the room
Before replacing it, you should allow the unit to cool completely to avoid burns. It is strictly forbidden to turn off the gas reducer while the heater is consuming gas from the cylinder. After turning off the heater, you need to disconnect the gas reducer from the cylinder and remove it from the holder on the body. Make a replacement.
Common startup problems
When starting the infrared heater, the following problems may occur:
- The heater refuses to turn on;
- The device turns off automatically some time after successful switching on.
Let's look at each situation in more detail.
The heater may not ignite due to a malfunction of the piezoelectric igniter. It is necessary to check the functionality of the device. When starting, a characteristic sound and crackling sound should be heard, and a spark should be visible.
Before starting, it is also worth checking that the tank is filled with gas. The pressure reducer with a pressure gauge must indicate the current pressure in the cylinder. You can also shake the container to make sure it contains liquefied gas. The cylinder must be correctly connected to the device, and the gas supply valve must be unscrewed.
If after installing a new gas cylinder the device does not ignite, then you need to check its temperature. Maybe it's too cold. In this case, you need to wait until the temperature of the cylinder reaches room temperature.
Sometimes when the device is first started there is air in its pipes. For this reason, the device may not start. It is necessary to turn on the gas supply and wait until the air leaves the system, gas flows and the main burner lights up.
The gas heater must be located in a place where it will be protected from moisture, dust and shock. Any of the listed influences will sooner or later cause the device to break down.
Spontaneous shutdown of the device after prolonged operation is acceptable. This happens due to the burner going out due to air flows. A special sensor must turn off the gas supply in this situation.
If the device turns on again, then there is no problem. If the device turns off immediately after starting, then a possible reason is the lack of sufficient gas in the cylinder.
Infrared heaters are equipped with sensors that detect the presence of oxygen in the room. If there is not enough oxygen, the device turns off. To solve this problem, you need to open the window and ventilate the room or turn on the ventilation system.
Malfunctions and steps to resolve them
If problems arise with the operation of the device, you must turn it off and do not turn it on until repair work is carried out. Among the main malfunctions encountered during the operation of infrared gas heaters are the following.
The automatic ignition of the fuse does not work. This problem in most cases arises due to the lack of a spark at the interelectrode gap of the piezoelectric device.
To solve this problem, it is necessary to diagnose the operation of the piezoelectric switch. If a visual inspection reveals a defect in this part, then it is necessary to fix it.
The device must not be moved or covered while it is switched on. Also, no flammable objects should be found at a distance of half a meter from it.
Problems with piezo ignition are of the following nature. The user presses the button and clicks are heard, but arson does not occur. A possible problem is the lack of gas in the cylinder. If clicks are not heard, then you need to check the electrical wiring that leads to the piezo ignition spark gap. Perhaps she was interrupted. In this case, it is necessary to change the wires.
If, when you press the button, the electrical machine turns off, this indicates a short circuit in the network. In this case, it is necessary to check the heater wires for short circuits.
If, upon inspection, it is found that the wiring is fine and the piezoelectric switch is working properly, then the user should try to light the fuse using a match. If ignition is successful, the cause of the malfunction is most likely the incorrect location of the spark in relation to the gas stream.
To solve this problem, you need to adjust the location of the ignition electrodes so that they are emitted along the gas stream.
The next common problem is the heater turning off when the control knob is released. This happens due to the fact that the solenoid valve closes while the device is turned on. The cause of this problem is the displacement of the thermocouple sensor from the fuse fire zone or its breakdown.
To troubleshoot a misalignment, the thermocouple must be properly connected to the valve. If a valve or thermocouple breaks down, these parts must be inspected, the breakdown identified, and the entire part repaired or replaced.
Gas cylinders must not be artificially heated. The thermal expansion of gas inside a closed container can cause an explosion. If necessary, it is better to move them to a heated room and leave them there to reach operating temperature. But it is strictly forbidden to place gas cylinders next to equipment that generates heat.
A common problem when using a device for a long period is a decrease in the burning power of the burners. If the user selects the maximum power mode, then all burner igniters turn on, but it becomes noticeable that one or more of them burn with insufficient strength.
This problem occurs for three main reasons:
- The pipes delivering gas to the burners are clogged;
- The pipes supplying the gas heater are dirty and clogged;
- There is a gas leak.
It is not difficult to solve this problem yourself. To do this, you need to carefully remove the pipes and check them for blockages. If a blockage is detected, it must be carefully removed using a small brush or a homemade cleaning device. It is important not to damage the pipe when cleaning. Before reconnecting, remove any remaining water.
The supply pipes are cleaned in the same way. It is not advisable to compress these parts with pliers, since they are made of easily bendable material. After cleaning, it is necessary to return the supply pipes to their place in the same position.
A strong gas odor is a clear sign of a leak in the gas hose or pipe connection. To determine a leak, apply a soap solution to the gas pipe connections. Instead of soapy water, you can use foaming dishwashing liquid.
A sign of a leak is the appearance of soap bubbles. If they appear, you need to turn off the gas and restore the tightness of the connection.
Sometimes when the burner is ignited, explosions and pops are heard. This occurs due to the presence of through holes in the burner through which air is sucked in. You can close such holes using mastic for fireplaces and stoves
When using some models of infrared gas heaters, the problem arises of switching the position of the knob that adjusts the power of the device from low heat to higher heat.
Usually the cause is the location of the heater, when the air flow blows against the direction of the burner flame radiation. There is also a situation when the fuse shifts.
The problem in the first case can be resolved by simply changing the location of the heater. It needs to be moved to a place where drafts will not blow on it. In the second case, you need to open the cover of the device and adjust the igniter. The flame should be located closer to the lower corners of the gas supply pipes.
If an unpleasant burning smell occurs from the device, you must disconnect it from the electrical network. Then you need to check the presence and integrity of the ceramic plates. Often a burning smell is a sign that part of the plate is missing. The check should only be carried out after the device has cooled down.
It is necessary to inspect the perimeter of each of the plates, determine the place where the part is missing. Repair of plates is carried out using a solution of refractory cement. After stirring the solution, it must be carefully applied to the damaged plate without staining the internal elements of the heater. In this way, the missing or damaged part of the plate is repaired.
You can turn on the device 24 hours after applying the solution.
One of the main reasons why heaters fail is the heavy propane-butane mixture. The use of such a mixture leads to clogging of pressure regulators, injectors, and valves. If low-quality fuel is detected, it is necessary to refill
If upon inspection of the fuse it is discovered that it burns bright red, then do not be alarmed. The reason for this is the presence of dirt in the gas pipe. The problem is solved by blowing and washing the pipe with compressed air.
Sometimes users find stains or burn marks on ceramic plates. The cause of stains is usually dirt in the gas outlets, as well as soot accumulated on the ceramic plate, within which flameless combustion occurs. The problem can be easily fixed using a can of compressed air.
The presence of soot on the walls of the device and on the burner usually indicates that low-quality gas is used as a resource for the unit. During operation, only high-quality gas should be used.
Distinctive features
Convectors operating on liquefied gas have a horizontal or vertical chimney. Vertical systems have more power, but have installation limitations - they cannot be installed everywhere. Models with a fan provide accelerated air circulation in the room.
Installation of the device follows the same principle as in the case of natural gas, but it is necessary to provide an additional hole to connect it to a cylinder located outside the room.
Important! During the first hours of operation of the convector, an unpleasant odor is felt in the room. This burns the lubricating oil. Ventilate the room and the air will be refreshed.
To start the device, the operations described above are carried out sequentially. The only difference is that instead of a tap on the gas pipe, they open a valve on the propane tank. An important distinctive feature of liquefied gas appliances is the ability to heat rooms located away from gas pipelines.
Choosing your unit
What should we teach you about choice, dear reader, if you yourself know perfectly well the standard set of conditions?
Desires must correspond to possibilities - no one has yet canceled this rule.
Experts advise paying attention to the brand of the product and the obligatory visual “fitting” of the future purchase to suit your interior and the size of the room - you will not be happy with an inexpensive purchase if you notice that the floor heating convector (aka mobile) is too small and does not have the necessary power in order to heat the room efficiently. And here, don’t carry it with you – it won’t help and won’t warm you up. Power, design, installation method, energy consumption - everything should suit you in your newly acquired heat source
And then you will be happy with your purchase and feel comfortable in your home.
Power, design, installation method, energy consumption - everything should suit you in your newly acquired heat source. And then you will be happy with your purchase and feel comfortable in your home.
Tweet
Fence for a summer residence: which one to choose?
Custom-made furniture according to individual sizes
Roller blinds for plastic windows, photo in the interior
(Visited 377 times, 1 visits today)
How to fix the problem
Malfunctions in the operation of the devices occur very rarely. The main reasons for unstable operation of the device:
- burner contamination,
- clogging of jets,
- dampening of contacts.
Experts advise carrying out preventive measures at least once every 24 months. Craftsmen carry out the necessary repair work:
- weld the damaged body,
- restore the automation system,
- switch the device to liquefied gas.
Attention! Only a certified technician from the gas industry or service center can carry out repairs on gas convectors.
The main task of the specialist is to eliminate the cause of the problem. To do this, replace the damaged node or block. Such repairs are done quickly at a low cost. At the final stage, the operation of the equipment is tested in different modes and the functioning of security systems is checked. Experts inspect the gas pipeline to prevent gas leaks.
Troubleshooting
As you can see, there is nothing complicated in the design of a gas convector. Due to its simplicity, this equipment serves for a long time and with high quality. But sometimes it happens that incomprehensible interruptions arise in its work. If you notice that the flame burns unevenly or is difficult to ignite at all, the problem is often a clogged nozzle.
Simply put, the hole through which the gas escapes becomes clogged with soot or other contaminants. In this case, you can easily clean it yourself. All you need for this is a thin needle. Use it to carefully clean the hole.
Very important: before starting work, be sure to shut off the supply of blue fuel to the equipment. For this purpose, a special tap is provided on the supply pipe.
It is absolutely forbidden to work with the device when gas enters it!
If after cleaning the problem does not disappear, then the most reasonable option for further action would be to call a specialist from a specialized organization. Remember that gas equipment has a high fire hazard. All more or less serious work with it should be carried out only by craftsmen who have the appropriate license.
If you decide to repair the gas convector yourself, but do something wrong, this is fraught not only with subsequent fines from the gas service, but also with the possibility of a fire. You should not take such responsibility upon yourself; be sure to invite specialists to troubleshoot serious problems. Good luck and a warm home!
Main characteristics of the device
Gas convectors have many advantages that allow them to be used in residential buildings, factories and shops. This:
- moderate cost,
- can be turned on only in one room if there are several devices installed in the house,
- The device provides significant gas savings,
- uniform distribution of warm air,
- ease of operation,
- reliability and long service life,
- can be used during a power outage,
- no installation of additional sources required,
- affordable installation and maintenance of the convector.
When choosing a heating system for a new apartment, consider installing gas convectors using natural or liquefied gas. Let your home be warm and cozy.
Criteria for selecting the required materials
Since a homemade device is assembled from units that have already been used, first of all it is necessary to assess the condition of the pipes
Particular attention will need to be paid to their walls. Their thickness should be several millimeters
If corrosion occurs, it is undesirable to use such pipes or be sure to eliminate all defects before use. All rust will need to be thoroughly removed from the metal with a brush, and then covered with an anti-corrosion compound so that the problem does not arise in the future during operation.
If a heating device is connected to an apartment or garage, then all components must be of absolutely high quality, since such systems are exposed to pressure of a large number of atmospheres. If the wall is damaged, it will not withstand the load and will eventually burst, which will lead to loss of coolant and breakdown of the entire unit.
For production, pipes with a diameter of approximately 12 cm are usually used. Sheet metal of the appropriate size is used to plug the ends.
To make bypass channels and fittings, you will need to use pipes of a smaller diameter, which can eventually be connected to the heating system. The threads on the fittings are pre-cut, for this reason the appropriate equipment is required - a “drill” (for creating external threads) and a tap (for cutting internal threads).
A DIY oil radiator can be made portable. In this case, small pipes will be used, and oil will be used as the coolant. Heating elements are used instead of heating elements. The choice of this component depends on the area of the room that needs to be heated. Home craftsmen often install an additional thermostat on such a device, which periodically turns the heating element on and off.
For good fastening to the wall, you will also need strong hooks that can support the weight of the resulting unit. To create a more aesthetic appearance, they can be purchased in the store. But if you don’t want to spend additional money, then strong reinforcement bars that need to be fixed in the wall are also suitable. It is advisable to first paint the hooks in the same color that was used to paint the heating device - this way the fittings will become invisible.
Difference from radiator
To make a choice between two types of heaters, you need to know the difference between a convector and a radiator. We already know the structure and operating principle of the first device. Now let's examine the radiator.
Design and principle of operation
A radiator is a hollow metal structure filled with coolant. In electric models this is mineral oil, in central heating systems it is water. But we are only interested in oil (electric) radiators.
A heating element is located inside the cavity. First, it heats up itself, then it transfers heat to the oil, which shares thermal energy with the body. Only then does the air, touching the heated metal, become warm, and it floats up. Here we are also talking about convection, but the heating path is too long and expensive.
Checking the connections located inside
Before starting work, we find a diagram of the device and carefully familiarize ourselves with it.
Then we sequentially inspect the power button and dismantle the front panel. By visual inspection, we identify traces of burning and the tightness of the mounting wires with the appropriate screws. We replace elements with loose or broken threads with new parts. Scale in areas with visible burning is carefully removed. Assembly occurs after thoroughly cleaning the exposed sections of wire and washers with sandpaper.
The temperature controller is tested using a multimeter. Most often, it is this element that becomes unusable in electric heating devices.
The feasibility of self-repair
There are many reasons why a heater malfunctions. The main ones include improper operation of devices, supply of unsuitable fuel to the equipment, placement of the heating unit in a room with an aggressive climate and high moisture, and neglect of preventive maintenance.
Initially, the owner of the device needs to decide which parts can be replaced. It is important in the first stages to figure out which breakdowns are easy to fix on your own, and which ones are best addressed to a repair shop employee.
The main danger that the user will face is a possible gas leak. Therefore, the first and main task when identifying a heater failure is to turn off the gas tap.
If you find that the burner of a gas heater is not burning, but fuel is being supplied, then in addition to shutting off the pipe or cylinder valve, you must urgently open a window to ventilate the room.
If you detect a leak with a characteristic gas odor, do not use anything that can generate a spark: matches, lighter. You should also not turn on the light, it can cause an explosion.
Manufacturers of portable heaters in the instructions for the devices recommend that if the equipment breaks down, take it to a workshop where they repair the corresponding equipment. This requirement is in accordance with safety regulations.
However, not every user wants to spend serious money on repairs. By following simple instructions, most problems can be easily fixed on your own using available materials and tools. The home craftsman will have to acquire some parts and components. In any case, it will cost less than repairing the heater in a workshop.
Before you understand the principles of repairing outdoor gas heaters and garage heating devices, you need to determine what types of these devices are produced.
There are three types in total:
- Infrared gas heaters. Such devices are used for heating rooms and open areas: sports fields, verandas, terraces, restaurants. The operating principle is to emit infrared waves. Warming occurs not due to the acceleration of warm air, but due to the heating of objects, which then radiate heat.
- Convectors without combustion product outlets. They are devices that distribute warm air throughout the treated space. They are installed only in open areas, as they release decomposition products during operation.
- Thermal gas guns. The principle of operation is to create heat in the structural unit of the gun and supply warm air to the heated elements due to a very powerful air flow. They are used both for targeted heating of construction sites and for processing large commercial facilities.
Good to know: can the thermostat be repaired?
A number of signs indicate a thermostat malfunction.
Namely:
- Lack of clicks;
- Moreover, the convector works and heats up;
- It began to heat up as much as possible, without reacting to the turns of the temperature regulator.
There is no point in taking actions to repair it, because... they have a closed body. It is almost impossible to open the thermostat housing without breaking it. In addition, they are available at any hardware store.
Vacuum manifolds
Vacuum heating collectors
The design of the individual parts of the vacuum manifold is reminiscent of the operation of a thermos. Solar heat easily passes through the transparent surface of the bulb into the copper rod located inside. A vacuum is created between the layers of the tube. This structure helps retain up to 96% of accumulated heat.
Advantages of vacuum installations:
- high heating temperature;
- stable and reliable design;
- ease of installation;
- good performance in summer and winter;
- minor heat loss.
Minuses:
- high price;
- installation is carried out at a specific angle of inclination of the collector;
- After snow has fallen, the system must be cleaned.
In some countries, solar collectors are the main part of the communications of every home. This applies to southern countries and is characterized by a mild, sunny climate.
