The question of how to hide pipes in the bathroom without installing them into the wall worries almost every property owner who has encountered the “delights” of old-style domestic apartment construction. Yes, in most new modern apartment buildings this problem has been largely solved by pre-planned closed installation. In this case, the appearance of the bathroom is not spoiled by ugly pipes, the overall aesthetics of the room is preserved, you can make beautiful and expensive renovations - and it is quite reasonable to count on an impressive result. But what about the opposite case? Don’t throw ashes on your head - the task is much easier to solve than you think, and you won’t need to rearrange the family budget or learn any new skills.
- What you need to know before installation;
- All methods of masking pipes;
- Features of installation of a plasterboard box;
- Conclusion.
Requirements for materials for sealing pipes
The material must meet a number of criteria:
Requirements for materials for masking pipes in the bathroom.
- A room with limited space, so it is not cluttered with heavy frames. The sheathing is fixed to a light metal profile or wooden slats.
- The specificity of the room is constant high humidity. Choose a material that does not absorb water and is not deformed by it.
- When cleaning, it is difficult to do without detergents with chemical reagents. It is important that the material does not react with them, the surface retains the quality of the decorative finish.
Modern materials such as MDF, plastic panels, and moisture-resistant plasterboard meet the requirements.
Preparatory work
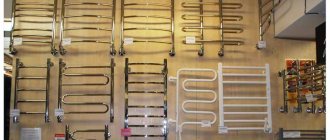
A device such as a heated towel rail requires preliminary preparation for subsequent painting. You cannot start painting immediately without any surface treatment. Follow these steps and you will get the job done well.
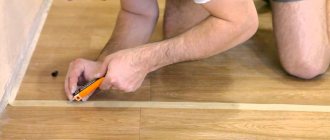
- Take sandpaper and sand the entire surface of the dryer. Especially carefully clean areas where rust has appeared, the old coating has come off, the paint has cracked, or cracks have formed. Try to do the work conscientiously, since preparing the device is the most important step in terms of the final result.
- If possible, remove the entire protective layer. This will allow the new layer to lay perfectly flat and last on the device for many years. This is especially important when it comes to chrome surfaces. The enamel does not adhere well to it, so clean it thoroughly.
- After finishing cleaning, wash off any remaining particles of the coating with a wet cloth and detergent. This will not only remove any remaining dirt, but will also degrease the surface.
- The final stage of preparation is primer. Also be careful when choosing a primer. This must certainly be a primer that is intended for use at high temperatures. Nowadays, German-made alkyd primers are in particular demand. Do not apply the composition in rough layers. On the contrary, the layer should be thin and very uniform.
Now you can go about your business for a while, since the primer should dry. Once this happens, you can proceed to the next stage.
Which pipe elements should not be masked?
The operation of the system is not immune to failures. To repair pipelines, inspection hatches are left to provide access to elements where problems may occur. These include places:
Metal pipes can be completely covered under tiles.
- with threaded connections, taps;
- with fittings that need to be tightened;
- corner type connections, tees, crosses, where there is a high probability of leakage;
- where counters and filters are installed.
Metal or plastic pipes without threaded or welded joints can be completely covered under plaster or tiles. Then the likelihood of a leak is reduced to zero, and you won’t have to break down the walls to fix the problem.
How to work with a chrome heated towel rail?
If a modern heated towel rail does not fit into the bathroom interior, its appearance can also be changed. Not every paintwork material is suitable for chrome: most either slip off or are quickly erased from the surface of the product. You will have to sand or sandblast it to remove the chrome plating down to bare metal. Afterwards, you can prime and paint the coil as usual.
If you don’t want to carry out such serious preparation, you can buy high-quality Tessarol or Hammerite and apply it directly to the chrome, although the price of the work will be quite high. Before painting, there is no need to sand or prime – you can simply degrease the product with any solvent.
Painting a heated towel rail is not a very difficult or tedious task; it can be done independently. A new product will last a long time if you choose high-quality paint, so there is no need to skimp on material.
Having a heated towel rail in your bathroom is very useful. This device heats the room, dries clothes, and warms your towel while you shower. Plus, modern models can become a very important attribute of interior design, adding some zest. However, over time, the device may lose its original appearance. Therefore, painting a heated towel rail is often the solution that can save you from the problem of an unsightly coil.
Of course, if the dryer not only lost its original appearance, but also began to work frankly poorly, there can only be one solution - replace it. However, as a rule, everything is fine with their reliability, but the aesthetic component fades over time. Therefore, it is enough to simply update the coil and give it some minor cosmetic repairs by simply painting it.
- 1 Materials and tools
- 2 Preparatory work
- 3 Painting
- 3.1 Useful tips
Basic rules of camouflage
Before you hide the pipes behind a decorative disguise, you should think about what finishing method is suitable for the interior. They also do not forget about practicality, but if it is decided to disguise the pipelines, aesthetics play an important role.
In order to have access to meters and pipes, inspection windows must be left.
It is advisable to draw up a plan or mark the laying of pipes on the wall. If they have already been laid openly, outline the contours of the camouflage elements.
If you nevertheless decide to lay threaded, soldered or welded pipelines in grooves, it is not recommended to immediately cover them with finishing materials. Allow several days to test under pressure and at rest. After confidence in the tightness has come, the grooves are sealed.
Pipelines are made from the same materials - this improves the quality of connections. Strength and linear expansion will be identical.
Together with communications, the meter, filters, taps, and fittings are closed. To have access to them, viewing windows are left. There must be enough space to replace or repair the unit.
It is recommended to insulate closed pipes. In a confined space, condensation forms, damaging the camouflage and walls. This is especially important for cold water pipes. For hot pipes embedded in the wall, space is left for expansion. In both cases, they are covered with a foam rubber or thermoflex casing. For cold pipes this is thermal insulation, for hot pipes it is also space that allows expansion.
Preparing the heated towel rail
Painting a heated towel rail bronze or any other color requires preliminary work . If a thin layer of enamel is applied to its surface, the surface will remain imperfect, and after a while rust may appear on it.
Use sandpaper to remove the top decorative layer throughout the dryer. Carefully handle pipe bends and cracks in the old paint layer to level the surface.
Ideally, if you want to beautifully paint your heated towel rail in chrome or bronze, it is recommended to completely remove the entire decorative layer. If it is a chrome layer, then it must be removed completely, since the paint will adhere very poorly to it.
Removing the top layer from heating radiators and heated towel rails is a long task, but it is worth it. In the future, painting the old product will be much easier.
After removing the top layer, the dryer is thoroughly wiped with a cloth and a cleaning agent to degrease the surface and remove remaining particles from it. The next step is applying a primer to the surface of the product.
Choose a primer that can withstand high temperatures . For example, the GF-21 primer has proven itself well. Also suitable are NOVA and CO primer enamels and Eckart. Apply them in a thin and even layer. Then leave the heated towel rail to dry for 3-4 hours.
The best ways to make pipes invisible
There are different ways to disguise pipelines in the bathroom. Options can be simple or complex depending on the selected materials and type of construction.
Options for masking pipes in the bathroom
Painting and decoration
Painting pipes in the same tone as the walls makes communications unnoticeable. It is important to choose the right composition:
Painting pipes in the bathroom.
- The paint for radiators retains its snow-white color for a long time. Unlike others, it does not turn yellow at elevated temperatures.
- If you choose other shades, then metal pipelines are painted with alkyd, acrylic or water-dispersion compositions.
- For plastic pipes, choose paints without acetone, which are diluted with white spirit or have a water base.
- For hot water pipelines, heat-resistant compounds are chosen.
Metal pipes are first cleaned, dust removed, and coated with a primer, for example GF-2. It improves adhesion to the base paint and protects against rust. There is no need to prime the plastic; the adhesion to it is already good. Condensation is possible on cold pipes; it can be removed by wiping it dry.
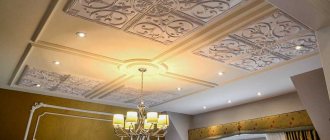
The decoration with polyurethane stucco, which is difficult to distinguish from clay, looks beautiful. The use of such decor is appropriate in a classical style room. Only vertical pipelines are masked, creating mini-columns. In horizontal areas, this design looks ridiculous.
Plasterboard box or false wall
The bathroom uses green, moisture-resistant plasterboard. A frame is mounted from a special metal profile, to which the gypsum board is screwed. Then the surface is finished by plastering, followed by painting or gluing tiles. You can sew vertical and horizontal pipelines in this way.
Masking pipes using a plasterboard box.
Algorithm of actions:
- Lines are drawn at a distance of 3-5 cm from the most protruding parts of the water supply or sewerage system. Use a level, otherwise defects on the finished box will be clearly visible.
- Holes for dowels are drilled along the lines. The guides are attached with self-tapping screws, and crossbars are attached to them after 15-20 cm. For fixation, special fasteners are used - crabs.
- Drywall strips are cut to the dimensions of the frame and screwed to the metal profile with self-tapping screws. The caps are recessed by 1 mm. In order not to tighten more than necessary, use a special bat for drywall.
- They make an inspection hatch by cutting it in the box with a construction knife. The door is installed on hinges.
- The edges of the seams are chamfered, sealed with putty, and a special tape is glued on top. Then the entire surface is puttied and rubbed.
Step-by-step steps for making a plasterboard box.
Ventilation holes are made on top of the box with hidden heating pipes or hot water. If taps are hidden behind the casing, there are threaded connections or fittings, a small hole is drilled in the lower part, which will help you quickly see the leak.
There are many options for using drywall to disguise communications and plumbing. A false wall is made from it, which is used to fence off part of the room. More often this is a toilet in a combined bathroom. The frame, covered with plasterboard, covers the corrugation that connects the plumbing to the riser. GCR is used to make screens for bathtubs.
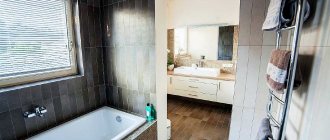
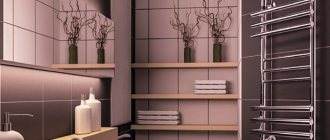
Disguise with furniture
The method is simple, but expensive. You need to purchase high-quality, moisture-resistant furniture that will not crack after a few years. In addition, it must be suitable in size: height, width, and not be too deep. In some cases, furniture is ordered. Such disguise not only looks beautiful, but also carries an additional functional load. Personal hygiene products, household chemicals and other things are hidden in it.
You can hide pipes in the bathroom using furniture.
Standard furniture requires minor modifications, which can be easily done on your own. The back wall is removed, but not completely. Triangles are cut from the fiberboard with which it is closed. They are fixed with self-tapping screws at the corners of the entire structure and individual sections. This gives stability, the furniture will not wobble. In addition, use a jigsaw to cut holes for the pipes.
In this way, by installing a pencil case, you can hide the riser. The cabinet under the washbasin will hide the communications supply to the mixer. Another option is a laundry basket instead of a bedside table. It is important here not to overdo it with furniture, so as not to use up a lot of space, which is already small in the bathroom.
You can hide the pipes behind a cabinet. masking pipes in the bathroom with furniture. Masking pipes in the toilet.
Frame covered with tiles
This is not gluing tiles to drywall, but fastening them with self-tapping screws to a frame made of metal profiles or wooden slats. The design is collapsible; you can remove a separate element at any time to gain access to communications, then put it back in place. Cladding with the same material as on the walls makes the camouflage invisible.
Covering the frame with tiles to disguise pipes in the bathroom.
To work, you will need a tile cutter or grinder with a diamond blade. They construct a frame, securing it to the wall, floor and ceiling with special metal brackets. In order to cut tiles less, they try to at least make the front wall of the box according to the size of the tiles. The edges must overlap one another; for this, the thickness of the material is taken into account.
Having cut the tiles to size, start drilling holes. You will need 2 in each tile. They use a drill with speed control and work at low speeds. You will need a spear-shaped carbide-tipped drill. It slides off the smooth glaze. To drill in the right place, stick a piece of tape. The diameter of the holes should be such that the self-tapping screw fits in freely, and in the profile it should be slightly smaller. It is recommended to soak the tiles before cutting and drilling - this reduces the risk of cracks and chips.
After installing all the elements, install the corners, which simultaneously cover the screw heads. A door is placed opposite the communication nodes to which access is required.
Working with cutting tiles requires caution. They use gloves to avoid getting hurt on sharp edges, and cover their eyes with glasses. The glaze crumbles into small pieces and scatters far.
Screen made of plastic panels
Masking pipes using a screen made of plastic panels.
The material is one of the most successful: extremely waterproof, lightweight, and easy to install. If necessary, the structure can be easily disassembled and then restored. Cleans well and is not afraid of aggressive chemicals. A variety of colors and patterns allows you to complement the interior of the room. You can cover a sewer pipe, a water supply pipe with panels, or make a screen for a bathtub.
The plastic is mounted on a frame made of metal profiles or wooden slats. First, make markings using a level or plumb line. Planks are fixed around the perimeter. In areas larger than 50 cm, profiles are added in the middle to increase the rigidity of the structure. Before sheathing, the starting corner is secured to the first rail with self-tapping screws.
The panels are cut to length and the first one is inserted into the molding. The wide shelf is directed towards the installation. The opposite side is secured to the sheathing with staples using a stapler or self-tapping screws. Further installation is carried out by inserting each subsequent panel into the groove of the previous one. Locks securely connect the elements, creating a durable structure.
If necessary, the top panel is cut to the required size and inserted into the moldings. Their variety allows you to carefully design joints, corners, and points of connection to the wall and ceiling. Use internal or external ceiling corners specially designed for these purposes.
The screen under the bathtub is made using a similar technology. The lower plank is fixed to the floor, the upper one - at one end on the wall, then spacers are installed after 40 cm. In a similar way, the pipelines leading to the bathtub and the sink, which is located nearby, are hidden. If you make a window, you get a place to store various household items. Pipes under the ceiling can also be hidden in this way.
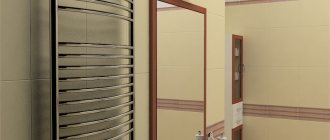
Plumbing roller shutters
Roller shutters for hiding pipes in the bathroom.
Roller shutters for masking communications have an important advantage: they quickly provide easy access to pipes over long distances. A special type of product is produced - sanitary ware. The curtain is made of synthetic fabrics with antistatic and water-repellent treatment. The range of colors is wide, a choice is available in accordance with the design of the room.
Raising and lowering of the panel is carried out manually or electrically. In the latter case, the models must be cassette type, the mechanism is hidden in a special aluminum box. For curtain widths up to 52 cm, the mechanical drive is driven by a chain. For larger sizes, a spring mechanism is installed.
Installation is possible in 2 ways: in a niche or on a frame attached to the wall. In the first case, a profile is installed along the perimeter of the niche in the same plane as the wall. Blinds are attached to it. If there is no natural niche with communications, arrange a protruding box, the sides of which are covered with plasterboard and lined. A roller blind is installed on the front part.
Masking pipes using roller shutters. Brown roller shutters for pipes in the bathroom. Roller shutters for masking communications in the bathroom.
To ensure stable operation of roller blinds, the side profiles are mounted strictly vertically and parallel. Minor distortions lead to jamming. The product is first assembled and then installed in place.
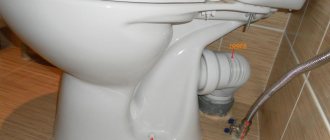
Installation of pipes into the wall
Installation of pipes into the wall in the bathroom is usually used in new buildings during major renovations.
The method is used in new buildings and during major renovations. Its positive side is that the dimensions of the room are preserved. The method involves cutting walls and laying communications in grooves. It is prohibited to use in panel houses or on thin partitions.
A significant drawback is limited access to pipelines in an emergency. Therefore, pipes without connections are hidden in grooves, shut-off and other devices are brought outside. They first draw a plan and indicate the location of all elements. Parallel lines are drawn on the wall along the width of the pipelines with a slight increase. Free space is required to accommodate insulating sleeves.
The grooves are made with a wall chaser - 2 at once. If such a tool is not available, use a grinder with a diamond blade. The building material between the slots is removed with a hammer drill or chisel. Debris should be removed from the finished grooves and the surface should be coated with a primer. The pipes are laid and fixed in separate places with mortar. You should not cover it with plaster right away: watch for several days to see if any leaks appear.
Fixing pipes with mortar.
Painting
If you have ever held a brush in your hands, you should not have any difficulties with painting a heated towel rail. Follow the instructions and everything will be fine.
- Arm yourself with a brush, but only with natural bristles. This will allow you to apply layers more evenly and not leave pieces of lint on the surface.
- Take the above paint, some old screwdriver, for example, and mix the composition with it. The mixture should be homogeneous, so stir well. It is best to do this in several approaches in order to achieve the ideal consistency.
- Now take a brush, carefully dip it into the paint so that the composition is literally on the tip. Start painting from the top to avoid smudges. Even if the drops fall down, they can be smeared, thereby avoiding unevenness.
- The paint is applied in at least two layers, but three is best. Each new layer is applied only after the previous one has dried. Not necessarily completely, of course. Moreover, alkyd paints have the excellent property of drying quickly, so a gap of 2-3 hours between layers is quite enough.
- After finishing painting, leave the heated towel rail undisturbed for about 5 days so that the composition is completely absorbed into the surface of the device and dries completely.
Useful tips
Agree that useful advice is never superfluous. Despite the fact that we have already talked about the main nuances of painting a heated towel rail, there are a few more points that you should know about.
- It is not necessary to use brushes exclusively to apply layers of paint to the surface of the dryer. There is a great device called a spray gun. This is an effective device that can provide maximum results with minimal paint consumption. The layers are applied evenly, there are no streaks, and there is a risk of leaving brush hairs on the heated towel rails, since they are not always of good quality.
- If you purchased alkyd enamel, but it turned out to be quite thick, you should not use it in this form. Use a special solvent, which is not at all a problem to find in any hardware store. Bring the paint to the desired consistency, after which you can begin painting.
- Do not start painting while the dryer has not yet cooled down. Also, do not turn on the device if the layers have not dried properly. We have already noted that after painting is completed, you should wait about 5 days. Therefore, the optimal time to perform such work is the end of the central heating season if you use a water heated towel rail. Then you will not depend on any deadlines, which means you will complete the task efficiently and reliably.
As you can see, painting is a fairly simple job. It’s not difficult to decide what exactly to paint.
If you are dealing with plastic dryer tubes, then you are unlikely to need to paint them. As a rule, such material is not afraid of anything except ultraviolet radiation. But if you decide to paint anyway, use any water-based compounds. For example, emulsion, silicone, dispersed or acrylic paint.
Carry out painting carefully and without haste, so that dried drops, stains, smudges and other little things do not form on the surfaces that will spoil the appearance of the device, despite the fresh layer of new coating. Such work requires delicacy and caution.
The pros and cons of hiding pipes in the bathroom
There are positive aspects to masking pipelines:
- the interior of the room is improved, communications become inconspicuous or not visible at all;
- with hidden installation, the space of the room is not taken away;
- camouflage with furniture creates a beautiful interior, places for convenient storage of various small items.
Negative points:
- Poor installation or materials lead to leaks and breakthroughs.
- Access to the pipes is limited, except for the option with roller blinds.
- In the event of an accident, the structure must be disassembled, in some cases without the possibility of restoration.
- Severe pipeline leaks during hidden installation are not immediately detected. You may have to make repairs not only for yourself, but also for your neighbors.
- Even moisture-resistant furniture in the bathroom lasts less than in dry rooms.
Despite the negative aspects of camouflage, you should not give it up. A competent approach to installation will ensure reliable operation of the system.
Paint selection
The selection of a high-quality composition is very important, because it is this material that will determine the aesthetics of the result and the service life of the coating. Conventional paints and varnishes will not work: the heated towel rail regularly heats up, and they will instantly crack. When purchasing, you need to pay attention to heat resistance: the paint for the heated towel rail must withstand heating up to +120...+180 degrees.
Also, high-quality material for painting the coil should have the following properties:
- resistance to water, can be used in wet areas;
- resistance to wear, friction, mechanical stress;
- anti-corrosion properties, absence of components harmful to metal in the composition.
As for color, you should choose a tone that is suitable for a particular bathroom, corresponding to the theme and style direction. Most often, users choose paint like chrome, silver, gold, or other metallic coatings. Heated towel rails in black, dark blue, and red look original.
If desired, shades can be combined and paints mixed with each other. It is not recommended to buy only white paintwork materials - even the most resistant material will lose color and become yellowish due to temperature changes.
Oil paints
Such products are not suitable for working with heated surfaces. They quickly lag behind the base, have insufficient adhesion, are not heat-resistant, besides, they smell unpleasant and have a short service life.
Acrylic paints
Acrylic-based compositions do not emit harmful fumes, do not smell, thanks to their smooth texture they are applied easily and in a perfectly even layer, and do not leave streaks or drips. Acrylic paints dry quickly and have a high degree of adhesion to surfaces. They also have disadvantages: poor chemical and mechanical resistance, rapid abrasion.
Silicone coatings
These paints are based on rubber and other resins diluted with water or organic solvents. The material in the form of a suspension is durable, does not deteriorate from high temperatures, lasts a long time (up to 15 years), wear-resistant, and moisture-resistant. Solvent-based paints are especially reliable, but they emit a pungent odor until they dry.
Alkyd enamels
Paints based on glypthal or pentaphthalic varnish and special pigments are considered heat-resistant (withstand up to +180 degrees), therefore they are ideal for heating pipes, radiators, radiators and heated towel rails. The finished coating does not peel off for a long time, does not darken or crack.
The service life of the paintwork is at least 10 years, and the film is resistant to water, household chemicals, and mechanical factors. It is better to choose matte or silky-glossy alkyd enamels of the desired color: they look the most beautiful. These paints have only one drawback: they contain solvents, so they emit an unpleasant odor for several days.
Ease
If you decide to do the repairs yourself, it is worth considering that the materials should be lightweight. This will eliminate the need to use additional labor and assemble formwork from heavy raw materials.
For example, strong steel frames are necessary for attaching mirror or marble panels.
Decorative curtain
A worn-out heated towel rail can be hidden behind a plastic curtain, which is used to protect the bathroom from splashes. To do this, you need to cut the blank to the size of the coil and bend the upper part or make loops. Screw screws into the edges of the heater. Thread twine or cord into the curtain and tie it up, decorating it with bows or beautiful knots.
Blinds look more aesthetically pleasing. They are more functional, easy to maintain and have a long service life. They allow warm air to pass through well and can also be removed at any time.
Blinds
If the pipes that you want to hide from prying eyes are located in a niche or wall opening, then the best option is to install blinds or roller shutters. This method does not interfere with the accessibility of communications and at the same time makes them invisible. Regular ready-made blinds with a manual control mechanism will do. There are special types of sanitary blinds.
The main thing is to choose the appropriate width, and you can fix the box to the ceiling or wall. It is also important that the base for the roller blinds is perfectly flat, without distortions and waves on the ceiling and wall, otherwise the curtain will not be able to rise and fall freely.
This is a modern, practical and cost-effective way to camouflage pipes. Suitable for interiors designed in high-tech, minimalism, loft, etc. styles.
Use of plastic panels
This method has become popular due to its simple installation. The work pattern is similar to how we did plasterboard sheathing. In this case, a frame is also constructed from metal profiles, and then it is sheathed with plastic.
It is not recommended to lay sewer or water pipes inside the rack profile. Here they can be damaged by self-tapping screws.
Sew it in a box, cover it with furniture, or leave it as is?
Technologies, theory and practice, stories of your construction, photo reports of your construction, questions and suggestions... Regular boorish and disrespectful behavior towards other community members in the context of communication in comments is prohibited. In case of the first violation, a ban in the community for 2-3 weeks. In case of repetition, permanent.
If it is not possible to replace the “towel”, then it can be transformed in different ways: make decorative overlays or mount a box. Your imagination will suggest many ways; we will look at the most basic, cheap options on how to update a heated towel rail in the bathroom.
This is a complex, time-consuming process. The main advantage of hiding pipes in the bathroom in the wall is the significant space savings, which pays off in a small bathroom.
Open communications have little appeal. Therefore, many people think about how to hide pipes in the bathroom, because there are more of them in this room than in other rooms.