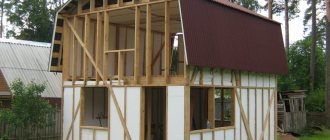
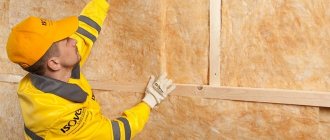
A frame house is one of the fastest and most affordable ways to build housing. But there are many nuances here. After all, there is no structure on the walls that resists environmental influences. Therefore, the issue of thermal insulation in such buildings is acute.
For insulation of frame houses, mineral wool is often chosen. Therefore, you need to figure out which type to choose and how to install it correctly.
Features of mineral wool as insulation
This type of heat insulator is well known, but it is not inferior in popularity and technical characteristics to modern technologies. At some points you can even be a step higher. If we compare the popular polystyrene foam or penoplex with mineral wool, then the second option is good at transmitting vapors that accumulate in the premises.
Some types of mineral wool are made from waste. For example, metallurgical waste is suitable for slag wool; glass wool is created from glass production residues or broken material.
In addition, insulation can be purchased at any hardware store. There are no special transportation conditions either, so you can use your own transport. The main thing is that the cotton wool does not get wet.
Advantages and disadvantages
Manufacturers establish a certain list of advantages and disadvantages of their material at the design stage. But since mineral wool is already used, consumers have added several of their own points. The undeniable advantages of insulation include:
- Low heat conductivity, which means mineral wool is an excellent heat insulator. But pay attention to the hardness of the wool. Stiffer material retains warm air better.
- Fire safety. All types of mineral wool are not capable of supporting combustion. This point is very important for a frame house.
- Duration of operation. This point is only possible if all rules for installing a heat insulator are observed.
- Noise absorption. In addition to the fact that wool is a heat insulator, it can also reduce the amount of noise that can penetrate into the interior. Moreover, it works well both outside and inside.
- Easy installation. Of course, there are several nuances, but the insulation does not cause any particular difficulties. The material can be easily adjusted to the desired size.
As for the shortcomings, there are only a few of them:
- hygroscopicity - cotton wool quickly absorbs moisture and loses its thermal insulation properties. Therefore, it is protected with special membranes on both sides;
- high cost - when compared with polystyrene foam, the price is slightly higher;
- the need to use a thicker layer of material to provide thermal insulation;
- fragility of fibers - this is especially true for glass wool. Therefore, installation of insulation is carried out only in protective clothing using glasses and gloves.
If the owner is not satisfied with this balance of pros and cons, he has the right to choose another option. But before that, be sure to consult with professional craftsmen.
Types of mineral wool
As mentioned above, there are several types of this insulation. Each has all the pros and cons that we have already become familiar with. The options differ in the raw materials used for production.
Slag
The main raw materials are metallurgical waste. At high temperatures, the components are fused and drawn into thin threads. This option is the cheapest of all types of cotton wool. But it also has a lot of disadvantages:
- When wet, strong acids are formed that can even destroy metal.
- Retains heat less efficiently.
- Short service life.
- Capable of withstanding loads up to 300 degrees Celsius.
Glass wool
To make this type of insulation, waste from the glass industry or the same materials as for glass melting (sand, borax, soda, limestone) are used. Everything is thoroughly mixed and, of course, fused. Next, thin threads are drawn out, from which the future insulator is formed.
Features of the material include:
- the most brittle and prickly fibers of all types of mineral wool;
- less hygroscopicity than the slag representative;
- resists biological, mechanical and chemical influences;
- gives less shrinkage;
- withstands heating up to 450 degrees, after which it melts.
Basalt wool
For this option, rocks are chosen as raw materials, namely basalt and bentonite clays. That’s why there is another name for stone wool.
Some manufacturers also add urea resins. But all components are safe for human life and health. The production temperature is around 1500 degrees.
The material has a lower moisture absorption coefficient, practically does not shrink, and can protect the house from exposure to temperatures in the range from – 180 to 700 degrees. The cost of this insulation is slightly higher than the previous two. But is it worth saving when it comes to your own comfort and coziness?
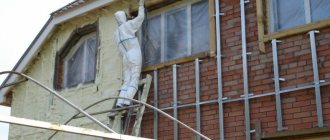
How to lath under mineral wool on the outside of a wall
When starting to install the sheathing, you need to perform a number of actions:
- Dismantle the old covering and sheathing, if any.
- Clean the surface from debris and dust.
- If bulges, cracks or gouges are found, take measures to eliminate these deficiencies.
- Treat the timber for the sheathing with a fire-resistant primer and antiseptic material.
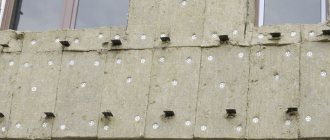
To fasten wooden guides, use metal brackets and dowel plugs. Depending on the width of the prepared insulation boards, the pitch between the beams is set. Don't forget to leave an allowance of 2-3 cm on each side. This will allow the mats to be securely fixed between the wooden guides.
The method of placing the sheathing is determined by the type of siding arrangement when covering the facade of the building. When installing the frame, periodically check the level position of the beam in the plane. A building level is used as an auxiliary tool.
Insulation thickness
In order not to make a mistake when choosing the size of insulation, focus on the following points:
- Climatic location of the site and the house. If you live in the northernmost part of the country, then you need to choose thicker insulation or several layers. The thickness of the thermal insulation should be 30 cm.
- Heating method.
- The height of ceilings in future premises.
- The size of the windows, as well as their design (wood or plastic and the number of cameras).
Professionals still recommend choosing mineral wool with a thickness of at least 15 cm, regardless of the region of residence. What does this have to do with, perhaps, the material, both in mats and in rolls.
Application area
It is not enough to know what materials are used for insulation and cladding of the facade; it is important to combine them correctly. First of all, when choosing, you should take into account the wall material and type of house, its load-bearing capacity
Houses on pile and column foundations are usually built on unstable soils, so heavy fiber cement and sometimes metal siding are unlikely to be used for cladding. The most acceptable option is vinyl or metal (not all houses) panels.
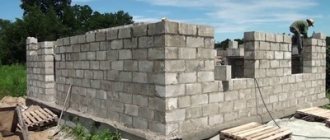
To cover a brick house on stable ground with sufficient load-bearing capacity, you can use all types of finishing; for a cinder block house, it is better to abandon fiber cement siding and increase the thickness of the insulation.
To decorate a country house that provides only seasonal living, there is no point in spending money on more expensive metal siding; vinyl siding will be quite sufficient.
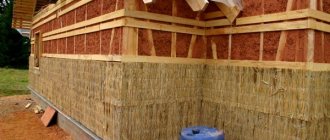
For houses in the construction of which wood is used, that is, timber, panel, frame, it is undesirable to use polystyrene foam and polyurethane foam insulation. The wall under such heat insulators begins to get wet and rot, which is due to their low vapor permeability. The optimal choice for a log house or a timber house is mineral wool, always with a waterproofing system.
Technology of thermal insulation of walls with mineral wool
In order for the cotton wool to fully perform the tasks assigned to it, it is necessary to adhere to all installation rules. Otherwise, within a few years the cold will begin to penetrate into the premises, and the frame house will be covered with ice.
The owner will spend all his savings on heating at this time. Therefore, either carefully study all the intricacies of the installation and do everything yourself. Or take care of a professional team.
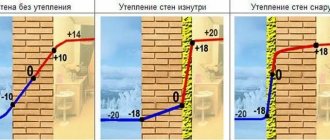
As for technology, you can work in two directions:
- from the interior to the outside. From the inside, the wall is covered with OSB board - vapor barrier - insulation - water barrier - again board - cladding;
- from outside to inside. First, OSB - water barrier - insulation - vapor barrier - slab - interior finishing.
There are no differences in the amount of materials used, and in future operation too, the main thing is not to confuse where the vapor barrier is and where the hydrobarrier is.
Vapor barriers
Such a membrane is covered under insulation. On the side of the room, the wall will be covered with an OSB board. This layer will allow vapors to escape freely, but not accumulate in the insulation. We already know that mineral wool quickly absorbs moisture, therefore vapor barrier is a necessary element in the process of insulating a frame house.
The film must be laid with an overlap of 10–15 cm. You can move both horizontally and vertically. The joints must be taped to prevent moisture from seeping through these places.
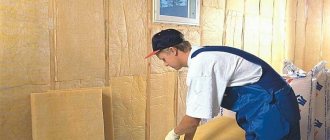
Installation of mineral wool
The insulation is placed tightly between the frame posts. If the width of the material is 60 cm, then the distance between the elements is about 59 cm.
This is necessary to ensure that the mineral wool does not slip and even small cracks do not form. But you also need to make sure that the slabs do not bulge, otherwise complete insulation will not be possible.
If cracks do appear, it is recommended to treat them with polyurethane foam. This will reduce the risk of cold flows entering the interior and heat loss.
Internal walls (interior) are also filled with mineral wool. In this case, it is used as a sound insulator. The installation process is identical, but there is no need to use a water barrier. It is better to lay a vapor barrier on both sides.
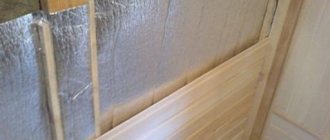
Installation of wind and moisture protection
This layer is laid in exactly the same way as the vapor barrier. The membrane is laid over the insulation, moving either from bottom to top or from left to right.
Be sure to make an overlap of 10-15 cm, which is glued with tape. Such a membrane will protect the insulation, and the entire frame, from atmospheric moisture and strong wind gusts.
Wall decoration
For the external cladding of the walls of a frame wooden house, you should not use heavy options. Vinyl or acrylic siding is perfect. To install it, a counter-lattice is placed on top of the windbreak. It is to these strips that the facing material is mounted.
Additional lathing will also create a ventilation gap, which means that the moisture that comes out of the rooms will leave the walls faster. The frame of the house will remain strong and reliable longer.
Materials and work
Sometimes the use of a certain technology is required due to the features of the design project of the building. At the same time, before starting insulation with siding, it is necessary to create a work plan. It is a kind of algorithm for performing work and determines the type and characteristics of the insulating material used.
It is possible to insulate the walls of a house using technology that involves the use of materials such as:
- Styrofoam;
- Expanded polystyrene;
- Mineral wool.
Sheathing with profile
The video and photos included in this article will tell you how to properly insulate a house and will illustrate the description of the basic rules for performing the work.
The timber is environmentally friendly, so it is very suitable for building a cottage. For such buildings, in most cases it is important to install siding with insulation yourself.
However, how to choose the most suitable thermal insulation material? To do this, you will need to carefully study the parameters of the possible options. They will be the determining factors in your choice.
Insulation and cladding scheme
If siding with insulation is done correctly, then the risk of microscopic cold bridges to the facade of your cottage will be reduced to zero. But in such bridges moisture constantly accumulates, which causes the appearance of mold, which is dangerous for the wood.
But, even despite the type of insulation, the work must involve the implementation of cladding for the insulating material. As such cladding you can use:
- brick;
- block house;
- or siding.
It is also worth noting that the type of cladding material influences the characteristics of the process of cladding the façade of a building.
For example, insulating a wooden house with siding and plaster are completely different things. To ensure that the final result of the work carried out pleases you, this is worth taking into account.
Required Tools
You don't need anything special. Everything that the owner has in the kit is suitable for installing mineral wool. Although some tools may not be at hand. Then we rent it or borrow it from someone.
- Impregnation for wooden elements.
- Roller or brush for applying impregnation.
- Hammer or screwdriver.
- Chisel.
- Nail puller.
- Jigsaw with blades for transverse and longitudinal cuts.
- Construction knife - for cutting insulation.
- Wood saw.
Installation of sheathing and siding
The question of how to install the sheathing should be given special attention, since the strength of the entire structure depends on this. It is preferable to install the slats in this order: if the siding is installed horizontally, then the slats are mounted vertically
In cases where it is necessary to install siding vertically, the sheathing is laid horizontally. Please note that the pitch between the slats is determined by the distance between the holes for fastening the siding. The slats must also be installed in corners, near openings, and so on.
Siding insulation scheme
It should be noted that the plane of the sheathing must be checked at all times with a building level, because the evenness of the siding installation depends on this. Wooden slats are mounted into walls using dowels or galvanized nails (weave). Please note that the sheathing is also treated with a primer if it is made of wood.
Siding is installed directly onto the sheathing elements using screws or nails. In this case, it is necessary to make a ventilation opening of several centimeters between the insulation and the facing material. Thanks to this, the walls will breathe. Siding is laid directly from bottom to top.
How to do everything yourself?
In a frame house, as in any other house, it is necessary to insulate not only the walls, but also the floor, ceiling, and even the roof. Such events will ensure that in the future residents will not freeze in the winter and swelter from the heat in the summer. Therefore, you should not lose sight of some elements of the structure.
Floors
Floor insulation begins with waterproofing. But the execution process will depend on the foundation on which the frame house stands. There are two options:
- You can crawl under the house - a pile-screw foundation. First, the wind-moisture-proof membrane is fixed. Be sure to overlap and glue the joints. Chipboard is nailed on top of it, but on the ground side. Next, they begin work on the premises. The insulation is tightly laid and covered with a vapor barrier. Then wood boards or boards are laid.
- If it is not possible to get under the house, then first fix the chipboard and lay a protective film on top. And then they work the same way as in the previous version.
For ceiling insulation, there is also a choice:
- from the side of the room;
- from the attic side.
The first option is somewhat inconvenient. Mineral wool fibers break off and get into the eyes and respiratory tract. This is very unpleasant and can cause an allergic reaction. But if it is not possible to use another option, then this one will also work.
The insulation is tied to the ceiling, covered with a vapor barrier, and then OSB or chipboard is used. After which you can begin finishing work.
In the second option, slabs will be used first, followed by insulation. After which the insulation is covered. Make sure everything is tight. The top of the mineral wool is covered with either boards or slab material.
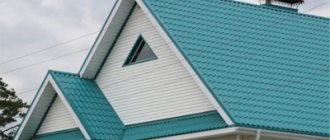
Pitched roof
It is better to insulate the roof before the roofing material is installed. They work according to this plan:
- Wood boards are fixed from the attic side.
- Lay a vapor barrier.
- Install mineral wool.
- Provides wind and moisture protection.
- Install roofing material.
If the roof is completely closed, then they work in the reverse order.
Stage six. We install siding panels
We will look at the installation of panels using vinyl siding as an example. But we dare to assure you that the installation of the same metal panels is fundamentally no different. First of all, we make sure that all preparatory work is completed and there are no shortcomings or flaws
By the way, this is a very important note, since there are no ideal people and no ideal workers. Man is created in such a way that he is bound to leave something unfinished or make a mistake.
This, of course, is all lyrics and therefore let’s move on directly to the process itself.
Since buildings rarely have an even geometric shape, such as a square or rectangle, we will definitely have a need for additional elements that serve to complete the façade work. The main elements of which are drainage systems that prevent water from getting inside. Initial and final strips, the functionality of which can be understood from the name. These also include external and internal corners, used for connections at external and internal corners, respectively. To join the side connections and fix them, we need J-profiles. For direct connections, a connecting strip is used.
You need to start laying from a predetermined starting point, from where the installation of the first row of panels and fastening of various elements - window strips, corners and starting strips - will begin. The recommendations below will help you ensure that the facade will last a long time and keep the material intact.
- A certain distance of approximately 30 cm should be maintained between fasteners.
- The fastening material (nails, screws) should not be pressed against the siding until it stops, otherwise it may become deformed and fasten them exclusively in the center of the hole.
- Attach hardware strictly at right angles.
The vast majority of sheets are mounted horizontally, for this we first need to install the starting strip. We fasten it so as to cover the upper edge of the foundation. Its installation should be given special importance, since the beauty and neatness of the appearance of the house depends on it. It is necessary to set the strip strictly according to the level, otherwise there is a high chance of wasting time starting all over again. There are no special requirements for the aesthetics of the strip itself; it can be of any color and even assembled from pieces so that it will still be covered with a vinyl panel.
To strengthen the strip as evenly as possible, we determine the location of the siding and screw in the screws. We pull the rope through the screws and use an accurate level to check whether the line is exactly horizontal. Using a marker or chalk, we draw a line along the rope, and using this line, we finally install the strip.
- If there is a need to splice several strips, be sure to leave a gap of about 6 mm between them.
- Under no circumstances should you attach it to the very corner of the building; a special profile is designed for finishing corners.
- You should not put a strip under doors and windows in advance, because you can easily make a mistake with the distance.
The next step is to install the internal and external corner strips. There are some differences in fastening siding from different manufacturers, which are outlined in the included instructions, but they are generally the same. The corner panels are attached in the same way as the starting strip, with the exact location of the fasteners - the middle of the hole. Further installation is not particularly difficult. The only place where you will have to tinker is with window and door openings.
That's all, good luck in all your endeavors and have a warm winter!
Treatment of a wooden structure before insulation
First of all, explore all the walls.
Clean all crevices and existing cracks from accumulated dust.
Treat the damaged areas with an antiseptic primer solution, if necessary, in 2 layers. Wait until it dries completely.
Seal all cracks and crevices. This work should be carried out carefully, since the presence of flaws allows cold air to penetrate into the living space, creating discomfort. It is better to carry out the work with a latex-based sealant intended for external types of wooden work. The paste helps maintain temperature balance and does not allow wind currents to penetrate into the living space through the walls.
A properly selected sealant can easily be applied to a thoroughly cleaned and pre-primed surface. Due to its elasticity, the seal will be able to deform, adapting to changes in the size of existing gaps. If there are large cracks, it is additionally recommended to use an acrylic type of tourniquet, which is placed into the crack as tightly as possible and only then covered with a layer of sealant.
Know! Repairing a wooden structure can be carried out using materials used as inter-crown insulation such as tow, felt and moss.
Insulation of frame walls with polystyrene foam - in detail and step by step
Despite the fact that mineral wool is a good material for insulation, it is worth examining the internal methods of preserving heat. Here the choice of material should be taken seriously, since one of the most important criteria, in addition to thermal conductivity, is the environmental friendliness of the product.
The best material for internal insulation, in all respects, is extruded polystyrene foam. It has low thermal conductivity, is lightweight, does not allow vapor to pass through and is thin, but alas, it is somewhat more expensive than other materials.
Installation of polystyrene foam is quite simple:
- A layer of wind protection is laid;
- The slats are attached and can be installed in a horizontal or vertical position;
- The interior is filled with extruded polystyrene foam;
- Usually there is also a vapor barrier, but with this material there is no need for it, so next comes lathing and drywall or any other finishing material.
Laying polystyrene foam
What makes a house damp?
Temperature changes, rain, snow and any weather changes are not all the reasons for the formation of a humid environment. In winter, the external and internal temperature indicators of the structure vary greatly. Wood actively absorbs moisture, passing it through itself and releasing it outside. The higher the temperature inside the room, the greater the level of moisture that the structure has to pass through. The process is usually called “breathing”. Violation of the process leads to the accumulation of liquid inside the insulation. The result is waterlogging and the formation of a favorable environment for the formation of harmful microflora.
Frame wall insulation pie - what elements does it consist of?
There are several main options for building a frame house, the first is a factory one, when ready-made blocks are initially purchased, it is called frame-panel. Another method is to arrange and assemble the panels on site, essentially by hand.
Both options must contain several important layers, each of which has its own specific function. In fact, there are only 5 main layers:
- So, naturally, the facade cladding comes first, this also includes the external insulation, so the function is an attractive design and protection from temperature changes;
- Next, the windproof membrane protects the house from drafts , removes moisture and thereby retains heat;
- The frame itself always contains some kind of insulation;
- A vapor barrier layer protects the insulation from the penetration of water vapor , which in turn ensures the durability of the building;
- Internal lining . There are no longer any special standards here; you can use internal insulation, a variety of decor and anything that seems appropriate to the owner.
Insulation pie
IMPORTANT!
Layers of vapor barrier and wind protection must be secured using sheathing . It is a mesh, usually made of wooden blocks, which fixes the necessary films and internal insulation, preventing deformation of the structure.