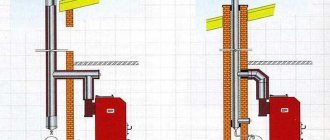
Proper installation of the chimney pipe through the attic floor, rafter system and roof is no less important than compliance with all other requirements when building the stove itself. The fire safety of the house, and therefore of everyone living in it, as well as the efficiency of the heating device, will depend on how reliably these components are equipped.
Chimney passage through a wooden ceiling
The passage of the chimney through a wooden ceiling must be especially reliable, since in this area the heated walls of the pipe are in close proximity to flammable materials. In order to protect the floor elements, various thermal insulation materials and special devices can be used - there is no shortage of them on the market today.
Such work must be carried out with the utmost responsibility. Therefore, in order to understand these issues, you should familiarize yourself with the current requirements of regulatory documents, consider the process of installing a chimney through the ceiling in order to carry out everything strictly according to the rules established by regulatory organizations.
Finishing chimneys: how to trim them correctly
When performing finishing work, it is necessary to adhere to fire safety standards.
Gases escaping from chimney structures have very high temperatures. It is mandatory for all types of chimneys to ensure sufficient draft force. One of the main requirements for finishing chimneys is the use of exclusively non-combustible materials. Therefore, such a solution as covering a pipe on the roof with a metal profile is considered the best. When the chimney is installed next to the ventilation ducts, it must be installed above the common hood.
Today, stainless steel chimneys with internal thermal insulation have become widespread. They are allowed to be placed on the roof without brickwork, using a metal apron.
Methods for finishing channels leading onto the roof are varied and largely depend on the preferences of homeowners. You can cover the pipe with corrugated sheets, clinker bricks, cement-fiber boards, lime-cement plaster, artificial or natural stone, or a finished double-circuit structure. The last option is convenient and has an attractive appearance.
Manufacturers
A universal option for most popular gas boilers is the coaxial design of the STOUT brand.
All components of the system fit together perfectly, are easy to install and maintain, and are adapted for use in our country. The variety of elements allows you to create absolutely any smoke removal system. The manufacturer provides a two-year warranty on all products. The technological manufacturing process is carried out at the same factories in Italy where similar, but more expensive goods are produced. STOUT is the choice of those who do not overpay for a well-promoted brand name, but are accustomed to choosing only high quality.
Coaxial chimneys from Baxi are manufactured for boilers that operate on gaseous fuel. Their construction is made of the highest quality stainless steel.
The Immergas company produces horizontal coaxial chimneys. It is possible to use such a device for gas boilers, as well as for units operating on liquid fuel.
The Buderus company produces horizontal chimney systems. For their production, two types of steel are used: galvanized and stainless.
The coaxial chimney for Hermann gas boilers is manufactured in certain sizes: the diameter of the inner pipe is 6 cm, the outer pipe is 10 cm. Such systems are made both horizontal and vertical.
Vaillant coaxial chimneys are manufactured with some design features that allow the devices to be used in conjunction with boilers from other companies.
The Korean manufacturer Navien produces chimneys that can be used in conjunction with floor-standing or wall-mounted boilers with a power not exceeding 75 kW.
Coaxial chimneys from the popular Viessmann company are produced in several versions with diameters of 6/10 cm, 8/12.5 cm, 10/15 cm. The design can be either vertical or horizontal.
Protherm produces both types of coaxial chimneys in sizes 6/10 cm and 8/12.5 cm.
The design of such Daewoo devices is made in such a way that installation can be done from any side of the boiler unit.
Ariston horizontal and vertical chimneys are made of enameled steel.
Functionality and safety rules and regulations
Since the heating system is a source of increased fire danger, its arrangement is strictly regulated by the norms and rules of construction SNiP 41-01 of 2003. This document combines the requirements for construction work of ventilation, smoke exhaust ducts and air conditioning systems.
According to the official instructions:
- To insulate and line the chimney pipe, use non-combustible materials correctly. If you choose materials that, in principle, are capable of burning, then the temperature from the fire should be 20 degrees higher than the maximum heating of the pipe. The heating temperature depends on the type of fuel used in the system.
- Iron cladding is permitted provided that the steel is either stainless steel or has an anti-corrosion coating.
- The brickwork of the chimney must be thicker than 12 cm. The concrete pipe is no thinner than 6 cm. Installation of an iron or asbestos-cement pipe is not permitted in all heating systems (for example, in solid fuel stoves, the gas temperature significantly exceeds their capabilities); their operating conditions are indicated in certificates and documents for finished products.
- The distance from the chimney wall to combustible materials and structures must be at least 25 cm, with insulation - 13 cm.
- The top of the pipe is equipped with a deflector or protective umbrella. If the roof is covered with flammable material, then a spark arrestor must be installed.
Clinker tiles are considered the best material for pipe lining. It has a magnificent appearance (many natural shades), it is durable and non-flammable. The ideal option is a pipe made entirely of clinker bricks. The option of refractory brick plus tile cladding is more common.
Classic plaster shows good appearance and performance properties. This type of chimney pipe finishing can be called budget. Placed on a metal mesh, it is thick enough to provide thermal insulation to the pipe and serve as fire protection for the roof. The difficulty is that not everyone can independently perform high-quality plaster while on a roof slope.
Metal or cement siding will provide the chimney with a presentable appearance. Properly mounted on a frame with insulation, it also performs a high-quality protective function for the pipe.
Corrugated sheeting on a frame is a popular, inexpensive and easy-to-install material for finishing a chimney. This option is convenient for self-installation, easy to select by color, durable and reliable in operation.
general information
Are there special standards for installing a chimney?
First of all, you need to familiarize yourself with the following standards:
- SNiP 2.04.05–91;
- DBN V.2.5-20-2001;
- SNiP 41-01-2003 (about heating systems);
- NPB 252–98 (about heat generators);
- GOST 9817–95 (TU for thermal units);
- VDPO (standard for the operation of smoke ducts)
This is necessary for the following reasons:
- Ensuring fire safety for residents;
- No risk of carbon monoxide poisoning;
- Obtaining a building inspection report.
If after commissioning the slightest errors are noticed, a certificate will not be issued. All the work will have to be redone, which will entail serious financial, time and moral costs.
You can try to hide the shortcomings by saving a little on the material or craftsman. Such an action can lead to more serious consequences - fire, death from carbon monoxide or fire. It is worth carefully studying SNiP and acting in full accordance with the standard.
The second thing you need to pay attention to is the quality of the chimney installation. If the work of the master is careless, you need to invite another specialist. When installing it yourself, carefully follow the instructions and consult a professional technician. When choosing materials, you should also not skimp on your safety. Correct installation in accordance with regulations will ensure a reliable chimney for a long time.
What are the features of chimney installation?
For proper installation, the following features, which are regulated by regulations, must be observed:
- Channel section. The cross-section of the chimney must be no less than the cross-section of the boiler pipe. Narrowing or curvature of the chimney is unacceptable throughout its entire length.
- Condensate. The condensate collector is mounted at the bottom of the chimney in the form of a removable glass. In this case, plastic, stainless steel, galvanized steel are used.
- Section shape. The best solution would be to choose a round pipe. An oval shape is acceptable. Square gas chimneys are not prohibited, but they have worse draft.
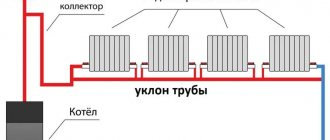
- Slopes and turns. The best option is a straight, strictly vertical gas chimney. Deviations of more than 30° are not acceptable. The height of the pipe to the point of slope must be at least 500 cm. The number of turns is no more than 3. Horizontal sections are acceptable, but in a minimum quantity.
- Pipe connections. Connections are made using clamps. The joints must be firmly fixed and sealed.
- Distance to walls. If the surface is covered with fire-resistant material, it is permissible to reduce the distance to 5 cm - 10 cm. In all other cases, the chimney pipes are located no closer than 25 cm to the surface.
- Sagging. Sagging pipes are unacceptable. To prevent sagging, it is necessary to secure the pipe firmly using brackets, maintaining the required distance.
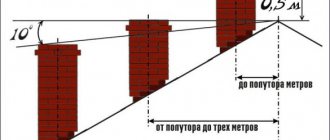
- Pipe height. At least 500 mm from the edge of the ridge when located on the roof at a distance of up to 1.5 m. When the pipe is located at a distance of 3 m or more, draw a straight line from the ridge to the location of the pipe at an angle of no more than 10°. The resulting point indicates the minimum possible height of the chimney.
- Insulation. The outer part of the pipe is insulated by any available method to prevent condensation.
- Fire safety. Wooden walls are insulated with fire-resistant materials. Brick or concrete can be insulated using polyurethane foam. Before installation, you must read the boiler instructions. It sets out the requirements for the chimney. When passing through the ceilings, a gap is left: with protection 400 mm, without protection 500 mm. The gap is sealed with sandbox or non-flammable insulation.
If these standards are observed, the chimney will be reliable and safe, and its service life will increase. For more detailed information about the standards, please refer to the specified documents.
How to install a chimney?
The chimney can be installed in two ways:
- Inside the building;
- Outside the building.
Moreover, both methods always go from bottom to top. Installation begins from the boiler or furnace, after which they gradually rise.
First of all, it is necessary to connect the heat generator to the chimney. Gradually rising, the pipe is increased, and slopes are installed if necessary. It is worth remembering that all connections are rigidly fixed, and every 4 m must be strengthened with a bracket. All seams must be checked for leaks.
Differences between methods:
- For internal installation, it is necessary to accurately mark and cut holes in the ceilings and roof for the chimney outlet. Each of them is equipped with fire-resistant material in accordance with fire safety.
- When installing externally , a hole is made in the wall, the first section of pipe is inserted into it, and thermal insulation is provided in this place. The remaining sections on the street side are mounted strictly vertically, secured with brackets. Finally, the seams are sealed and the pipe is thermally insulated.
Technically, installing a chimney is not difficult if all calculations and preparatory work have been completed in accordance with the standards. It is also necessary to remember about fire safety - pipes should not come into contact with anything, fire-resistant material should be laid in places close to the walls, passages through partitions and the roof are also provided with fire-resistant protection.
What mistakes can you make when installing a chimney yourself?
Inexperienced craftsmen can make mistakes, which can lead to various troubles. Let's look at the most frequently repeated ones:
- Bizarre shape. The best choice is a round straight pipe. Don't get carried away with other forms. The consequences are deterioration of the chimney.
- Horizontal sections. Their length should be no more than 1 m. The consequences are poor traction.
- Boiler replacement. Often when replacing a boiler from solid fuel to gas, the old pipe is left behind. The consequences are rapid destruction of the chimney.
- Aesthetics. Often people only care about the appearance of the pipe, forgetting to clean it from the inside. The consequences are worsening traction, the appearance of blockages.
- Height calculation. Sometimes they save money by making the pipe lower than required according to the requirements. The consequences are soot contamination, fire from possible sparks, carbon monoxide poisoning.
- Choice of material. If you save on material during installation, in the near future more significant expenses will be required to reinstall the chimney due to its destruction. The consequences are the costs of dismantling the old and installing a new chimney, possible poisoning or a fire.
- Unified network of chimneys. Sometimes several stoves or boilers are connected into one chimney. It is worth remembering that each stove must have its own chimney. The consequences are the appearance of reverse draft, carbon monoxide poisoning.
When should you start planning?
You need to start planning the chimney at the time of designing the structure. This is necessary to make changes to the project:
- Heat generator . In case of heating using liquid, air or gas coolant, there is no need to change the foundation. When planning a fireplace or stove heating, it is necessary to make a separate foundation for the stove. This is necessary so that the stove is independent from the house. In this case, if the foundation sags, microcracks will not form in the chimney, and carbon monoxide leakage will be prevented.
- Chimney . It is worth planning the location of the chimney in advance. In this case, you can plan a hidden chimney, install a fireplace in the wall if the walls are brick, provide a chimney passage through the ceilings or an outlet through the wall.
- Details . Depending on various nuances, you can provide in advance the necessary superstructures or niches in the building, take into account the basement and attic.
With this approach, you will not have to rebuild or punch additional holes later.
What types of chimney are there?
When choosing a chimney, you need to take into account the type of fuel in the boiler:
1. Gas chimney. Used for gas heating. Has increased resistance to acids and condensate.
2. Solid fuel chimney. This type is more common and is used in all stoves, fireplaces and boilers that burn solid fuel.
The installation of various chimneys is almost identical, but their structure and materials differ. Due to the nature of the chemical composition passing through the chimney, it is strictly forbidden to use a chimney that is not suitable for the fuel used. Otherwise, there could be catastrophic consequences.
Question: what is the difference between gas chimneys and solid fuel chimneys?
Chimneys for gas boilers differ significantly from solid fuel boilers in the following characteristics:
- According to chemical properties. When gas is burned, the smoke temperature is relatively low, but it contains aggressive acids. The material must be fire-resistant, moisture- and acid-resistant. For a solid fuel chimney, it is sufficient to withstand high temperatures, since the temperature of the smoke is much higher, and there are no corrosive acids in the composition.
- According to physical properties. For chimneys of gas boilers, the most important parameter is gas tightness. Light weight will also be an advantage. Flexible finned tubes are allowed on turns. Solid fuel chimneys must be made exclusively from materials that are smooth inside. The pipe must be round. This prevents soot from accumulating in the pipe and makes cleaning easier.
Thus, it is impossible to replace one chimney with another. If solid fuel was replaced with gas, the chimney will have to be replaced in accordance with the standards.
Final assembly of the combustion products exhaust system
What needs to be done during the installation of a chimney to ensure that the equipment works efficiently and is safe for others?
Sealing a chimney on the roof requires the following conditions:
- There must be a gap between the channel and the roof, especially if a highly flammable material was used; its dimensions are regulated by regulatory documents
- The chimney itself in this area must be treated with insulating materials (asbestos) that can prevent fire
The chimney passage can be made on the ridge or slope of the roof, and each method has its own characteristics.
The first option may lead to the need to partially change the rafter system, and the second may become a pocket for snow. But these shortcomings can be easily solved by adding an element under the ridge strip, which will avoid leaks.
After the pipe has passed through the roof, sealing begins. The building materials market offers a wide range of units that can be used in various conditions.
The traditional option is a flashing made of metal strips corresponding to the size of the pipe.
For roofs made of tiles or corrugated slabs, the fastening of elements is carried out using a lying seam, and on pitched structures with a slope of more than 30°. A special beam is installed behind the chimney. It serves as protection against rainwater.
Waterproofing a chimney on the roof involves installing a protective apron. It can be made of flexible tape or metal coated with a polymer composition.
An elastic apron is installed around the perimeter of the pipe in two layers, placing the lower one under the roofing, and mounting the upper one on top and covering it with metal profiles.
Insulation made of steel sheets is placed on a roof deck insulated with roofing felt. Its individual elements are attached along the perimeter of the channel, starting from the bottom. The grooves are filled with silicone or polymer sealant.
How to significantly improve chimney draft - from cleaning to fan
The most important parameter in the operation of a chimney system is draft. Everyone knows that it is very important for the operation of a furnace or boiler, but few people know - what is draft? This parameter determines the speed and volume of movement of flue gases through the chimney. It is necessary to remove gases and supply oxygen to support the combustion process. The phenomenon of draft itself occurs due to the different densities of cold and hot air. Hot is less dense and is accordingly replaced by cold. This is how hot flows move from bottom to top.
Traction efficiency can depend on several parameters:
- Internal section of the chimney. The smaller its diameter, the faster the rate of release of hot gases. But when they reach a certain minimum size, they will begin to get inside the room. If the pipe is too large, then the flow of cold air can form the so-called reverse draft.
- The amount of soot deposited on the walls of the chimney. It can significantly reduce the useful diameter of the pipe, which will lead to a loss of traction speed.
- Number of turns in the chimney. Each turn or bend is an additional obstacle to the passage of smoke.
- System tightness. If there are cracks in the structure, cold air can enter the system through them, forming a cold curtain and preventing the passage of smoke.
- Weather. Low atmospheric pressure and high humidity reduce the rate of replacement of hot air with cold air in a heating device.
Failure to comply with the above conditions is often the cause of poor traction. But how can this indicator be determined without special instruments and devices?
Determining traction yourself
If the efficiency of the furnace (boiler) has noticeably deteriorated, then there are several ways to check the draft. You can use a special device - an anemometer, but in most cases purchasing it for home use is not economically efficient. It is best to resort to proven folk methods:
- Candle. If you light a candle, bring it to the chimney and immediately extinguish it, then in the direction of movement of the smoke you can see whether there is a draft.
- The degree of smoke in the room.
- Thin leaf. The degree of its deviation may indicate the presence of traction.
Once the problem has been identified, you can begin to solve it.
Ways to improve traction
There are several ways to improve your cravings, and each of them is effective in its own way. But before you start implementing one of them, you should do a number of preventive procedures with the chimney structure itself:
- Cleaning from soot (read about it here). To do this, use a special set consisting of a ruff, a sinker and a steel rope.
To do this, you need to go up to the roof and lower the brush along the entire length of the chimney into the outlet part of the chimney. Next, begin to clean the walls of the chimney using progressive movements. At the same time, layers of soot will begin to fall into the furnace, which are then removed.
- Complete sealing of the chimney . Using one of the methods described above, it is necessary to check the structure for the absence of cracks or holes. This problem is typical for brick chimneys, when partial destruction of the masonry occurs during operation.
If after these measures the craving does not improve, then you need to resort to more radical methods.
Traction regulator
This device is installed on the chimney outlet.
After preliminary adjustment, it compensates the pressure in the pipe with the external pressure. In this case, not only does the operation of the heating device normalize, but also the thrust speed is the same, regardless of external weather conditions.
Deflector
This additional structural element is also placed on the outer part of the chimney.
Its outer diameter is much larger than the cross-section of the chimney itself. This is necessary for the effect of a pressure drop to occur when air flows around an obstacle. Those. when the deflector structure is flown around by an air flow, a low-pressure area is created inside it, which contributes to the creation of conditions for better thrust speed.
Chimney weather vane
An original design that can not only improve draft, but also protect the chimney from precipitation.
Its operation is based on the principle of a deflector and the exhaust of flue gases only on the leeward side. This allows you to reduce external air resistance and thereby normalize the thrust speed.
Smoke fan
One of the most effective methods is to install a special fan on the chimney.
Inside this structure there is a ventilation system that creates an artificial air flow in the chimney. It creates a rarefied air area inside the chimney, thereby improving the conditions for good draft. But to install it, you will need to connect an electrical line, which is not very convenient, since it will be necessary to comply with all safety regulations.
As can be seen from all of the above, it is possible to improve draft in a chimney, and this can be done effectively and quickly. But to choose the optimal method, it is best to take the advice of professionals who will carefully analyze the condition of the chimney.
Source: dearhouse.ru
Finishing the top of the chimney
Finishing the outer part of the pipe also begins with its thermal insulation.
If it is brick and in good condition, it is enough to use basalt wool and any facing material for external work. Suitable: corrugated sheets, tin, clinker, tiles or natural stone panels. If the brick is old, the chimney must first be repaired. To do this, line the brick channel with a steel pipe. A metal chimney is insulated in the following way: a second pipe (of larger diameter) is put on it, and the space between them is filled with basalt wool. For beauty, the outside of a metal chimney can be decorated with any material that is used for a brick one. The finishing is fastened to a frame made of a metal profile, if it is a sheet material.
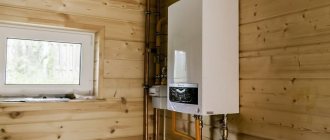
All private houses have an individual heating system. Even if it is a boiler and not a wood stove, it still requires the gas and smoke generated as a result of fuel combustion to be removed from the system. When the heating boiler is located in the basement of the house, the instructions for its operation allow the chimney to be installed along the outer wall. And then it can be considered as an element of the facade, and its decor can be made in accordance with the exterior decoration of the house. If the building has a stove or fireplace, the chimney passes through the space of the room in which they are located and the attic. In this case, the interior decoration of the attic roof is carried out taking into account the existing chimney.
Background.
Since the construction of the stove in my house, an asbestos-cement pipe with an outer diameter of 250 mm has been used as a stove pipe. It consisted of two sections screwed into one another.
The stove is located in the annex. But despite the height of the pipe being 2.5 m, it turned out to be lower than the height of the ridge of the main house. Any stove maker will say that such a scheme will not provide good draft and, moreover, a reverse of the air stream is possible.
And so it was. In windy weather, the stream often overturned and the smoke, instead of going into the chimney, went into the house. Partially, this problem was solved by installing a “Mushroom” visor on the pipe.
Of course, I understood that the best solution to this problem would be to increase the height of the pipe. But... somehow I never got around to it. But the situation turned out so bad that I had to do it unplanned.
As I already said, the asbestos-cement pipe consisted of two sections screwed into one another. So... The upper pipe burst at the junction with the lower one. I had to dismantle it.
There were no such pipes in any hardware store in the city.
A neighbor suggested a solution to the problem. He suggested building it up with a regular asbestos-cement pipe with a diameter of 200 mm. To be honest, I didn't really like this idea:
— firstly, I was afraid that the narrowing of the pipe’s flow area would have a negative impact on traction;
— secondly, there was no idea how to connect two asbestos-cement pipes of different diameters;
Looking ahead a little, I will say right away: the pipe was successfully extended, the thrust... increased significantly. I forgot about the overturning of the jet like a bad dream.
And now the actual pipe connection technology itself.
Chimney on a metal roof
Bypassing a chimney with metal tiles is a complex process. It does not bend like ondulin and is difficult to install hermetically.
Sealing includes the following steps:
- Roof waterproofing is installed on the side walls of the pipe
- Behind the pipe, at a distance of 80 cm, a gutter is built into the waterproofing material to drain moisture
- A box is installed in the roof and the chimney is removed
- A groove is made for the wall profile
- Set up a profile. The process is described above
- Set language
- The roof is covered with metal tiles. Around the pipe it should overlap the profile and the tiles that flow around the pipe
- Install the apron. For metal tiles they are made smooth. It should be secured to the protrusions of the coating with self-tapping screws.
Do I need to make a foundation for the stove?
Installing a stove in a wooden house may require the presence of a foundation. However, a permanent foundation is required for a metal stove only if its weight exceeds 750 kg. Typically, steel stoves weigh much less (up to 300-400 kg). But if the equipment is covered with brick, then the weight of the entire structure will be very impressive.
When the stove weighs up to 80 kg, a foundation is not needed; the device must be installed on a solid, non-combustible base.
Another way to determine whether a foundation is needed is to consult a professional stove builder. This must be done at the stage of designing a wooden house, since the foundation for the stove is built during the creation of the foundation for the house. If the building has already been built, then the flooring at the installation site will have to be dismantled. After this, you will need to remove the soil and make a foundation for the stove.
Chimney pipe lining and special caps
One of the finishing methods is cladding. For this, natural or artificial stone is used, but this option is not practical. This is explained by the fact that often the cladding is torn off from low-quality bricks, along with the top layer of ceramics, which spoils the roof. If the brick is of high quality and beautiful, there is no point in covering it.
When the sheathing is heavy, it should be fixed not only with adhesive, but also with hardware. For this purpose, metal brackets or dowels are used - nails directly through the stone tiles.
To protect ventilation ducts from atmospheric hazards, protective caps are installed on the pipe heads. They reduce traction force, so their size should not be too large. In this case, the distance from the top of the pipe to the bottom point of the cap must be at least 15 centimeters. The shape of this product and the material it is made from can be very different.
Gas chimneys
What materials are suitable for gas chimneys?
Due to the peculiarities of the chemical composition of the smoke that appears during gas combustion, the main requirement for the material is resistance to chemical aggressive environments and corrosion. Thus, there are the following types of gas chimneys:
1. Made of stainless steel. The best option. Their advantages are light weight, resistance to various corrosions, excellent traction, and operation for up to 15 years.
2. Made of galvanized steel. Not the best option compared to stainless steel. Provides poor traction and is more susceptible to corrosion. Operation for no more than 5 years.
3. Ceramics. Gaining popularity. Operation up to 30 years. However, it is necessary to take into account the high weight of the chimney when laying the foundation. Maximum thrust is only possible with vertical installation without errors.
4. Coaxial chimney. It has increased efficiency and safety, but at the same time a high price. It is a pipe within a pipe. One is for removing smoke, the other is for supplying air.
5. Brick chimney. Shows negative qualities when using gas heating. Operation is short-lived. It is permissible to use a brick chimney left over from stove heating only as an external casing for a liner made of a more suitable material.
6. Asbestos cement. Outdated option. The only positive thing is the low price.
There are a lot of options for installing a gas chimney. When choosing a material, it is worth starting from its quality characteristics. You should not skimp on your health and the safety of your loved ones.
Does the type of boiler affect the choice of chimney?
The design of the chimney depends entirely on which boiler will be used - closed or open. This dependence is explained by different operating principles of boilers.
The open type is a burner with a coolant coil located on it. For operation, air coming from the room is required. Such a boiler requires the best possible draft.
Installation is carried out:
- Externally. When installing a chimney, you can use the external installation method by bringing a straight horizontal pipe through the wall, and then lifting it up to the required height. This method requires a high-quality heat-insulating layer.
- Internally. You can pass the pipe internally through all partitions. In this case, 2 slopes of 30° are permissible.
The closed type is a chamber with a nozzle into which air is pumped. The smoke is forced into the chimney by a blower. In this case, the best solution would be to choose a coaxial chimney.
How to install a coaxial chimney?
The main positive characteristics of this type of chimney are:
- Easy installation;
- Safety;
- Compactness;
- By heating the incoming air, it cools the smoke.
Installation of such a chimney is permissible both in a vertical and horizontal position. In the latter case, a slope of no more than 5% is required to protect the boiler from condensation. It is worth considering that the total length should not be more than 4 m. For installation, you will need to purchase special adapters and umbrellas.
Is it possible to remake a chimney?
There are often cases when the owner decides to switch from solid fuel to gas. Gas equipment requires a suitable chimney. But you shouldn’t completely rebuild the chimney. It is enough to sleeve it in one of the following ways:
1) Using a stainless steel pipe. A stainless steel pipe of suitable length is installed inside the existing chimney. Its diameter must be no less than the boiler pipe, and the distance between the pipe and the chimney is filled with insulation.
2. Furanflex technology is a more expensive method, but more wear-resistant. An elastic pipe under pressure is installed into the chimney, where it takes shape and hardens. Its advantages are a seamless surface, ensuring complete tightness.
Thus, you can significantly save on materials while complying with all regulatory requirements.
Finishing a pipe with slate stages of work
Lining the chimney on the roof is necessary not only for better preservation of the chimney structure, but also as a decorative finish, so it is usually made from materials that are most suitable for roofing. One of the most durable, durable, and also very aesthetically pleasing is the stanza.
Its color depends on the deposit and can be:
- Purple
- Green
- Graphite
It can be in the form of tiles or panels. Fastening the slate is possible using copper nails with a wide head with a diameter of 2.5 mm and a length of 40 mm.
When performing work, it should be taken into account that due to temperature changes, deformation of materials is possible. Therefore, the nails are not nailed down completely; a small gap must be left between the head and the tile.
The tiles are installed on the sheathing, the beams are attached to the corners of the chimney, and if its width is more than 60 cm, another additional beam will be required.
Finishing the chimney on the roof is carried out in several stages:
- The outer guides are set according to their level, the rope is pulled (above, below and in the middle - at a height of more than 2 m), and then the intermediate bars are set
- If necessary, the smoke duct is insulated
- Plywood sheets are laid on the guides
- The tiles are being laid (their installation is carried out in such a way that one overlaps the other within 1.2, and the angle is not less than 22°
There are several ways to lay slate - from the standard rectangular one, to one reminiscent of fish scales. They are selected taking into account the pattern of the roofing.
The simplest and cheapest lining method is to coat the surface of the smoke duct with a cement composition. But such cladding has an unpresentable appearance and is also short-lived. Therefore, it is recommended to apply marble or Venetian plaster on top of it.
The first is performed on a previously primed surface. To do this, the dry mixture is diluted with water in a bucket in the proportions indicated on the packaging. Please note that it is usually sold in white, and to obtain a colored coating, color is added.
The diluted composition is applied in a thin layer and left to dry, and then cleaned with a steel brush. Next, a second layer is applied - if necessary, but experts still recommend limiting yourself to one. The final touch is to treat the surface with a grinding machine and grout with an iron spatula.
Venetian plaster, unlike marble, is considered an expensive pleasure, but it looks amazing. Moreover, if you do everything yourself, you can save a certain amount of money.
It is also sold in bags, has a white color and is diluted with water with the addition of color for application. Apply with a spatula or trowel. But to obtain a high-quality coating from Venetian plaster, the use of forced drying technology with a construction hairdryer is required. Any cracks that appear are treated with paint or varnish and, after drying, polished with a grinding machine.
Wild stone as a facing material
Another option for finishing a chimney could be the use of natural materials. Wild stone has proven itself well in this role. It is laid on cement using a plaster mesh fixed to the surface for adhesive rigidity. The seams are sealed with cement with the addition of color.
And the last stage of work related to the arrangement of the exhaust gas removal system is the finishing of the chimney inside the house. It can be made of various materials, the choice of which depends on the interior of the room.
The importance of chimney finishing
In this article we looked at the assembly, insulation and lining of a combustion gas exhaust system. Each of these stages is mandatory for the efficient operation of heating equipment, but can be performed using different materials. Which one is the best is up to you to decide. After all, this depends both on the design features of the chimney and on the architectural style of the entire building.
All private houses have an individual heating system. Even if it is a boiler and not a wood stove, it still requires the gas and smoke generated as a result of fuel combustion to be removed from the system. When the heating boiler is located in the basement of the house, the instructions for its operation allow the chimney to be installed along the outer wall. And then it can be considered as an element of the facade, and its decor can be made in accordance with the exterior decoration of the house. If the building has a stove or fireplace, the chimney passes through the space of the room in which they are located and the attic. In this case, the interior decoration of the attic roof is carried out taking into account the existing chimney.
How to increase traction with your own hands: homemade devices
Before you start building a deflector yourself, weigh your strengths, review the available materials, and only then get down to business.
Drawings and diagrams
To create a deflector with your own hands, you need to use diagrams and drawings. You can use ready-made ones, which are presented in large quantities on the Internet, or you can do it yourself, relying on data from ready-made diagrams and drawings.
Photo gallery: ready-made diagrams of traction devices
On the Internet you can find good help for constructing the device.
Carefully study the device diagrams and choose the one that suits you
The diagram shows the structure of this traction improvement device
The diagram shows the components of this device
If you decide to test yourself and save money at the same time, arm yourself with measuring instruments to determine the internal diameter of the chimney. Depending on this value, using the table as a guide, you can determine the necessary parameters for the height of the deflector and the width of the diffuser.
With an internal diameter of 120 mm, these parameters are respectively 144/240, for a diameter of 140 mm - 168/280; if the internal cross-section is 200, then 240/400; for a cross section of 400 mm, you will need a deflector height of -480 mm, and a diffuser width of 800 mm.
You can calculate the necessary parameters (for a specific pipe diameter) yourself using simple calculations. To determine the width of the diffuser, the internal diameter of the pipe must be multiplied by 1.2; We consider the width of the umbrella for protection to be -1.7 x d; We find out the total height of the structure if we multiply the size of the internal section by 1.7.
Having received all the dimensions, we make drawings for more accurate cutting. We draw diagrams on a sheet of Whatman paper or on the back of the remaining pieces of wallpaper.
It is best to construct a life-size drawing. So that when cutting, you can simply attach the cut paper parts to the steel sheet and not have to recalculate the data taking into account the scale of the drawing.
We stock up on materials and tools
Everything needs to be prepared in advance so as not to be distracted during work.
To make the deflector we will need:
- galvanized sheet with a thickness of at least half a millimeter, stainless steel can also be used;
- metal scissors;
- drill with different drill bits;
- device for setting rivets;
- hammer;
- pliers;
- clamps, nuts, bolts;
- marker (for transferring the drawing onto a metal sheet).
Preliminary stage
The preparatory work consists not only in drawing out the details of the device, but also in cutting them out and trying them on. All paper elements are fastened with paper clips or a stapler and applied to each other. If everything fits, then you can carefully remove the fasteners and straighten the templates.
Do not be negligent in the process of creating a deflector; try to think about your safety. To avoid injuring your hands and to protect your eyes, use gloves and special glasses prepared in advance.
Let's get started
So, everything is in place, we can get started!
A step-by-step description of the sequence of actions will help you:
- We transfer the parts cut out of paper onto a galvanized sheet. We should get developments of the following elements: cap, diffuser, outer cylinder and stand.
- Using metal scissors, carefully cut out all the components of the deflector. In places where the cuts are made, the metal is bent with pliers to a thickness of half a millimeter and “passed” with a hammer.
- The diffuser, cap and cylinder blanks are rolled up and holes for fastening are drilled (if bolts are used). Connections are made using rivets or bolts; in exceptional cases, welding can be used (semi-automatic).
- To attach the cap we prepare 3-4 strips of metal. The dimensions of the strips are 6 by 20 cm. The strips, folded at the edges and tapped with a hammer, must be bent in the shape of the letter P. On the cap, five centimeters from the edge, drill 3-4 holes and secure the metal strips with bolts.
- The other ends of the galvanized strips must be attached to the diffuser, thereby “looping” the cap and diffuser.
- We insert the resulting structure into the shell.
You can watch the video about how to build a TsAGI deflector with your own hands.
Roof chimney waterproofing for rectangular pipe
So, the materials are prepared, it’s time to start insulating. The process consists of several stages:
To groove means to make a shallow groove (groove) in the wall of the pipe in the place where the upper edge of the wall profile ends. It will be driven into this groove for tightness. To do this, you need to attach the profile to the pipe and mark a line along the upper edge. Then carefully use a grinder to make a furrow in the brick. The depth of embedding is 2-3 cm, depending on the depth of the curved edge of the profile. When everything is ready, carefully remove the debris and moisten the wall with water, thoroughly coating the resulting groove. You can pour water from a bottle by making holes in the lid.
Starts from the front of the pipe. We attach the part to the pipe and measure. Along the upper part, where the profile enters the groove, we make an allowance of 5 cm on each side so that it can be folded over the wall. From below, where the part will lie on the roof, leave an extra 10-15 cm on each side. Carefully hammer the upper edge into the groove on the pipe, and attach the lower part to the sheathing with self-tapping screws. Thus, we lay all 4 sides. The edges of the profile overlap on all sides.
Apply sealant along the upper edge of the profile. You can install an abutment strip - a metal plate that covers the seam between the profile and the pipe.
The tie is installed at the front of the chimney. We place its edge under the edge of the profile and screw it on. It should reach the edge of the roof. Sometimes a waterproofing material is laid between the apron and the pipe, then there is no need to ditch. The sheet is screwed on top with a metal plate.
The apron is laid on top of the roofing. There is no need to make a groove for it; it is attached to the pipe with self-tapping screws. The lower part covers the entire structure adjacent to the roof.
Pipe installation.
First, the coupling was put on a larger diameter pipe. As you noticed, looking at the drawings, I left virtually no gaps between the pipe and the cylinder. The coupling sat on the pipe very tightly.
Then he inserted the two hundred into the coupling. Thanks to the tight fit, the pipes are installed rigidly relative to each other.
To avoid possible loosening in windy weather, the top tube is additionally secured with 4 braces.
To prevent precipitation from getting into the pipe, a “fungus” visor was installed.
This design is already 2 years old.
Although I was afraid that the narrowing of the flow area would not have the best effect on the draft... I was very pleased with the result of the work: the draft was excellent, there was never a reversal of the jet, the pipe stood rigidly.
Source: 1001samodelka.ru
Lining the middle part of the chimney
The middle part of the smoke exhaust pipe passing through the attic is lined only for thermal insulation. If an attic is being built, the pipe passes through it and heats the room. In this case, the chimney lining should be harmoniously combined with the interior of the attic. For work, you can use heat-resistant plaster, but first the pipe must be insulated. To do this, use basalt wool, which is attached to a pre-installed metal frame.
The wool slabs are laid so that they are held by the frame itself. Additionally, self-tapping umbrella screws are used. For plastering work, a reinforcing mesh is stretched over the insulation boards. Such thermal insulation prevents the formation of condensation inside the chimney and its subsequent destruction.
Covering bathhouse walls with non-combustible insulating materials
To prevent the walls from overheating, you can use materials with increased thermal insulation properties and inertness to high temperatures. Two types of materials are used:
- reflective;
- fireproof with lining.
The first type includes materials for wall cladding, consisting of thermal insulation with fire-resistant properties and a metal covering in the form of a sheet.
Insulating walls with reflective sheathing
A protective cake with reflective materials is done this way. First, the thermal insulation is attached using ceramic bushings directly to the wooden walls, then it is sewn up with a stainless steel sheet.
Advice! It is better not to use galvanized metal, since heating may release heavy metals harmful to the human body.
Stainless steel with a polished surface reflects the heat flow inside the steam room, reducing heat loss. In this case, reflected heat is more useful than direct heat. For thermal insulation use:
- basalt cardboard or cotton wool, the only material with increased hygroscopicity, non-flammable, environmentally friendly;
- asbestos cardboard, which reliably protects against flames and has a long service life;
- mineralite, an artificial material made specifically for these purposes.
Protective sheathing requires ventilation gaps of 2 cm from the wall to the insulation, 2 cm from the insulation to the steel sheet. If it is necessary to install the stove as close to the wall as possible, make a double skin of non-combustible insulation, use ceramic bushings to maintain gaps of 2-3 cm and sew them up with a steel sheet.
Insulation with cladding
Measures to protect walls with cladding are necessary in order to preserve the interior decoration of the room. They are more expensive, but no one has canceled the aesthetic advantages of the bathhouse. It is based on tile cladding, which is laid on fire-resistant cladding made of gypsum plasterboard, non-deformable gypsum-based cardboard with fiberglass, mineralite, non-flammable cement-fiber material, moisture-resistant and resistant to biochemical influences, LSU, fiberglass material bound with magnesium additives, resistant to high temperatures, high humidity. Heat-resistant glue is used for installation.
Advice! Use heat-resistant reinforced Terracotta glue, made from fireclay dust bound with kaolin additives, intended for tiling stoves, fireplaces, and all heated surfaces.
The recommended facing materials are quite varied, the best of them are:
- terracotta tiles, they are made from specially fired clay, which gives increased heat resistance and durability;
- clinker, denser clay tiles with a surface of various colors, similar to facing bricks;
- tiles, also made from clay, having an original embossed surface;
- porcelain stoneware made from a mixture of clays, kaolins, quartz sand, feldspars by high-temperature firing under a pressure of 400-500 kg/cm², with imitation of stone, wood, durable artificial material;
- soap chloride, a rock mineral consisting of talc, magnesite and chlorite, an environmentally friendly natural material that does not absorb moisture at all, has an attractive appearance, does not crumble, and is not afraid of high temperatures.
Advice! Use soap chloride to finish the steam room, this mineral has a healing effect on the human body, regulates blood pressure, stimulates cerebral circulation, expels viruses and microbes due to the release of vitamin D when heated.
All of the listed tiles are an element of protection that forms a cake, the basis of which is a fire-resistant material. Just like a screen, sheet material is installed on ceramic bushings with a gap of 2-3 cm from the wall. The minimum distance to the heat source from the tile should be 20cm.
Protection with cladding decorates the room, creates a positive mood, and helps to increase the efficiency of procedures. And most importantly, properly installed insulation prevents wooden walls from overheating and catching fire. Have a nice steam!
Roof chimney box
First of all, you need to take care of the passage hole. In order to seal and protect roof materials from contact with a hot pipe, a box is made. This is a structure made of ceramics, asbestos or metal, which prevents the pipe and roof from coming into contact. Sometimes they make their own rafter system for the chimney as a box. In this case, the box will be wooden. Design diagram in the figure:
To install a box made of non-combustible material, it is necessary to prepare a hole for the pipe outlet. The box itself can be purchased or made independently. The size of the box depends on the diameter of the pipe - the minimum distance between the walls of the box and the pipe should be 15 cm. We then follow the algorithm:
- The box is inserted into the hole so that its upper edge is aligned with the roof level
- A pipe is inserted or laid out through the box from above
- The inside of the box is glued with a waterproofing film along the walls so that the entire hole is closed and the edges can be glued to the pipe
- The edges of the insulation are hermetically glued to the pipe. Use fire resistant sealant and reinforced tape
- Insulating material is laid inside - expanded clay, stone wool, etc. This will create thermal insulation. Do not pack tightly, air circulation must be maintained.
Next comes the exterior finishing of the chimney.
I encountered a problem with extending the chimney
The situation is this: two asbestos pipes are coming out (outer diameter 180, inner 143), they need to be extended using galvanized ones. There are galvanized pipes of 135 diameter. How can they be combined with asbestos? Some kind of adapters? so that it all holds tightly, because... increase 220 cm
It is not clear what kind of pipes are, but in any case you should not narrow the pipes. I advise you to find a pipe of larger diameter and put it on top, securing it with a clamp
chimney pipes, on the roof they come out touching each other. Everything around is cemented, you can’t move them apart, i.e. putting it on top is a problem
What are the initial conditions? Maybe you can do without building up the chimney.
Initially, everything was fine, then a neighbor’s wall of the second floor appeared nearby (the house is divided in half - one half is one-story, the other was built into two floors). There are chimney pipes on the roof of the one-story half; they are about a meter away from the wall. There are turbulences from the wall and the boiler goes out. That's what the experts said. It needs to be built higher than the ridge of the neighbor's extension. this is 220 cm.
Well, no one will tell you
You have a flue made of two pipes! Put one large pipe on them. Bend it into an oval and put it on. Or order... Just remember, the pipe will start crying. I have an iron pipe, I heat it with gas, I wrapped it on top with polystyrene foam film and foil and secured it with tape with the foil facing outward - protection from the sun and it turned out beautifully. And seal the joint with the asbestos pipe with mortar, even clay will do. You can’t do anything else - it’s winter
It's winter though. Equip existing pipes with clamps to prevent them from flying into the chimney, prepare a clamp for attaching guy wires, make or buy caps, stock up on asbestos sheets and asbestos cord. Secure the clamps with prepared braces, wrap the steel pipes with asbestos and push them into the existing chimney. Secure with stretch marks. Wrap the pipes with Izover, Ursa, etc. Wrap with foil, foil-foil polyethylene foam, etc. Wash three times to complete the job successfully. It is not advisable to combine chimneys. I won’t get into theory, this is on the topic of heating and ventilation.
Related article: How to cover a garage roof instead of roofing felt
In your case, I would do this: I called companies involved in tin production and ordered from them an F180 pipe with flaring on one side up to F184, the length of the flaring is 15-20 centimeters. After which this pipe is put on the asbestos pipe and fixed with self-tapping screws. To reassure yourself that the fastening is secure, you can install guy wires. Use F135 pipes somewhere else, for example, in a bathhouse. Because It’s pointless to even make a sandwich with it (it’s not stainless steel, there’s a big difference with the internal diameter). I don’t recommend sticking them into asbestos pipes, wrapping them with asbestos fiber, because... similar operations are carried out on the ground. Otherwise you will end up with “snot”, and snot and carbon monoxide in the room are a RISK.
Recommendations for choosing a location for installing a chimney
Any construction work, especially those that involve removing smoke and combustion products from the premises, is carried out after agreement with the fire services and architects. Where to install the chimney is ultimately decided by the customer, but it is still worth following some rules.
- The best option is to install it next to the ridge. Snow accumulates least at this location, so the junction of the roof to the chimney will be less exposed to precipitation and the likelihood of leaks is reduced significantly. In addition, the higher the pipe is located towards the ridge of the roof, the lower it must be installed.
- Do not install in valleys or places where precipitation accumulates. Even if you seal the chimney very well with waterproofing materials and sealants, there is still no guarantee that the roof will not leak sooner or later.
- To prevent the wind from blowing smoke from the chimney into the attic window, the chimney should be installed as far as possible from such windows.
- It is not recommended to make the connection of the pipe to the roof rigid, otherwise if the roofing system is destroyed, the chimney will also collapse.
Chimney installation: calculation and main mistakes
When installing a smoke exhaust system, it is very important to correctly calculate the chimney for a wood-burning stove. Any errors that are made during the calculation process will affect its operation in the future.
When calculating the chimneys of wood-burning stoves, we pay attention to two indicators - the height and diameter of the pipe section. We will talk about the section and its types later, first we will deal with the height.
When calculating the optimal height of the structure, it should be understood that the chimney must maintain natural draft. The chimney should not be too high (despite the fact that in a high chimney the draft will increase, too much cold air will flow inside). However, you can’t make it too low, in which case you risk losing traction altogether.
Calculating the height of a chimney is a complex operation that is best left to a professional. However, if you decide to do it yourself, then remember two things:
- Pipe diameter and height are directly related and vary depending on each other;
- In general, the height of the chimney above the roof level cannot be less than 500 mm.
Postulates of chimneys in a private house.
Fire safety requirements form the basis of any chimney in a private home. According to SNiP 41-01-2003, channels are designed vertical, bends up to 30° are allowed (attitude from the vertical to a meter). The chimney is created with an equal cross-section along its entire length, with a smooth inner surface. Pipe height - from 5m.
Chimney in a private house
Gases are easily removed through round pipes, but more difficult through square or rectangular shapes. The cross-section of the chimney is selected according to the power of the heating boiler and is prescribed in the instructions. It corresponds to the size of the outlet pipe. If the cross-section of the channel is made smaller, the waste is poorly removed, the fuel burns poorly, and gases enter the room. If it is more, the heat “flies into the chimney”, due to which the automation is disrupted. Plus, more condensation forms (the smoke cools). The minimum cross-section of the chimney for a stove is 140*140mm and increases with increasing its power. For fireplaces, the ratio is 1/15 of the firebox parameters.
The interfloor cutting for the chimney duct has its own standards, where an increase in fire safety will not be superfluous.
Chimney in a private house
What do the professionals advise?
As you can see, making an attached chimney yourself is not so difficult. The main thing is to choose all the materials correctly and take into account fire safety standards, which will allow you to avoid many unpleasant situations. It’s up to you to decide whether to vent the chimney through the roof or make it external. After all, what is better or worse is always easier to determine in each specific situation.
And finally, I would like to share some advice that professional stove makers give:
- Before you start purchasing chimney elements and installing it, be sure to determine the power of your firebox. The more powerful it is, the larger pipe diameter you will need.
- Be careful when choosing the height of the structure, which has a significant impact on obtaining good traction. A chimney that is too short will poorly remove combustion products, while a chimney that is too long will lead to excessive heat loss. Practice shows: the optimal pipe height is 5 meters. But here, too, everything is individual.
- If your boiler is equipped with forced draft, then the output of the external chimney can be completed at the stage of arrangement of only the horizontal section (without further extension of the vertical pipe).
- It is better to remove the chimney from the side of the gables (if possible). This greatly simplifies the task, since its arrangement will not be hampered by awnings and roof eaves.
- The maximum length of the horizontal section should not exceed 1.5 meters. It is here that the smoke flow is inhibited, which significantly reduces draft.
- Here, provide a special hole for technical needs: inspection and cleaning of the chimney. After all, the horizontal section is the most problematic in this regard. Sales consultants will help you choose the right item.
- If there is a wooden wall on the side of the boiler, fireplace, or stove, be sure to install a protective screen. These can be sheets of mineralite, asbestos, galvanized, fire-resistant plasterboard, glass magnesium or other fire-resistant material.
There is no need to do this
. With this I will finish my short review. I hope that this information will help you avoid mistakes when making an external chimney yourself. I will be happy to answer all your questions, listen to your wishes and criticism (this is always useful).
Warmth and peace to your home, and impeccable operation to your boiler and fireplace. And don’t forget to recommend the article to your friends, in case someone finds it useful... See you, bye!
Wisdom Quote: Nothing teaches you more than realizing you made a mistake. This is one of the main means of self-education.
How to finish a pipe on a roof cladding options
The part of the pipes that rises above the surface of the roofs is constantly exposed to external loads, so they need to be protected. To prevent a decrease in the functionality of the roofing pie, roof sealing should be done efficiently. Also important is the appearance of the pipes, which must correspond to the architectural appearance of the home.
On every roof of a private house you can see several types of pipes - chimney and ventilation. Finishing the pipe on the roof involves performing mandatory sealing at the points of contact of the roofing covering with vertical surfaces, protecting the channels from precipitation and thermal insulation of the chimney. In addition, the aesthetic design of the roof outlets is important.
It is important to know
Before starting installation, you should familiarize yourself with some subtleties
For example, it is important to know that the larger the structure area inside the room, the less heat loss there will be. When creating a detailed diagram, take into account the fact that smooth horizontal sections should be up to one meter
Please note that contact of the system with any communications, such as gas and electricity, is unacceptable. And if there are wooden parts in the way of placing the chimney, then the pipe must be moved away from them using special steel brackets. The distance between fastenings should not exceed one meter.
Also include in the plan a part of a collapsible pipe or insert with a door through which inspection and cleaning of soot will be possible. Of course, installing a sandwich chimney is a serious and responsible matter, so if you decide to do it without specialists, then understand the degree of responsibility and strictly follow the step-by-step instructions.
Waterproofing a chimney on the roof
When making a passage through the roof, it is important to comply with SNiP standards. A gap should be left between the roof elements and the chimney, the size of which is regulated by documents
At the point of passage through the roof, a box (wooden or galvanized metal) is usually installed, in which all the free space around the pipe is filled with non-combustible material - stone or glass wool.
Sealing a chimney on the roof can be done using improvised means or using standardized elements. Around the chimney you should make a so-called collar, or flashing - a trim made of strips of metal, about 40 cm wide, in accordance with the dimensions of the pipe. The bend angle of the steel strips must correspond to the angle of passage of the chimney pipe through the roof. To calculate the length of the section, you need to take into account
:
- slope angle;
- chimney dimensions;
- chimney finishing type.
If the flashings are made of galvanized sheets, then they are interconnected with an overlay and soldered. Elements made of sheet steel are connected by a double standing seam. The rebated seam connection is used to seal the passageway on roofs made of corrugated slabs and tiles. If the roof slope angle is more than 30 degrees, a special beam should be installed behind the chimney - a “bumper”, which will protect the pipe from rainwater flows and excessive snow pressure in winter
.
A protective elastic apron for a chimney can be made
:
- from flexible metal tape (lead or aluminum);
- made of galvanized metal with polymer coating.
The apron is installed around the pipe in two layers around the entire perimeter. The bottom layer of the apron is placed under the roofing, and the top layer is mounted on top of the roofing material. To cover the top layer of the apron, a waterproofing film and metal profiles are used.
The top curved edge of each apron should fit into a groove cut around the perimeter of the chimney. After installing the edge into the groove, the joint is filled with polymer sealant or silicone for roofing.
Ready solutions
Sealing a chimney on the roof is a rather complex task, the quality of the solution of which determines the reliability of the thermal and waterproofing of the roof. You can make the passage assembly yourself, using various materials and special strips, or mount a ready-made structure, which includes a wide protective apron.
Ready-made roof cutting on the construction market is presented in many versions - models differ in material and manufacturing method, as well as the angle of inclination of the element that protects the place where the pipe passes through the roofing pie from water. The angle of inclination can be from 15 to 55 degrees, therefore, the cutting of the chimney on the roof is designed for the most common slope options.
To install such a structure, a hole of appropriate dimensions is made in the roofing pie. A seal made of rubber is attached to the outside of the structure using silicone. The distance between the pipe and the collection passage is filled with non-combustible insulation. The roofing penetration covers the passage unit, after which the penetration can be attached to the roof with self-tapping screws. To ensure a tight connection, it is recommended to use a sealant.
When choosing the option of how to seal a chimney on the roof, you can use other ready-made solutions, for example, Master flash roofing penetrations.
https://youtube.com/watch?v=rL-_Irakk4s
How to extend a chimney.
To connect two pipes of different diameters, I had to make a coupling. The starting material is steel sheet, 1.5 mm thick.
Using a grinder, two rectangles were cut out, measuring 200x630 and 250x790, as well as a circle with a diameter of 300mm with a cut out window with a diameter of 190mm.
Rectangular blanks were bent into a cylinder shape. I used the appropriate asbestos-cement pipes as a template. The resulting joints are welded using electric arc welding.
I assembled the structure in this way: I placed a cylinder with a diameter of 250 mm on a flat surface, placed a circle with a cut-out window on top, and placed a cylinder with a diameter of 200 mm on top of the circle.
This entire structure was welded with electric welding.
Options and features of exterior finishing
The chimney trim on the roof plays a decorative role. To avoid maximum smoke removal and prevent the formation of condensation, the outer part of the pipe must be insulated, and insulating materials require mandatory external protection. The finishing of the chimney pipe should be in harmony with the design of the roof, and it will make the smoke exhaust structure a full-fledged decorative element.
There are a lot of finishing options, the most current ones can be named:
Plaster. This is a simple solution that allows you to protect the pipe from the cold and provide it with a pleasant appearance. At the request of the house owner, mineral chips are added to the plaster mortar, which allows the finished cladding to be given a beautiful relief structure.
Decorative brick. This is another common solution that is widely used in finishing brick buildings. This finishing of the fireplace chimney allows you to maintain the temperature in the chimney; it lasts for a very long time and does not collapse even from very strong heat. Artificial or natural stone. A stone chimney looks very solid and stylish; it attracts attention to the roof and performs its functions perfectly. This is an almost eternal facing material that will make the smoke removal system more reliable.
Finishing the chimney with corrugated sheeting. An interesting option is one in which the smoke exhaust duct is designed in the same way as the roof itself. Finishing a chimney with a metal profile is a fairly strong and durable option; such lining is installed on a metal frame and reliably covers the insulating material.
These are just some of the external cladding options that will help make the chimney beautiful and very noticeable. An ordinary pipe can be turned into a real home decoration.
Finishing the chimney with a metal profile on the outside
Finishing a chimney on the roof with corrugated sheeting is one of the simplest options; even a novice home craftsman can handle such work. A galvanized sheet equipped with an anti-corrosion coating will be a strong and durable solution: it does not burn, does not collapse under the influence of high temperature or strong vibrations, and installation of such cladding does not take much time. However, this is a cold material, so the chimney will have to be insulated.
Finishing the chimney with a metal profile is carried out after the construction of the metal frame. Metal sheets are installed overlapping on it to ensure the strongest possible connection. To ensure that the sheets are positioned evenly, a building level is used when attaching them.
The metal profile is attached with self-tapping screws; this work is more convenient to carry out using a screwdriver. Between the metal sheet and the smoke exhaust pipe there is a layer of non-combustible insulation.
Finishing the chimney inside the building
A fireplace or stove is usually installed in a living room or study, so it becomes necessary to conduct smoke exhaust ducts through the second floor and the attic or attic room. The decoration of the chimney inside the house can be very diverse in appearance, but in any case it is installed on a common basis. The interior finishing of the chimney is carried out as follows:
- To line the chimney, a metal profile frame is built around it, which is sheathed with special plasterboard sheets. They must be fire-resistant, this will ensure the fire safety of the house. Such sheets are designated by the special abbreviation GKLO.
- The frame is insulated: a layer of mineral wool or other non-combustible insulating materials is laid around the chimney.
- Smooth plasterboard sheets are finished with any selected materials: it can be ordinary wallpaper, ceramic tiles, plaster and much more. This decoration of the fireplace chimney allows it to be harmoniously integrated into the space of the room, and the choice of material depends on the style of interior design.
The interior decoration of chimney ducts can have a wide variety of colors, so it can be chosen to suit every taste. However, in any case, it is recommended to choose non-combustible materials so as not to increase the risk of fire
This is especially important in a wooden house: walls located near the chimney, and especially all bending areas, must be treated with fire retardants
External and internal finishing of the chimney will allow you to turn it into a full-fledged decorative element: the choice of materials depends on the design features of the building and the financial capabilities of the owner. Self-installation of the cladding will allow you to save a lot, but it must be carried out in strict compliance with all technological requirements.
You need to enable JavaScript or update your player!
Do it yourself or order it?
You can only make a brick chimney yourself or a structure from an insulated single-layer steel pipe. But laying smooth and beautiful walls of a brick pipe is more difficult than laying just a brick wall, and you must have the skills of an experienced mason. Single-layer pipes will have to be insulated; the quality of self-insulation is much worse than that of ready-made factory-made pipes.
You can independently install a chimney made of ceramics and sandwich pipes. It is impossible to manufacture elements of such chimneys on your own, but the industry produces many modules that allow you to assemble a pipeline of any design.
The question of whether to install a pipe yourself or hire a team of professionals is quite complicated. Installing a chimney is quite a complex job, and it is worth thinking about and carefully assessing your capabilities: is it possible to take prefabricated scaffolding or scaffolding of the appropriate height, will you have assistants, do you have the skills to install building structures, how do you react to height.
Chimney finishing, choice of materials
Negative factors affecting the chimney include
:
- atmospheric influences (wind, precipitation, ultraviolet radiation);
- difference in ambient temperatures;
- high temperature operating loads.
Due to the difference between the temperature of the working pipe and the air temperature in the chimney, condensation forms, which provokes destruction of the pipe during the combustion of heating oil
. To avoid the formation of condensation and protect the pipe from external influences, it is necessary to provide reliable insulation of the chimney through lining.
Various materials are used to cover the protruding part of the pipe. When choosing, you should consider
:
- resistance to external factors, wear resistance;
- appearance and color scheme (matching the roofing or wall decoration of the building).
It is recommended to line the chimney before laying the roofing material to avoid damage or contamination of the roof covering.
Finishing a chimney on the roof is most often done using
:
- clinker bricks or tiles;
- plasters;
- cement fiber boards;
- roofing material (corrugated sheeting, slate).
Characteristics of finishing materials
Clinker bricks or tiles are a practical option for finishing a chimney pipe, since dirt is not noticeable on such material.
The advantages of clinker materials also include the aesthetics of the masonry; such a chimney goes well with any type of roofing. It is worth noting the resistance of tiles and bricks to weather conditions, temperature changes, as well as the strength of the material. For lining the chimney, exclusively solid clinker bricks are used, laid on a clinker mortar; special compounds are used for grouting joints. Thin, lightweight clinker tiles are usually used for lining tall pipes. Finishing a chimney on the roof with plaster is characterized by
:
- affordable cost;
- simple installation;
- versatility (suitable for any roofing);
- the ability to implement any color schemes (plaster can be painted with silicone paint).
Plastering pipes is carried out using the same technology as finishing facade walls. Traditional cement or lime-cement mortar can be used, but a more durable option is to use mineral, silicone, silicate or acrylic plaster. Painting the dried surface increases the wear resistance and durability of the finish.
Small-format cement-fiber boards are durable, resistant to ultraviolet radiation, moisture, temperature fluctuations, and light in weight. This is an environmentally friendly, non-flammable material. Smooth or structured slabs can be used for lining the chimney; the material is available for sale in a wide range of colors.
If slate is used for roofing, the chimney lining on the roof is usually made of the same material. Slate slabs can be shaped like an arc, flake, rectangle or octagon. The color of this natural material depends on the deposit. This color is usually graphite, green or purple.
A fairly simple and inexpensive option for finishing a pipe is to use corrugated sheeting. It is used if the roof covering is made of the same material. The pipe, finished in the color of the roof, looks aesthetically attractive.
Manufactured in a factory, the chimney elements for the roof passage have an aesthetic appearance and are quite easy to install. They are equipped with a steel chimney duct and can have a ready-made external cladding made of any material, or be prepared for independent finishing so that the chimney is externally in harmony with the roof. The modular steel structure is not additionally finished; it is enough to install it at the point of passage through the roofing pie.
Operating principle and device
In the family of devices for removing combustion products, the coaxial chimney stands apart. This modern design is much more efficient and safer than a conventional chimney pipe. This system is ideal for boilers with a closed combustion chamber.
To make a coaxial chimney, you need to take two pipes of different diameters and place the narrow pipe inside the wide one. You also need to connect the inside of the wide pipe and the outside of the narrow pipe with special jumpers so that the central axes of both pipes coincide. Well, the coaxial chimney is ready.
In practice, such a design is, of course, easier and more reliable to buy than to make. The cost of a coaxial chimney will be higher than the price of an ordinary stainless steel pipe, but the costs will be fully recouped.
Using a coaxial chimney allows combustion products to be removed through the facade of the house; there is no need to install a 5m vertical chimney
A double pipe is necessary to perform two functions simultaneously. Combustion products are removed from the boiler furnace through an internal narrow pipe. And through the gap between the inner and outer pipes, air enters the combustion chamber, i.e. oxygen necessary for fuel combustion.
This solution has a number of advantages. An alternative to a coaxial chimney is a traditional chimney combined with forced air injection into the combustion chamber.
In this case, the air is usually taken from the room in which the boiler is installed. A coaxial chimney allows you to take air from the street and supply it directly to the firebox.
The diagram shows the general principle of operation of a coaxial chimney, as well as its structure in comparison with a traditional chimney pipe (+)
What happens in such a chimney during boiler operation? Hot combustion products move outward through the inner pipe, and in the opposite direction there is a parallel flow of fresh cold air. As a result, a completely natural heat exchange occurs: hot gases give off heat to the adjacent cold flow.
The air enters the combustion chamber already in a heated state, which increases the overall efficiency of the boiler, because there is no need to waste precious kilojoules on heating the air masses. At the same time, the temperature of the outer surface of the coaxial chimney is noticeably lower than when using a standard chimney pipe. This circumstance makes the design safer.
Another advantage of a coaxial chimney is easier installation of the boiler, because you do not have to install a forced ventilation system. In addition, these structures have different requirements than traditional chimneys. As a result, the combustion product removal system takes up less space.
On the outside of the building, the coaxial chimney pipe looks much more laconic and takes up less space than with the external installation of a traditional chimney
Coaxial chimneys are universal; they can be installed with gas boilers and with devices operating on liquid or solid fuel. Chimneys with different diameters are available for sale, which allows you to select suitable pipes for a particular boiler.
Installing a traditional chimney in an already constructed building is a rather difficult task. If the installation of a chimney was not provided for during the design, you have to go through the floors and roof or take the chimney outside.
A bulky structure can create problems both inside and outside the building. But coaxial designs are simpler and more compact. The installation of such a chimney on the outer wall looks laconic and will not spoil the appearance of the house.
Advantages
By installing a chimney through a wooden wall, many advantages are gained. Among them are:
- The chimney pipe is almost completely vented outside, rather than stretched through the entire building;
- The installation of the structure can be carried out both during construction and after the completion of the building. Can be done when installing a heating system;
- There is no need to make holes in the ceilings, whereas the boiler is located on the lower floor of a house with 2-3 floors;
- The integrity of the roof is preserved;
- Assembling and pulling the chimney through the wall does not cause any particular difficulties.
How to protect a country house from fire when installing a stove
Fire regulations require protection of walls and floors made of combustible materials when using solid fuel heating equipment. Fire prevention measures include:
- Use of thermal insulation materials with a high degree of fire resistance to protect walls and ceilings at the installation site.
- Application of fire protection: impregnations and mastics.
Safe installation of the furnace and the use of fire prevention products are a mandatory requirement for the operation of furnace equipment.
How to cover the walls and ceiling when installing an iron stove
The part of the ceiling located above the stove and at the point where the chimney passes, as well as the adjacent walls, experience severe thermal stress. The following fire safety conditions and measures are considered mandatory:
- The ceiling is made of non-combustible materials. The use of wooden and plastic panels is not allowed. It is optimal to use gypsum fiber boards treated with gypsum putty for painting.
- The walls are protected with basalt cardboard followed by sheathing with steel sheets. For convenience, we use ready-made protective decorative wall screens made of stainless steel, which have a beautiful appearance and provide a high degree of safety. The walls are protected with plaster with a thickness of at least 3 cm, as well as brickwork.
Fire safety requirements for installing a metal stove in a wooden house are described in detail in SNiP 31-05-2003 and SP 118.13330.2012.
Fire retardant treatment of wooden structures
Where the stove is installed, wooden walls are protected using fire retardants: mastics and impregnations. Load-bearing structures and beams must be processed. Fire retardants are applied to the walls and floors where the furnace equipment is installed.
Mastics and impregnations have been developed for protection. The former provide better fire protection, the latter are almost colorless.
The order of installation regarding fire safety measures specified by the manufacturer is specified in the technical documentation. Fire protection work is carried out by representatives of the Ministry of Emergency Situations. You can take measures to prevent fire yourself, but before putting the stove into operation, you will need to obtain a certificate from the inspector of the Ministry of Emergency Situations about the fulfillment of all requirements of the safety regulations.
Detailed parameters for installing a solid fuel heating country stove are described in the technical documentation attached to the heaters of leading European and Russian factories. Compliance with the described rules is mandatory.
Small brick stoves without a foundation are great for country houses or temporary buildings, especially if the building is already ready, and there is no way to build a foundation for the stove in it. You can install a small stove on a regular floor, even a wooden one, as long as it is made of thick enough boards. Being equipped with a cast iron hob, it can be used not only for heating, but also for cooking. At the same time, this unit is more convenient to use than steel stoves, since it emits heat softly and can accumulate it in sufficient quantities (you have to add firewood less often).
It is not always possible to allocate space for a stove foundation, but there are stove options where a foundation is not required.
Many owners of already built country houses do not dare to build such a unit due to reluctance or lack of opportunity to build a foundation for the stove. In such a situation, you can build a miniature brick oven without a foundation.
Features of the operation of brick chimneys
After the construction of the chimney is completed and the pipe has been successfully put into operation, it is advisable to familiarize yourself with the features of using a brick stove. In order for the heating unit to serve for a long time and without accidents, it is necessary to follow simple but important rules.
- The main enemy of brick is sudden temperature changes. It is better to heat more often, but for short periods of time. It is not recommended to make more than 2 fuel loads per firebox. This is especially true for coal, the combustion temperature of which exceeds 1000 degrees.
- Timely cleaning of the pipe from soot unlimitedly extends the service life of the chimney duct.
- If cracks occur on the stove body and chimney in particular, measures should be taken immediately to eliminate them. Neglected cracks tend to progress quickly and pose a threat not only to the integrity of the brickwork, but also to human health. Carbon monoxide, which is colorless and odorless, but poisonous to all living things, penetrates into the living space through small cracks.
- The slightest malfunction in the doors of the firebox or ash chamber (ash chamber) first significantly reduces the heat transfer of the stove, and then leads to an avalanche-like accumulation of soot on the chimney channels. If you find a door, view or valve that does not close tightly, you should immediately repair or replace it.
- At least once a year it is necessary to carry out preventative maintenance on the furnace. It is best to do this at the end of summer, before the start of the heating season. A daily preventative procedure includes opening the blower door for 15–20 minutes. This simple action will allow you to briefly create maximum draft, which will pull the soot deposited on the walls into the external environment.
- The use of damp firewood has an adverse effect on the cleanliness of smoke ducts, especially in winter. It is more rational to use fuel briquettes, the humidity of which is much lower. Firewood should be prepared ahead of time - drying wood naturally is a long process (from a year to two).
Full range of design and installation services
carries out a full range of work on the design, installation and commissioning of smoke removal routes of any level of complexity, length and design. The company’s installation department specialists will prepare a detailed technical work plan, taking into account all the nuances of the structure, its design and layout, as well as taking into account the personal needs and wishes of the customer. Drawing up a plan is possible both at the initial stages of construction and in finished buildings.
The project plan is drawn up with an accurate calculation of the cost of both all work and the required chimney elements, which is undoubtedly convenient for the customer. After approval of the project, a team of specialists arrives at the client’s site and promptly carries out high-quality installation of the smoke exhaust system, followed by commissioning. A big advantage is testing and a full check of the functionality of the heating and smoke exhaust system upon completion of the work. The client receives long-term guarantees of the quality of the constructed smoke removal system, installed in accordance with all fire and operational safety rules and regulations.
Flaws
Although it has many positive factors, the structure also has negative sides. You need to familiarize yourself with them:
- An integral rule for installing a chimney through a wall is to create insulation on the pipes;
- Inside and outside the house you will need to allocate a relatively large horizontal area for the smoker;
- According to some experts, if this outer pipe is for a gas boiler, then the productivity will be low;
- This product will not be in harmony with the overall design, however, this can be played around somehow.