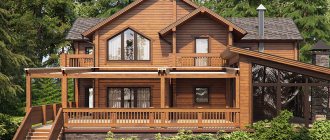
It’s hard to believe, but many still don’t know what the main difference between a sauna and a traditional bath is. Let's conduct a small educational program: the sauna is a dry-air procedure, and the temperature in the steam room is approximately 2 times higher than in a Russian bath. From here we draw a completely reasonable conclusion, which will be especially relevant for those who want to build a sauna: in order for everything to work out, you should carefully think through all the nuances and abandon improvisations. Your ingenuity should give way to cold calculation, based on strict adherence to the prescribed standards for sauna design. What are these norms? Is it possible to build a wonderful sauna without damaging any of them? All this will be discussed in as much detail as possible in today’s material.
Sauna parameters
To design a typical sauna, I wanted to take a standard size. Without thinking twice, I went to the prices section on our website and calculated the average size based on the available projects. The average size was 2.45x2.17 meters. Here we take into account both saunas with wood-burning heaters and electric ones.
When drawing up a project at this stage, I am interested in the presence of openings and the thickness of the walls, as well as the height of the ceiling in the room. For a typical project, again, I will choose typical characteristics. Heater - electric (they are chosen a little more often), without a window (more often it is absent), the thickness of the wall with the doorway is 150 mm, the height of the sauna ceiling is 2.25 m (for this, the ceiling of the original room must be at least 2.35 m) .
We will assume that the partitions have not yet been erected and the doorway is being constructed in accordance with our technical specifications.
A special case is the layout of shelves in the maximum number and maximum width. Only by planning the sauna with shelves and a heater can you determine the optimal location of the door.
Because We took the “dirty” size of the room; it is necessary to take into account the thickness of the sauna frame. As a rule, these are 50 mm battens, 30 mm counter battens and 15 mm lining. The resulting cake is 95 mm thick.
Now we have data with the “net” dimensions of the sauna, so we can at the same time determine the volume of the room for selecting a heater.
What can cause a fire?
Even the most competent sauna layout cannot guarantee the occurrence of an emergency. Especially if the sauna was commissioned many years ago and is regularly used for its intended purpose. Over time, the wood used for wall decoration loses moisture, which dramatically increases the likelihood of fire even at relatively low temperatures.
An unfortunate combination of factors (the stove did not turn off in time, overheating of the air in the steam room) can lead to a critical fire hazard. Therefore, there is a very specific recommendation - to completely change the lining inside the steam room every 6 years. And even though visually it remains just as fresh and reliable: you will never see the deformation of its structure with the naked eye.
What else should you pay attention to in order to prevent a fire hazard?
- gross errors in the installation of furnace equipment;
- no cuts or concessions when integrating the stove into the steam room space;
- improper operation of the chimney;
- malfunction of the electrical equipment used;
- incorrect connection of the irrigation system to the general water supply channel, etc.
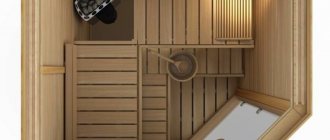
The location of the heater and the configuration of the shelves
We will choose a place for the heater closer to the corner so that it does not interfere with the passage. For easy access to the shelves, it is better to place the electric heater on the opposite side of them. Because The wide wall will have an opening; we will place the heater on the short wall. Based on the size of the heater and its safe distances, you can calculate the width of the upper and lower shelves. In this sauna, along the left wall there is an upper shelf with a width of 590 mm and a lower one - 365. Along the far wall - 690 and 465, respectively. The free space allows you to make any of the shelves even wider, but I will leave these dimensions because... the result is a universal configuration of 7, 6, 5 and 4 strips. It will be comfortable for visitors with different body types and different temperature preferences. It will also be possible to steam while sitting or lying down.
The width of the shelves is calculated by the width of the strip plus 10 mm. The standard plank for sauna shelves is 90 mm. The ten-millimeter gaps are one less than the slats, hence the size. The lower shelves have the same width, with the difference that the outermost strip extends 25 mm inside under the lining.
List of required documents to open a bathhouse
In order to open a private or public bathhouse, you will also need to choose whether the activities will be carried out within the framework of an individual entrepreneur or LLC. As noted above, you should not give up alcohol. And a license to sell it is issued only to legal entities, which include an LLC. Otherwise, the individual entrepreneur in the case we are considering does not differ significantly from the LLC.
To register a limited liability company, you will need to prepare the following documents:
- The decision of the sole founder or the minutes of the general meeting on the creation of the organization.
- Agreement on its establishment.
- LLC Charter.
- Receipt for payment of state duty.
- Notification of transition to the simplified tax system.
A limited liability company is registered with the Federal Tax Service (FTS). In addition to the documents listed above, you may also need a letter of guarantee to provide a legal address - if the premises are not owned, but rented.
As for the bathhouse specifically, among other things, you need:
- permission of local authorities;
- permission from the sanitary and epidemiological service;
- fire service permit;
- contract for sanitary treatment of premises;
- waste removal agreement;
- contract for washing and disinfection of textiles.
If you wish and have the financial capabilities, you can seek help from specialists who will help in collecting the documents required to open a bathhouse complex. This will save the lion's share of time.
Selecting a heater for a sauna
Harvia Moderna was chosen as the heater. This compact model hangs on the wall, has a remote control panel included and quickly warms up the sauna. Small safe distances allow it to be mounted directly on a wooden surface and next to any wooden structure. We will also provide a fence for the heater for additional safety.
When selecting the power of the heater, it is necessary to take into account not only the volume of the sheathed room, but also any stone, glass and non-insulated surfaces. In our case, we have a 7x19 dm door with a glass panel. According to the instructions for the heater, the glass area must be added by a factor of 1.2 to the existing volume. In our case, it is necessary to add 1.5 m3 to 10.1. Thus, the calculated volume of the sauna was 11.6 m3. This volume corresponds to a power of 8 kW. In practice, with reliable thermal insulation and correct ventilation, 6 kW may be sufficient. But such a solution is preferable if it is not possible to allocate more kilowatts. To save energy and quickly heat up, it is recommended to install an 8 kW model. The thermostat will turn off the heater more often, because... The temperature will stay in the sauna longer.
Where to begin
So, at first, a timid thought about construction finally took shape into a completely mature and serious intention. Well, it’s time to get down to the most important thing - and this is not purchasing the necessary material, no, no. First you need to draw up a thoughtful project plan for the future sauna. And so that it turns out to be more than just your stupid fantasies, take into account the basic design standards when developing it. All of them are spelled out in a set of regulations of a technical, economic and legal nature - in fact, they are what are taken into account during any construction on the territory of our country. Briefly, this code is called SNiP, and it is this that we will take today as the starting point for the construction of a sauna.
Ventilation, lighting and door
The finishing touches are to determine the height of the shelves, arrange the lamps and choose a location for the exhaust vent. Height of standard shelves: lower – 45 cm and upper – 90 cm. We will place the lamps in three corners. We will place the exhaust hole in the corner opposite from the heater. It will be located below the shelves. The ventilation valve is installed on top of the wall or in the ceiling. The inflow will be through a gap under the door 3 cm high. The heater is located near the door; it is not necessary to arrange an additional inflow under it.
The final top view drawing will look like this:
Before installing partitions, you need to determine the location and size of the doorway. The width of the opening should be 4 cm greater than the width of the door frame, and the height should be 5 cm. The opening itself is located in the middle between the bottom shelf and the heater fence.
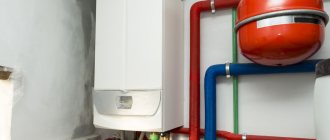
Electricity supply
Even a dry room requires safety.
- Heat-resistant insulation.
- The power for the electric furnace is laid in the screed, and is not left with a conventional cable running along the wall.
- Sockets cannot be installed inside the steam room.
- Only luminaires designed for use at high temperatures are used.
- Lamps are placed closer to 30 cm to the ceiling.
To prevent short circuits, connections are made through switches with protective shutdown. All switches are located strictly outside the sauna.
Frame
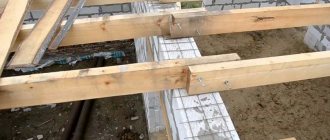
First of all, the wall frame is installed. For the sheathing, a 50x50 mm softwood timber is required. A 50 mm thick insulation will be laid here.
The pitch of the bars is set according to the standard width of the insulation - 600 mm. Where it is not possible to make exactly 600 mm, we make it smaller. We provide a ventilation duct on the wall opposite the heater. We connect it with a tee to the ventilation duct for the ventilation valve, which will be located in the ceiling. One ventilation duct is led from the tee to the shower room or dressing room (for the installation location of the ventilation valve, see the technical specifications for electrical wiring below). We install a block flush with the doorway on each side. Part No. 1 is made 100 mm shorter than part No. 2, because a ceiling beam will be installed on it (specification of Saunaflame products - at the end of the article).
For greater rigidity, the ceiling frame is made along a short wall. Part No. 3 – timber 50x100 m – is installed on the second part with the short side. The ceiling insulation is made at least 100 mm.
The ceiling counter-lattice is made in increments of no more than 600 mm from 50x30 mm timber (part No. 4). The ceiling cake also contains aluminum foil on a paper base. To complete the ceiling installation, lining is hemmed onto the counter-lattice. A hole with a diameter of 100 mm is made in the lining to install a ventilation valve, which is connected to the previously installed vent. channel in the ceiling.
Requirements for ensuring epidemic well-being
These requirements imply:
- monthly activities to exterminate rodents and parasites;
- ongoing elimination of defects in floors and walls (as cracks form);
- weekly general cleaning;
- routine cleaning during the working day;
- the final “promenade” of the cleaning employee at the end of the working day, the last cleaning is done with the mandatory use of disinfectants.
The SES will definitely check the disinfection log and the consumer’s corner in the sauna.
Electrical wiring and ventilation ducts
Before laying insulation into the walls, it is necessary to remove the wires for lamps and electric heaters and provide a ventilation duct for main ventilation. The cross-section of the wire for the electric heater is selected in accordance with the power (the recommended cross-sectional area is indicated in the product data sheet). After this, you can insulate the walls and cover the insulation with aluminum foil, not forgetting to remove the ends of the wires. Scheme of technical specifications:
Pool Features
The choice will depend not only on wishes, but also on the type of soil on the site and the availability of communications.
Main types:
- A small bathhouse, the main purpose of which is cooling after the steam room. It is impossible to organize a swim in them, but they will not require excavation work.
- A full-fledged swimming pool, which will require its own project with soil testing and communications.
To create a large pool, it is better to hire professionals.
Walls
After the ceiling is hemmed and the walls are insulated, you can begin installing the wall counter-lattice. The top bar will just rest against the ceiling lining. The bottom one will be near the floor. Another plank should be opposite the future frame of the upper shelf - 855 mm to the top edge (height of the shelf minus the thickness of the plank for the shelves 25 mm and the thickness of the board on which the shelves are assembled 20 mm). The other bar is opposite the middle of the backrest. The remaining space is filled so that the counter-lattice pitch is no more than 500 mm. In our case, two more strips are added. One is between the bottom bar and the top shelf bar. The second is between the top bar and the backrest bar. We start with the wall according to type A (detail No. 5):
On the remaining walls, the spacing of the counter-lattice remains the same as on the long wall (view A). Drawing of the left wall counter-lattice (type B):
An electric heater is installed on the right wall (view B), so at the place where it is attached it is necessary to provide strips to which it will be screwed. In the instructions for the heater we find the dimensions and distances for the mounting frame:
In accordance with these dimensions, we provide a counter-lattice for the right wall (type B):
The wall in which the door will be installed (type D) must also have a stiffening frame around the perimeter of the door (parts No. 10 and No. 12), because In this place, door panels will be made from clapboard. Mounting boards for the door frame are installed in the doorway. At the top, two 100x20 mm strips are enough; along the edges, the strips (part No. 13) are installed opposite each hole in the door frame, into which it is then screwed. Unpack the door in advance and measure these distances.
Fire distances
Compliance with the prescribed standards during construction helps prevent the movement of fire from one building to another. For example, if you have set up a sauna in a separate building, and next to it there is a country house or a country cottage.
The distance to the fence, as well as to the neighbor’s bathhouse or sauna is also taken into account. The final norm depends on the type of materials used to decorate the walls of the sauna.
- to the fence of the neighboring plot - at least 3 meters;
- when finishing with brick or concrete blocks, the distance to the neighbor’s sauna is at least 6 meters;
- when finishing with any other materials - at least 8 meters.
Door and paneling
It's time to install the door. Using parts #10 and 12 this will be easy. You already have the ceiling lined. There is a hole in the ceiling with a ventilation valve. Wires for lamps and heaters are installed in the walls. If you want to install the control panel outside the sauna, now is the time to do it (run the cable from the control panel installation location to the connection block of the heater). The temperature sensor has a wire that can be passed behind the lining or along its surface. Now is the last moment when it can be hidden. Once decisions have been made on all the wires, proceed with the installation of the lining. Make a hole in the lining where the wires exit before nailing it. You can make cutouts for the vents in advance. constant exhaust holes (see picture with parts No. 26 and 27). The door paneling is nailed last.
After all the lining is nailed down, proceed to installing the ceiling and door skirting boards. Cover the bottom vent with a wooden grille. You can also install lamps.
Public bathhouse project
Project for the construction of a public bathhouse, modern requirements for visiting public places, bathhouse complexes of a new stage being built, video of an ancient bathhouse complex in Riga.
Typical designs of public baths
They are usually calculated:
- for urban conditions from 50 to 300 seats;
- for rural areas – from 10 to 25 visitors per day.
They also have separate standards and requirements for public places to comply with hygiene and safety rules. For public buildings, where the capacity significantly exceeds the number of visitors to family baths, there are separate provisions fixed by SNiPs and GOSTs - official documents on the right to conduct this type of activity.
The development of projects is based on the requirements of SNiP 31-06-2009, which is guidance and methodological recommendations for the construction of public buildings and structures. They take into account all the nuances of the construction of public baths, from allocating a certain area for the building to determining the territory for parking cars.
Modern requirements for projects
Modern projects for public spaces are diverse and very diverse. They provide for both traditional premises with a standard floor height of 3.30-4.20 meters with window openings located at least 1.50 meters from the finished floor line, and the introduction of separate luxury class offices into the project. As additional space, projects may include the construction of swimming pools and plunge pools. For lovers of moist hot steam, the complexes can be equipped with rooms of a classic Russian corner bath, for those who prefer dry hot air - rooms of Finnish saunas. The design of structures for collective visits at the present stage has long been no longer based on the traditional standard construction of the old formation. The construction and location of premises are driven by consumer demands, which are not satisfied by the large accumulation of human masses in cramped dressing rooms and stuffy locker rooms. No one is anymore satisfied with the tight hum of the washing department and the crush in the steam room.
Diversity of the market for services provided
The service market is often driven by a growing interest in bathhouse facilities with eastern traditions, rooted in the distant past. Thanks to them, new complexes were built in the hammam style, with soft steam and heated surfaces of the room, baths made of logs in the Japanese ofuro or sento style. Infrared sauna projects with internal lining made of Canadian cedar began to be ordered more often.
The construction of such institutions requires substantial financial investments, since equipment for this type of complex for visiting a large number of people is quite an expensive pleasure. But, despite the costs, the number of people wanting to spend their leisure time “in a special way” is only increasing.
Nowadays, public baths, as well as large domestic baths and complexes, are a place of relaxation for a reputable company, where it is possible to relieve stress after a working week and stock up on strength for the coming everyday life.
Social bath complexes
But this category of structures being built does not give up its positions. Its availability in the form of low cost of services remains its main advantage to this day. It makes no sense for general developers to build palace mansions while investing capital in the construction of social bathhouses made of logs, designed for the average level of income of the population. Therefore, typical projects contain traditional premises, such as a dressing room, a waiting room, a locker room, a washing room and a steam room. It is in such bath complexes, built not only from wood, but also from brick or foam blocks, that preferential services are provided for a certain category of people, such as participants in military operations, pensioners, students, as well as low-income citizens, where they are given discounts on visiting.
A social collective bath complex, as a rule, has additional types of services. When designing it, additional areas are being introduced for hairdressing salons, massage rooms, and a buffet. The vision of collective baths from the point of view of ancient dogmas is becoming a thing of the past, being developed using modern technologies, materials, design skills and taking into account the requirements of today's visitor.
A unique video of the ancient bath complex “Nelli’s”, which is currently functioning in Riga:
Shelf frame
Start installing the shelf frame with the rack blanks. For this, a 50x70 mm beam is used. The figure shows the sequential installation of racks. We start with the top shelf, which runs along the entire wall, then the other top shelf.
Secure the adjacent racks with metal corners for rigidity (on the inside). Transverse and longitudinal bars 50x50 mm will connect all the racks of the upper shelves. We recommend that you do not install the bottom shelf racks until you have installed parts #16, 17, 20, and 21.
We recommend fastening the racks of the lower shelf, which are adjacent to the racks of the upper one, together. We complete the installation of the lower shelf by fastening parts No. 18, 19, 22 and 23 racks (No. 15).
The frame of the shelves is done - it's time to install the lower baseboards.
Safety regulations
The sauna requires strict adherence to fire safety rules:
- It is prohibited to install a steam room in a residential building that can accommodate 10 or more people at the same time.
- To finish a built-in steam room, you will need partitions with a high degree of fire resistance.
- The oven is equipped with an automatic shutdown.
- Organize supply and exhaust ventilation.
- The distance from the electric stove to the wall should be at least 20 cm.
Money is often the main factor in choosing a project, but you shouldn’t skimp on safety.
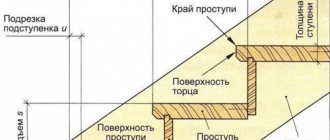
Shelves
The stitching between the shelf levels is where we'll start. First of all, the one opposite the entrance is mounted.
Then install the second side:
We install the end strips of the lower level according to the same principle:
|
We fasten the prepared strips for the shelves with a 20x50 mm rail with the same pitch as that chosen for the racks. Thus, these slats will cover the frame of the shelves. Top shelf layout:
Layout of the lower shelves:
Place the resulting shields on the frame. A 20x50 mm rail that holds the planks together is screwed to the frame.
What can you save on?
If the owner of the future sauna has the skills of a builder, then it is more profitable to build it yourself. Although large construction companies purchase material much cheaper than can be purchased at retail.
One of the cheapest options is a miniature prefabricated sauna, which is simply built into the bathroom.
Backrests and fencing for electric heaters
The backrests are fastened to strips of the same cross-section as those chosen for the shelves and the backrests themselves. The finished shield is screwed to the wall into a pre-designed counter-lattice strip (see above). Wall (view A):
Wall (view B):
Hang the mounting frame with the electric heater. All you have to do is make a decorative fence around the electric heater. Its dimensions take into account the safe distances from the heater body to wooden structures specified in the passport:
The final touch: hang lampshades, a thermometer, a hygrometer and an hourglass. Place the stones in the oven. The sauna is ready.
Ask any questions you have in the comments.
advice, design
What regulations should be followed?
All requirements and standards set out in the relevant documents must be strictly observed, since any violation entails a penalty or termination of the establishment’s work until all inconsistencies identified by regulatory authorities are eliminated.
Draft design of a public bathhouse for 50 people
Documentation for the design and construction of the premises
- SNiP 2.07.01 - this document regulates the location of a public bathhouse in a populated area, the location of structures on the territory, as well as the capacity standard depending on the area of the premises.
- SNiP 2.08.02 regulates all issues related to technical equipment and the area of each of the bathhouse premises, depending on its purpose. In addition, the document identifies the main premises that must be present in the project.
- SNiP 21.01 regulates the width of passages for road transport. This is due to both the convenience of access for customers and the free movement of special services equipment in the event of emergency situations.
- SNiP 2.04.01 and SNiP 2.04.05 regulate standards relating to high-quality heating, hot and cold water supply. In addition, these acts reflect the requirements for the installation of a sewerage system, as well as high-quality ventilation - without this, the bathhouse is unlikely to function fully.
Ventilation diagram for a steam room in a public bath that meets the requirements of regulations
Acts regulating the safe operation of the bathhouse
- GOST R 51232, SanPiN 2.1.4.544, SanPiN 2.1.4.1074 regulate the most important issue - the issue of water quality in public baths. Only clean water guarantees safety for health; this issue requires constant monitoring.
- If there is a swimming pool in the bathhouse, then the water in it must meet the requirements of SanPiN 2.1.2.1188. If it is not there, then this act is not required to be studied.
- SanPiN 982 determines that bath furniture should be easy to wash, disinfect and be resistant to high humidity. That is why the use of upholstered furniture in such premises is not allowed.
Wooden furniture is the optimal solution for a public bath
- GOST 28428 requires that all rooms be equipped with thermometers to control the temperature in all rooms of the bathhouse.
- GOST 12.1.019-79 reflects the most important requirements for electrical safety and regulates the conditions for ensuring the required level of safety during operation.
- GOST 12.1.004-91 contains a list of requirements for compliance with all fire safety standards; the document also helps to organize safe working conditions for workers and determines the list of necessary equipment and protective equipment that must be available.
Documents regulating the level of service
The level of service provided in the bathhouse must comply with both the general rules of trade and a special act that was developed specifically for such establishments.
GOST R 52493-2005 is the main document that should be followed by all owners of public baths and showers. In addition to the general set of rules, the act contains references to the main acts that regulate the activities of the bathhouse.