Are you planning to renovate your apartment? Great! Then you definitely need a 3d bathroom design program. In the process of renovating and designing an apartment, it is very important to think through all stages of your actions. This will help make your dreams come true and pre-calculate the amount needed to implement your plans. In the modern world, a lot of opportunities are open to people, so the process of renovation transformations in an apartment has become much more accessible.
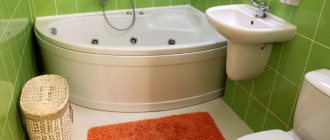
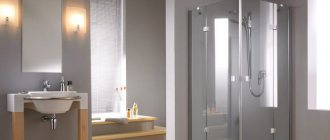
An example of a 3D bathroom layout created in a special program
When a bathroom design program appeared that allows you to look at different transformation ideas, everyone can see at the planning stage what the space will be like in reality.
Program functions for 3D bathroom design
Interior Design 3D is a universal software in Russian for Windows that will help you plan the design of your office, apartment or office. A simple, intuitive interface will allow you to quickly get used to the editor and immediately start modeling the layout. The following options are available to you:
- ✓ Construction of premises according to exact dimensions.
You can draw the rooms manually or upload a scanned house plan and trace it in the editor; - ✓ Built-in catalog of standard layouts.
If you need to finish the housing in a standard house, you don’t have to build a model from scratch. Just select the desired option from the built-in library; - ✓ Installation of windows, doors and stairs.
Various types of these elements are available in the catalogue. Made material, color and size can be customized; - ✓ Finishing floors, walls and ceilings.
Choose finishing materials from the built-in library or add your own textures from your computer; - ✓ Adding furniture.
Arrange furnishings from the built-in catalog, customize their size and appearance. Thanks to the variety of elements, you can realize any idea: be it the arrangement of a serious workspace, or the bright and cozy design of a child’s room for a boy. - ✓ View the finished project
in 2D design mode (“top view”), in 3D view, in the virtual visit window (the ability to see the room from the inside, as if visiting live), in a photorealistic photo;
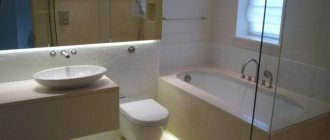
Bathroom layout made in the program
What are the advantages of online projects
Bathroom designs made with your own hands will help you see the finished version at the stage of thinking about the design. This is a great opportunity to choose the perfect style and renovation solution for the room. Many programs will give you a chance to become an artist of space in your own home without the help of expensive designers.
Program for creating 3D bathroom layout 3D Visicon Pro
Therefore, independently drawing up a project is:
- Saving;
- The ability to create your own environment with your own hands;
- See all the options that you would like to try to turn into reality.
From this we can only draw one conclusion: it is imperative to use such programs.
How to work in a 3D bathroom design planning program
Step 1: Create a room
First you need to create a project and draw the walls. In the 3D Interior Design constructor, you can draw a room manually according to measurements taken in advance, or download a real plan as a template and simply trace it.
Building a bathroom layout
A 3D layout of the created room will appear at the bottom of the screen. If you need to change its size, drag the mouse on any of the walls. This opportunity will come in very handy if you later want to design a private house.
When creating a layout, pay special attention to the choice of doors. The bathroom design program offers a large number of options: from regular and double doors to arches. The application also contains an impressive collection of different types of windows, including balcony blocks.
Installing doors in the program
Step 2. Finish
If you double-click on the created room, the settings panel will appear on the right. Here you can change the name of the room, set the height of the walls and select finishing materials. Tile is best suited for wall cladding and flooring.
Choosing tiles for the bathroom
To set the appearance:
- ✓ go to the menu of the element you want to configure (“Walls”, “Floor”, “Ceiling”);
- ✓ click on the “Material”
and select
“Tile”
; - ✓ select the appropriate option and click “Apply”
; - ✓ adjust the texture scale and evaluate the result in the viewing window.
Setting up finishing materials
Didn't find a suitable material in the catalog? Bathroom Planner allows you to upload materials from your computer. For example, you can download the desired texture on the Internet and add it to your project to make a design that is as close to reality as possible.
Step 3. Arrange the furniture
Now you need to choose furniture. The editor provides several options for bathtubs and showers, Jacuzzis, mirrors, sinks and other elements.
Arranging furniture in the bathroom
In the future, you can customize the appearance of any added item. Adjust the color of the bathtub, rug or sink, change its location and evaluate the result in the preview window.
Don't forget to add a light source: in the catalog you will find about a dozen options for lamps and chandeliers of various styles. Select the appropriate one and add it to the layout.
Step 4. Save the project
The finished visualization can be saved on your computer as an image or printed on a printer. You can also leave the project in the format of the software itself so that you can return to editing if necessary.
Software for selecting room cladding
You can create a design project using the free IKEA Home Planner app. The created interiors can be uploaded to the store server. In the designer, before sending the order to the seller, the cost of tiles, plumbing fixtures and various decorative elements is calculated.
There is also an application Roomstyler.com / My deco 3D room planner, which has a user-friendly interface. Interior finishing and building plan options are available here. Windows, doors, household appliances, etc. are added. The server integrates store sites. Users can immediately find out the cost of decorative elements. When work on the model is completed, you can share the result on Facebook.
The free Sweet Home 3D application has a large selection of decorative elements and space design options. The working window consists of 4 parts: room type, 2D and 3D models, a list of used items indicating dimensions and characteristics. The parameters are adjustable.
What to consider when planning a 3D bathroom design in the program
In order to be able to design a high-quality layout the first time, when working in the editor you should consider the following features:
1. Create a separate room.
You should not draw one common room with a hallway and a bathroom, and then build partitions. In this case, you will not be able to complete an individual finish for the bathroom, since the finishing materials are installed on the entire room at once.
2. When setting up finishing materials, you can take textures from any section
. If the flooring options offered in the “Floor” category do not suit you, look, for example, at the tiles from the “Walls” category.
3. If the installed tile seems too large for you, adjust the “Scale” parameter. Move the slider to the right to reduce the tile size
.
4. Basic bathroom furnishings
are located in the corresponding section of the furniture catalogue. However, you can find matching items in other tabs. For example, in the “Miscellaneous” section you may need switches, sockets, a gas boiler and other objects.
Selection of plumbing
The first and most important thing you need to decide on when planning the interior of a bathroom is the plumbing. Fortunately, now it is as diverse as furniture sets.
Bath
Modern bathtubs differ in shape:
– Rectangular – strict and laconic. They will fit well into a minimalist and high-tech interior;
– Triangular models are not the most convenient to install. But they are spacious, luxurious and elegant. And often with additional functions, such as hydromassage;
– Oval bathtubs are sophisticated and laconic. This is a good alternative if rectangular bowls seem too massive and rough to you;
– The round model is an unusual solution that will fit only into spacious bathrooms. It will become the central element of the interior and decor;
– A clawfoot bathtub is the epitome of elegance. If you want a luxurious bathroom in a classic style, this is what you need. Catchy, beautiful, on aged twisted or massive lion paws.
As for materials, the most traditional are durable cast iron bathtubs. They were one of the first to appear, and are still strongly associated with the classical style. But they are too heavy and require special care.
Acrylic is light and warm. This is a godsend for bowls of non-standard sizes and configurations. But the surface is easy to scratch; it is afraid of chemicals and abrasives. A good option for modern interiors.
Steel is the most affordable and very practical. But it cools down quickly and is too noisy. Steel will fit into loft and deliberately minimalist styles.
Artificial stone is expensive, but very effective and practical. This bathtub is suitable for interiors built on natural materials and textures.
Shower cabin
Shower cabins are ideal in three cases:
– If you don’t like to soak in the bath, there’s no point in wasting time, water and space
Pay attention to modern and multifunctional shower cabins;. – If the bathroom is too small, a corner cubicle or a cubicle against the wall is a real find;
– If the bathroom is too small, a corner cubicle or a cubicle against the wall is a real find;
– Ultra-modern high-tech would be better complemented by a shower room. The latest models are equipped with lighting, music and other interesting options.
Toilet
The most important criterion for choosing a toilet when planning the interior design of a bathroom is the method of its installation. There are two main options:
– Classic floor design with cistern. You can even install and connect it yourself;
– Wall-hung toilets. The frame is mounted into the wall, so the bowl is pressed closely against it. These models do not have a visible tank. This is an option for small bathrooms and modern interiors.
Sink
Sinks are as versatile as bathtubs. It is better to immediately choose them together so that they are in harmony with each other.
In shape they can be round, oval, square, irregular polygonal. Complex unusual shapes fit well into high-tech, pop art and other fashion trends. But they are more difficult to wash.
To artificial or natural stone and acrylic, earthenware and porcelain are also added. These are good options for the classics. Stainless steel washbasins are good in a loft. Glass – in minimalism and hi-tech. There are even fancy but low-functional wooden sinks.
According to the installation method, there are water lilies that are attached to the wall, tulips on legs, floor or wall consoles and built-in sinks.
And for small bathrooms, the washbasin can be combined with a cabinet or installed above the washing machine. It's absolutely safe. They even sell ready-made kits.
Laying features
Before laying, the tiles must be inspected for damage. For this purpose, it is better to lay out all the blocks on the floor or any other hard surface. They need to be measured and compared with each other so that the size is the same - this is necessary to create an even pattern.
Glue is immediately applied to the tiles. At this time, special markings are made on the wall and a screed is laid. Then the glue is applied to the wall. You should avoid a layer that is too thick - the glue will not have time to dry and after a while the tile will simply slide to the floor.
Cut the mosaic tiles with special metal tongs or a construction knife. After a few days, grout each seam without risking moving the tiles out of place.
Substrate options
- Paper. The chips are glued to the paper base with the front side. This makes it easier to apply them to the wall. There are two main disadvantages: firstly, if moisture gets on the base, a separate element may come off prematurely, for example, during transportation. And secondly, you can evaluate the result and integrity of the parts only after they are fixed to the wall (when the base is peeled off). So you will find out late about the presence of chips and cracks on the front side.
- Net. The principle of operation is slightly different here. The chips are glued on the back of the mesh, so you can immediately see their quality. The disadvantage of this base is that it reduces the area of contact between the tiles and the adhesive.
- Hitch. This is the most convenient base from a work point of view. The chips are connected to each other by drops of glue. Sheets come in larger sizes: 30 x 60 cm, which significantly increases the speed of working with them.
Preparation
First, prepare the wall. It should be as even as possible so that the tiles do not go into “waves”. The old coating will have to be removed; it fits well only on wood and drywall.
Required tools:
- Spatula for applying glue.
- A utility knife to cut the film.
- Metal tongs or a utility knife for cutting tiles.
It is recommended to putty the walls and coat them with a primer, and seal all cracks and recesses. You can level the wall using a building level, which shows the angle of inclination.
Marking
Marking is necessary to ensure that the tiles lie in even rows. The markings are applied with a pencil with a thick lead or a cord with a weight, which is attached to the ceiling and ensures a perfectly straight line.
Tile laying options:
- Basic . The tiles are laid alternately, on the same level. The distance between elements is minimal.
- Chess board . The layout is carried out according to the basic principle, but elements of contrasting colors are used, alternating with each other.
- Linear . The pattern is formed in even rows, the tiles are laid one after another.
- "On the run" . The sutures are displaced relative to the mosaic segment. Suitable for round mosaics and laying out panels.
- Modular . There is deliberate negligence, tiles of different sizes are placed on a special drawing.
Grout
Proceed to grouting the joints no earlier than one day after laying the tiles, otherwise the risk of moving them out of place is very high. For grouting you will need a spatula and a rubber sponge.
Remove the protective film (if any). Using a spatula, start grouting first horizontally, then vertically. Remove the remains with a sponge.
Marking
Design is carried out with measurements. The markings will allow you to rationally arrange pipes, communications and drains. She will indicate the best placement of equipment and installation of portable communications. Sometimes the building does not provide for the demolition of walls to accommodate a bathroom. In this case, you will have to think about the rational location of the plumbing in relation to the riser.
The same bathroom area can be used in different ways. For example, if the dimensions of a separate bathroom are 1800x1700 mm and the bathtub is installed opposite the entrance, 2 marking options are possible:
- a closet with a heated towel rail opposite the washing machine and sink;
- a washing machine with a narrow cabinet opposite the sink, packed on both sides with compact shelves.
The same applies to combined bathrooms. The markings will simplify the task of arranging all the elements of the arrangement. Sometimes for one type of area, taking into account the different locations of the riser, several location options can be selected.
What material is it made of?
This finish is classified according to the type of materials used for its manufacture.
- Ceramic tiles (tiles).
- Plastic.
- Glass.
- Smalt.
- Metal.
- Stone.
Not only the appearance of this cladding, but also its service life depends on the type of material.
Optimal lighting option
Bright light allows you to create a comfortable atmosphere; it is necessary to install moisture-resistant lighting fixtures that are not afraid of temperature changes. The optimal solution is to use halogen lamps, which are popular for their economical consumption of electrical energy; they are often mounted in a suspended ceiling.
If you need to create an intimate atmosphere in the room, use decorative lighting, and with the help of mobile lamps you can achieve any lighting effects: rotating devices can change the intensity of the light flux. Among the unusual solutions for the bathroom, it is worth noting the installation of lamps in the floor.
Advice from professionals
- To decorate any bathroom, choose high-quality, moisture-resistant and practical materials. They should not be smooth, otherwise the lining will be dangerous.
- Never place furniture end to end. Firstly, it does not look aesthetically pleasing, and secondly, the furniture is not ventilated, which leads to the formation of fungus.
- If the interior is decorated in cool colors, put light bulbs with a warm yellow color in the lighting fixtures. This technique will make your stay in the bathroom more comfortable.
- One of the popular types of decoration - decoupage - will help to refresh a boring design. You will need glue, acrylic varnish, brushes and three-layer napkins with a beautiful large pattern. Make sure the design you choose matches the style of the bathroom. Then it’s a matter of technique: cut out the design, stick it on the surface of the tile, cover it with varnish and you’re done.
- Oilcloth curtains are a thing of the past. Replace them with a beautiful fabric with water-repellent impregnation. Soft rugs underfoot create the illusion of warm sea sand, and neatly folded stacks of towels evoke thoughts of peace. To prevent the bathroom design from reminiscent of an oriental bazaar, the color scheme of fabrics is chosen in the same style.
Summarize
Even if you decide to do a bathroom design project yourself, do not hesitate to ask for help from those who are more competent in this matter. The fewer mistakes you make at the project development stage, the fewer problems will arise when you start the actual repair work.
If there are no people among your friends who could help with advice or, in general, check the project itself for errors, look for information on the Internet. Fortunately, there is plenty of it, and it is freely available, so you can always find answers to any questions. With the right approach, today even absolute beginners can create a decent quality design project on their own, but keep in mind that this is wise to do if you plan to do some simple renovations. If you are aiming at something more serious, we recommend that you seek help from specialists, since it is no longer worth risking your money and nerves, which will definitely be spent in excess. It makes more sense to spend money on a specialist who will do everything efficiently and with the highest quality, and this will already be the key to a correctly completed repair, where the customer will receive the expected result. This has already been tested by the experience of those who were very confident in their abilities and decided to save on literally everything, including the development of all the necessary technical documentation.
Examples of mosaic layouts
There are several basic layout methods, for example, seam-to-seam, diagonally, or many other options presented below.
Taking a running start
This installation resembles brickwork. Most often, to create this effect, rectangular elements are used, which move with every second row.
Net
It consists of ready-made matrices of small or large sizes on a mesh, which are glued to a specific surface, which can significantly simplify and facilitate finishing work.
Chess
The classic layout option, which is quite popular and provides the opportunity to advantageously emphasize the character of the interior.
Angular
Mosaic tiles, due to their plasticity, are perfect for corner decoration. This decor smoothes out the sharp corners of various protrusions or boxes and creates a spectacular flow of surfaces.
The photo shows a blue wall mosaic with a corner layout in the bathroom interior.
Linear
Due to continuous, intermittent, parallel, intersecting, symmetrical, broken, chaotic or other lines, for example, in the shape of a wave, the situation takes on a truly original appearance.