Even novice craftsmen know that the appearance of suspended ceilings and the duration of their use until the next repair directly depend on the quality of the preparatory work.
In this article you will find a lot of useful information about what needs to be done before installing suspended ceilings, as well as about possible difficulties that arise in the process of performing this work.
1. Overview of the advantages of suspended ceilings 2. Preparing the room 3. Electrical work 4. Preparation of walls 5. Marking 6. Recommendations from experts
Finishing the ceiling in a wooden house and country house with fiberboard slabs
When selecting material for rough cladding of the ceiling surface in a private house, the choice of owners often falls on fibreboards. This versatile material has a wide range of uses and many advantages. The main advantage of this finish is an affordable price with high performance characteristics. If, in addition to purchasing the slabs, you install them yourself, you can save significantly on arranging the rough ceiling surface. We will tell you how to install fiberboard on the ceiling in a wooden house.
Sheet sizes
Due to the fact that the differences between fiberboard and hardboard are insignificant, when determining the dimensions, the parameters inherent in all solid boards are taken into account. The most popular options:
- width - 1220, 1525, 1830 and 2140 mm;
- length - 2140, 2440, 2745, 3050, 3350 and 3660 mm;
- thickness - 2.5, 3.2, 4, 5 and 6 mm (7 mm slabs are also available).
Standard parts have dimensions of 1220*2140 (2440) mm and 1220*2750 mm.
At all domestic enterprises, hardboard and other types of fiberboard are produced strictly in accordance with GOST
Materials and tools required for work
I used the following set of materials:
| Materials | Description |
| Fiberboard | This material allows you to prepare the ceiling for further finishing, and in country and country houses, fiberboard is often used as a finishing coating. After attaching it, you just need to paint it, and the work is finished, which is very quick and easy |
| Galvanized nails | With their help, sheets are attached; I use the 3x25 or 3x30 option, this is quite enough to securely fix the material. The nails have a larger head, which is also important, as this allows you to more reliably press the fiberboard to the surface |
| Several boards | These can be unedged options, which you will find at home with a thickness of 25 mm or more. The boards will be used to construct the lift, so there are no special requirements for them |
| Wood screws | Ordinary black self-tapping screws with a large pitch of 41 or 45 mm long; if the boards are thicker than 25 mm, then you can take longer options. These hardware will be used to assemble the lift and to attach it to the wall. |
We will need a few simple tools:
- Screwdriver - I have said, I say and will continue to say that this power tool should be available to any person who, at least occasionally, does minor repairs at home. If you like to tinker, make repairs or build a house from scratch, then you simply cannot do without a screwdriver;
- A hacksaw with a fine tooth is perfect for cutting fiberboard ; with its help, the cutting quality will be excellent. And don’t worry about getting too tired – the material is not very hard and cuts well. If you have a jigsaw on hand, you can use that too, just use a blade for clean cutting (T101B);
- Nails are driven in with a hammer , an option weighing 400-500 grams is suitable for the job; swinging a kilogram striker is not the best idea;
- For measurements, we cannot do without a tape measure , the minimum length of which must be no less than the size of the fiberboard. The markings are made using a pencil; any pencil will do, as long as it is sharp and draws well on the material.
Recommendations from experts
Almost all manufacturers of suspended ceilings, as well as experienced specialists who professionally install them, claim that the presented structures can be operated in the temperature range from 0 to 50 degrees.
Important point! Be sure to remember that when installing suspended ceilings, sudden changes in temperature in the room should not be allowed. You can install the presented structures when the thermometer shows no less than plus 10 degrees.
Never rush to begin installing suspended ceilings immediately after completing the preparatory work.
Think carefully about such important things as steam, noise and waterproofing. It may make sense to complete all the work as a whole, which will allow you to save a decent amount of money.
If you have decided on the choice of suspended ceilings, start looking for ceiling skirting boards, which should be harmoniously combined with each other. This issue is especially relevant in the case when an ugly joint has formed between the new ceiling and the wall.
A detailed analysis of the presented topic showed that preparing the ceiling for a stretch ceiling is not a very difficult task. Almost every adult man can do it. To do this, you need to carefully study the above information, and in the process of preparing the ceiling, adhere to these recommendations.
Fiberboard on the ceiling in a wooden house
To all the disadvantages of plywood, you can also add the large weight of the sheet, glued together from 6-8 layers of birch veneer. Laying and holding it above your head until the installation of the fasteners is completed is quite difficult physically, especially if you try to complete the finishing alone, on your own.
Fiberboard is a very light and easy-to-work material
To simplify the work and reduce the load, many craftsmen suggest sheathing the ceiling in a wooden house with fiberboard or fiberboard. Sheets made of pressed cellulose fiber are several times lighter, can be easily cut, sanded, and adjusted to size.
If you choose the right type of sheet or use hardboard, then it is quite possible to make a full-fledged fiberboard ceiling with your own hands, photo.
The fiberboard surface is ideal for painting
How to attach fiberboard to the ceiling
Fiberboards are much thinner than plywood, so when planning the installation of the material, you must immediately decide on the best method and means of securing the slab to the sheathing.
Options for attaching fiberboard to the ceiling
To install a ceiling made of wood-fiber boards, you will need to assemble a lathing with higher rigidity and surface precision. Simply sheathing a fiberboard ceiling in a wooden house by laying sheets on cross-beams lined with a plywood-type lattice obviously won’t work. Fiberboard has very little rigidity, so the surface will be wavy.
In order to lay fiberboard on the ceiling surface, you can use three mounting options:
- Make a special sheathing or shingles;
- Use a metal frame under the fiberboard, as is the case with drywall;
- Completely sew the rough ceiling from an unedged board or slab.
Any of the listed designs of rough hems will make the fiberboard finish rigid, and most importantly, flat. The sheets themselves can be fastened with wallpaper nails, you can glue them, or, in extreme cases, use a furniture stapler.
DIY fiberboard ceiling
It is known from practice that the best option for laying fiberboard is slatted shingles. Thin strips, no more than 2.5 m long, are placed on the ceiling beams in increments of 5-10 cm. The result is a more rigid grid than in the case of plywood, and at the same time quite strong, capable of holding a relatively light fiberboard sheet.
It is best to cut wood-fiber boards in advance into strips or blanks no more than 1.2 m wide. It is quite possible to hold such fiberboard on the ceiling with your own hands, in order to first grab it along the sides, and then you could straighten, align and sew it to the slats on the ceiling.
It is easy to glue boxes and cladding from fiberboard
Seams and joints are sealed with a mixture of wood glue and cellulose fiber obtained by unraveling scraps of fiberboard or plywood on an emery wheel. To prevent the putty from falling out of the seams, it is sealed with tape.
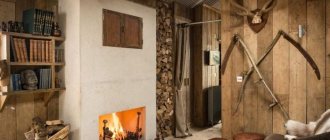
Types of decorative wall panels
Wood always remains a relevant material because it can store the energy and warmth of nature. Over time, it does not lose its attractive appearance, but absorbs time and ages gracefully. Wood is a malleable and easy-to-work material. Using wood, you can realize any fantasy and transform it into reality. This requires an idea, desire, time and basic specialist skills.
Important! Facing fiberboard panels allows you to solve many problems:
- To carry out installation work, no preliminary preparation of the wall surface is required, which means there is no need to work with cement and glue.
- Such panels are very easy to transport, disassemble and install. It's like a construction kit that even a non-professional specialist can easily assemble.
- Thanks to the finishing of walls with such panels, it is possible to hide all errors in the wall surface and communications. And the presence of a wide range of colors allows you to choose panels for any room.
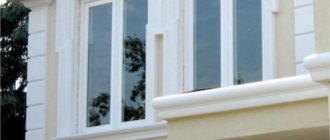
On the modern market there is a huge assortment of different materials, with different sizes and shapes, representing an expanded range of colors and shades, decorated with a pattern or print. Each variety has its own individual performance characteristics and properties. Let's look at the main differences between vertical wall panels.
Slatted panels
They are long, fastened together with strips. The width of each panel varies between 10–30 cm, the length corresponds to 2.5 to 6 m, and the thickness ranges from 8 to 25 mm. Modern apartments have a ceiling height of 2.5 m, so the length of the product is enough to install vertical panels.
Such panels are characterized by a tongue-and-groove system, which allows for more convenient and easy installation, in which special brackets and clamps are used for fastening.
Sheet panels
They represent the largest modules in size. They are characterized by a uniform color or the presence of a pattern on the surface. In appearance, the panels are similar to hardboard sheets.
The most common sizes are 130x49 cm, 130x100 cm, 122x244 cm, 260x100 cm, 128x98 cm, 200x100 cm, 260x490 cm, 260x98 cm, thickness can vary from 3 to 6 mm. With a perfectly flat surface of the walls, the panels are perfectly glued directly to the wall. The positive aspect of this material is the high speed of installation.
Important! If there are errors in the wall, it is preferable to fasten sheet panels to the sheathing using nails.
Tile panels
They have a square shape. Thanks to them, designers have the opportunity to implement interesting decorative solutions. For square panels, or so-called tile panels, the installation principle is exactly the same as for typesetting panels. In this case, you can form a pattern by combining panels of different patterns or tiles of different colors.
Standard sizes of tile panels: 15x60 cm, 30x30 cm, 30x60 cm, 98x49 cm, 98x98 cm.
Additional nuances
Based on the base material and the applied top layer, wall panels are characterized by both resistance to high humidity and a negative reaction to it. That is why, when choosing a material for finishing fiberboard walls, it is necessary to study the properties of the material in detail.
Moisture-resistant wall panels are characterized by the presence of the following types:
- panels made of natural wood, which are coated with wax or some other special material;
- the base is made up of other materials, but on the front side there is a laminated film, which is painted in some color, although sometimes there are products laminated on both sides;
- plastic panels or panels that are covered with plastic.
Non-moisture resistant panels include:
- chipboard panels;
- MDF and fiberboard panels, not laminated models.
When can a ceiling be lined with fiberboard?
First, let's figure out in what cases it is appropriate to finish the fiberboard ceiling in a wooden house.
This type of ceiling lining is used in the following cases:
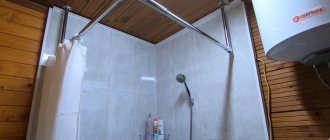
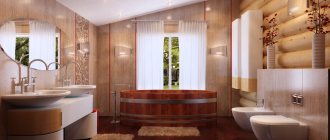
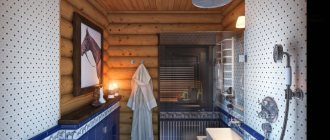
- This wood sheet material can only be used in rooms with normal humidity. As a rule, such a ceiling is made in any living room, kitchen, hallway or toilet. But bathrooms, baths, saunas and swimming pools are suitable for these purposes.
- The vapor permeability of wood boards is quite good, so they can be installed in rooms without heating, for example, on a glazed balcony or loggia, veranda. The material does not interfere with the natural ventilation of the base, does not deform or crack at low temperatures.
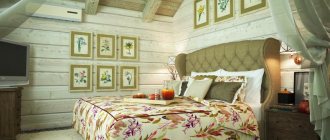
- Fiberboards can be used to line ceilings in a country house or in a country house for permanent or seasonal residence. The material improves the heat and sound insulation of rooms.
- This slab material weighs little, so it is suitable for installation in houses with dilapidated floors.
However, when choosing this finishing material, it is worth remembering that it is not environmentally friendly, because glue containing phenol is used to glue the fibers. In addition, it is not recommended to use fiberboard in rooms with an increased fire hazard.
Temperature
It is worth paying special attention to the composition of the canvas. The operating temperature for PVC sheets ranges from +5 to +50°C. Fabric ceilings are more expensive, but they also have a greater margin of safety. They retain their appearance and properties both at −50 and +40°C.
The presence of a stove in the room as a whole does not affect the change in the characteristics of the paintings. It is only necessary to take precautions directly near the pipe to ensure optimal temperature conditions.
PVC film stretch ceilings of any type are installed using special equipment - a heat gun. The preservation of the quality and appearance of the canvas depends on the correct temperature. The process does not take much time. Before the main assembly, the room is heated to +40°C, and the materials are stored in another room.
Tension occurs when the vinyl film is heated to +70°C, so you need to be extremely careful. It is better for this work to be carried out by a craftsman who has experience in installation in wooden houses. Ceilings made of fabric do not require heating.
When to use fiberboard for ceiling lining
Installation of fiberboard on the ceiling is possible in the following cases:
- The material is allowed to be used only in rooms with normal humidity. Any living room, corridor, kitchen or toilet is optimal for this, but not a bathroom.
- Since the material has good vapor permeability, it is allowed to be used in rooms without heating. As a result, due to temperature changes, condensation will not accumulate behind the hemmed surface. The product is not afraid of cracking and shrinkage due to sub-zero temperatures.
- Fiberboard is suitable for finishing the ceiling in a private home for temporary or permanent residence. The material protects well from heat loss and extraneous noise.
- Due to their low specific weight, the slabs are used for installation in dilapidated buildings with weakened load-bearing capacity of walls and ceilings.
Important! When choosing a room for installing fiber panels, do not forget that they are quite easily flammable and are not environmentally friendly due to the content of glue used to glue wood fibers together.
Freeing up space
Installers will need enough space to move freely. It is necessary to provide access to the walls and floor slab. Interior items that interfere with this will need to be removed. Large furniture is moved closer to the center of the room.
Separately, you should pay attention to the presence of a wardrobe. Such furniture is located from floor to ceiling. The wardrobe is assembled until the fabric is stretched. When installed, a specialized strip is attached to its upper part.
Small furniture, household appliances and elements placed on the walls are removed. In the case of PVC film, a heat gun is used. A sharp increase in temperature provokes the formation of condensation on the internal surfaces of household appliances. This leads to failure of electronic components.
Fibreboard installation technology
Features of finishing the fiberboard ceiling depend on the choice of installation option. However, there are general rules:
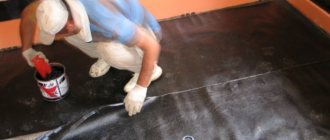
- Before starting work, the base is cleaned of old coating, grease stains, mold, rust - these inclusions can be easily removed with vitriol, antiseptic or soap solution.
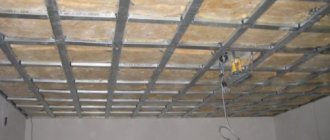
- When laying out the sheets on the frame, the sheathing is installed. Both wooden blocks and metal profiles are suitable for forming the frame.
Then the ceiling is sheathed with sheet products fastened with nails, self-tapping screws or screws. The best sheet size is 1x1 meter. In this case, you can work “with one hand,” and to make it easier to arrange the lathing, you can buy ready-made profiles for suspended ceilings.
Important! The fastening technology is characterized by the absence of gaps. That is, all slabs are laid end-to-end without gaps. If this does not work, it is better to cut the material into slightly smaller slabs to make them easier to install or use the remaining material to seal the seams.
Tools and materials for work
Before starting installation, the technician will need the following kit:
- building level, tape measure, pencil;
- screwdriver;
- drill;
- hammer;
- nylon cord;
- hardware; hacksaw, jigsaw;
- fiberboard sheets;
- bars or profile for sheathing;
- glue.
A stepladder and personal protective equipment will also be useful.
Methods for attaching fiberboard to the ceiling
As a rule, installation of fiberboard on the ceiling is carried out on the lathing, but the light weight of the boards allows you to glue the materials to the base.
When choosing an adhesive option, you will have to perform the following work:
- Check the base level; in case of large differences and defects, seal the cavities with putty.
- Prime the base before you start gluing the sheets. The primer should saturate the base well and dry - this increases adhesion.
Regardless of the choice of installation option, finishing the fiberboard ceiling in a wooden house requires treating the elements with fire- and bioprotection impregnations.
Floor arrangement
The production of flooring is often accompanied by a large amount of dust, which can settle on the PVC film. In this regard, rough work is carried out at the initial stage.
The surface is inspected for damage. Particular attention is paid to the junction of the floor and the walls. Existing cracks are filled with cement-sand mortar. If necessary, pour a concrete screed.
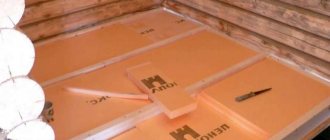
At this stage, hydro and sound insulation is installed. It is possible to install underfloor heating systems or lay insulating materials. The final step is finishing the flooring.
Finishing the fiberboard ceiling in a wooden house with your own hands
To level the ceiling, plasterboard, suspension systems, tension fabrics and wood panel materials are used. One way to level the ceiling surface is to install fiberboard on the ceiling in a wooden house.
In this case, you can hide the load-bearing structures of the floor, level the base and get a flat surface that is suitable for different finishing options. There are several ways to attach fiberboards to the ceiling.
Moreover, all work can be done with your own hands.
When can a ceiling be lined with fiberboard?
First, let's figure out in what cases it is appropriate to finish the fiberboard ceiling in a wooden house.
This type of ceiling lining is used in the following cases:
- This wood sheet material can only be used in rooms with normal humidity. As a rule, such a ceiling is made in any living room, kitchen, hallway or toilet. But bathrooms, baths, saunas and swimming pools are suitable for these purposes.
- The vapor permeability of wood boards is quite good, so they can be installed in rooms without heating, for example, on a glazed balcony or loggia, veranda. The material does not interfere with the natural ventilation of the base, does not deform or crack at low temperatures.
- Fiberboards can be used to line ceilings in a country house or in a country house for permanent or seasonal residence. The material improves the heat and sound insulation of rooms.
- This slab material weighs little, so it is suitable for installation in houses with dilapidated floors.
However, when choosing this finishing material, it is worth remembering that it is not environmentally friendly, because glue containing phenol is used to glue the fibers. In addition, it is not recommended to use fiberboard in rooms with an increased fire hazard.
Fiberboard installation technology
Installation of fiberboard on the ceiling is carried out in different ways:
- If the base is fairly level, then the material can simply be glued to the base with glue or screwed with self-tapping screws. But before that, the old finish is removed from the ceiling surface, all holes and cracks are sealed, the base is puttied and primed. It is advisable to carry out antiseptic treatment of wooden structures.
- In most cases, installation is carried out on a supporting frame made of galvanized profiles or bars. In this case, there is no need to carefully level and prepare the base. Additional advantages of this method of fastening are that it is easy to lay thermal insulation material behind the frame, install built-in lamps in the ceiling and lay communications.
For ease of installation, it is better to cut the slabs into pieces measuring 100x100 cm. In this case, the work can be carried out without assistants. Installation on a steel frame compares favorably with wood in its resistance to moisture and deformation when the indoor microclimate changes. The metal frame will last much longer and has an anti-corrosion coating.
Attention! All wood materials expand and contract with changes in humidity in the room, so the sheets are fixed with a gap of 0.2-0.3 cm to compensate for the linear expansion of the slab.
Also, during installation, be sure to make a gap of 3-5 mm around the perimeter of the room along the walls. After installing the baseboard, this gap will not be noticeable. The seams between the fiberboard are sealed with putty or sealant.
Tools and materials
Before making a fiberboard ceiling in your country house, prepare everything you need for work:
- to make the frame you will need bars with a cross section of 40x50 cm or galvanized steel profiles (ceiling and guides);
- fibreboards, cut into squares with a side of 1 m;
- special glue is useful when using frameless installation technology;
- self-tapping screws and dowels for attaching the frame to the base ceiling;
- short self-tapping screws for working on metal or wood (the choice is made depending on the material of the sheathing);
- perforated hangers;
- dowel-nails (a pair for each suspension);
- single-level connectors (needed only for steel frames);
- drill;
- hammer;
- perforator;
- notched spatula;
- level;
- screwdriver;
- painting cord;
- roulette;
- ruler;
- pencil;
- ladder;
- hacksaw for metal work (when using a steel frame);
- hacksaw, jigsaw or hand saw for cutting bars and fiberboard.
Depending on how the fiberboard ceilings will be finished, you may need spatulas, putty, primer, impregnation, roller and brushes, as well as the selected finishing material.
Methods for attaching material directly to the ceiling
First, let's figure out how fiberboard is attached using frameless technology. This installation method is only suitable for flat bases made of wood, concrete and plaster. The plates are simply glued with special glue or fastened with self-tapping screws.
In any case, the basis must be properly prepared:
- First, the ceiling is cleaned of old finishing. The wallpaper is moistened and cleaned with a spatula, the whitewash is washed off with soapy water, and the tiles are removed along with the remaining adhesive.
- Then all holes, cracks and crevices are removed from the base. They are sealed with putty or repair compound.
- If required, the entire ceiling is puttied to remove unevenness.
- If there are areas with mold on the base, they need to be thoroughly cleaned and treated with antiseptics. For preventive purposes, it is better to impregnate the entire wooden ceiling with an antiseptic primer.
- After this, to improve the adhesion of the two bonded surfaces, the base is impregnated twice with deep penetration soil.
Useful tips
To obtain a high-quality result, the following recommendations must be taken into account:
- When purchasing material, you must check safety certificates.
- It is advisable to purchase products from one company and in the required quantity. The fact is that different parties can have different tones.
- Installation begins with preliminary preparation of the surface; installation should not be carried out on an undried base. Any defects that are not corrected can lead to serious problems later.
- Before gluing, priming is carried out; when laying on the frame, the racks are coated with protective agents.
- When fixing, the self-tapping screws are screwed in directly without strong pressure: the head should be flush with the coating, not deeper.
Due to their diversity and availability, the demand for panels is constantly increasing, but during installation it is recommended to take into account certain nuances.
When to use fiberboard for ceiling lining
Installation of fiberboard on the ceiling is possible in the following cases:
- The material is allowed to be used only in rooms with normal humidity. Any living room, corridor, kitchen or toilet is optimal for this, but not a bathroom.
- Since the material has good vapor permeability, it is allowed to be used in rooms without heating. As a result, due to temperature changes, condensation will not accumulate behind the hemmed surface. The product is not afraid of cracking and shrinkage due to sub-zero temperatures.
- Fiberboard is suitable for finishing the ceiling in a private home for temporary or permanent residence. The material protects well from heat loss and extraneous noise.
- Due to their low specific weight, the slabs are used for installation in dilapidated buildings with weakened load-bearing capacity of walls and ceilings.
Important! When choosing a room for installing fiber panels, do not forget that they are quite easily flammable and are not environmentally friendly due to the content of glue used to glue wood fibers together.
Floor protection
In the process of fixing the canvas, installers need to reach the floor slab. Metal stepladders are often used. The legs of the stairs scratch the flooring. In this regard, they protect it from damage. The work is carried out in the following sequence:
- Remove furniture and interior items. Massive structures are moved to the center.
- In the freed space, cardboard or thick polyethylene is laid out on the floor.
- Glue the backing with tape. This prevents the cardboard from moving when moving the ladder.
Thus, they protect floor materials from various types of mechanical damage. In some cases, thick non-slip fabric is used instead of cardboard.
General principles
Let's start by reviewing the basics.
So, what surfaces can be puttied?
- Stable . What does it mean? The only thing is that if the coating peels off, nothing good will come of this venture.
- Porous . On a glossy plastic panel or glass, most coatings will stick simply disgustingly. The composition that is applied to the surface must penetrate its unevenness.
However: there are exceptions. For example, heat-resistant mastics based on stone flour and a polymer binder adhere perfectly to stainless steel and glass, and cleaning the surfaces after they dry is almost impossible. However, cement, gypsum and acrylic putties cannot boast of such reliable adhesion.
- Quite tough . However, there is a loophole here: putty reinforced with fiberglass mesh can make the surface of foam plastic or glued mineral wool hard enough to use such a coating as a finishing coating on the facade of a house above the base.
Features of choosing wood species
The most accessible wood paneling is made of pine. This is the most common coniferous wood, easy to process and with fairly high performance properties. Among the disadvantages are low hardness and poor resistance to high humidity, but for residential heated premises this is not significant.
Wooden panels made from larch are much more expensive than those made from pine. Although this breed is also domestic and widespread, high prices on the world market also affect the domestic one. Advantages: higher hardness on the Brinell scale and immunity to fungus and mold, even in high humidity conditions. And this is a better choice than decorating the interior walls of a wooden house if it is intended for seasonal living.
The Brinell method is one of the most commonly used methods for determining the hardness of a material. The two substances are pressed together and then the depth of the impression is measured.
Panels made of cedar or oak can be either domestic or foreign. For example, a block house and clapboard made of Canadian cedar are considered elite finishing materials. Soft to process, but durable wood of both species, polished to a shine. It has beautiful shades of color and is resistant to high humidity. Like finishing materials of other valuable types of wood, the panels are produced in a format for interior cladding only.
Source stroubani.ru
It is not for nothing that Canadian red cedar is considered an elite material