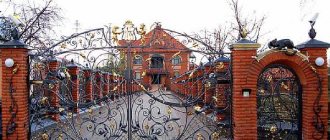
Fences can serve a variety of functions. In addition to protecting the territory and dividing it into certain zones, they should also have an attractive appearance and not require special operating conditions. All these characteristics are met by a clapboard fence, which is becoming increasingly popular in suburban construction. It is distinguished by its versatility of use, a very wide selection of materials, shapes and colors and reasonable cost.
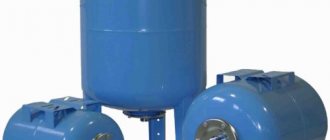
PVC fencing
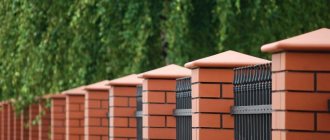
Burnt fence
A burnt fence is a durable structure that does not lose its aesthetic appearance after decades of use.
After firing, the lumber acquires a silver-white color and a more pronounced natural texture on the cut, which looks interesting even without a finishing layer of varnish. Why are boards fired? Pre-treatment removes the weak top layer and protects the wood from ultraviolet radiation, moisture, fungus and mold. Firing neutralizes negative factors better than varnishes and impregnations, the protective properties of which last a maximum of 8 years.
Calculation of materials and preparation for construction
A fence made of burnt boards for a plot of 15 acres (the perimeter of the fence is 110 meters) will require 6 cubic meters of unedged lumber with natural moisture. Treat the prepared pickets with copper sulfate and place them in a stack with ventilation holes.
After this, mark the area using a tape measure, rope and pegs. The distance between the pegs should be equal to the future spans of the fence - 2–2.5 meters.
Stages of work
A fence made from edged boards is installed in several successive stages.
- Burn the lumber.
- Use a brush or karcher to remove ash.
- Protect the bottom of the posts.
- Install the supports using the butting method.
- Secure the joists.
- Secure the vertical bars.
- Coat the fence with oil.
Preparation of materials
Before installing the fence, the boards must be dried naturally for 2.5 months or in a drying chamber. Then start firing. To carry out the work you need:
- gas cylinder,
- burner,
- drill with brush or Karcher.
First, burn the material using a torch with a cylinder. After this, clean the ash with a brush and water or a Karcher. The finished wood looks interesting even before finishing with varnish.
Butting of pillars
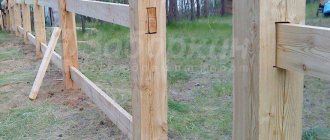
A fence made of charred wood is mounted on metal posts made of a profile pipe, coated with epoxy primer and bitumen mastic. To prevent skewing of the supports during soil heaving, use the butting method instead of concreting.
To do this, drill holes 1.2–1.3 m deep in the ground. Cover the bottom with a 10-centimeter layer of crushed stone. Compact the crushed stone and install the posts, controlling the vertical level. Fill the holes with sand and gravel in layers, compacting thoroughly. Technology protective coating
A fence made from burnt slab acquires its completed look after installing the logs and crossbars. Fix the logs with self-tapping screws, 2–3 pieces per span. Choose the order of attaching the boards depending on your preferences. There are different ways:
- fence,
- chess,
- Christmas tree,
- double-sided picket fence, etc.
Finishing
Wait a few days before applying the top coat. For impregnation, use tung or linseed oil with the addition of wax. The oil composition polymerizes to its full depth and forms a reliable protective layer.
The optimal coating option is two-layer, where:
- the first layer is pure oil,
- the second is oil with added wax.
Since wax for exterior use is expensive, the optimal mixture proportions are 50 grams per liter of oil.
If all the work is carried out correctly, a finished fence made of burnt boards will last 20–30 years without the need for repairs. In Moscow, given the climate, to improve the operational parameters of the structure, treatment is repeated every 8–10 years.
Installation of poles
After studying the thematic section of the forum, the craftsman decided to abandon concreting in favor of butting. I drilled holes with a hand drill (200 mm) in increments of 3 m, to a depth of 1.3 m, filled in a 10 cm layer of crushed stone, compacted it and installed the pillars. Layers of sand and crushed stone with tamping and pouring filled the holes to the top. The pillars became strong, “like stone.”
As often happens, practical thoughts come late: after installing his pillars, the craftsman began to think about the durability of the supports and how he would have to change them in ten years due to insufficient wall thickness. For those still preparing, he advises the following:
If you need a fence that will last for decades, immediately think about the appropriate supports. What I came to: it is optimal to cover tubing pipes with a wall thickness of 5.6 or 7 mm, cover them with soil and protect them with bitumen. It's practically forever. If it’s cheaper, use a 100×100 mm wooden beam, burn it intensively and do not coat it, but actually soak it in pine tar and linseed oil. During installation, there is no need for concrete, only backfilling with crushed stone for “ventilation”. There is no need to fight the forces of frost heaving - it is easier to neutralize them.
How to burn and brush boards
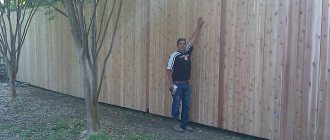
My friend and I decided to install a new section of the front fence at his dacha. Approximately 30 meters long. A Euro picket fence costs from 25 to 35 thousand rubles, but we decided to take the trouble for a couple of weeks and make it ourselves. We are going to make it from burnt boards 10cm wide and 1.5 meters high.
A cube of boards costs 7 thousand rubles, a cube of firewood for burning is around 2 thousand + 10 liters of tung oil + 6 liters of turpentine. All together approximately 22 thousand rubles. only for the board, not counting the metal posts, crossbars between them and cement for pouring. The result should look something like this (only it’s not oil, it’s just moistened with water to simulate impregnation with oil)
At the back of the site we lay out a barbecue made of refractory bricks to put 3 logs of firewood in 2 layers (in height). In width, it can fire 4 boards at a time.
To make the boards burn out faster, they need to be dried; they are usually damp. Place it under a canopy and in the sun. If you don’t dry the boards (you can use a fan, by the way, if there’s no wind), you’ll get tired of burning them normally.
You have to burn it very hard so that they are completely charred. Don't be afraid to burn it out... It will only get better. When fired, excess moisture comes out of the board, and the resins contained in the wood turn into a good “preservative” for the board. In Rus', the lower crowns of houses were burned so that they would not rot from below. The boards receive good protection from ultraviolet radiation, bugs, mold and precipitation (but you still need to soak them in oil). This is how we burn it:
To burn 12-15 boards this way, you only need 6-7 logs of firewood. Since there is a lot of smoke (especially if they are damp or frankly damp), it is better to do this away from home. Then we drag them to the place where we will brush them (in our case, remove the coal). But you can just leave them on the ground, nothing will happen to them.
Fastening methods
To build a fence at your dacha with your own hands, you don’t have to be a builder. The basic principles of installation are quite simple, so by choosing a not very complicated option, you can be sure that everything will work out. The simplest type, which is easy to install with your own hands, is a wooden fence on metal (stone) pillars. Step-by-step installation and fastening instructions:
- Mark the area where the fence will be erected, mark the places where the columns will be driven in.
- Drill holes about half a meter deep.
- Pour a layer of sand (about 10 cm) and compact it.
- Drive columns into the holes, pour fine crushed stone on top or concrete them.
- Weld the logs to the supports (if metal veins are chosen) or, if the logs are made of wood, attach them using self-tapping screws.
- Attach wood strips to metal or wooden joists with self-tapping screws.
kak_eto_sdelano
How it's made, how it works, how it works
The most educational LiveJournal community
My friend and I decided to install a new section of the front fence at his dacha. Approximately 30 meters long. A Euro picket fence costs from 25 to 35 thousand rubles, but we decided to take the trouble for a couple of weeks and make it ourselves. We are going to make it from burnt boards 10cm wide and 1.5 meters high.
A cube of boards costs 7 thousand rubles, a cube of firewood for burning is around 2 thousand + 10 liters of tung oil + 6 liters of turpentine. All together approximately 22 thousand rubles. only for the board, not counting the metal posts, crossbars between them and cement for pouring. The result should look something like this (only it’s not oil, it’s just moistened with water to simulate impregnation with oil)
At the back of the site we lay out a barbecue made of refractory bricks to put 3 logs of firewood in 2 layers (in height). In width, it can fire 4 boards at a time.
To make the boards burn out faster, they need to be dried; they are usually damp. Place it under a canopy and in the sun. If you don’t dry the boards (you can use a fan, by the way, if there’s no wind), you’ll get tired of burning them normally.
You have to burn it very hard so that they are completely charred. Don't be afraid to burn it out... It will only get better. When fired, excess moisture comes out of the board, and the resins contained in the wood turn into a good “preservative” for the board. In Rus', the lower crowns of houses were burned so that they would not rot from below. The boards receive good protection from ultraviolet radiation, bugs, mold and precipitation (but you still need to soak them in oil). This is how we burn it:
To burn 12-15 boards this way, you only need 6-7 logs of firewood. Since there is a lot of smoke (especially if they are damp or frankly damp), it is better to do this away from home. Then we drag them to the place where we will brush them (in our case, remove the coal). But you can just leave them on the ground, nothing will happen to them.
They decided to assemble a workspace from stumps: they sawed up a fallen birch tree with a chainsaw, put stands on the bottom for the stumps so they wouldn’t fall over, and on top there were stops to match the dimensions of the board.
There is a lot of dust and dirt flying. Before brushing the boards, you need to pour them from a watering can or, as we did, dip them in a barrel of water. In general, you need to work in a respirator. Better yet, wear a chemical protective suit
You can brush manually with metal and then nylon brushes, or you can use a special tool (there is a photo above). We used a machine with a nylon attachment. The result of the treatment (furrows, pattern contrast, etc.) will greatly depend on the nozzle. This is how it works for us (the boards are dusty, they need to be washed with running water and dried):
As you can see, the boards are not entirely uniform; flaws appear, which, in fact, only decorate the board.
We make a fence from slabs with our own hands
The construction of such a structure is in many ways similar to the creation of fences from edged, unedged boards, or picket fences. Therefore, we will not go into detail at some stages so as not to repeat ourselves.
Marking, foundation
After developing a construction scheme and calculating costs, selecting a location, and cleaning the site, you should proceed to marking.
Since the fence will not create a large load on the ground, it is enough to equip a columnar foundation. But sometimes a belt one should also be used if the slab is combined with heavier materials (metal, stone, brick).
The type of base largely depends on the selected raw materials for the pillars. In the version with a fence made of slabs, pillars made of wood or metal are considered optimal.
Preparing material for fastening
To begin with, the selected planks are cleared of bark. This is a mandatory procedure, since there may be insects under the bark that spoil the wood and significantly reduce its service life.
This is done this way:
- This can be done using an axe, a bayonet shovel (suitable for thick and wide blocks) or a scraper. The last tool, which is the most convenient and neat to use, is a steel strip with two handles.
The slab is placed in a vertical position with emphasis on any reliable structure.
- Use a scraper to remove the bark from top to bottom. In this case, the tool does not damage the wood.
- Knots are cleaned separately. The edges are smoothed with a plane or an ax.
The cleaned elements are passed through with sandpaper, but it is more effective to do this with a grinding machine or an electric drill with an attachment. The surface will take on a neat appearance.
Treatment with protective agents
The next step is the application of a special composition (antiseptic), which penetrates deep into the structure of the wood and creates a film on the surface, protecting the raw material from moisture, the development of fungus, and insects.
A separate category is fire retardants, that is, products that make wood resistant to fire.
Thanks to the treatment, the service life of the slab increases to 15 years.
Drying time is a day.
Tips for choosing a suitable protective agent against rotting, the procedure for processing wood.
Installation of slab
This is done in two ways:
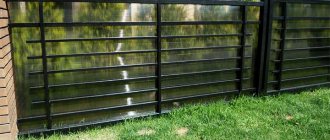
- Horizontally. Simplified fastening option. The boards are nailed or screwed directly to the supports. Material consumption is minimal. Nails and screws should be treated with an anti-corrosion compound. Disadvantage: low strength and stability of the structure.
- Vertical. Outwardly it resembles a fixed picket fence. Two horizontal veins (logs) are mounted to the supports: one 20 cm from the top, the other 20 cm from the bottom. The obapole is fixed vertically. The material consumption is large, but elements of different widths and thicknesses are suitable.
In addition, in both methods, the boards can be fastened either with or without a gap.
Other nuances of installing wooden elements to the structure are described in detail in this article: “Wooden fence on metal poles.”
Decorating a finished fence
For decorative and protective purposes, it is best to paint the fence, but the coating will have to be renewed every 2-3 years.
An article about choosing paint and the process of applying it to a wooden surface.
The fence will look impressive if you add the following elements:
An alternative to painting is brushing, tinting or varnishing the material.
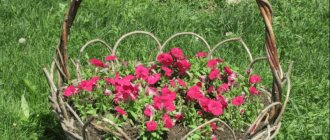
From the remains of the slab you can make a small hedge for a flower bed.
If you use your imagination, even with minimal investment you can turn an ordinary fence into a unique, beautiful structure.
Wooden fence with firing
A fence made of burnt boards is a type of wooden fence that is distinguished not only by its durability, but also by its unusual appearance. The firing process gives the wood an original silvery tint in certain areas and highlights the texture of the material more clearly. In addition to the aesthetic component, firing also has a purely practical function. This treatment protects the fence from mold, mildew and the harmful effects of solar radiation by removing the top layer of wood.
Preparation and calculation of material
To calculate how much material you will need, use averages. For example, a fence with a total length of 110 meters will require about 6 m3 of wood (at the natural moisture content of the material).
The preparation process includes treating the picket fence with a solution of copper sulfate. After this, the material must be stacked. Be sure to leave ventilation holes for the wood to dry out.
Before starting work, the area must be marked. You will need a regular tape measure, wooden stakes for markings, and string to string between them. The distances between the pegs correspond to the length of one span (usually from 2 to 2.5 meters).
Installation process
- Firing the picket fence,
- Cleaning the material from ash using a brush,
- Protective treatment of support pillars,
- Installation of supports (butting method),
- Installation of logs,
- Installation of vertical pickets,
- Impregnation of wood with oil.
How to burn wood
After the boards treated with vitriol have dried thoroughly (naturally for up to 2 months), they must be properly burned. To do this you will need: a gas burner with a gas cylinder, a special brush or other equipment for cleaning soot (for example, Karcher). Carefully and evenly burn the material on all sides, and then clean the remaining ash on the surface with a brush and water. After this, the material will begin to look much more interesting even without finishing.
Installation of supports
Typically, a wooden fence is mounted between support posts made from a regular profile pipe. To protect against the negative effects of moisture, the metal surface is treated with an epoxy-based primer and bitumen resin.
To eliminate the possibility of the supports being skewed due to seasonal ground fluctuations, use the butting method during installation. The method involves installing supports in pre-prepared holes about 130 cm deep. A 10-centimeter layer of crushed stone is poured onto the bottom of such a hole. A support is installed and filled alternately with layers of sand and crushed stone to ground level. Each layer is carefully compacted.
Then the logs and crossbars are installed, and the burnt boards are already attached to them. There are several methods of fastening, and each owner can choose the one he likes: picket fence (single-sided and double-sided), herringbone, checkerboard, etc.
Finishing
After completing the installation of the fence, wait a few days and begin the final processing of the wood. You can soak the boards with tung or linseed oil. By adding wax to it, you will create a reliable protective layer. Moreover, it is better to carry out processing in 2 layers. For the first layer, use pure oil, and for the second layer, add wax to it at the rate of 50 g. per liter This treatment can be repeated every 7-9 years, and then your burnt fence will last a long time (20 years or more), maintaining a beautiful appearance.
Conclusion
Clapboard fencing is a universal option that is used in suburban construction. The design is characterized by strength, durability, a wide selection of materials and design solutions, ease of operation and reasonable cost. Constructing a clapboard fence with your own hands is quite simple. Installation does not require special knowledge or skills, however, before direct installation, it is advisable to familiarize yourself with the basic stages of construction, this allows you to use material more economically and avoid the most common mistakes.
The installation method depends on the materials used - wood, metal, vinyl, etc. The materials have a different set of functions and differ in appearance, but absolutely all of them are resistant to external irritants, safe for health and have a long service life, which is explained by their demand and popularity .
Preparation of material
Since the fence is an external structure, and first of all, it must provide protection from invasion - not so much by people as by animals, the material and the structure itself must have sufficient mechanical strength. The second requirement is resistance to weather factors: moisture, low and high temperatures, ultraviolet radiation.
To increase the service life of the fence, some measures should be taken.
- Before installation, wooden poles must be treated with a primer with a deep impregnation effect. These elements are in contact with the soil and are more exposed to moisture. One more nuance should be taken into account: in winter, when the soil freezes, it expands, and when the temperature rises, it thaws. The support column will constantly experience additional compression and weakening, and as a result loses stability. Therefore, when building a fence with your own hands, it is recommended to fill the support pillars with concrete, and not just dig them into the ground.
- The slats should be treated with protective compounds on both sides or with drying oil. If necessary, the lamellas are cut to length. The upper edge of the boards can be given any decorative shape - rounded, pointed, figured.
- The wooden beam is also treated with an antiseptic composition. The photo shows lamellas prepared for installation.