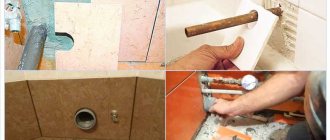
When carrying out renovation construction work, it is often necessary to lay technical communications in the walls. In this case, the walls for the pipes are chipped with a special construction tool using various technologies.
These works are accompanied by a large amount of debris and intense dust, so special dust control methods are used when performing them. When carrying out apartment renovations with your own hands, related to the installation or transfer of plumbing equipment, it is important to know how to properly groove walls for pipes.
Rice. 1 Cutting through a concrete wall for wiring with a wall chaser
Basic requirements for hidden communications
Construction codes and regulations, which include the normative document SNiP 2.04.01-85, regulate the rules for the location of water pipes in the walls - it is useful to know them when carrying out installation work. The documentary acts indicate the following basic standards for the installation of water lines in the walls:
- It is prohibited to chip load-bearing walls, as this reduces their strength and, accordingly, leads to a decrease in the stability of the entire structure.
- Only solid structures connected by soldering or welding are allowed to be laid in walls. If the connection is removable, access to it is provided by installing inspection hatches or removable panels.
- When laying a pipeline from metal-plastic or metal elements, the placement of electrical wiring should be taken into account; during gating, the electrical line at the work site must be de-energized.
- The groove must be laid taking into account the expansion of the pipeline material when heated; its depth and width are calculated to maximize the increase in the diameter of the passing pipes. It is recommended to install a compensating junction for every 3 linear meters of pipes carrying hot water.
Rice. 2 Example of performing gating with a hammer drill
- The pipes are secured using clamps; during installation, the pipeline should not come into contact with the walls of the channel - this contributes to the appearance of extraneous sounds during operation.
- It is recommended that the hot water supply pipeline placed inside the walls be placed in a heat insulator (Energoflex) to reduce heat loss in the line.
- When sealing the grooves, the material should not be heavily compacted; it is advisable to leave air cavities in the event of linear expansion of the pipes.
What tools and materials will you need?
Thus, the prices for sealing grooves (and punching them) are relatively low. But doing this work yourself, of course, will cost even less. In concrete, foam blocks and bricks, grooves are most often sealed with cement. But if desired, you can use putty, rotband, etc. for this purpose. Sometimes the channels are closed with the help of alabaster. However, experienced craftsmen advise using this material only as a last resort. The fact is that alabaster, when dried, can significantly increase in volume. As a result, the canal walls can simply be destroyed.
Grooves for sockets in wood are usually corrected with a special mixture consisting of sawdust and PVA glue or paint.
The following tools are used when sealing a canal:
- putty knife;
- bucket and scoop;
- hammer drill
Work plan for installing pipelines into walls
It is advisable to perform operations with pipes, such as placing them in walls, in the following order:
- Planning with the development of a pipeline diagram and drawing up a line drawing indicating dimensions.
- Marking the walls using a construction pencil and level. In this case, two lines are applied to the surface corresponding to the width of the channel.
- Grilling walls to the required depth in compliance with safety regulations.
- Cleaning the channel from dirt and dust, laying and fastening pipes using clamps.
- Connecting the pipeline to the system and checking its functionality, if possible, conducting test tests with increased pressure.
- Sealing the channel with building materials: to improve adhesion and adhesion, it is wetted; usually the putty is done using quick-drying dry mixtures based on gypsum, which are diluted in water.
- Finishing the wall with decorative finishing materials.
Rice. 3 Scoring tool
Attention to protective equipment
It is very important to use protective equipment during work. During the cutting process, a lot of dust and sand are released, and stones can also break off. To avoid injury or health problems, use the following equipment:
- protective glasses;
- respirator;
- gloves;
- closed clothes.
In addition to protective equipment, it is very important to follow safety rules:
- load-bearing walls are a risk area in panel-type houses (it is not always possible to ditch them);
- deformation of the reinforcement frame of reinforced concrete structures is strictly prohibited;
- in concrete walls, it is advisable to groove the walls not deeply and in a vertical direction;
- you should not carry out any operations in walls with deformed reinforcement, as this will only increase the risk of collapse;
- pay attention to electrical wiring.
Grilling technology using various construction tools
When deciding how to groove a wall in the bathroom for pipes or make channels in the floor to run hot heating pipelines through, they resort to dismantling work using the following methods and tools.
Hammer and chisel
An old-fashioned method, suitable for working on walls made of soft building materials (gas silicate blocks, foam concrete, gypsum plaster). During installation, at the beginning, special grooves are knocked out along two lines of the channel with a depth of about 10 mm, then the material is removed between the punched lines, after which the operation is repeated many times until the desired depth is obtained.
Advantages of types of grooves for pipe wiring
In order to increase living space and achieve a neat effect, it is necessary to hide as much as possible in the walls all communications laid inside the house or apartment. There are several ways to mask pipes:
- behind false walls, ceilings, floors.
- in decorative boxes.
When building a house or remodeling an apartment, you can initially lay pipes inside walls, partitions or in the floor without subsequent gating. In the case of finished buildings without communications laid inside, it is necessary to make special grooves. The process of making such grooves is called gating.
To simplify the process of slitting with your own hands, you need to study the following questions:
- In what areas are furrows allowed to be made?
- What are the features of gating in narrow spaces?
- What can be laid in the walls?
- What's the best way to do this kind of work?
Wall chaser
A wall chaser is a tool specially designed for chasing wires. Its design is similar to an angle grinder, only instead of one disc you can use two simultaneously working ones - this allows you to cut a channel of the required width in one pass. Unlike an angle grinder, the wall chaser is provided with protection from dust - for this purpose, there is a pipe on the protective cover for connecting the suction pipes of a construction vacuum cleaner. In the device, you can adjust the distance between the located disks, thereby setting the width of the groove and the depth of the cut.
To lay a pipeline in the walls, wide channels are required, for which the inter-disk distance of the wall chaser is not always designed - then only one disk is installed in the tool, and the work of cutting through the walls is carried out in two stages, similar to using a grinder.
Rice. 5 Wall chasers
Hollowing technology
Actually, the procedure for making a channel for electrical wiring or pipes is technologically simple. However, the work is usually labor-intensive and dirty. Before gating, it is recommended to cover all furniture and floors with fabric, film or paper. There is usually a lot of dust when making a channel. It is recommended that the craftsman performing the gating wear a respirator.
A grinder is usually used as a tool when laying a channel. Craftsmen also often use a special device - a wall chaser. First, two parallel grooves are cut into the wall, the distance between which should be equal to the required channel width. Next, the wall material between the slots is simply knocked out with a hammer drill.
After laying the wiring or pipes, they begin sealing the grooves. This operation is also performed using special devices.
Making walls for pipes with your own hands
After drawing up a plan for the placement of the pipeline, taking into account the fact that all branches and changes in direction in the line are carried out at right angles, begin marking. The work is performed in the following sequence:
- Checks for the presence of hidden wiring at the work site; if there is no layout diagram, you can use a special device to search for wires.
- Using a construction pencil and a level, two lines are drawn on the wall, corresponding to the width of the pipes with a small margin. If a heat insulator is used on a hot water pipeline, increase the width of the channel accordingly.
After marking work is completed, you can measure the total length of the channel and most accurately determine the required length of pipes in the line.
- Once you have finished marking the walls using a building level, tape measure and pencil, you can begin grooving; the above tools are used when carrying out the work.
If gating is necessary, there are several options for how to most effectively carry out this procedure; to carry out the work you can:
- Use the services of hired specialists; the cost of one linear meter of groove, depending on its parameters, wall material and region, fluctuates within 5 USD. per linear meter.
- If you don’t have the necessary tool, you can rent it and do the work yourself, saving some money.
- If you have your own hammer drill and the necessary attachments for it, you can drill the wall yourself using only this tool. If you only have a grinder, use it to cut through the wall, and you will have to knock out the material manually using a chisel and hammer.
Advice from professionals
- Grilling is rough work, and it is performed according to certain rules. For example, the grooves should be located exclusively vertically or horizontally.
- Pipes can only be connected to each other using a monolithic welding technique. If the communications were connected using dismountable fittings, inspection windows should be left.
- Even if you are sure that there are no hidden electrical wires in the wall, you should turn off the power to the section of the wall that you plan to work with. The grooves must be larger in width than the pipes themselves and their fastenings. The coefficient of expansion of the material is insignificant for metal communications and polymer pipes reinforced with aluminum.
- It is important to prevent the pipes from coming into contact with the groove walls. For this purpose, communications are secured with clamps. This requirement should be taken especially seriously if the system has many bends. Failure to comply with this rule will lead to excessive noise during the operation of the water supply or sewerage system.
- It is important to prevent tight contact of the material for finishing the groove with the elbow. The groove must be sealed in such a way that an air gap is formed inside. Filling the space with material is a mistake.
- After the channel has been created, and the material inside has been selected, its cavity must be thoroughly cleaned and dust-free.
- The start-up of communications is carried out even before decorating the groove in order to check the system for leaks.
- Be sure to leave inspection holes, which will be needed if the system needs to be repaired or replaced.
- You should not rely on a chisel and a hammer if you have to work with a solid concrete wall in which you need to make grooves of considerable length.
When working with an angle grinder, you should not overdo it and do not put too much pressure on the tool. Otherwise, you may encounter the equipment overheating and failure, and the equipment may become unusable.
Grinding concrete walls in panel houses with a grinder
Using a grinder, you get a groove with neat, even edges - this makes further placement of the pipeline in the channel easier, and its use significantly increases the speed of work. The scoring procedure using a grinder consists of the following steps:
- Place a diamond-coated concrete disc on the grinder and cut the wall strictly along the line to the required depth, not forgetting to use dust protection during work.
- Using a hammer drill with a spade attachment or a chisel and hammer, knock out the concrete between the cut grooves. When carrying out work, control the deepening of the groove with a piece of pipe, trying to maintain a depth of at least 5 mm. from the plane of the wall.
If the channels for the pipes are large, you can use a grinder to make one or two additional cuts in the middle - this will make it much easier to further knock out the concrete not only with a chisel, but also with a hammer drill.
- After the work is completed, the channel is cleaned of dirt and dust accumulated in it using a brush; before sealing with gypsum binder, the surface of the groove is moistened.
Rice. 7 How to make grooves for pipes when using a hammer drill
Concrete surface
It is recommended to use a hammer drill. A grinder is also used when working with concrete, but to cut this material you will need a diamond disc; a regular one for stone will be ineffective.
- At the first stage, the surface is marked taking into account existing communications.
- Then holes are made along the length of the furrow to the entire expected depth in increments of 10–15 cm, or the boundaries of the canal are cut with a grinder.
- A perforator is used to hammer out the concrete from the groove.
Shredding brick walls with a hammer drill
A hammer drill is a universal construction tool that can be used to drill holes and knock out hard materials - thanks to these properties, the tool can quite effectively knock out channels for water supply or heating pipes. The work order is as follows:
- Pobedit drill for concrete with a diameter of 8 or 10 mm. in perforation mode, it makes a series of holes of the required depth along the entire length of two lines, the step can be chosen arbitrarily, but the smaller the distance between the holes, the better the quality of the groove edges.
- Next, insert a shovel-shaped attachment into the hammer drill, switching it to impact mode, and knock the brick between the drilled grooves, controlling the depth with a pipe section.
- Upon completion of the work, the groove is cleaned of dust and foreign debris; for this you can use a household vacuum cleaner.
Rice. 8 Angle grinding machine used for scoring walls for pipes with two discs
The basic principle
The basic principle of gating is to create a shallow “hole” into which a communication junction must be inserted. To do this, two parallel ones are made deep into the wall with a specialized construction tool (wall chaser) at a distance of 2.5 cm from each other. The depth is approximately the same, this is due to the diameter of the pipes (usually 20 mm).
After all the manipulations are completed, the hammer drill comes into operation. It is used to remove the internal filling between the slots.
Homemade wall chaser
A professional wall chaser is an expensive tool, and in terms of its operating principle and design it is practically no different from an angle grinder. This allows craftsmen to make some changes to the design of the angle grinder elements to effectively perform the gating functions.
Two disks. Installing two discs allows you to speed up work and improve its quality - the channel is cut in one pass, and its width is the same along its entire length. If the groove is narrow, the modification is quite simple - a second disk is placed on the grinder, the width of the groove is set by a washer installed between the disks. To increase the distance between the cutting wheels, you can make an attachment for an angle grinder on a lathe with a wider seat.
Fig.9 How to make furrows for water supply pipelines with a grinder without dust
Nozzle for vacuum cleaner. To combat dust, some craftsmen make a separate attachment for an angle grinder with a fitting for connecting a vacuum cleaner. To implement this improvement, soldering or welding work that is quite difficult for a non-specialist is required.
There is an easier way to deal with dust - tie a piece of water pipe to the handle of an angle grinder with masking tape and connect a vacuum cleaner to it.
The main tools for making walls for pipes with your own hands are a hammer drill and an angle grinder; a more expensive wall chaser is used when carrying out professional work in the construction industry. With your own hands, you can turn an angle grinder into an analogue of a wall chaser by making fairly simple changes in the design.
How to close a channel in concrete or brick
In such walls, grooves are sealed most often using cement mortar. It is prepared on the basis of coarse sand in a ratio of 1:3. You can also buy a ready-made cement mixture intended for laying walls or pouring foundations. The dry building composition is poured into a bucket and filled with water. The amount of the latter is calculated based on the fact that the finished mixture should have a fairly thick consistency. You can check the correct preparation of the solution with a simple trowel. They need to pick up some of the mixture and turn it over. The finished solution should not fall down.
For plasticity, you can add a little lime to the mixture. Actually, the sealing of the grooves in the wall itself is done using a spatula. A small amount of the mixture is collected on this tool, and then applied to the groove, trying to fill the latter without voids. Each portion of the solution is carefully leveled over the surface of the wall, moving the spatula along the channel and across it.
After the solution has dried (after about a day), the surface of the sealed channel is cleaned with coarse sandpaper. Next, the area is further leveled using finishing putty. At the next stage, you can begin to actually decorate the walls.
The procedure for using putty will be exactly the same. The mixture is first diluted with water according to the manufacturer's instructions. Next, with its help, the groove is carefully sealed. In this case, the finishing material may not be used.
Preparatory work
Before installation of the pipeline begins, drawings of sewer pipes are drawn up. They are necessary for designing the most optimal ways to connect sanitary fixtures and performing accurate calculations of the required pipeline products.
In addition, the diagram will help determine how many fittings need to be purchased for the future sewer system. No special tools are needed to install a sewer pipeline. You can get by with a hacksaw, a file and a tape measure.
When purchasing pipe and shaped sewer products, it is imperative to ensure that all elements have sealing collars. The rubber bands must not have any damage, otherwise the tightness of the connection is not guaranteed.
What kind of walls can be tiled?
A frequent and well-founded question is: is it possible to trench load-bearing walls in a monolithic house for sewerage? Searching for information on this matter is very difficult, since there is no special section in regulatory documents on this matter. However, SNiP has a direct instruction in this regard - only vertical channels with a depth of no more than 20 mm can be tapped. For hidden installation, it is necessary to make horizontal routes, the depth of which should exceed the diameter of the pipes by approximately 5 mm. This means that hidden installation of drainage lines in supporting structures is impossible. However, the sewerage system is rarely located along the outer planes. For example, gating of walls in a panel house for sewerage is most often done along the longitudinal partition of the sanitary cabin. It is not a load-bearing element, so driving a route for laying pipelines in it is permitted.
Socket for a socket in a wooden wall
This is how grooves are sealed in concrete or brick walls. The price per meter of work in this case, as already mentioned, is relatively low. Installing hidden wiring in a wooden house is a much more complex and expensive operation.
Wires in a log or cobblestone house can only be pulled openly. That is, they cannot be hidden in the walls. This is what safety regulations require. In this case, the wires are hidden in special ways (for example, by passing them through ceilings).
Hidden installation of a socket in a wooden wall is possible only in one case. Its installation must be carried out using a special technology that ensures safety. First, a nest is made in a log or bursa. Then a thick metal socket box is inserted into it. Next, channels are drilled for metal tubes for wiring.
In this case, sealing the grooves using any compounds is not required. A recessed socket usually looks quite aesthetically pleasing in itself. However, sometimes it happens that unsightly gaps remain around the socket. In this case, the situation can be corrected using a special composition prepared using sawdust.
It is not difficult to make such a putty material yourself. To do this, you need to prepare small sawdust (you can take the same ones that remained after gating) and PVA glue. Epoxy can also be used as a binder. If you wish, of course, you can purchase a ready-made wood correction mixture in the store.
Putty is prepared for chopped or cobblestone walls by simply mixing sawdust and glue. The finished composition should have the consistency of sour cream. When preparing putty, glue must be poured into sawdust, and not vice versa.
Sewage pipelines perform an important task in ensuring human life. You can install such a pipeline in an apartment or private house with your own hands, if you know how to install sewer pipes correctly. All the basic and main features of this process are reflected in the article.
Main line laying
Installation of the sewer pipeline is carried out in several stages:
- Cutting plastic sewer parts is carried out with a regular hacksaw (for metal) or special scissors.
- It is imperative to use a regular file to remove the chamfer at an angle of approximately 15º. A chamfer is required for:
- simplifying pipeline assembly;
- minimizing the risk of damage to the sealing ring when connecting pipes.
When installing a sewer line, cutting and reducing the length of pipeline fittings is strictly prohibited.
- Before directly assembling the pipeline, the entire distribution of sewer pipes is laid out on the floor according to the laying diagram. After checking the presence of all fittings and compliance with the required length of all pipe sections, you can begin assembling the products into a single system.
- To facilitate the connection of parts, it is necessary to lubricate the elements that will be mated with silicone sealant. Thanks to the use of sealant:
- The connection of pipeline parts is greatly simplified;
- rubber cuffs are retained;
- cuffs and pipes are prevented from sticking together.
- Due to temperature changes in the length of the pipe, it is necessary to provide a compensating gap in the straight section. To do this, at a straight joint, first push in the connecting parts until they stop, and then push the pipe out 1.0 cm.
Optimal slope
Sewerage is a non-pressure system in which wastewater moves by gravity. Therefore, the installation of sewer pipes in the bathroom, kitchen and other rooms is considered to be done correctly if the required slope of the system is maintained.
Many novice craftsmen make the big mistake of thinking that the greater the slope of the sewer pipe, the better. The fact is that not homogeneous wastewater flows through the pipes. It also contains kitchen waste in the form of grease and other impurities. Therefore, the speed of sewage transport is not the same.
If the slope is too large, water will be effectively removed from the system, and food debris and fats will settle on the insides of the pipes in the form of deposits. If the slope is chosen optimally, then the liquid medium will have time to move solid residues with it.
According to building codes and regulations, the slope (per meter) for products is considered optimal:
- up to 50.0 mm in diameter – 3.0 cm;
- up to 100.0 mm in diameter – 2.0 cm.
Pipe fastening procedure
Correct and reliable fastening of the pipeline is a very important step when installing a pipeline system. The pipes are fixed along the walls using special clamps. The distance between the clamps is usually chosen equal to 10 pipe diameters. Clamps are divided into:
- rigid with rubber seals;
- floating (without seal).
Fine for wiring.
Theoretically, horizontal grooves for electrical wiring can be less than 30mm deep. and they can be performed without cutting the working reinforcement. However, in fact it is very difficult to make such a filigree fine. Firstly, the reinforcement may be a little closer to the surface. Secondly, the fine must be cut very carefully so as not to touch the reinforcement. Builders can easily make mistakes, and then you will have to answer.
It is better to carry out all communications in non-load-bearing walls, in wall boxes, a layer of plaster, and so on. Load-bearing walls are not intended for this.