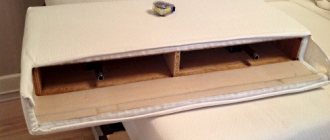
The well often does not fit into the landscape design of the site. Therefore, improving its appearance is an important matter. At the same time, it should still be convenient to use. Therefore, you need to pay attention to the design of the gate and the strength of the cover over the well. The latter is especially important if the dacha is often visited by children.
Let's think about how you can harmoniously fit a well into the design of your territory.
Source: www.remontbp.com
The need for houses over a well
Firstly, it is needed to protect the water from dirt. In the absence of a tight-fitting lid, various debris gets into the well. Water from such a source is allowed to be used only for technical purposes, for example, for irrigation. The canopy will ensure timely removal of precipitation and melt water, which contains impurities.
In addition, a well house is a way to ensure the safety of children and pets. For this purpose, the structure is equipped with locks and latches. To facilitate the process of collecting water, gates and racks are installed. The simplest version of such a device is a rotating log with a handle. This “duet” is complemented with a chain.
The appearance of a building is as important as its design. It must match the landscape design. An added bonus of a well house is its ease of maintenance.
Well gate design
The classic version of a well lift is a wooden cylinder mounted on a metal axis with a handle or fixed on steel pins driven into both ends. To make a drum, a log with a diameter of 18-25 cm is taken. The second option is to use a metal structure. The mechanism is fastened above the well shaft. The knob rests on two posts that have a special recess and a fixing element. The second method is to install metal pins into holes drilled in the racks.
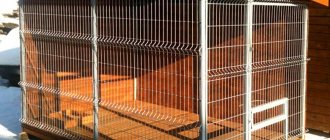
Well with a gate
The efficiency of using the mechanism is influenced by some of its parameters:
- Increasing the diameter of the drum leads to a decrease in the number of rotations of the crank required to get water from the well.
- The length of the gate handle determines the force required to lift the bucket. The larger the radius of rotation, the easier the work. But if the length is too long, your hand will not be enough to turn the handle.
- The type of door fixation on the posts.
Types of houses for wells, their pros and cons
All decorative buildings can be divided into two categories: open and closed. The former are considered easier to manufacture. They can have a pitched or gable roof. The advantages of such structures include a minimum amount of building materials, while the disadvantages are the inability to use them in winter.
To ensure a regular supply of water after the onset of cold weather, you must:
- insulate the building with expanded polystyrene;
- cover the lid and rings with several layers of wood.
The closed well house has more impressive dimensions; it is a real house with a door. The advantage of this design is good thermal insulation. The downside is that construction is more expensive in terms of price and time.
Support nodes
Through-hole mounting
Where metal pins or pipes contact wood posts requires regular lubrication. Completing the procedure will ensure smooth movement of the knob and will allow you to maintain the normal size of the hole. Rotation of metal without sufficient lubrication is accompanied not only by an unpleasant creaking noise, but also gradually increases the diameter of the hole. Expansion of the opening leads to backlash; in such a situation, rotation of the well drum requires great effort.
Caprolon bushings
The use of caprolon bushings in the design will prevent the development of wooden holes. Polymer material has many advantages over metal analogues of products:
- The service life of caprolon is 2 times longer than that of metal.
- The material is resistant to abrasive particles, chemicals and corrosive processes.
- The polymer is harmless to people, its use is allowed in the food industry.
- Caprolon is wear-resistant and makes the mechanism operate silently and smoothly.
- Polymer bushings are designed for operation in a wide temperature range: from -400 to +700.
Gate diagram for a well
Bearings
Rotation of the well gate, carried out using bearings, is the most expensive but effective option. Their use complicates the design, requiring the installation of hubs on the well posts. The use of ball bearings makes the rotation axis particularly easy; lifting a bucket of water does not require significant physical effort.
Ideas for houses for a well, materials, drawings, production
There are various forms of houses, let's look at the most popular ones.
Option 1: Open visor
This option consists of a simple metal or wooden canopy on two posts. To which the gate is attached.
Option 2: Gable house
First, a drawing is made based on the well ring. The diagram must display all elements taking into account their dimensions. The more accurate the drawing, the lower the likelihood of errors when creating a structure.
They purchase building materials and prepare tools. The list of the latter includes:
- electric plane;
- roulette;
- jigsaw;
- hammer;
- circular saw;
- Phillips screwdriver;
- hacksaw;
- nail puller;
- building level.
To create a well house with a gable roof, you will need the following materials:
- wooden beam (sizes 50x50, 50x100)
- log for the gate;
- boards and door fittings;
- edged boards;
- screws and nails;
- roofing felt or slate.
Don't forget to purchase an antiseptic. It is necessary for processing wooden parts. They must be sanded beforehand.
After everything is prepared, you need to follow the step-by-step assembly algorithm.
It includes several stages:
- Clear the area around the well, level, pour and compact crushed stone, first larger, then smaller (15-20 cm thick).
- Construction of the frame. The base is made from timber (section 50x100 mm). The perimeter of the future structure should be larger than the diameter of the well ring. Attach two support posts with the same cross-section to the frame with metal plates and connect them with a block (50x50 mm). Attach to the sides using 4 posts (50x50 mm), cut them at an angle of 45 degrees for a better fit.
- For strapping, use an edged board (width 12 cm, thickness 4 cm). The next step is to fill the resulting gaps with boards. Leave the side where the door will be located unchanged.
- Making gates. To do this, sand a round beam with a diameter of 20 cm and a width of 4-5 cm less than the gap between the vertical posts. Make holes in it on both sides with a diameter of 2 cm and a depth of 5 cm. The same, but through, drill in the racks and insert metal bushings there. Hang the beam on steel rods with a diameter of 24 mm. Bend the left one at a right angle, leave the right one in the same form. This will make it convenient to collect water. To prevent the gate from deforming, use metal wire. Attach a chain from which the water container will hang.
- Install the assembled system onto the frame. Attach the jibs (they act as amplifiers), install the sheathing, and lay the roofing material. The latter can be replaced with slate.
- Installation of door leaf. To make it you will need boards (20 cm wide) and screws. Secure the resulting canvas with beams (25x30 mm). All that remains is to mount the fittings and hang the finished door.
- Decorate the house as you wish.
Finishing
If concrete rings were used during the construction of the well, then they must be decorated somehow. Some types of closed well houses can be considered as a modernized version of the superstructure structure.
The construction sequence does not play a special role, but it is still better to start with the arrangement of the well itself, and then, taking into account the thickness and dimensions of the lining, mount the upper part (closed or open).
Natural stone
If there is access to the surface of natural stone nearby, then it can be used to finish the well. As an alternative, there is another option of using granite paving stones.
The sequence of operations is as follows:
- Around the well, part of the soil (more precisely, backfill) is removed to a depth of about 30 cm.
- The bottom is compacted, a cushion of sand and fine crushed stone is filled in (for sandy soils, only crushed stone can be used). Water it with water and compact it.
- Lay out the first layer of stones, connecting them together with cement-sand mortar.
- Lay out all subsequent layers to the edge of the upper ring, filling the seams between the stones with mortar. The sinuses between the finishing and the concrete rings are also clogged with the solution.
- Level the upper part of the masonry with the mortar to the same level as the concrete ring of the well head.
- If the part of the house being built on is made of wood, then a layer of rolled waterproofing must be laid between the concrete and the frame.
Log house made of logs or timber
This option is used when it is necessary to build a well in Russian rustic style using standard concrete rings. The beginning of construction proceeds in exactly the same way as in the previous method - the site is prepared and the base is formed in the form of a strip of stone so that the tree does not lie on the ground. You can also install a small columnar foundation at each corner, which is then hidden with a blind area.
The corner connection of the crowns is usually made in the simplest way - in half a tree. When arranging a log house, you must ensure that the wood does not touch the concrete walls. It is best if the rings are covered with rolled waterproofing.
Note. The “incompatibility” of concrete and wood is taken into account in any structures where they are located nearby.
Sheathing on frame
This is one of the most common modern methods. A beam or any metal profile can be used as a frame, including the one used for installing drywall.
Note. Of course, the anti-vandal properties of Knauf profiles and their analogues are lower than those of conventional angles or channels with a wall thickness of 3 mm, but the strength of the structure assembled with the cladding will be quite acceptable.
Any façade panels are used as frame cladding. But if you choose vinyl siding, then a basement option with a thicker and more durable wall is better suited for the well.
dizlandshafta
Option 3: log house
Its construction will not take much time.
In order to end up with a neat and multifunctional structure, you need to follow the following instructions:
- Install the racks, remembering to secure them with supports.
- Fold the frame using rounded timber (diameter 10 cm). Collecting them crosswise. The 4 bottom ones will be the same, and then with an equal decrease (like a nesting doll).
- Make a gate (see above).
- The final stage of construction is the installation of the roof, its sheathing and covering.
How they did it in the old days
You cannot simply secure the constructed gable roof to the side posts with a collar. It is necessary to thoroughly strengthen and strengthen the supports, install struts, and only after that attach the protective canopy. Otherwise, at the first strong wind, due to the large windage, the roof can simply destroy the pillars and even throw off the gate. An illustration of how seriously in the old days they approached the problem of installing a roof for a well with their own hands can be seen in the diagram of a log house below.
We recommend reading: The height of the roof fencing of public buildings and the roof in use, how to install and select a fastening unit, more details in the photo and video
An ordinary wooden chopped well was always equipped with a fairly high and wide roof with a roof span of more than 2.5 m. The height of the ridge above the ground was also about 2.5 m. The result was a rather bulky structure, capable of accommodating at least five people under a canopy. The height of the overhangs was about 2 m, this is enough to use the well even in winter, with a lot of snow.
In order to reliably fix and hold a fairly heavy hinged structure, the craftsmen had to use the following solution:
- Install two vertical log posts with a diameter of 200 mm. They also served as supports for installing the lift gate;
- The supports, about four meters long, were dug 1/3 into the soil backfill without concreting or installing external struts;
- The roof support posts were not connected to the frame, so any lateral or vertical load on the roof did not in any way affect the stability and strength of the well head.
Almost the entire well structure, from the roof to the lower crowns of the frame, was made of oak. The lower parts of the supports driven into the ground were first burned to charcoal, covered with birch tar and coated with clay. As a result, the roof and the well itself served for many decades, delighting the owners with clean water and a convenient device.
Option 4: sheet metal house
Construction costs depend on the complexity of the structure. A well house made of metal sheets will fit well into any landscape design. The structure can have an octagonal, hexagonal or triangular shape.
In addition to sheet metal and corrugated board, you will need profiles, metal rods, a lock and door hinges. The procedure is not complicated:
- Prepare your work surface.
- Make a frame by soldering metal rods. Don't forget to leave room for the door.
- Assemble the roof.
- Weld it to the base.
- Place the structure in its proper place.
- Hang the door.
- Cover the building with a protective compound.
Preparatory work
To make a house for a well, you need to collect tools. Its configuration will differ. For example, a set of carpentry tools is required from timber. If the structure is made of metal, then it is necessary to have a welding machine and related tools.
If the roof is made of metal, then the following set of materials and tools is required:
- metal corner;
- profile pipe;
- loops;
- electrodes;
- welder mask;
- corner, tape measure;
- welder's hammer;
- level;
- welding machine;
- paint and primer, etc.
Now let's look at the basic material for a closed house:
- wooden beam for forming rafters 50 × 50 mm, length 0.85 m – 4 pcs.;
- wooden beam for forming a ridge 50 × 50 mm, length 1 m – 1 pc.;
- wooden beam for the base 100 × 100 mm, length 1 m – 4 pcs.;
- wooden beam for attaching the base and rafters 100 × 50 mm, length 1 m - 2 pcs.;
- wooden beam for columnar support 100 × 50 mm, length 1.7 m – 2 pcs.;
- log for forming a shaft over the well Ø 250 mm, length 0.9 m;
- board for a bucket stand 30 × 300 mm, length 1 m;
- board for the slope and front part 20 × 100 mm;
- metal corner – 4 pcs.;
- a metal rod Ø 20 mm up to 300 mm long, and the second L-shaped, 400 × 350 × 250 mm;
- metal bushing – 2 pcs.;
- washer hole Ø 26 mm – 5 pcs.;
- loops – 2 pcs.;
- screws, nails and other fastening materials;
- roofing material, let it be tiles;
- chain and bucket.
Important: the wood used must be well dried.
The following materials are required for a log structure:
- logs;
- logs or timber to support the roof;
- roofing felt;
- tiles;
- metal rod;
- chain and bucket;
- fastening material.
Among the tools you must have:
- drill;
- wood hacksaw;
- set of screwdrivers and drills;
- hammer;
- paint and special impregnations for wood;
- axe;
- pliers and other carpentry tools.
Drawings and dimensions
Drawings need to be prepared. The scheme is standard. See photos for ideas. Thanks to a detailed drawing with details, you can make a beautiful well top better and faster.
Advice from experts on arrangement
The choice of a place to dig a well in a country house or a private country plot is made in compliance with a number of rules.
It is erected according to certain rules, and here are the main ones:
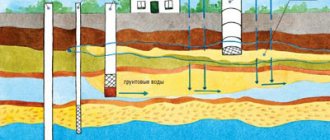
- The water source cannot be located closer than 8 meters from the outdoor toilet.
- If the sewage system at the dacha is designed as an absorbent cesspool (septic tank without a bottom), and the well is intended for drinking water, then the well shaft should be located at least 50 m from it.
- In the case of a sealed cesspool or if the water will be used exclusively for watering the garden, this distance can be reduced to 20 m.
- Also, the water source should not be located close to silos. The distance to them should also be at least 8 m.
Here it is worth considering that the greater the distance of your well shaft from all kinds of structures that pollute groundwater, the better.
This diagram shows that the well from the septic tank must be located at a distance of at least 20 m if the water is intended for household needs, and 50 meters if the water is intended for drinking
Tip No. 1 - time to carry out work
It is best to start work when the aquifer is at its lowest level. And it decreases significantly either during periods of prolonged drought, or after a month has passed after the first frosts hit.
Why during these periods? During these periods, water horizons are not recharged with water - in summer due to insignificant precipitation, and in late autumn and winter because the freezing upper layer does not allow water to penetrate into the earth.
Even though it’s freezing outside, you can go as deep into the aquifer as possible and comfortably. At this time, its recharge is minimal
You can dig a well at normal times, but in this case, at the last stage, you may not be able to penetrate well enough into the aquifer.
If you plan to make a filter, which is at least 60 cm, and have at least one ring of water in the well - 80 cm, then you will have to go deeper below the upper threshold of groundwater by about one and a half meters. And the easiest way to do this is in conditions where water does not remain constantly and at high speed.
But, if you rely entirely on a good pump that can pull slurry mixed with sand, then this is not a problem. In both cases, you will have to tinker in the slurry. And, of course, it is better if it is in warm weather.
Tip #2 - searching for groundwater
Many could see how some specialists, in search of water, walk around an area with two frames. Where they intersect, then, supposedly, the aquifer passes close to the surface.
To this we would like to note that any real hydrogeologist will tell you that:
- Water is everywhere and always, except, of course, when you live on the side of a mountain. If the terrain is more or less flat, then the groundwater belt lies, as a rule, at the same distance from the surface of the earth. If your site is hilly, in this case, it would be more acceptable to consider digging a mine in a low area. You can save money on 1-2, or even 3 rings, depending on what elevation changes your country landscape has.
- Searches using frameworks yield absolutely nothing. The effectiveness of this method has not been proven by scientists. Therefore, if you hire a home-grown specialist who practices this method, be aware that this specialist is most likely hanging noodles on your ears. Another thing is that you cannot prove this. As already mentioned, water is everywhere. And the fact that he made a mistake a couple of rings down or up, he will write off as the costs of the method, which he will warn you about in advance.
- The best way to find out at what distance the water lies is to either ask a neighbor on whose property there is already a well, or ask local geologists, drillers and meteorologists. They have engineering-geological maps, from which they will determine the depth of groundwater.
Well, when we have decided on a place, we go to get the rings and the necessary tools and equipment, if there is none at your summer cottage.
Some craftsmen search for water using such frames. But there is no scientific confirmation of their effectiveness, so it is better to entrust this operation to specialists
Tip #3 - choosing rings
It all depends on the diameter of your shaft. If you want to have a wide well, you can take wider rings. Of course, it takes longer to dig, but it is more convenient both to dig and to use. You can turn around properly, use a shovel with a longer handle, etc.
If you are satisfied with a narrow design, you can opt for rings of small diameter. In order to “get a feel for the situation,” you can climb into one of the rings right at the company and try to turn around in it. Whichever one will be more convenient to work in, take those.
The best option for a country well would be KS 10.9 tongue-and-groove, manufactured in accordance with GOST 8020-90. Of these, installing a shaft is a pleasure.
There are rings with a deeper lock, but they still have to be fastened together with staples to prevent shifts due to heaving
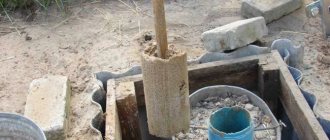
Tip #4 - what to do with quicksand?
Quicksand is a layer of silty clayey sand saturated with water. It resembles a dirty slurry in appearance; it is very difficult to obtain water from it: it is only possible as a result of long-term settling. And even then there will be too little of it, so extracting water from quicksand is pointless.
In general, the presence of quicksand in a section is an extremely rare geological situation. They are found only in glacial deposits, which are found, for example, in the Leningrad region. However, if you get caught, it would be advisable to go deeper below this layer. Only in this case will it be possible to ensure constant and rapid filling of the mine with water.
The process of overcoming quicksand is very labor-intensive. The legs are constantly being sucked in, and the accumulating water and slurry create additional difficulties in work. But if you want the well to be full, you will have to do this.
Three staples on different sides are enough to ensure that the rings are held tightly together. Quicksands of this design are not scary
Tip #5 - don’t delay the work
It is advisable to carry out work on arranging a well in the country as soon as possible. Delaying the work using the open method will lead to the collapse of the pit walls.
And if in a situation with the open method, the situation can be corrected by cleaning the hole and covering the crumbled edges with earth after installing the rings in the shaft, then in the second case it may be necessary to use a crane.
Upon completion of digging the well and backfilling the bottom filter, it is advisable to pump out the first water from it. Then it is mandatory to take a water sample for analysis in order to submit it for laboratory testing. Only after this will it be possible to decide whether it can be used for technical or drinking purposes.
Variations of the structure
The protective structure can be open or closed. In the first case, the likelihood of water freezing in severe frosts increases significantly. Insulating the well ring with an expanded polystyrene foam coat followed by decorative finishing will help save the situation. A closed type design is more practical from the point of view of frost protection. The air layer itself retains heat, and in combination with thermal insulation material it copes perfectly with the functions assigned to it.
The choice of materials when making a house for a well is based on the general architectural concept of the suburban area. If the main structure is a wooden frame, it would be logical to use logs to finish the well ring and boards for the roof. If the exterior of the house contains elements of brick or stone, the corresponding material is used when assembling the structure for the well with your own hands. The top is sheathed with material identical to the roofing of the main building. The proposed design is not an unshakable postulate and is relevant if the house is located within sight of the main building. A well located further away allows you to expand the boundaries of the choice of finishing for the house.
Comment! A wooden house, especially with carving elements, is incredibly attractive, but requires regular maintenance. Otherwise, the appearance will quickly lose its former luster. Siding mounted on a metal profile frame is much easier to maintain.
Another example of a drawing with dimensions will help you navigate the choice of configuration:
Conclusions and useful video on the topic
Those who would be interested in listening to expert advice in a slightly expanded and different version can watch the following video:
Work on arranging a well shaft is not as complicated as it is labor-intensive. And it is not always necessary to dig the earth's surface, going tens of meters into it.
Much more often the aquifer occurs at a depth of 4 to 7 meters. Taking turns, it is quite possible for two strong guys to dig such a mine in two days. The main thing is desire and tools!
Tell us about how you dug and equipped a well on your summer cottage with your own hands. Share technological subtleties that site visitors can use. Leave comments, post photos and ask questions in the block below.