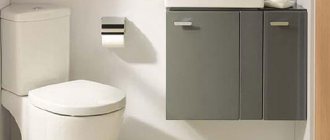
Anyone who is thinking about renovating a bathroom must think about installing a convenient and comfortable toilet in it. In addition to the fact that it must be in harmony with the overall interior of the bathroom, it simply must be of high quality, functional and reliable. That is why this type of plumbing fixture, such as an attached toilet with a hidden tank, is in great demand.
It is mounted on the floor close to the wall on a stand, which serves as a support for it and forms a single unit with the bowl. In other words, such a toilet combines elements of a classic floor-standing toilet and a wall-hung one. In addition, the attached toilet allows you to hide from prying eyes: bends of the siphon, drain pipes, sewerage and water supply systems, as well as the flush cistern.
You absolutely do not need an expensive installation system, and cold water is simply supplied to the cistern hidden behind the false wall. The sewerage system pipes are both located and supplied to the toilet separately. In addition, an attached toilet is an excellent solution for small bathrooms combined with a toilet.
Attached toilet with cistern
Advantages and disadvantages
Let's look at the advantages of an attached toilet with a hidden cistern:
- since it is shorter than a classic floor-standing toilet, you save space;
- an attached toilet allows you to visually create a volume of free space;
- makes the bathroom interior impeccable.
Now let's look at the disadvantages of this model:
- high price;
- when replacing tank fittings, it will be inconvenient for you to act;
- if difficulties arise in hidden communications, then repairs will not be easy;
- Unlike a wall-hung toilet, the attached model stands firmly on the floor, that is, there will be no free space under it.
Materials and shape
No miracles are expected here. Attached toilets are made from the same materials as regular toilets:
- faience;
- porcelain;
- composite;
- a natural stone;
- stainless steel;
Earthenware and porcelain remain the most in demand. How do materials affect the quality components of plumbing products:
- Porcelain. This material is one of the most resistant to both chemical influences during cleaning and mechanical damage. Does not absorb unpleasant odors and moisture. It is easy to care for and clean. If you take good care of them, the service life of such toilets will be about 50 years. They cost more than earthenware.
- Faience. A very popular, one might say classic, material in the production of toilets. Not as expensive as porcelain, but at the same time the products are beautiful and durable. The production of such sanitary ware is based on the dense structure of ceramics, which is fired at high temperatures in special furnaces. And to reduce the porosity of the ceramics, a glaze is applied to the top of the toilet, which allows it to become less dirty and very practical.
- Composite These toilets have a wide range of colors. This is achieved due to the fact that special additives are added to the polymer concrete base, which allow them to imitate the texture of natural stone.
- A natural stone. Even porcelain surpasses in cost and can only be seen in large and expensively furnished bathrooms. More often made to order than found on store shelves.
- Stainless steel. Stainless steel attached toilets are quite easy to clean and have good reliability and durability. Bacteria do not multiply on their walls; they can withstand severe mechanical loads. Nowadays, they are increasingly found in public toilets.
Beautiful toilet
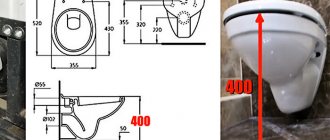
As for the shape, choosing the appropriate model that will fit into your bathroom interior will not be difficult. It is important that the toilet fits the main sewer pipes. That is why the attached toilet must have an outlet that will allow it to be optimally suited for docking to the main sewer lines in the apartment. Three types of main output are produced:
- Straight - used for hidden installation of a sewer pipe in the wall. Simply adapts to the oblique position of the bell using a corrugated adapter. The horizontal direct outlet pipe is parallel to the floor.
- Oblique. It is one of the varieties of horizontal outlet, in which the outlet pipe is located behind the bowl of the attached toilet or at its base. The axis is directed to the floor plane at an angle of 45° from top to bottom.
- Vertical. Toilets with a vertical outlet, in which the outlet is directed directly to the floor, are more suitable for private houses or old Soviet Stalin buildings, when the sewer pipe is located directly under the toilet. The drain itself passes under the ceiling riser of the apartment, which is located on the floor below.
In addition to keeping the outside of the toilet body clean, you will have to pay more attention to keeping the inside of the bowl clean. At the same time, the internal space of the bowl plays an important role in simplifying toilet care.
The shapes of the bowls are:
- Disc-shaped. Sometimes it is also called a shelf. Its principle was that what went into the toilet ended up on a shelf, from which it was then washed off with water, avoiding splashes. But constant water on the shelf created an unpleasant odor in the room and contributed to the deposition of salt formations. A less popular model because it has low functionality and high water consumption.
- Funnel-shaped. You will not have any odors or pollution because the contents of the toilet are directly directed into the water through the flush valve. This allows you to save water and does not create unpleasant splashes at the most inopportune moment.
- Half shelf. The combination of the first two forms made it possible to find a compromise solution to the problem. The water mirror moves back or forward, and one of the sides has a flatter option. This allows for less contamination of the toilet, and also does not create splashes when using the flush tank.
Installation of the cistern
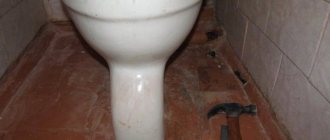
Attaching the toilet to the floor using glue with your own hands
You might be interested in information on how to replace an old toilet
In terms of popularity, this method of installing a toilet can compete with installing plumbing fixtures using dowels and screws. Here, specialized construction adhesives are used, purchased in the appropriate stores, or mixtures based on epoxy resin, prepared independently. Also, very often, ordinary silicone sealant is used to fix the toilet.
Attaching the toilet to the floor using glue with your own hands
The popularity of this method of installing plumbing products is due to its certain advantages.
- Clean installation - when installing the toilet on the glue, no dust or dirt is formed. There is no need to spend energy cleaning the bathroom later.
- Safety - when installing a toilet using glue, there is virtually no risk of damaging the plumbing product or tiles on the toilet floor.
- Simplicity - in the previous fastening method, to successfully drill tiles you need to have some experience in the repair business. Here you won’t need it - you just need to know how to handle a glue gun.
- Reliability - a toilet installed with glue or sealant will not wobble.
It should be understood that this method of installing plumbing will require some patience - after installing the toilet on the glue, it cannot be used for 12-20 hours.
Epoxy is the best adhesive for toilet bowls
To attach plumbing fixtures to the floor you will need the following materials and tools:
- tape measure and square;
- marker or pencil;
- glue gun;
- narrow spatula;
- small rag;
- spray bottle with soap solution;
- emery cloth;
- ammonia;
- glue or silicone sealant for attaching the toilet.
Installing a toilet: a – preparing the installation site; b – preparation of the base; c – coating the bottom of the toilet with glue; d – installation of a toilet; d – installation of the tank; e – sealing of the socket; g – connecting the tank to the water supply network; h – adjusting the water level in the tank; and – fully installed toilet
Let us present the process of attaching the toilet to the floor with our own hands in the form of step-by-step instructions.
Step 1. Perform a preliminary “try-on” of the toilet in the toilet - place it on a cardboard so as not to accidentally damage the tile and imagine how to install this plumbing product in the best way. Consider whether it is comfortable for you to sit on it, how difficult it is to provide access to the sewerage system and connecting the water supply to the tank.
First you need to perform a preliminary “trying on” of the toilet in the toilet
Step 2. Using a corner or tape measure, center the toilet. Note how many centimeters the plumbing should be set back from the left and right walls of the toilet, respectively.
Mark the distance to the left wall
Mark the distance to the right wall
Centering the toilet
Step 3. Remove the cardboard from under the toilet and re-align it with the walls of the toilet. To do this, use, as in the previous step, a tape measure or a corner.
Re-leveling the toilet
Important! When aligning the toilet bowl with respect to the walls of the toilet, do not forget about the tank - it should also be positioned as level as possible. Check whether the holes with which both parts of the plumbing product will be connected to each other in the future are aligned.
Step 4. With a marker or pencil, outline the part of the toilet bowl that is adjacent to the floor in the toilet.
Stroke a path
Step 5. Using a knife or sandpaper, sand the edge of the toilet support so that it becomes perfectly smooth and provides better “adhesion” to the glue.
Cleaning the edge of the toilet support
Interesting! In some cases, it is justified to sand the part of the tile to which the toilet bowl support will adjoin. But at the same time, be careful - do not go beyond the edge of the line marked in one of the previous stages with the abrasive and do not spoil the tile.
Step 6. Treat the tiles where the toilet is installed with ammonia to degrease the surface. Then wipe dry with a microfiber cloth.
Degreasing tiles
Step 7: Carefully apply glue or silicone sealant (as in this case) to the edge of the toilet bowl support. The composition should be exactly as much as necessary - if there is a shortage, the attachment of the plumbing product to the floor will be fragile, and if there is an excess, there is a chance of staining the tiles.
Applying glue to the edge of the support
Glue applied
Step 8. Transfer the toilet with glue applied to the bowl support into the toilet and carefully lower it to the place marked in one of the previous stages with a marker. It is advisable to do this work not alone, but with an assistant - otherwise there is a high risk of smearing the tiles next to the plumbing fixtures with glue or sealant and securing the product in a way that is not required.
Installing a toilet with glue
It is better to install the toilet together
Step 9: Use a spray bottle to spray the area around the toilet support with soapy water. This is necessary so that when cutting off excess sealant, the latter does not stick to the tile.
The tiles around the toilet are sprayed with soapy water
Step 10. Wet the spatula with the same soap solution discussed in the previous step of attaching the toilet to the floor. Then use this tool to remove any remaining adhesive or sealant.
Removing glue residue
Remains of glue or sealant should be removed immediately after attaching the toilet to the floor to prevent the composition from drying out and staining the tiles.
Step 11. Wait a while, 12 to 24 hours, for the glue, sealant or other compound you used to attach the toilet to set and dry. Until this time, it is undesirable to somehow move or even touch the plumbing fixtures. Installing a toilet with your own hands, you can read the video in our article.
Step 12. After the adhesive has finally set on the tile, continue installing the toilet - connect the plumbing to the sewer, install the tank and connect the water supply to it, attach the seat with a lid to the product, etc.
Important! As mentioned above, you can prepare the glue for attaching the toilet to the floor yourself. To do this, heat 20 parts of epoxy resin to +50°C, then add 4 parts of solvent and 7 parts of hardener to it. Mix them and then add 40 parts of cement. Mix everything again until a homogeneous mixture is obtained. The product should be used as glue as soon as possible - after 1.5-2 hours the mixture will lose its properties and begin to harden.
Video - Fixing a toilet with silicone
Drain
The attached toilet does not have a flush cistern, as we understand it. It is replaced by a special flat tank, which is specially adapted for hidden installation. It is located in a niche made in the wall. The water flows created by the flush system, in order to efficiently remove the contents of the toilet bowl, are divided into three types:
- Shower - when water flows are distributed throughout the bowl. By flushing the contents of the bowl, a whirlpool is formed that effectively collects and removes everything into the sewer system.
- Sucking. One of the most powerful drains. It works like this: the bowl is filled with water, after which when the drain valve opens, the contents fall down along with the liquid.
- Cascade. Ensures uniform distribution of water when washing the inner bowl of the toilet. One of the least efficient drains.
Geberit Combifix
Hidden Kombifix cisterns from the German manufacturer Geberit are designed specifically for installation in solid walls - brick or concrete. This series of plumbing is a comprehensive program: installation with a sound insulation system, drain pipe, necessary fasteners. The water supply is carried out centrally at the rear or at the top. The flush volume is adjustable. The factory setting is for 3 and 6 liters, you can change the range to 4.5/6/7.5 liters. The manufacturer's warranty on Kombifix equipment is 10 years.
Tank and fittings
An attached toilet involves installing a hidden cistern for the toilet, in which the drainage system will be securely hidden in the wall. This means:
- tight installation of the floor toilet against the wall;
- hidden installation of the cistern;
- Thanks to a special technological hole, the flush key is located on the outside of the wall.
Thanks to high-quality material, the hidden cistern has good strength and at the same time it does not receive loads associated with the weight of the toilet. If we talk about connecting it to the water supply system, it can be:
- rear;
- top;
- right;
- left.
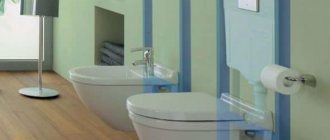
Stylish toilet
In this case, a prerequisite is the presence of a built-in shut-off valve. The installation depth of the hidden tank is about 8-10 centimeters.
As for the drain fittings, it can be connected to the exit button with a pneumatic connection or a lever cable. A fairly innovative solution is the two-button flush system. One button is designed to drain half the volume of the tank, the second - completely, which allows you to significantly save water consumption. In addition, the double flush is equipped with a quick-acting storage valve.
In addition, there are flush tanks with a stop-flush system, in which pressing the button again stops the flow of water, allowing you to use the liquid flow at your discretion.
General views
It is precisely taking into account the above characteristics that the owner undertaking a renovation should consider, as an option, a floor-standing toilet with a hidden cistern. Such products are installed on the decorative floor covering close to the wall. Such models successfully combine the properties of both classic floor and suspended installed frame products.
Attached toilets are equipped with flat flush cisterns connected to water supply and sewerage systems hidden behind a decorative wall. Therefore, attached-type equipment, being much cheaper than frame installations, becomes the optimal solution for rooms that combine a latrine and a bathroom.
In addition to performing the usual functions, the plumbing fixture can be supplemented with some convenient options.
- Microlift. A mechanism resembling a door closer. It smoothly lowers the lid, thereby protecting the product from mechanical damage and preventing the plastic from hitting the ceramic.
- Bidet. Faucet, to facilitate hygiene procedures, mounted on the bowl of a plumbing fixture.
Installation
Installing a hidden tank involves securing it to the wall with screws or anchors. After this, it is laid with plasterboard or brick, in order to decorate it with ceramic tiles or panels. In this case, the water supply outlet and the sewer socket are left on the outside of the wall. It is to them that the toilet itself will be connected in the future.
When carrying out installation work, you will have to take into account some nuances (rules) for installing a hidden cistern for an attached toilet:
- You will have to do the installation of the tank and sewerage before finishing work in the bathroom. The height of the plumbing fixtures is installed taking into account the laying of ceramics on the floor plus 1-2 centimeters.
- When assembling the sewerage system, only rigid liner is used, and all connections are fixed with silicone sealant. But if you use corrugated or flexible hoses, you will soon have to change them to a new one, because they have a shorter service life compared to the fittings of the drain tank.
- To avoid leakage due to differences in level, the liner is attached taking into account the location of the pipes.
- If the drain button has mechanical rods, then the wall thickness should be at least 7 centimeters.
- It is preferable to start laying ceramic tiles from the place where the drain button will be located and which will be the center of the wall.
- The double button will allow you to save water consumption and will help reduce the formation of condensation in the toilet.
The final stage of toilet installation
Required Tools
Even when purchasing plumbing fixtures, you will find out that the installation is sold separately from the main equipment, but it usually comes with all the necessary pipes and fasteners.
Before you begin installation work, you will need to “arm yourself” with certain tools:
- a hammer drill or drill to drill holes;
- a set of wrenches of wrenches and adjustable varieties;
- marking kit - tape measure, level, pencil;
- screwdriver;
- spatula for glue and paint brush.
All other tools and materials should be selected as needed.
You should also take care of the covering material in advance. This is usually a large sheet of drywall and a finishing product - primer, tile (with adhesive) or paint. Instead of drywall, you can use plastic decorative panels - they are appropriate if they are already present in the decoration of the bathroom.
Additionally
In addition to its main purpose, an attached toilet can perform (be equipped with) the following additional functions:
- Microlift. A device that is specially created to ensure that the toilet lid does not fall down with a sharp, unpleasant sound, and cracks and chips do not form on the plumbing. Its operating principle is similar to that of a door closer, which allows you to close the door slowly and carefully. All together allows you to use the toilet, feeling comfortable and cosy. Today, you can not only buy a toilet complete with a microlift system, but also install it on an existing toilet in the form of an overhead seat with a microlift. Products from Germany, Italy, and other European countries, including America, are in great demand.
- Bidet. It is becoming increasingly widespread because it helps a person quickly clean up after using the toilet. In addition, the bidet system has a self-cleaning function, meaning you don’t have to worry about someone else using it. As a rule, it takes the form of a retractable fountain mounted on the rim of the bowl. In addition, the bidet includes a built-in hairdryer, water heating and a hygienic shower. You can control all these functions thanks to the panel located on the side of the toilet lid. Just like a microlift, you can purchase an attached toilet with a built-in bidet, or additionally install an overhead cover with bidet functions.
Attached toilet and bidet
How to install a concealed floor-mounted toilet in an apartment? Expert advice and nuances in work
A floor-standing toilet with an attached cistern is popular among those who love comfort and ergonomics. This model fits into the toilet: regardless of size, it looks both in a small and spacious room.
- System Description
- Distinctive features
- Pros and cons
- Material
- Release form
- Bowl shapes
- Types and organization of drainage
- Hidden tank
- Armature
- Additional functions
- Mounting options
- Floor mounted toilet
- Sound insulation of sewer riser
- Installation of a tank with a button
- Subtleties of installation work
- If there is a plasterboard partition
- Tank in front of the pipes
- Useful video
Preparation for installation work
The preparatory stage consists of the following steps:
- choosing a suitable location for plumbing fixtures in the toilet, creating markings;
- sewerage and water supply outlet. The ends of the pipes should be approximately 13-16 cm from the surface so that the device can be connected to communications;
- If a room is being renovated, you first need to lay tiles and then begin installing the plumbing. Otherwise, you will need to cut the required pedestal shape from the floor tiles.
After preparation has been completed, you need to prepare the necessary tools.