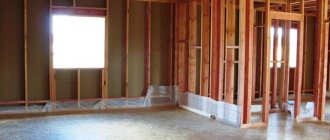
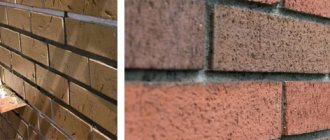
Brick is a classic building material designed to last for decades. The thermal conductivity of brick walls depends on their thickness - the number of rows of masonry.
If a brick wall freezes in the first winter after building a brick house, this means that the construction technology was violated or the thickness of the house wall is insufficient. In this case, it is necessary to solve the problem of thermal insulation of brick walls from the inside.
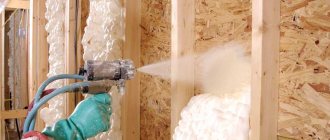
External thermal insulation should be a priority, but its installation is not always possible. Let's look at how to insulate a brick house from the inside with mineral wool, which one is better to use, and how to properly carry out the installation of thermal insulation.
About insulating brick walls
Human activity is associated with a large release of heat and moisture. Heat radiates from the body, from household appliances. Moisture is released when breathing, cooking, using water for hygiene, washing dishes, and watering flowers. And the warmer the air, the better it retains moisture.
If the brick walls are not insulated enough, then when the heated, humid air cools, condensation will form on them. This will lead to the growth of fungus and the appearance of dark spots on the surface of walls and ceilings.
Mold spores are harmful to human health by entering the respiratory system and causing asthma or allergic reactions. In addition, mold has a destructive effect on the materials from which the walls are built and irreversibly damages the finish.
Before insulating the walls of a brick house from the inside, it is advisable to understand how this will affect the condition of the external walls and the indoor microclimate.
Features of internal insulation
It is clear that insulating a brick house from the inside is not the best solution. However, you should resort to it if:
- The building is an architectural monument and the appearance of its facade should not be changed.
- The walls of an apartment in a multi-story building freeze. According to current standards, it is forbidden to install structures that change the appearance of the building.
- The buildings are located close to each other, which makes it impossible to carry out work on insulating the external walls.
- Exterior brick houses made of expensive facing bricks are a pity to cover with new finishing, and laying a new outer layer of decorative brick after installing the insulation requires additional serious financial investments.
The disadvantages of insulating internal brick walls include the reduction of space in the room due to the installation of insulation and a base for finishing. The thickness of the insulating “pie” is usually at least 10 cm.
When installing thermal insulation inside the house, it is important to remember that insulating the internal surfaces of brick walls is fraught with the formation of condensation, which should not be allowed.
Video description
Insulation instructions in the following video:
Advice from professionals
When carrying out such work, you need to pay attention to the following points:
- Vapor barrier will help if you make a hermetically sealed joint at the seams.
- The thermal insulation layer should not have a high vapor permeability parameter. In the case where this indicator is higher near the wall than that of the insulating material, steam will escape outside.
- To achieve complete adhesion of polystyrene foam to the wall, the beacon method of applying plaster and the method of leveling the glue with a comb are used. This allows air bubbles to pass between the wall and the insulation.
On a note! To prevent moisture from appearing on the walls, a high-quality ventilation system must be installed in the house - hoods and valves on the windows.
Natural ventilation must be calculated no less carefully than forced ventilation Source sovet-ingenera.com
Where to place thermal insulation?
Insulation of buildings should be carried out correctly from the outside, otherwise condensation cannot be avoided upon contact with a cold front (dew point). Let's consider three types of brick walls:
- There is no thermal insulation . The dew point is located in the thickness of the brick wall, so it accumulates moisture during the winter months, dries out and eventually collapses.
- Thermal insulation is located on the room side . As the brick wall freezes, the dew point moves towards the room, towards the inner surface of the enclosing structure. As a result, moisture condenses between the heat insulator and the brick wall. To avoid the appearance of moisture in the wall, it is necessary to ensure effective ventilation of the room .
- The insulation layer is laid on the street side . The wall does not freeze, so it remains dry and freely allows water vapor to pass through. It is important that there is a ventilation gap between the insulation layer and the brickwork to remove moisture from the room.
Pros and cons of mineral wool
Mineral wool has some advantages over other insulation materials:
- low thermal conductivity;
- reduced fire level;
- stability of characteristics under mechanical influence;
- soundproofing;
- resistance to temperature changes;
- biochemical resistance;
- convenience and ease of installation.
But there are also disadvantages:
- heavy weight, very heavy construction;
- not hard and durable enough;
- higher cost;
- increased safety requirements;
- the highest labor costs.
Despite many advantages, building regulations do not recommend insulating rooms with ordinary mineral wool. This is due to the presence of phenol in the composition, which has a negative effect on the human body. When insulating a brick wall from the inside, you can use ecowool or stone wool.
If mineral wool is installed incorrectly, hazardous substances will enter the air through the ventilation.
When working with mineral wool, it is mandatory to use gloves and a respirator!
Professional advice on choosing
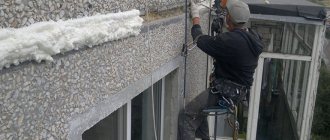
We have prepared several useful videos for you. They contain advice from professional builders on the use of various waterproofing technologies. After getting acquainted with this material, you will better imagine the stages of work, and also get acquainted with some tricks that make it easier to apply waterproofing to walls:
Applying waterproofing indoors is an important component of finishing work. If you neglect this operation or violate technology in order to save money and time, the consequences can be extremely unpleasant. Carry out all stages of the work carefully and without unnecessary haste, and you will forget about problems with damp walls. Glad this result is worth the effort, isn’t it?
Estimated prices for insulation
The cost of a heat insulator and their installation depends on the area of insulation, the size and price of the slabs. With a total insulation area of 109.9 m2, a thickness of the slab layer of 0.1 m, the volume of the heat insulator will be 11 m3.
Since most insulation materials are sold in m3, knowing its cost, you can determine the total cost of purchasing slabs:
- Basalt wool, 1500 RUR/m3, total 16500 RUR.
- Mineral wool, 1070 rub./m3, total 11770 rub.
- TechnoNIKOL basalt wool, 2270 RUR/m3, total 24970 RUR.
- Glass wool Isover Warm House, 1250 rub./m3, total 13740 rub.
- Stone wool Mat Teploroll, 1280 RUR/m3, total 14080 RUR.
- Slag wool, 860 rubles/m3, total 9640 rubles.
- Ursa GEO Facade, 975 rub./m3, total 10,725 rub.
Factors influencing the cost of thermal insulation work for a house with brick walls:
- type of material;
- wall area;
- height of the house;
- finishing method;
- technical condition of the surface;
- season.
Durability of waterproofing material
Waterproofing materials have their own specific service life, which also depends on additional factors.
For example, acrylic mastics can last up to 20 years, provided they are used indoors. If we talk about penetrating products, they are the most durable, as they last as long as concrete itself. Therefore, such waterproofing materials for walls from the inside are the most expensive.
Membranes made of PVC or rubber can withstand from 10 to 15 years, provided that nothing damages them from the outside. But bitumen-based waterproofing materials last the least. Replacement will have to be done after 5-10 years. But the good thing about this type of concrete waterproofing is that it is very easy to replace.
In any case, the price of waterproofing is much less than repairing damaged walls and an entire house. Therefore, the question of profitability does not even arise here. All that remains is to choose the appropriate material, prepare the walls inside or outside and get to work.
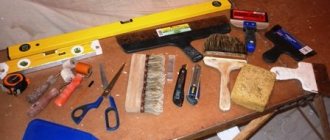
What you need to do DIY insulation work
To perform insulation you may need the following tools and materials: Tool kit for insulating brick walls from the inside:
- hammer drill with a set of drills;
- screwdriver;
- level;
- roulette;
- furniture stapler;
- hammer;
- scissors;
- putty knife;
- brush;
- the insulation itself;
- adhesive solution;
- polyurethane foam;
- lathing material;
- deep penetration primer;
- antifungal impregnation;
- polyethylene film;
- mushroom dowels;
- nails.
Some construction equipment may not be needed. It all depends on what you plan to use to insulate the brick wall.
What is a vapor barrier and how to install it
The process of internal insulation of brick walls has one important stage - installation of a vapor barrier. Economic activities in the house lead to the constant release of moisture (steam).
Mineral wool, in turn, absorbs this steam and because of this, dampness and mold occur. Therefore, it is very important to isolate the insulation from moisture and steam with a special membrane. It is installed on top of a frame with insulation. A vapor barrier can be created using a membrane film.
It is vapor permeable, which has a positive effect on the quality of insulation. The membrane film “works” only in one direction. This must be kept in mind when installing it. The entire partition is covered with film. The membrane film must be laid overlapping, and the joints must be glued with mounting tape.
Insulation of brick walls from the inside with mineral wool, consider 2 options
It is important to note that thermal insulation of internal surfaces is the last thermal insulation solution, which should only be considered if it is not possible to insulate a brick wall from the outside.
Ignorance or recklessness in this case may worsen, but not improve, living conditions.
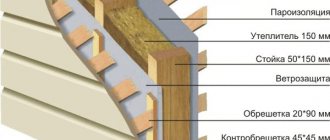
Frame method
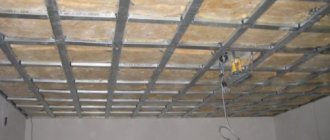
The first option is quite complicated, and not everyone can do it with their own hands. Most experts recommend insulating walls from the inside using a metal frame onto which plasterboard sheets are attached.
- The material (for example, mineral wool slabs) is laid in the middle between the sheathing strips. After that, a vapor barrier is attached over the insulation, forming a sealed layer. The vapor barrier serves to protect the insulation from moisture.
- Between the insulation and, in our version, drywall, we leave a gap of several centimeters for ventilation of our system. As a result, we will have a system in several layers (membrane insulation, air layer for ventilation and all this is covered with plasterboard).
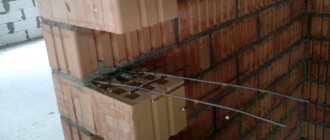
Installation of insulation using fastening brackets
In order to insulate brick walls from the inside with mineral wool using this technology, follow the following sequence:
- Install special holders for attaching plasterboard profiles to the wall.
- Screw them vertically at a distance of 50-60 cm from each other.
- Give the bracket the shape of the letter P. Such fastenings are reliable enough both for installing the profile and for fixing mineral wool.
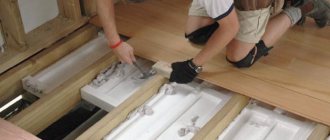
- Unpack the roll or bale of mineral wool sheets.
- Measure and cut slabs and sheets of the required length with a margin of at least 10 cm. If you do not take into account the margin in length, then if the mineral wool is slightly deformed, it may simply not be enough to insulate the entire height of the wall.
- Place the measured strip of cotton wool onto the mounting holders. Mineral wool can be easily pierced with a staple, so it will hang vertically without any problems. The bracket is necessary to ensure that the insulation covers the entire wall tightly and without breaks.
- Install the next strip lightly with an accordion.
- Secure the drywall to the profile.
Types of materials for waterproofing
If we talk about purpose, there are 4 groups of materials:
- Sealing.
- Anti-filtration.
- For protection against corrosion.
- Heat and waterproofing.
If we talk about the form, then the following types are distinguished:
- Coating type;
- Roll type;
- Injectable.
Waterproofing internal and external walls can be done in different ways. To understand how to do it right, it is important to consider the features and characteristics of each waterproofing.
Bitumen mastic
Representative of coating products. Bitumen, a product from oil refining companies, is an elastic mass of dark color. Usage: applied to the wall with a roller or brush. A dense film is created on the wall, which is not afraid of water and does not allow it to penetrate inside. The film is durable and will not crack. Thanks to its viscosity, it penetrates into all cracks, crevices and pores of walls made of concrete, brick or blocks. The waterproofing layer can be used either independently or in addition to rolled products. Scope of application: protection of buildings exclusively from the outside, walls, plinth and foundation.
The advantage of bitumen mastic is ease of application and good efficiency. The process is fast and cheap. Mastic can be sold in finished form or as solid bars. The second option requires melting before work. The downside of the material is that the mastic takes a long time to harden. And if you buy cheap and low-quality products, they may crack over time.
Advice ! The repairability of the mastic is excellent. All cracks and defects of the previous layer can be easily covered up and hidden.
Polymer type mastic
Coating waterproofing in the form of a plastic adhesive composition. The base is acrylic polymer. It is used both to protect internal and external walls, foundations and plinths. In addition, it has good thermal insulation characteristics.
Advantages:
- Easy to apply, a beginner can handle the task;
- Speed of work;
- After application, a dense and even coating appears that perfectly protects the surface. No additional finishing is required;
- The material is protected from fire;
- Made from safe materials, can be used inside the home, even in the bathroom;
- Sold in a large assortment and in different colors;
- Not afraid of negative temperatures;
- Dries quickly;
- Elastic, minor deformations of the walls and cracks that form cannot break it, the film stretches.
Deep penetration substances
Also coating waterproofing, but the principle of operation is slightly different. If in the first two cases a protective film was created on the surface, preventing moisture from penetrating into the wall, here the protective layer is formed from the inside. After application, the composition penetrates the pores and structure, and then crystallizes. This way moisture will not penetrate into the structure. And even if the surface is damaged, this will not affect the waterproof properties.
The material can penetrate deep to a distance of up to 1 m. It is used for both internal and external work. The best option if you need waterproofing for the walls in your apartment. To use, you need to prepare the dry mixture according to the instructions (by adding water) and apply to the surface. Even a beginner can complete the process; everything happens quickly and safely.
Ruberoid and roofing felt
Old or classic representatives of roll-type waterproofing. Sold in rolls. The installation process is reminiscent of working with wallpaper. Roofing felt can be glued to mastic or fixed by fusing. Both materials are used only externally to insulate walls, plinths and foundations.
Roofing felt is based on cardboard or fiberglass, which is impregnated with bitumen. After gluing, a protective layer is created that does not allow moisture to pass through. Roofing felt is a cardboard sheet that is impregnated with a tar-based composition. The quality of roofing felt is better, and the price is lower. Although, these materials are among the cheapest. But they do not waterproof the walls inside the house.
Film or membrane
Representative of roll materials. Made from PVC or synthetic rubber. Scope of use: indoors and outdoors for walls, plinths and foundations. The film is glued to the surface, preventing moisture from passing through. Easy to use and affordable.
The main disadvantage is that it is easy to damage. Soil or rodents can damage the integrity of the waterproofing layer of the walls or foundation, and it will begin to fall on the base. Therefore, even during installation work, it is important to be careful.
Pastes or injection materials
Representatives:
- Epoxy substances;
- Gels based on acrylates;
- Polyurethane substances.
Designed to protect the material from the inside at the structural level. Method of application: holes are made along the entire wall at a distance of 40–50 cm. A paste or injection mixture is injected into them under high pressure (hence the name, the process resembles an injection or injection). This is an expensive method and requires special equipment to implement it. Such waterproofing for interior walls is rational only in cases where other manipulations cannot be carried out.