Home / Ceiling design / Design solutions / The wall behind or near the fireplace or stove - how to decorate it?
When a fireplace or stove is lit, the wall near it becomes heated. This is unsafe if the walls and floor where the stove or fireplace is located are not properly finished. This part of the house structure must be insulated with fireproof materials that can completely prevent fire. In addition, you need to take into account the requirements for installing heating devices - the distance from the partitions.
Insulation options
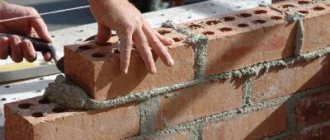
There are many non-combustible materials that can be used in this case. The easiest way to protect all surfaces from heat is to place a protective box around a red brick heat source. It is able to protect structures from heat and easily tolerates thermal effects. However, this decoration of the wall around the stove in the house looks a little unaesthetic and you can choose other materials:
- Porcelain tiles and tiles.
- Fiber cement boards.
- Factory-made protective screens.
- Metal sheets.
- Artificial or natural stone.
The easiest way to work is with a ready-made protective screen - you just need to select it according to size and install it on site. This option is also good because such finishing of walls near the stove or fireplace is done in the shortest possible time and without “dirty” or “wet” finishing work. The remaining options are more labor-intensive and have some nuances. Therefore, they need to be considered in more detail.
Frame-type slopes
So, if plaster is a continuous covering of a slope, then there is also a frame type, when there is empty space inside that can be additionally insulated. The choice of material for such solutions directly depends on the type of building cladding. Slopes can be made of plastic, wooden lining, vinyl or metal siding, window profile, metal cassette element. The installation of these materials is almost identical, so we did not separate them.
View the following photographs showing similar slopes.
Metal cassettes with matching façade cladding
Slopes made of wooden lining
Siding slopes with external frame
Special window profile
Slopes made of plastic with a metallic sheen
Each of the listed materials has its own set of characteristics, but none of them provides the window system with additional thermal protection, like special compositions of plaster mixtures. However, there are methods for insulating such slopes: the internal space is filled with polyurethane foam or mineral wool.
External insulation of window slopes and walls
Installation proceeds according to the following scheme:
- A frame is exposed, which can be external and internal, or only external. In the first case, a belt of slats or metal profiles is attached near the window frame and the same along the outer perimeter of the slope. In the second - only the outer element - the inner one is replaced with a starting profile, which is attached directly to the frame. The last solution is suitable for plastic and thin lining.
- All frame elements are set clearly in level, since they completely determine the geometry of the future slope.
- They are attached differently, depending on the material. Most often, anchors and metal hangers are used as fasteners.
- The finishing material is installed according to the fastening scheme of the specific material. For example, wooden lining can be held in place by nails and self-tapping screws directly or through metal clamps, and siding is held in place by self-tapping screws and a special fastening profile.
- The outer corner of the slope is covered with a decorative element. Usually these are overhead corners, examples of which you could see in the photographs shown above.
Determining the width of the slope
Galvanized profile frame
Sheathing for lining
Slopes made of fiber cement siding can also be installed over the sheathing.
It is much easier to make a frame slope than a plaster slope, and in 90% of cases it does not require additional processing. The product begins its service life immediately after installation. Everything would be great, but not every material will last long. Painted elements fade over time in the sun, wood can rot and change color. You can repeat the coloring, but it will not look like the factory one, and the slopes will definitely lose their attractiveness. But plaster surfaces can be renewed an unlimited number of times.
Prices for various types of window slopes
Slope panel
Video - Slope made of plastic panels
Tile and porcelain stoneware
These two materials are best suited for insulation in this case, as they have a beautiful appearance and will not spoil the interior. However, in terms of labor intensity and costs, this will be the most complex method of registration. You will have to prepare the surface, stick the tiles and only then install the stove in place. At the same time, you will have to do without heat for some time, since the work is carried out in several stages and each takes time.
Helpful information
Before finishing the window slopes from the outside, it is advisable to familiarize yourself with theoretical information.
What are they needed for
Some particularly inquisitive citizens may wonder why they are needed at all?
In fact, they carry very significant functions, namely:
- Protection of polyurethane foam from deformation
. Over time, this material begins to lose its qualities and, as a result, ceases to properly protect the room from the penetration of cold air. - Another equally important function is to protect the seams from moisture (precipitation)
. Without proper finishing, fungus and mold will begin to form in the cracks, which will irreversibly have disastrous consequences.
- Don't forget about the decorative function either
. Without the right frame, the frames will not have a complete look.
Note! Quite rarely, a company that installs windows also offers clients installation of slopes. In this regard, many people decide to carry out this task with their own hands.
What should they be?
Of course, each construction operation has its own instructions, which indicate the basic requirements for the materials used. This trend has not escaped our question either.
In particular, there is GOST-30971, which regulates the following requirements for external slopes:
- Waterproof. They should not allow moisture to pass through (for example, during rain).
- Resistance to high and low temperatures. This property is especially important for our country, whose climate is characterized by sharp temperature changes.
- Resistance to ultraviolet radiation (sun rays). On hot summer days, the sun can have a detrimental effect on many materials. In particular, they begin to fade and sometimes even lose their properties.
- They should facilitate (or at least not interfere with) the evaporation of moisture from the central seams. The vapor permeability coefficient must be at least 0.15 mg/(m*h*Pa).
Minerite or fiber cement boards
This material is suitable for those cases when there is no desire to waste time on laying tiles or assembling a complex protective structure. The plates are mounted directly on the wall or on a specially prepared metal profile structure. In the first option, the plates are simply attached with self-tapping screws or using clamps. With clamps, a ventilation gap of three to five millimeters remains between the wall and the assembled surface, which further increases safety.
The second method is more complicated, but such finishing of the walls near the stove in the house will protect them much better from the heat. On the surface, using a construction stapler, basalt cardboard with a foil coating is attached, with foil inside the room. Metal profiles are attached through the cardboard to fix the external decorative panels. Decorative slabs are attached to the profiles in such a way that they do not reach the ceiling a few centimeters. This gap is necessary to compensate for possible shrinkage of the house. Ventilation holes are made in the bottom of the slabs, which can be covered with a decorative grille.
Plaster type slopes
Windows can relate differently to the plane of the walls - either they are recessed inward and there are perpendicular slopes, or they are aligned in one plane. In the second case, to protect the insulation, only an overhead casing is required, however, such a solution can be implemented mainly only during the construction of a new house, or old windows were installed in the same way. Making a platband is much easier than making a slope.
Beautifully plastered slopes with concrete elements
So, the first on our list will be plaster slopes. They can rightfully bear the title of a classic version.
For such slopes, a sand-cement mixture is used, from which the outline of the window opening is completely formed. Today, this method is not as popular as it used to be, but many still consider it the most reliable and durable solution.
They are used if the walls of the facade of the building are either completely plastered, or an architectural element is formed from the mortar, which will outwardly blend harmoniously with the material of the walls.
The master plasters the slope, forming it with special beacons
The advantages of such slopes are the availability of materials and a fairly simple manufacturing technology; this finish is resistant to atmospheric influences and looks simple but neat.
An experienced craftsman will make a high-quality slope within a few hours, if we are talking about a simple rectangular shape. Complex compositions with non-standard geometry can be very time consuming. It’s almost impossible to do something like this yourself without experience and templates.
Cement plaster requires a certain amount of drying time, which will not allow you to immediately decorate the structure. It is also worth considering that such work is dirty, so you should be careful.
The plaster slope is painted in contrast to the walls and to match the window
Interesting to know! For work, you can use any plaster mixtures, including decorative ones, for example, bark beetle. It all depends on the design approach.
Prices for various types of decorative plaster
Decorative plaster
How to make a plaster slope
Now let's figure out what is required for such work and in what sequence it is performed. We are preparing the following tool:
- Container for mixing plaster mixture.
- Electric tools for mixing - mixer, electric drill, hammer drill.
- A set of spatulas for applying the mixture, a corner trowel, and a trowel for applying the plaster.
- Tools for determining the evenness of a slope - a plumb line, a bubble building level, a laser axle builder.
- Wide brush with soft bristles.
- Plaster float.
Required tool kit
We purchase the following materials:
- Ready-made dry plaster mixture or cement with sand, if you decide to save a little. The slopes do not require a lot of material, so it is better to buy it ready-made, since the factory composition contains plasticizers in the required proportions, which adds elasticity to the solution - in general, makes working with it more comfortable.
- Putty mixture. Compositions for external work are used, including decorative plaster, applied only as a finishing layer.
- Deep penetration primer for exterior use, which will reduce water absorption of the base and strengthen it.
- Fiberglass mesh for slope reinforcement. This material is inexpensive, but significantly strengthens the concrete layers, so do not neglect it.
Thermal insulation plaster
When choosing a ready-made solution, we advise you to pay attention to the additional properties of the material. Thanks to the use of certain additives, the compositions can differ favorably from the classic sand-cement mixture. For example, thermal insulation plaster will additionally insulate your window. It contains foam glass granules, perlite, and vermiculite, which imparts similar properties. In addition, the material is moisture resistant. Fiber fiber is often used for additional reinforcement.
Now let's take a step-by-step look at how slopes are plastered. In fact, the technology includes only two stages - placing beacons and working with the mixture. If everything is clear with the second point, then the first has many options for execution. Today we will look at a modern method that will help to do everything efficiently even for a beginner who has not encountered anything like this before.
Table 1. Plastering slopes.
| Photos, steps | Description |
| Step 1 - priming the base | First, the base must be cleaned of dirt and dust. This is done using a regular brush. Next, a layer of primer is applied, which needs to dry well. The drying time is indicated on the jar with the composition. This step is mandatory, since due to low adhesion the plaster may fall off over time. |
| Step 2 – installation of internal beacon | Installing this element is rightfully considered the most difficult, but not the option that we will offer you. Here is a special beacon profile for slopes with reinforced mesh and an adhesive base. It is inexpensive, but saves a lot of your time and nerves. Installation occurs in the following order: 1. An indentation is made from the edge of the frame exactly the width of the profile. You can navigate directly along the edge, but we advise you to put additional level marks so that you don’t have to tear off the glued profile if it misfires, and the window itself may not be positioned exactly. 2. Remove the protective tape from the reverse side to release the adhesive base. 3. The profile is glued along the marks. Attention! If your slope is very wide, extend the fiberglass mesh using a separate roll. |
| Step 3 - installation of external slope | The second beacon can also be made in different ways. Let's take a specific example in which the craftsman uses a metal rule and even pieces of plywood sheets. He establishes the rule as follows: 1. Two holes are drilled in the wall at a certain height into which plastic dowels are inserted. 2. Then homemade clamps are installed, as in the photo, consisting of a platform and a short support on one side. There is a slot in the platform for a self-tapping screw so that the height can be adjusted. 3. A rule is set under the free end of the clamp, it is clearly leveled, after which the screws are tightened for reliable fixation. |
| Step 4 – side external beacons | It is much easier to place beacons on the side walls. The photo shows another option. Plywood was used, in which cuts were made to allow for quick adjustment of the position of the element. It is also attached to dowels. All external beacons are set strictly at an angle of 90 degrees with respect to the window frame along the internal beacon. The undoubted convenience of this solution is the speed of installation (no need to wait for the mixtures to dry under the beacons) and the ability to quickly correct the position if mistakes are made. |
| Step 5 - plaster | Next, the plaster mixture is mixed. It must be thrown inside the slope so that it sticks securely to the base. Attention! In no case is it allowed to spread the solution, only throw it on. If desired, the plaster can be further strengthened. To do this, screw dowels are screwed into the base and do not reach the end. The protruding cap will significantly strengthen the structure of the slope. 1. The applied mixture is pulled with a rigid spatula along the beacons. You can use any smooth and strong lath. 2. We achieve ideal evenness of the surface. 3. After some time, the plaster must be rubbed down. 4. The external beacon is removed after the slope has dried. Advice! To avoid the solution sticking to the plywood, the latter can be coated with waste oil or covered with a plastic bag. This measure will further increase the service life of the device. |
Prices for deep penetration primer
Deep penetration primer
Video - Do-it-yourself slopes: beacons for plaster
Metal sheet
This protection option can be used when the distance between the walls of the stove or fireplace and the protected surface is more than 20 centimeters. The sheet is simply attached to the surface so that its edges protrude beyond the edges of the heating device by 30 centimeters on each side. The option is unreliable and is not recommended for use if the heat source is not removed from the partitions at the specified distance - the risk of fire remains.
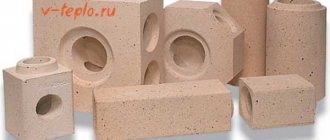
Refractory materials for furnace lining
Fireclay materials for lining furnaces, namely brick and mortar, make it possible to create a protective fireproof screen both around the firebox and around the body of the metal furnace. The difference between a kiln brick screen and a lining screen is that the lining is a protective casing located close to the walls of the kiln.
Natural stone for finishing
Fireclay can withstand temperatures up to 1300 degrees. Today, in addition to bricks and mortar, there is also fireclay coating, glue, and mastic, which can be applied even while the stove or fireplace is operating. Their composition includes microscopic fireclay fibers and binding substances; they line the entire surface of the furnace and seal individual cracks. In addition, materials such as kaolin paper, kaolin cardboard, in the form of rolls and also kaolin wool in separate pieces are produced for lining.
Stone
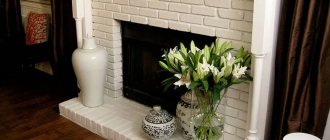
This type of wall decoration behind the stove or fireplace is very beautiful. However, this is also the most expensive finishing method if natural material is used. Artificial stone is cheaper, but it also falls into the category of expensive decoration. The surface is prepared using standard technology, and the heating device is installed after all finishing has been completed.
Conclusion
Now you know how slopes are finished using all modern methods. Additionally, watch the video in this article. And if you have any questions, write them in the comments and I will answer you as soon as possible.
Today, many are interested in what is the best way to finish window slopes. It is almost impossible to give an unambiguous answer to this, since there are many methods that have certain advantages and disadvantages. For this reason, below we will look at the main options and their main properties.
There are internal and external slopes. We will focus on the latter, since they are subject to more stringent requirements. The internal ones can be made from almost any material.
What else to consider
To avoid any troubles during the operation of the furnace, you need to take into account the requirements of SNiP in all cases - even with installed protection, even without it. They are simple and compliance with these rules guarantees you the necessary level of protection:
- The distance from unprotected wooden walls to the heating device is 1000 mm.
- If the wall is protected by a material equivalent in thermal conductivity to brick - 130 mm.
- If the floor is not protected by anything, then the distance to the bottom side of the heater should be at least 140 mm.
The floor is best protected with ceramic tiles or porcelain stoneware. You can also use a mineralite slab or a regular sheet of metal. It is most important to protect the area directly in front of the firebox door, as embers can fall out and cause a fire. Directly under the heating device, the floor covering does not heat up particularly strongly and if a distance of 4 - 15 centimeters to the bottom of the oven is maintained, additional protection may not be needed there.
Technology for installing fire-resistant materialheat-resistant materials for finishing walls near the stove
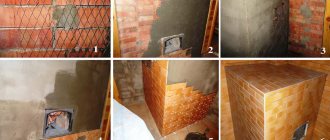
Multilayer protective technology, using the example of wall cladding near a heater in a bathhouse, consists of a sequence of actions:
- A layer of vapor barrier and waterproofing is attached to a wall made of combustible material. As a vapor barrier, you can use a three-layer film consisting of foil, polyethylene, and kraft paper for strength. It is attached using a metal profile (wooden blocks can be used instead of a metal profile).
- Next, insulation is installed, for example, foiled mineral wool. It is placed inside the sheathing so that the foil layer is on top. The joints of mineral wool slabs must be sealed with aluminum tape.
- Using self-tapping screws, fire-resistant boards, for example, made of fiber cement, are attached to the sheathing. An alternative to fastening a multilayer structure is to install the plates with self-tapping screws through a sleeve. This creates a space between the slab and the wall.
- After fixing the slabs, they can be faced with ceramic tiles for aesthetics. To do this, a metal mesh is screwed onto the self-tapping screws onto the slabs, onto which heat-resistant adhesive is subsequently applied and the tiles are glued.
If the installation is carried out in compliance with the technology and ventilation gaps, the wall near the stove will not heat up and will not create a fire hazard.
A budget-friendly way to protect between a stove and a wooden wall is to use profile metal used for the roof. To do this, you will need two sheets of such metal and hollow tubes. Hollow metal tubes are attached to the wall, and a metal profile is mounted to them. The distance to the floor and ceiling should be at least 10 cm. The tubes are attached to the sheet in the same place as the first ones and covered again with the sheet. Hot air moves in the gaps between the wall and the floor, while the wall remains unheated.
Tiling windows - rules for finishing corners and slopes
When repairing or replacing a window, questions regarding the finishing of slopes always arise quite acutely. And the main one is what material to choose. There can be many options, from simple plastering and painting to finishing with plasterboard or sandwich panels. No less popular is covering windows with tiles - tiled, ceramic or imitating natural stone. This will be discussed further.
Tiles in the decoration of openings
The choice of one or another tile and the method of its installation depends on factors such as the purpose of the room, the requirements for its sanitary condition, the overall design, and the personal preferences of the owner. For example, an artificial stone with a chipped surface is unlikely to be appropriate in the kitchen, since it will be difficult to wash off grease and soot. But in a living room decorated in the appropriate style, or on a loggia, it will look great. But smooth tiles or ceramic tiles for covering windows are great for kitchens and bathrooms; they can also be used in residential and public spaces for finishing slopes, if this fits into the overall concept of the interior. The advantages of this material are obvious. This:
- Excellent appearance, variety of colors and textures of decorative surfaces;
- Resistance to mechanical damage;
- High hygienic properties, ease of care;
- Strength, reliability and durability of the coating;
- Additional fixation of the window frame in the opening.
Unfortunately, the advantages of tiles do not include low price and ease of installation - this will require some experience, patience and accuracy. But the result compensates you for all costs and labor.