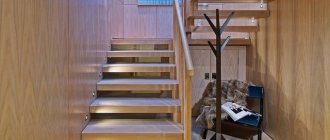
A beautiful staircase, an integral part of which is the railing, often acts as the calling card of a private home. It is worth noting that the main functional purpose of this structure is the ability to conveniently move between floors. But handrails and railings are responsible for the reliability and safety of the stairs. Among other things, the overall attractiveness of the staircase structure largely depends on them. In this article we will tell you how to make a staircase railing with your own hands from wood and metal.
In the process of manufacturing railings, high precision must be observed, because the components for them are located at different levels.
You will have to make various attractive elements, perhaps make patterns, etc. But don’t be afraid of making railings, because most often “the eyes are afraid, but the hands do the work.” Get to work!
How to choose source material
Wooden
Before you begin assembling the railing, you need to decide what type of material will be most suitable for the interior of the house.
- For many generations, natural wood has been used to produce stairs and railings. Today, railings are made from different types of wood. And each type of wood imbues the interior with a special aroma. Wooden railings will fit into even the most cutting-edge room design.
- Metal railings are also very popular. Bent and forged railings look noble and elegant. They are very versatile and will fit into every interior. You just have to take a responsible approach to choosing a patterned design for the railings.
- Railings made of plastic and glass. Glass panels replace balusters, and handrails in this case are made of plastic. However, in this case, the railings can only be used with a certain interior solution. In combination with retro and classic styles, such railings will look out of place.
Design features of balusters
- Basis of the design. It is located at the very bottom and is a support for other parts. Do it with extra length. This will make it easier to fit and attach the product.
- Center of the structure. Is the most beautiful. Made for good decoration and aesthetics. Often they are complemented during production with beautiful carvings and small designs.
- Supporting part for handrails and railings. It rests on the railings and railings.
They are made from a wide variety of wood types. They have fancy shapes, different sections and sizes.
There are several types of balusters:
- Flat. Usually made from plywood or boards.
- Ordinary balusters. They have a variety of sizes, there are square and round sections.
- With dots and shapes. These wooden stands are made according to templates on machines.
- Carved. Handrails are the most difficult to make. They cost much more, because... usually made by hand.
There are several types of balusters
Important points to consider when making railings
Railing height
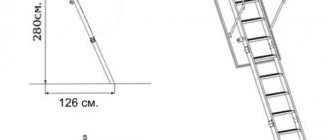
Here you should pay special attention to the form. If you have children, then there's a good chance that railings can take a lot of abuse. The child will most likely test the strength of the railing repeatedly, for example by swinging on it or simply sliding down it. It is also worth noting that the lower part of the railing should be made so that your child cannot slip between the elements. As for height, this is worth thinking about separately. The minimum height of the railing is 900 mm. The best height for a person 1.80 m tall is 1200 mm.
As for the surface of the railing, it must be perfectly smooth. If the staircase structure is narrow, then it is allowed to install railings on only one side. However, if its width exceeds 1250 mm, then both sides should be equipped with railings. Please also note that the distance between the balusters in the case of small residents cannot exceed 150 mm.
Methods of fastening balusters
Before installing balusters, familiarize yourself with the general design of the staircase. So, you will identify many features that will help you decide on the fastening method. Now let's look at each of them in detail.
Fastening to dowels
This method is used more often than others. They are very easy to use. You can also make them yourself. But more often they buy in construction stores, they have a low cost.
In addition to the dowels themselves, you need wood glue. Before use, holes are drilled in the balusters with the depth of half the dowel and the same width as the dowel. Afterwards, the entire hole is filled with glue, and the product is inserted there. Next, wait for it to dry completely. All excess that appears outward from the very beginning is removed with a rag.
Stud mounting
There are several options for stud fastenings. There are smooth and carved.
Before attaching the balusters to smooth pins, holes are made in the products. Be sure to mark before drilling. The hole should be exactly in the middle.
The second method uses pins with cutters on both sides. They resemble screws. Before screwing in such a pin, a hole 1-2 mm long is drilled in the hole.
Attaching the outer support posts
Support posts will help you make handrails on the stairs with your own hands. It is important to properly fix the outer supports. A lot of weight falls on them. There are two ways:
- "Capercaillie." Specially shaped grooves are drilled in the upper and lower parts. A capercaillie curls up in them. These are a type of bolt. The thickness depends on the massiveness of the support.
- Bayonet nut. A small cutout is made in the lower parts of the supports. The stand is attached to the steps and floor using this nut. This method is difficult. Patience will be required.
Don't forget about attaching balusters.
Attaching balusters to wooden stairs is quite simple if you approach it responsibly. Then you will get an excellent result that meets all safety standards.
Self-tapping installation
The most affordable installation method. It is often used. When using it, the railings will stay in place for a long time and firmly. Self-tapping screws in both the lower and upper parts are inserted through the sides. Wood caps are covered with special putties.
The tool is an important part of the preparatory process
Before making the railing, prepare all the tools. Everything here, of course, depends on the source material you choose for making the railings. If the railings are metal, then you will need a welding machine with the necessary additional materials. If you are equipping a staircase with wooden railings, then first prepare the following tool:
Wooden stair railing
- two hammers - light and medium weight,
- chisels,
- wood hacksaw,
- screwdrivers,
- bit,
- electric drill,
- skin,
- jigsaw,
- metal construction square, plumb line or level,
- screwdriver
The master's work is scary! Making stair railings
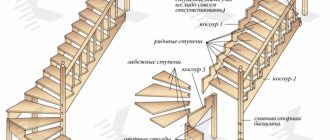
First of all, collect all the elements necessary to complete the work. The railing assembly kit includes:
- Handrails are that part of the railing that a person holds on to with his hand.
- Balusters are vertical posts that hold handrails.
- Rotary and end pedestals are more durable than balusters, racks installed vertically. They are placed at the beginning and at the end, as well as at the turning points of the staircase structure.
Cabinet
When making railing elements with your own hands, keep in mind that some of the finished parts will end up in waste during the assembly process. This may be due to errors during the work process. Experts say that 10% of the elements will be defective. Therefore, make more elements than actually required.
The assembly process depends on the source material. If we are talking about assembling metal railings, then the main action is to connect the parts into one whole using a welding machine. If you do not know how to handle it, then it is better to call a specialist to your home. You can connect metal parts with rivets, however, such a connection is not very reliable.
Baluster sizes
To make wooden handrails, balusters and turning tables, you will need wooden blocks of different sections. To process them you will need a jigsaw. With its help you will give the details shape. After this, you should carefully sand the surface of all elements for the railing. And at the next stage you can start the installation process.
The main advantages of metal railings for stairs
We can safely say that metal products today are the most popular for reasons.
The advantages of metal railings include:
- high strength;
- durability;
- reliability;
- high wear resistance;
- resistance to various influences;
- simple care methods;
- various design options;
- Different prices depend on the complexity of the parts.
Metal stair railings do not require difficult maintenance conditions; it is enough to remove dust. The technical capabilities of the materials make it possible to give products a very original appearance, it is distinguished by its originality.
Very often manufacturers use the following methods:
- polishing with abrasive materials;
- painting with powder or oil paint;
- galvanic anodizing (a method of imparting a chrome or nickel shine to the surface);
- matting (the process is characterized by the use of special sandblasting equipment).
If desired, most of the finishing can be done independently without the help of specialists. When processing metal products, all stages cannot be neglected; this will prevent the formation of corrosion and significantly extend the service life of the product. Complex finishing processes will require not only the necessary experience, but also special equipment.
Installation of wooden railings. Let's learn to do it right!
The installation of railings should begin with the installation of end bollards. These are the points from which you need to start in the process of performing work. They should be installed at the beginning and end of the stairs, as well as at its turns.
Attach a string to one of the pedestals and stretch it between all the pedestals. So, you will determine the location of the handrail, which will allow you to secure it correctly and securely.
Fastening wooden balusters
Then mark the locations for attaching the balusters. The distance between them is determined individually, however, it is not recommended to place them further than 20 cm from each other. Their complete installation is only welcome. These elements can be attached both to the steps and to the strings on which the steps are attached. If you decide to fasten the balusters to the bowstrings, then you need to first cut them at a given angle. Accordingly, the balusters are mounted horizontally to the steps.
Securing balusters with nails is not very effective. Practice shows that during use, nail fastenings quickly become loose. It is better to use self-tapping screws and glue specially designed for this.
Handrail dimensions
Now the balusters should be attached to the handrail. If you make special grooves in the handrail for the entry of balusters, then the process of installing handrails for stairs will be simplified. In those places where the staircase turns, to install the balusters to the handrail, you need to make a special transition element, which is filed at a certain angle.
Once the balusters are installed, fill any gaps. Clean the surface of the finished railing from dirt and dust. Sand all defects. Now leave the structure so that it can dry completely. Then proceed to finishing, which includes coating the surface of the railing with varnish or paint.
Natural materials
If you want the wooden surface of the railing to preserve the beauty of its natural pattern, then you can use parquet varnish to treat it.
At this point, the installation of wooden railings will be completely completed.
Choosing wood for balusters
For such products it is better to use hard wood.
- Oak planks. They are very hard. They will last a long time due to their strength and durability. They will be able to withstand strong masses. Handmade stair railings will not wear off during installation and use. Insects cannot harm them.
- Beech boards. Also durable. But, in addition to strength, they have flexibility. Therefore, they are often used for carved railings; they are easy to deform. But before installation it is better to treat with antiseptics.
- Ash boards. They are similar in structure to oak. But they are less durable. The positive side is that they are resistant to rot. Because of this, ash boards last a long time.
- Pine boards. It is easy to process. They will never rot (due to the resins they contain). If there are sudden temperature changes, they will not be deformed. Very durable. Compared to other woods with the same properties, they are low in cost.
- Deciduous boards. Very durable. They do not wear out over time. They are distinctive in that they gain their strength during service. This is due to the special composition and structure of the wood.
- Birch boards. Experts do not recommend using them for railings. They are fragile and rot quickly. But if you don't put much stress on your wood stairs and are doing them purely for decorative purposes, they are great. They are easy to process and have an aesthetic appearance.
Important! Before purchasing the wood you need or ready-made railings, inspect it carefully. It is not recommended to purchase if it has transverse cracks, knots, or the presence of insects.
We purchase material for forged railings
Forged stair railings are much more difficult to make than their wooden counterparts. However, the effort is worth it! Initially, you should purchase the starting material and assemble the tool:
- Level, grinder with attachments, cleaning wheel.
- Welding machine with electrodes, mask.
- Rolled metal and metal profiles of different sections. It is better to use a profile with a small cross-section, because it is easier to cut and shape it.
Sketches of metal railings
Before starting work, it is very important to think through a sketch of the railing. It is important to take into account that the finished railings must correspond to all the interior features of the house.
You are unlikely to be able to implement a very complex project at home. Because this requires a forge and a pneumatic hammer. Choose a more modest, but no less attractive design.
Pre-prepare the assembly area. The site should have a special coating on which you can draw steps on a 1:1 scale. To do this, you need to take measurements. Measure the height and depth of all steps. Now draw the silhouette of the stairs on the prepared area. Then outline the outline of the railing.
The pillars should be spaced 10 cm from the first and last steps. This is necessary for reliable and durable fastening of the railing posts.
We come up with a pattern and implement the idea
After you've drawn the frame, think about the pattern. For example, these could be balusters that resemble a vine. It can be decorated with metal sheets sold in specialized stores. Use easily erasable chalk for drawing.
When you have made the pattern, take a string and use it to determine the length of each individual curl. To do this, attach the lace and measure the length. Cut the profile according to the measurements. Moreover, the profile should have a slightly longer length. This reserve will help you make fewer mistakes. If it is unnecessary, you can always cut it off.
Let's start forging and welding the frame with a pattern
You need to give each prepared segment a shape that is designed according to the pattern. Using a forge at home is impossible, so you will have to bend the profile cold. To do this, of course, you should be patient.
Manufacturing of metal railings
Use a hammer and vice for this. Insert a section of profile into them and try to bend it with a gas wrench. A few tries and you'll get the hang of it! Then, if necessary, you should trim off all the extra centimeters from the pattern elements. The resulting forged elements must match the pattern with maximum accuracy.
Now you need a welding machine. First, connect the fence frame. Lay out the required shape from the profiles and weld them together. It is better to make the seam temporary, so that in case of an error, it can be corrected without unnecessary labor costs. Now fill the frame with forging elements that create a pattern. Fit piece by piece, locking them in place. Apply spot sutures that can be separated in case of urgent need. If at the end of the work no errors are identified, turn the railing over to the other side and weld all the seams properly. Return the structure to its original position and weld on the opposite side. Now weld forged decorations that will enrich the structure. The finished section should be installed without any deviations.
Working with a welding machine
Clean all seams so that they are aesthetically attractive. This process is carried out using a grinder with a grinding wheel. Pre-protect your eyes from sparks by wearing special glasses. Then attach a metal brush to the unit and thoroughly clean the surface of the railing. This will remove defects, rust and unevenness.
The final stage of production - painting
Coloring
You can paint the railings with a brush or spray. Don't forget to prime the metal before doing this. Interestingly, only white primer will hide small irregularities, which will make the paintwork smoother. When choosing paint and primer, pay attention to the composition, because they must be compatible. Each layer must dry well.
If you want your wrought iron railings to look chic, you should apply a wrought iron patina. So, you can decorate some forging elements. The manufacturing process is now complete. All you need is to install the fence in a permanent place.
Do you already have experience in manufacturing and installing railings? Then write us comments. Your experience will be useful to us!
Conclusion
Having experience working with wood or metal, making your own railings for a wooden staircase will not be difficult. Purchasing ready-made parts will make this process especially easier. True, this will lead to a slight increase in the cost of manufacturing the product (see also the article “Staircase on a metal frame made of wood: advantages and process of manufacturing combined structures”).
From the video in this article you can get some additional information on the topic discussed.