Active use of bathrooms leads to the formation of a special microclimate in these rooms. High humidity and constant temperature fluctuations contribute to the accumulation of condensation on surfaces, followed by the appearance of fungus and mold.
Especially often, fungal colonies grow in places that are difficult to reach for cleaning: tile seams, cracks, joints between plumbing fixtures and tiles. Special sealants can prevent destructive processes.
Previously, cement mortars were used to grout joints and plug cracks. However, practice has shown their fragility in conditions of high humidity, temperature and the presence of various kinds of microorganisms.
In modern construction, sealants are used for various external and internal works.
Application and performance characteristics
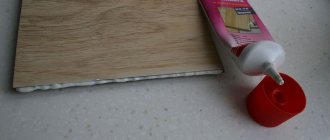
Transparent and translucent silicone sealant is used for various works: sealing joints between countertops and walls, bathtubs, shower stalls, toilets, sinks, etc.
It is also used to process gaps during pipeline installation. High-quality silicone-based sealing mixtures also have antiseptic characteristics, so they can be used to insulate window and door systems inside or outside the house without worrying about fungi and mold.
The main performance characteristics of conventional silicone plumbing sealant include:
- High level of elasticity of the hardened composition.
- Possibility of use for processing moving parts, elements, structures.
- Fully resistant to steam, condensation and water.
- Resistant to UV exposure and household chemicals.
- High level of adhesion to glass, ceramic, tile, stone, concrete surfaces.
- Wide operating temperature range (from -40 to +100o).
- Resistance to biological influences (fungi, mold, insects).
What does it contain?
The production of silicone sanitary sealant is based on silicon (it is from it that silicone polymer material is obtained). Sealing compounds made from silicone also include various additives:
- Manufacturers must add a fungicide to the product. It is necessary to provide a bactericidal effect and prevent the occurrence of mold lesions.
- To reduce the viscosity of the mixture, organic extenders are used.
- Mechanical fillers (manufacturers usually use glass or quartz dust, chalk and other suitable components) can improve the quality of the connection with different surfaces.
Important! To obtain a sealing mixture of a certain shade, dyes (colors) are used. They are added immediately at the factory, because silicone sanitary sealants, taking into account the instructions for use, as well as the specifics of use and operation, cannot be painted after application.
Scope of application
For those who decide to resort to the help of this super product to carry out the sealing process in the bathroom, there is no question of choice. Silicone sealant is used, as a rule, to create seams between plumbing fixtures and the walls of the room so that moisture does not get into these gaps. Transparent plumbing material is used for connections between sewer and water pipes. Sometimes a special FUM tape is also suitable for these works.
One type of sealant for sewer and water supply pipelines is epoxy resin. But first it is mixed with a hardener. In this case, it is imperative to follow the instructions for creating such a sealed product.
As for the treatment of cast iron pipes, standard plumbing sealant is used for them.
There are actually a lot of areas for using silicone and polypropylene compounds in an apartment. And we are talking here not only about the treatment of a water block, a bathroom, and so on. Sometimes caulk is used to seal the seams between the window frame and the opening.
It is very convenient to use white sealant when installing a toilet
This type of plumbing contains a large number of points that are worth paying special attention to. Thus, the water hose that supplies liquid to the tank has a unique shape, which can be sealed either with FUM tape or neutral silicone sealant
To seal a pipe duct in a cable duct, you can use either standard neutral or acidic sealants, or Portland cement, which is more powerful in its properties and functions.
Manufacturers
Among the most popular companies producing sealants, it is worth highlighting four main ones.
- Ceresit. German products with European quality, standards and practicality. The sealants of this brand are known for their best adhesion to the surface being treated, excellent waterproofing properties and the presence of special additives that protect the room from mold and germs.
- "Moment". The brand, founded by a German chemical company in Russia, has a large number of necessary construction assistants. Among them is the very popular “Moment-Germent”. A large number of varieties of sealants from this company allows any craftsman to choose his own product. Unique products include frost-resistant, high-temperature and restoration options.
- Ciki Fix. The Turkish manufacturer is also among the top four leaders in the Russian construction market. A characteristic feature of this company’s sealants is its extraordinary ability to bond surfaces of different textures together. The seams are waterproof and elastic, but do not protect against fungus and mold.
- Makroflex. Another high-quality brand comes from Germany, but with Russian production. This is a modern and timely solution to any construction and finishing tasks. The company produces a variety of sealants that cope with both internal and external use.
When choosing a plumbing sealant from this variety, the main thing is not to forget its true purpose. And we must use this construction miracle correctly with maximum efficiency.
Water supply
A common problem with the appearance of puddles near the toilet is the depressurization of the connection between the water pipe and the tank fitting. In modern models, plastic components are found. Therefore, during operation, the threads can wear off and thus the seal is destroyed.
This problem can be resolved very simply. Shut off the water supply with a shut-off valve. The hose is twisted and flax or fumlent is wound onto the thread. Screw it back. If the leak stops, the problem is resolved. If not, then you should repeat the procedure, increasing the layer of sealing material. Another reason could be a crack in the plastic fitting. In this case, it should be replaced with a new one.
Method 3: fastening with taffeta
It is ideal to attach the toilet to taffeta in case of a wooden floor. It is better to place nails nailed on the back side of the taffeta in a checkerboard pattern. They should protrude approximately 1-2 cm above the front surface of the part. This provides better grip on equipment and long-lasting stability. It is better to entrust the fastening of the toilet to the floor with taffeta to specialists, however, if you make an effort, you can do it yourself.
It is necessary to prepare a recess in the floor where the cement solution will be poured. It is better to do this with the provided plumbing tools. If the floor is concrete, then it is better to use a jackhammer. But this must be done as carefully as possible. The recess should be smooth and have clear corners corresponding to the corners of the toilet base.
This form will prevent the occurrence of unwanted gaps between the product and the floor. After this, you need to pour the cement mortar. Taffeta is sunk into it downwards onto pre-prepared anchors. The result is taffeta that is flush with the floor.
The solution dries within 12 hours (sometimes longer). Next, the installation of equipment begins. The product must be fixed with special screws, under the heads of which washers-gaskets must be installed. Such elements are made of rubber. They prevent possible failure of the frame.
Construction experts recommend lubricating screws with a special substance - graphite or grease. This makes it easy to unscrew them if necessary.
The taffeta under the toilet bowl is easily replaced with a rubber backing. It is cut from a sheet of material, the thickness of which varies between 5-15 mm. A classic example is an old rubber mat, which is usually placed in the hallway or on the landing. Remember that the backing should be approximately 1-2 cm smaller than the toilet support post.
Open toilet installation sequence
Compared to the time and effort required with the closed method, the open method requires much less. But if you look from the aesthetic side, it is worse, due to the fact that the fasteners are visible from the outside of the toilet walls.
Do-it-yourself installation of a toilet with sealant using an open method is carried out in the following sequence:
- You need to place the toilet in the required place. It is also recommended to connect it with corrugation to the sewer pipe in order to calculate the location as accurately as possible. Toilet with sealant
- Using a pencil, make marks where the bolts will be located. Here you need to keep it level so that the holes do not move.
- You also need to circle the base of the toilet around the perimeter. This is where the sealant will be applied.
- Set the toilet aside and make sure everything is exactly the right size using a tape measure.
- Scratch the tile glaze with a core. This will make it possible to install the drill so that it does not “float”.
- Holes through the tiles are made with a glass drill. Be sure to turn off the impact mode in the drill or hammer drill so as not to break the tiles.
- Once you reach the concrete, change the drill bit with a pobedit tip and turn on the rotating impact mode on the tool. Carefully drill holes to the size of the fasteners (anchors or dowels).
- Thoroughly clean the holes from dust and debris. Seal them with sealant. It will act as a waterproofer to prevent water from accidentally penetrating under the tiles, and will more securely secure the elements in the holes. It is imperative to ensure that water does not get into the holes made, since then the sealant may simply not set and the seal will be destroyed.
- Along the contour that was outlined earlier, it is also necessary to apply sealant to avoid moisture getting under the base. Installing the toilet on the fasteners
- Place the toilet in exactly the right place and insert the fasteners. If everything is done correctly, they will go in without problems. It is advisable to place a plastic or rubber gasket between the head of the dowel or anchor so as not to overtighten and damage the base of the toilet. Tighten the nut or self-tapping screw. It is also recommended to use special plugs to prevent water from entering.
After installation, it is also advisable to immediately remove all excess sealant with a regular rubber spatula. When working with drills, try not to overheat them, as there is a high probability of “burning” them, which can lead to complete failure. This completes the installation of the toilet on ceramic tiles using the open method.
Preparatory work
To install a toilet on a tile base using sealant and then connect it to various communications, the following materials and tools are required:
- toilet;
- pipe (preferably corrugated);
- ball valve;
- cold water supply hose;
- sealant (any kind, as long as it is waterproof);
- sealant for connections;
- drill for glass and concrete;
- hammer drill (you can also use an impact drill);
- a set of open-end and adjustable wrenches;
- screwdrivers;
- core;
- hammer;
- pencil.
Depending on the type and characteristics of the toilet base, its installation on a tile base can be carried out using two methods: open and closed. The first type involves the protrusion of the bolts that secure this type of plumbing. The second, as is already clear, is their hidden location inside the toilet body itself. But let's take things in order.
Use of adhesives
One of the most versatile methods of attaching a toilet to a tile floor is gluing. Modern industry offers a whole line of products designed for reliable fixation of plumbing fixtures. Often these are simple products that are applied immediately (liquid nails, sealants); there are also two-component compositions, the most famous of which is epoxy resin.
For those who want to achieve excellent results and are not afraid of work, we can recommend an adhesive composition based on epoxy resin, which has been used for decades. Its composition:
- 100 parts epoxy;
- 20 parts solvent;
- 35 parts hardener;
- 200 parts of cement.
First, take the resin and bring its temperature to 50 degrees in a water bath. The solvent is introduced, followed by the hardener. The mixture is stirred all the time. Cement is added last. The resulting mass has sufficient fluidity; when it hardens, it firmly fixes the mating parts.
While the glue is being prepared, you need to prepare the surfaces. To do this, simply sand the base of the toilet and the tiles with coarse sandpaper. An adhesive mass is applied to the base. The layer must be at least 4 mm, otherwise it will not be possible to completely fill possible irregularities in the tiles and the base of the bowl. Place the toilet in place, press down firmly and leave until completely hardened.
Even a novice repairman can install a toilet on tiles with his own hands. The main thing is not to rush and not to forget that you are doing this for yourself. Just try, spend a little time and everything will work out, and another useful skill will appear in the home master’s collection of skills. Related article: How a toilet cistern works
Where should I start?
In order to carefully remove material glued using the “liquid nails” composition, it is important to take care of safety in advance. If it is glass or mirror it is recommended:
- cover the area below around the dismantling site using thick cardboard or spreading thick burlap;
- the glass surface of the decor to be removed must be protected by placing a wide piece of tape on top (this will minimize the appearance of cracks and chips and will prevent fragments from injuring your hands in case of an unsuccessful operation);
- in order for the surface of the glass to peel off, you will need to use a hot air stream, turning on the hair dryer at maximum, which will help soften the layer of dried glue and gradually remove the decor (mirror or glass, tiles) from the glued surface;
- you need to constantly hold the material with your hands so that it does not spontaneously slide down and break or deteriorate;
- You can pry up the material with a regular construction spatula to catch on the edges and corners, and then begin to carefully remove it - separate the coating or decor using string wire.
Right choice
On sale you can find silicone sealant in a tube, in cartridges or in spray form. The most common is the first storage method, but to remove the substance from the packaging you must additionally purchase a special construction gun.
When choosing a product for sealing plumbing fixtures in a bathroom or toilet, it is imperative to pay attention to the composition and intended purpose of the product.
There are white and colored products on sale, since the sealant should not stand out against the background of the objects being processed. After uncorking the package, the substance retains its properties for only a few days, so you should try to use it completely within 2-3 days.
When choosing, you need to pay attention to the following factors:
Undamaged packaging
If there is even the slightest crack in the package body, the substance can harden and dry out. It can no longer be used for its intended purpose.
Place of purchase
Give preference to large hardware stores. Do not buy any repair products from small stalls or markets.
Remember that the right product is half the success.
How to replace
There are two replacement options:
- Call a plumber.
- Replace it yourself.
The first method is good because you don’t have to look for a gasket or disassemble a toilet whose design is unknown. In addition, you must have a minimum set of tools.
The second method is more profitable in terms of saving money. But here you need to have at least a little experience and the necessary tools.
Removing the tank
Dismantling the tank begins with turning off the water in the plumbing system. To do this, you need to close the valve. After this, you need to disconnect the flexible hose. In order not to unscrew the hose along with the fitting, you need two adjustable wrenches. In most models, the tank is screwed on with two bolts, but there are models with three and even four bolts. If the nuts are not rusty, then there will be no problems. If the bolts are covered with rust, use a grinder. After this, carefully remove the tank.
Replacing the gasket
After removing the tank, you need to remove the rubber gasket and install a new one in its place. Then you need to connect the tank to the toilet. First make sure that there are rubber gaskets under the bolt heads. You need to tighten the bolts with a wrench, tightening each bolt in turn at a certain number of turns. It is necessary to monitor the tightening force so that the ceramic does not crack.
On the shelf
There are several design features for attaching the tank. This is a special shelf that extends beyond its body. To ensure tightness, round or oval gaskets are used. The sealing of the connection depends on the quality of the gaskets. During installation, you must pay attention to the tight contact of the gasket plane to the toilet and the tank. When tightening bolts, the main thing is not to overdo it. Remember that ceramics is a fragile material.
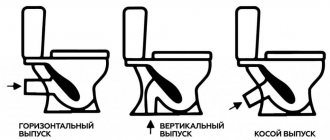
In toilet designs, three types of shelves are used to receive sewage:
- with horizontal outlet;
- with oblique release;
- with a plate-shaped horizontal shelf.
The dish-shaped and horizontal shelves have one drawback: water is retained in it. With a high content of iron and calcium, rusty spots appear on the surface of the shelf, which have to be dealt with all the time. These types of shelves were used in older designs. Modern toilets have an oblique shelf. To flush sewage in such toilets, less water is needed.
Separate location
Designs with a separate tank location are rarely used for several reasons:
- flushing of sewage with water occurs with great noise;
- primitive design.
Toilets with a separate tank have been known since Soviet times. There are some models with a separate tank, but they try to hide it behind a plasterboard wall.
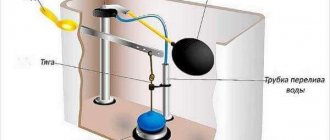
The tanks are:
- compact;
- built-in;
- mounted
The built-in and wall-mounted ones are mounted separately from the toilet and connected to each other by an overflow pipe.
Tank installation
A special place is provided for installing the tank on the bowl. It is necessary to tighten the cistern body with the toilet using special winged screws. Built-in or wall-mounted ones are installed separately and fixed to the wall with special fasteners. In most cases, they try to hide mounted tanks behind a false wall.
Leak at the junction between the bowl and the tank
One of the common reasons why a toilet joint leaks is a misalignment or damage to the gasket. If you just bought a new toilet, and there is dripping at the junction with the tank, it is due to improper installation or a defective rubber gasket.
If the toilet has already been in service for some time, the reason is probably a cracked gasket or a misalignment of the tank (for example, someone pressed hard on it from the side). It should be clear to you what to do if the joint between the bowl and the tank leaks due to the gasket - the rubber seal needs to be replaced. The algorithm of actions is quite simple:
- turn off the water supply and drain the water from the tank.
- blot the remaining water at the bottom with a sponge or rag, otherwise it will flow out onto the floor;
- unscrew the water supply hose from the tank;
- Unscrew the screws that hold the tank on the toilet shelf, after which it can be dismantled;
- unscrew the locknut that holds the drain;
- install a new gasket, coating it with silicone (gaskets differ in shape and size, so it is better to choose according to your own example);
- put everything back together in reverse order.
Fill the tank with water and make sure there are no more leaks at the junction.
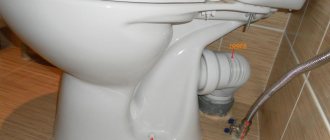
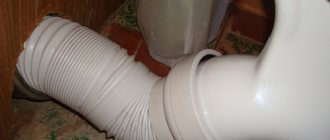
What to do if the corrugation leaks
If the toilet bowl leaks or drips, you can also deal with this problem yourself. Most often the reason is a dried out seal. Over the years, the rubber membrane loses its elasticity and may crack, resulting in gaps through which water leaks from the drain hole onto the floor.
If possible, you should remove the toilet to provide more room for action, but this is not necessary. Your task is to remove the worn-out corrugation and clean the seats: the fan pipe and the outlet on the bowl.
Coat the surfaces with plumbing silicone and install a new corrugation. It should fit quite tightly. Allow the silicone to set by waiting at least 1-2 hours, after which you can check that the toilet bellows at the joint are no longer leaking.
In the case when it is impossible to dismantle the toilet or this has its own difficulties, and the corrugation cannot be removed without this, you can resort to one trick:
- try not to flush the toilet for at least one day;
- crawl under it, picking up a screwdriver (it is better to use a plastic or wooden stick);
- carefully pry up the corrugation at the junction with the toilet that is leaking;
- having protruded it, squeeze out a small portion of silicone inside;
- bending the corrugation in a circle, fill the entire cavity with silicone sealant.
This method may not be the most productive, but it is quite effective. With its help, you can urgently eliminate a leak with minimal labor costs.
Silicone
Quite a popular type of sealing compounds. The composition can be acidic or neutral. Acid ones are easier to produce and cost less, but working with them indoors is difficult - there is a strong smell until they harden. The second negative point of acidic ones is that when applied to metal, it quickly oxidizes. Therefore, it should not be used to seal steel and cast iron bathtubs. Neutral silicone sealants do not react with materials, so their scope of application is wider. But the production technology is more complex and they cost more.
Silicone sealant for the bathroom is a good solution
Both acidic and neutral silicone sealants may or may not be waterproof. Only waterproof ones are suitable for baths. They also come in one-component and two-component types. For private use, single-component ones are mainly used, since they do not need to be mixed before use.
Properties and scope
Properties and scope of application of silicone sealants:
- They have good adhesive ability. They can be used to seal joints between stone and plastic window sills, when installing sinks and other appliances into the countertop.
- It is used for sealing joints of glass, non-porous building materials (metal, plastic, glass, wood, ceramics), joining plasterboard to the ceiling, and drainpipes.
- They are characterized by increased tolerance to high temperatures and can be used to seal seams around chimneys.
- They are resistant to water and can be used to seal junctions of bathtubs and showers, sinks and other plumbing fixtures.
The main advantage of silicone sealants is that after polymerization the seam remains quite elastic. It does not crack and can be used to seal the joint between an acrylic or steel bathtub and a wall. Disadvantage: susceptibility to the appearance and proliferation of fungus. It can be solved by adding antiseptic additives. To prevent the development of mold and mildew, it is better to use silicone sealant for an aquarium or a special plumbing sealant. Both of these types have antibacterial properties.
Brands and prices
Silicone bathtub sealants are popular today and any store will have a fairly decent assortment.
| Name | Color | Special properties | Surface film formation | Release form and volume | Price |
| BAU MASTER UNIVERSAL | white | acid | 15-25 minutes | Gun tube (290 ml) | 105 RUR |
| Bison Silicone universal | white, colorless | acidic, resistant even to sea water | 15 minutes | Gun tube (290 ml) | 205 RUR |
| KIM TEC Silicon 101E | white, transparent, black, gray | acidic, contains antibacterial additives | 25 min | Gun tube (310 ml) | 130-160 rub. |
| Somafix universal silicone | white, colorless, black, brown, metallic | acid | 25 min | Gun tube (310 ml) | 110-130 rub. |
| Somafix construction | white, colorless | neutral, does not turn yellow | 25 min | Gun tube (310 ml) | 180 rub. |
| Soudal Silicone U universal | white, colorless, brown, black, | neutral | 7 min | Tube for pistol (300 ml) | 175 RUR |
| WORKMAN Silicone Universal | colorless | acid | 15 minutes | Tube for pistol (300 ml) | 250 rub. |
| RAVAK Professional | neutral, antifungal | 25 min | Gun tube (310 ml) | 635 RUR | |
| Ottoseal s100 sanitary | 16 colors | acid | 25 min | Gun tube (310 ml) | 530 rub. |
| Lugato Wie Gummi Bad-Silicon | 16 colors | neutral with bactericidal additives | 15 minutes | Gun tube (310 ml) | 650 rub. |
| Tytan silicone sanitary, UPG, Euro-Line | colorless, white | acidic with bactericidal additives | 15-25 minutes | Gun tube (310 ml) | 150-250 rub. |
| Ceresit CS | colorless, white | acidic/neutral | 15-35 min | Gun tube (310 ml) | 150-190 rub. |
As you can see, there is a very wide range in prices. Expensive sealants (Ravak, Ottoseal. Lugato) - made in Germany, Denmark, Czech Republic. According to reviews, they are of excellent quality - they have been used for several years without changes, fungus does not multiply on them. They are presented in the widest range of colors.
Inexpensive Ceresit, Tytan, Soudal serve well. These manufacturers have a wide range of both acidic and neutral silicone sealants. There are other types (acrylic, polyurethane). They also have good reviews specifically for use as a sealant for the bathroom - the joint with the wall.
Important differences between different toilets
This plumbing fixture can be presented in different types. The main differences between all varieties may be:
- Material used in the process of creating a toilet. This factor is important because the attractiveness of the product, its durability, resistance to stains, ease of maintenance and other factors depend on it. Modern beautiful toilet
- The appearance and shape of the toilet bowl, and today modern manufacturers create products that amaze with their unusual and unique appearance, due to which the attractiveness of the entire bathroom is significantly increased.
- The installation method may be different, and it is best to choose a product that can be installed by yourself. To do this, standard devices are usually purchased, which are installed in the same area of the room and using the same method as the old toilet.
- The appearance and color of a particular toilet are also important parameters, since it is important to choose an element that will simply fit perfectly into the existing room, and will also go well with other plumbing fixtures that are already there.
We invite you to familiarize yourself with the Sink cabinet (113 photos): a bedside table or cabinet for a washbasin in the bathroom, floor-mounted options, how to make it yourself
Which glue to choose
The cheapest way to glue a toilet to ceramic tiles is with a cement-based solution, but its seam will not always look aesthetically pleasing. It will also be difficult to dismantle in the future, especially if the toilet is connected to a cast iron sewer. Liquid nails also work well, but it will be difficult to replace the plumbing fixtures with new ones.
When using silicone, there is a high probability of the toilet moving or being damaged. Epoxy will quickly help to glue, but during dismantling there is a high risk that the tiles and plumbing will be damaged.
Cement mortar
Can be used if the toilet is installed for a long time. For installation you need a hammer, cement, and a chisel. The earthenware is installed in place, its outlet is connected to the sewer pipe, and the contours are outlined with a marker.
The toilet bowl is removed, and a notch is made on the tile along the drawn contour and a light chip of the top glaze is made with a hammer and chisel. This way improves the adhesion of cement to tiles. Actions are carried out wearing protective glasses.
A solution is prepared with or without sand. The consistency should be thick. The installation site is wetted, and a solution is generously applied to it along the marked contour. The toilet is placed on the solution and pressed slightly to the floor. Excess cement is removed with a rubber spatula.
Sealants
When choosing silicone sealant, you need to pay attention to its composition. Acetic
Has a strong smell and is inexpensive
Acetic. It has a pungent odor and is inexpensive.
Neutral. Dear, can be used with any material.
Sealants are resistant to UV rays, adhere well to plumbing parts, are resistant to elevated temperatures, and form a flexible, beautiful seam.
- Ceresit Sanitary. A special sealant for plumbing, it can be used in areas of increased dampness. Provides good adhesion and prevents the spread of mold. Resistant to sunlight, has a long service life. Before applying the sealant, the surface must be cleaned to improve the adhesive characteristics of the material.
- Baumit Silicone. Does not allow the spread of fungus, is resistant to ultraviolet radiation, can be used at t=+5…+35 °C. Used for fixing interior plumbing fixtures and for tiling work. Resistant to high temperatures. Release form: 310 ml tubes.
Liquid Nails
Acrylic. It is based on a water emulsion.
Neoprene. Based on organic dye.
The mixtures are not susceptible to moisture and are resistant to mechanical damage. They set quickly, so installation is carried out very quickly. The following brands of compounds are suitable for installation.
- Belife is a one-component polyurethane composition. Has high initial adhesion force. Eco-friendly, safe for humans.
- LIQUID NAILS LN-901 – the product is suitable for damp areas. You can adjust the position of the glued parts for another 10 minutes. from the moment of application. Withstands t=-29…+60 °C, can be used indoors and outdoors. Dries completely within a day. This is a universal, durable composition that is resistant to mechanical stress.
- Titebond Multi Purpose is a universal product in a light beige shade. Has a viscous consistency. It hardens for half an hour, the parts adhere tightly. The adhesive is toxic and has a pungent odor, so all work with it is carried out in protective equipment. Resistant to dampness and low temperatures.
Epoxy adhesives
The adhesion of epoxy to any surface is ensured due to the ability to penetrate into the structure of the material. Epoxy-based adhesive is available in the form of a powder, paste or viscous mixture.
- EAF is a two-component composition of high strength. Has low shrinkage, can be used in damp objects. Has good quality at an affordable price.
- Moment is a heat-resistant composition. Available in the form of a plastic mixture. Forms a sealed joint, which after drying can be painted, polished, drilled.
- Contact – can be used in damp conditions. Hardens in a maximum of 2 minutes. It needs to be installed very quickly, since there is no time to correct the position.
Possible troubles during dismantling
It is not always easy to remove a dilapidated toilet with your own hands. If the device was installed more than 20 years ago, then all fasteners may rust. Also, even during the USSR period, toilets were often embedded in a cement screed. In such cases, you will need to spend more time and effort to remove it.
- If it is impossible to easily unscrew the fastening elements or the toilet is installed on a cement screed, then you will need to break the base of the plumbing unit. For this you will need a hammer, chisel and crowbar.
- Before starting work, you need to remove all water from the toilet siphon. This is necessary so that after the “destruction” of the plumbing is completed, you do not have to deal with cleaning up liquid dirt. Water is removed from the siphon using a rag. Wipe away all the liquid.
- When starting work, it is imperative to wear gloves and safety glasses. Earthenware can break into small pieces, which can easily injure unprotected areas of the body. Apply a couple of strong blows to the base of the toilet with a hammer. Then you will immediately notice the cracks that have appeared, and subsequent blows must be applied to them. For this work it is possible to use a crowbar and a chisel. Not a single plumbing unit can withstand such pressure.
- Once the base of the toilet is broken, you can begin cleaning it. Then the base is cleaned of any remaining earthenware and cement screed. If there are rusted bolts left, they are cut off using a grinder or a hacksaw.
Useful tips
Plumbing materials, despite their strength, are very fragile. Therefore, maximum force should not be used when securing with screws or bolts. To reduce pressure, softening pads must be placed under the screw heads.
Important! When using glue, you need to thoroughly degrease the surface. If epoxy resin is used for fastening, the proportions of solvent and base substance are strictly observed.
The surface is covered with adhesive evenly, without the formation of bubbles.
Instead of wood, you can use high-quality multi-layer plywood as “taffeta”
It is important to ensure high-quality waterproofing so that the lining does not collapse prematurely
Reasons for the appearance of gaps and their size
Gaps between the bathroom wall are formed when the geometry of the room is incorrect or when the dimensions of the bathtub do not match the dimensions of the room. Even a minimal error in the slope of the wall leads to the appearance of an opening.
Gaps come in the following sizes:
- up to 1 cm (such a seam is easy to make in any way);
- 1-3 cm (most common; sealing it does not cause any difficulties);
- more than 3 cm centimeters (a gap of up to 3 to 5 cm can be sealed using a combined method, using a corner or plinth; with a gap of more than 5 cm, a polyvinyl chloride shelf should be made for the bathroom, covering the visible space).
When sealing joints in a bathroom, you should follow the installation instructions for a particular material. This will ensure the stability of the joint, reliability, and prevent possible cracks.
You can avoid the formation of gaps if you follow certain rules when renovating your bathroom:
- first finish the floor surface;
- fix the bathtub, observing all installation rules, then there will either be no gaps, or they will be insignificant;
- decorative wall decoration begins with laying tiles in the direction from the bathtub to the ceiling.
Sealants for furnace equipment
Repairing a fireplace is not possible without using materials not intended for use at high temperatures. Select special high-temperature sealants. Used as:
- means for treating cracks in masonry;
- chimney repair composition;
- fixing composition of heat-resistant gaskets to metal structural elements;
- roof sealant at the junction of the roof and the chimney.
What are they for?
Sealants for furnace equipment are used to ensure adhesion between structural elements, as well as to avoid deformation. Taking into account the characteristics of the temperature regime, compositions that are resistant to temperature changes and high heat are chosen.
For stoves and fireplaces, you cannot use sealant made of cement and sand, because it will crumble over time, and repeated work will be required to restore the sealed base.
Varieties
The products used in the repair of stove masonry are divided into 2 categories:
- Silicate compounds. Excellent for repairs in high temperature conditions. At the same time, the greatest heating is up to +1500 degrees.
- Silicone sealants. They are used exclusively for repairing objects whose temperature does not exceed +250 degrees.
Heat resistant
Used for places with maximum heating up to 350 degrees. Area of application: external joints of stoves and fireplaces, cracks in masonry, parts of heating systems, hot water systems. Not used between furnace castings and brickwork.
Heat resistant
Withstands temperatures up to 1500 degrees. Application area:
- joints between casting and masonry in the fireplace;
- combustion chambers in boilers or furnaces;
- chimneys at the joints of the seams and near the outlet pipe.
Heat-resistant sealants are used at the point of contact with the flame if a material marked “fire-resistant” or “fire-resistant” is selected at the time of purchase.
The sealant is used in the presence of cracks with a width of no more than 1.5 cm x 5 mm. List of fireproof sealants:
- Soudal is based on sodium silicate.
- PENOSIL Premium for ovens whose temperature does not exceed +1500 degrees.
- Den Braven FIRE SEALANT up to +1200 degrees.
Description and properties of toilet sealant
The sealant must be absolutely waterproof
Operating conditions in the bathroom and toilet are not the easiest. Quite high humidity causes condensation at joints and crevices. It accumulates dust and dirt, creating conditions in the joints that are favorable for the active proliferation of bacteria, fungi and mold. Since the temperature in these rooms is either high or low, moisture accumulates in the joints especially quickly.
Another feature is the likelihood of leakage . Even the most correct installation requires sealing the seams and ensuring waterproofing of all joints. Previously, seals were used for this. However, such materials quickly become unusable. Sealants - acrylic, silicone - last much longer and do not leak.
The sealant is required to be attractive . Black or gray lining of joints is not the best option in apartments where all rooms are decorated stylishly and tastefully.
There is no special sealant for plumbing. However, there are a number of compositions with optimal properties for use in such conditions.
Source
Advice from the experts
Experts advise placing the toilet (if possible) at a minimum distance from the sewer pipe, since in this case the corrugation stretches less and, therefore, sag less. A stretched pipe becomes deformed, deposits accumulate on its walls, which pull it down - this leads to potential blockages. There are times when it is impossible to dismantle a sanitary fixture. In this case, you can simply cut off the old plastic pipe with a knife and replace it with a new one.
Some disadvantages of a corrugated toilet pipe should be noted: it is easy to damage from the outside and inside. In the first case, this can happen from any mechanical impact, and in the second, from a sharp object, such as a piece of glass, being flushed down the toilet. Despite the fact that plastic is considered resistant to aggressive environments, exposure to various chemicals that are part of cleaning products still destroys it over time. From an aesthetic point of view, the corrugation does not look very nice, because unpleasant deposits inside are visible through its walls.
When to start dismantling the toilet?
The need for replacement arises for a number of reasons:
- mechanical damage to a plumbing product;
- moving to a new apartment;
- wear and tear due to age;
- major repairs;
- changing the design in the room.
You need to begin work on removing old plumbing when the new toilet is prepared for installation with all components and tools. You should begin work by reading the instructions, performing step-by-step work to dismantle the old product.
Silicone sealants
Silicone rubber compounds are suitable for plumbing installation and waterproofing. Silicone is different from other materials used to make sealants. Hardening of the mass occurs due to the absorption of water from the air.
Advantages
- resistance to ultraviolet radiation, moisture, heat, cold (temperature difference from -50°C to +200°C);
- adhesion (cohesion) with various materials;
- resistance to chemical attack (cleaning agents);
- Possibility of application on surfaces at any temperature;
- the presence of anti-fungal agents in the composition;
- elasticity;
- neat, unnoticeable seams.
Transparent and white silicone compounds are sold in stores. You can add dye to colorless ones.
Varieties
There are two categories of silicone sealants:
- One-component.
- Two-component.
The first products include acidic and neutral silicone compounds.
Acidic cleaners are an inexpensive product that produces a strong vinegar smell when working with it. It is not recommended for use on materials that react with acid (metals, marble, concrete).
Neutral substances contain alcohol or oxide impurities that do not smell.
Conditional division of sealants according to purpose of use:
- "Automotive";
- "Sanitary";
- "Aquarium";
- "Universal";
- "Electrical insulating";
- "Low modular."
Of these types, a sealant marked “Sanitary” is an excellent option for plumbing work. It can be used to install a toilet without bolts.
Two-component products include silicone sealants used in industrial production. Hardening occurs when the base is mixed with the catalyst. This is a durable and wear-resistant material.
Features of silicone-based sealants
Liquid silicone rubber, known to consumers as silicone sealant, is a one-component substance for the most effective protection of seams, cracks and joints. Divided into two types:
Acetic or sour
Refers to construction products of a low price category. A sour odor may be felt during application. The disadvantage of this substance is that it cannot be used on aluminum, marble products and materials that react with acetic components.
Neutral
They contain alcohol, oxide and other impurities that make the substance more durable. Applicable for any materials, but the price for such sealant is higher.
Sanitary
There is a separate sanitary silicone sealant, ideal for sealing seams in residential areas. It does not contain additives that could impair the performance of the product. When dry, the shrinkage rate is only 2%. This indicates that the treated seams will remain well sealed for a long time.
It can also be used as a retainer for moving parts and as a backing for plumbing fixtures. This type of sealant is often used to install toilets mounted on an already tiled floor or wall (as is the case with wall-hung ones).
Right choice
You can find silicone sealants on sale in different packages: cartridges, tubes, sprays. The cheapest ones are the usual formulations in tubes that have an elongated spout. Cartridge sealants require the additional purchase of a special gun. They are usually purchased for processing large areas.
Best before date
Sometimes sealants with expiring shelf life are sold at a large discount. You should not be fooled by tempting offers: usually the products are thicker, less elastic and may partially lose other beneficial properties, especially fungicidal ones.
How to choose high-quality sealing material?
Silicone sealant not only needs to be used correctly, but also purchased. Let's look at five recommendations that will help you choose high-quality construction silicone:
- Expiration date – It is very common to see expired expiration dates on packages. Sellers offer such goods at a good discount, but do not pay attention to such a tempting offer. Construction silicone, along with its expiration date, has lost all its beneficial benefits.
- Packaging - when choosing a material, be sure to pay attention to the integrity of the packaging, since any small crack can cause the material to dry out and be unsuitable for use.
- Purpose - on the packaging of the purchased substance it is written for what purposes it is best to use it. Buy the right material.
- Company - of course, it is best to buy goods from well-known manufacturers, as they guarantee the reliability and quality of the material. Don’t be afraid of high prices; not all global brands inflate the cost of products. For example, products of the trademarks “Ceresit”, “Titan”, “Soudal”, “Knauf”, “Moment” have proven themselves to be excellent.
- Store - do not buy sealing substances from a “dubious man” in the market. It’s better to visit a large hardware store - a specialist there will advise you and help you make your choice.
Important! Silicone sprays for sealing seams are very popular now. They can be found at any hardware store. They are very easy to use and do not require additional tools during application.
Technology for installing a toilet on tiles
As noted earlier, there are two ways to install a toilet on tiles, which directly depend on the mounting features of this plumbing equipment. So, the external fastening method is carried out according to the following algorithm of actions:
- the toilet is installed at its potential location;
- Accurate pencil marks are made along the contour of the plumbing fixture and at the attachment points;
- the marked fastening points are drilled with a hammer drill or a drill, and first a drill intended for tiles is used, and then a drill for concrete;
- the resulting holes must be cleaned of dust and debris, then carefully treated with silicone sealant and dowels inserted;
- A layer of sealant is applied along the marked contour of the toilet, on which the device is installed;
- Bushings are inserted into the mounting points, then screws are screwed in;
- in order to give the fastenings a more attractive appearance, plugs corresponding to the toilet bowl are inserted;
- excess sealant that has protruded from under the base of the toilet is removed with a silicone spatula.
This completes the installation of a toilet on tiles externally. All that remains is to connect the device to the sewerage and water supply systems, but these points will be discussed in more detail later, but now it is necessary to understand the features of the internal fastening, which is carried out in the following way:
- as with external fastening, first the contour marking of the toilet bowl and its internal fastenings are carried out, which are subject to subsequent drilling;
- then dowels are driven into the resulting holes;
- The toilet is put in place and screwed with bolts for fastening with appropriate gaskets under their heads.
The last third stage is considered the most important manipulation, since screwing the toilet tightly is not recommended due to the possible uneven surface of the floor. So, if the toilet sits tightly and evenly against the tiles, you can safely tighten the bolts all the way
Otherwise, it is necessary to adjust the base for the toilet by using cement mortar and covering the existing irregularities along the edge of the plumbing fixture. Then you can tighten the bolts to a secure locking position.
Particularly popular today is the “warm floor” system, the presence of which does not allow the toilet to be installed using any of the above methods. In this case, it is most advisable to use an elastic adhesive mass in the form of liquid nails, epoxy resin and silicone glue.
The installed toilet must be connected to the sewer system using a corrugated pipe that connects the silicone-treated toilet drain outlet and the sewer hole. The last stage of installing the toilet is to connect a flexible hose using an adjustable wrench, which connects the flush tank and the water supply pipe. If the thread of the mentioned pipe is internal, then a sealing tape is used. At this point, the process of installing a toilet on tiles is completed, and you can begin using it directly with your head held high.
How to install a new cuff
If, when draining, you notice a leak at the place where the cuff is installed, then it’s time to think about how to change the cuff. It goes without saying that you can try to fit the product onto the toilet outlet better. If the cause of the leak is a displacement of the cuff, then such actions will help.
But, in most cases, rarely does anyone do anything behind the toilet, so it is unlikely that the cuff will be moved out of place. Based on this, much more often the cause of a leak is the appearance of a crack. Some home craftsmen suggest sealing the gap that appears using silicone sealant or using other improvised means (for example, wrapping a rubber strip). But, based on the cheapness of the toilet cuff, it would be more rational to replace it. In this case, you will have a 100% guarantee that the leak will not appear again in the near future.
The work itself of changing the cuff on the toilet will not cause enormous difficulties, especially for beginners. There is no need for special skills and abilities. Besides this, you do not need to prepare any tools. All that is needed for the job is the cuff itself and a knife or chisel.
All actions occur according to the following algorithm:
- First of all, remove the old cuff. To do this, just pull it out of the sewerage system pipe and pull it off the toilet outlet.
- After this, proceed to prepare all surfaces. Carefully clean the toilet outlet and sewer pipe from deposits, rust and mortar residues (if any). If this work is not done, the new cuff will not fit correctly. And this will lead to the reappearance of the leak.
- In order for the cuff to sit securely in its place, you need to carefully dry all surfaces. If there is also slight moisture, there may not be a completely reliable and airtight connection.
- Then it is possible to coat the entire perimeter of the cuff with plumbing silicone sealant. This is done both with the inner surface of the end, which will be put on the outlet, and with the outer side of the ring, which will be inserted into the pipe. Some experts do not use sealant. According to their point of view, the cuffs themselves are quite reliable, so using additional sealing materials is a waste of money. Everything here will depend on your personal opinion.
- Now put one end (the one with the larger diameter ring) onto the toilet outlet. This must be done with little effort, but do not overdo it. The cuff must sit well in place.
- The other end of the cuff is inserted into the sewer pipe.
If desired, it is possible to additionally treat the joints with silicone sealant.
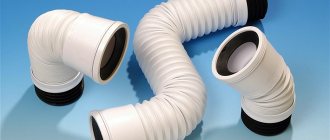
This method of replacing the cuff is suitable if the distance between the socket and the outlet is no more than 5 cm. Moreover, if they are located on the same axis, then a straight cuff is used. When shifting the axes, an eccentric is used. In this design, the axes of the cuff ring are shifted by the required distance.
If the distance between the sewer pipe and the toilet outlet is enormous or the displacement of their axes does not allow the use of an eccentric, then it is better to use a corrugation. Thanks to the flexible corrugated pipe, connecting the toilet will be easy, regardless of where it is installed.
Using sealant in an old bathroom
Silicone paste can be used to partially repair an old toilet whose joint with the floor has already lost its strength. To do this, proceed as follows:
- prepare the base - clean it from dirt, rust, plaque, remove old sealant if possible;
- degrease the surface;
- purchase sealant in a cartridge, insert it into a construction gun;
- pass the product over the seam so that it gets under the device as deeply as possible, making the line strictly continuous;
- remove excess composition with a rag;
- after a few minutes, start forming a seam using a rubber spatula (you can also use your hands in rubber gloves) - the goal is to level the silicone to the level of the surface being treated;
- After the drop has hardened and the seam is uneven, cut off with a utility knife.
It happens that the toilet cuff, which is placed on the sewer pipe, has lost its seal. It can also be replaced using sealant. To do this, you need to remove the adapter with the cuff from the rubber seal of the pipe, take out the latter too, clean and dry everything. Buy new parts: seal, adapter, cuff. Apply silicone sealant to the pipe, insert the rubber band, then lubricate the cuff with the same compound and secure it in place.
How to seal connections with your own hands - step-by-step diagram
Step 1: Surface Preparation
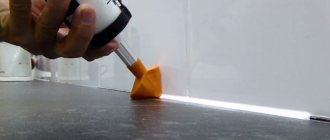
Before starting work, it is necessary to prepare the surface to be treated. We remove from it all traces of previous putty, plaster, dirt, dust, paint, etc. The presence of greasy stains is also considered unacceptable. Therefore, you first need to wash the product well, and then degrease it, for example, with white spirit, and let it dry. If you plan to treat the seam between the tiles and the bathtub, it is recommended to fill it with water. The contents can be drained only after the plumbing sealant has completely hardened. The fact is that the edges of steel baths are somewhat deformed when there is a load in the central part, so the container must take its “working” position.
Step 2: Sealing
You should unscrew the plug from the tip, and then cut the end of the nozzle at an angle of 45°. All that remains is to insert the tube of silicone into the mounting gun and you are ready to work. This stage requires caution. Slowly pressing the trigger of the mounting gun, we begin to process the seam, moving from the corner. In this case, it is desirable that the line be continuous. If you have squeezed out excess silicone sealant somewhere, you can remove it with a clean napkin or damp cloth.
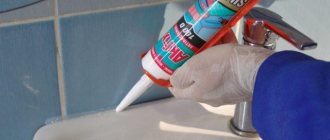
Step 3: Forming the Seam
Finally, the seams need to be formed. You can also do this with your finger; to do this, put on rubber gloves and carefully smooth the sealant, smoothing out all imperfections. However, professionals recommend using a spatula. To make the seam neat, you should moisten the construction tool with soapy water.
Step 4: Finishing
All excess is removed with clean paper. Also remember that silicone dries very quickly, so wash your hands and construction tools immediately. If the layer nevertheless sets in an undesirable place, then the sealant can be cleaned mechanically or with a special solvent.
- Author: Mikhail Malofeev
- 5
- 4
- 3
- 2
- 1
How to remove mold in a bathtub on caulk?
The method for removing fungi from silicone sealant depends on the age of formation and the extent of the spread of mold. If a small area is affected by the fungus, and very recently, it is enough to wash it off with water and treat the area with an antiseptic. Taking immediate action can ensure that there is no mold growth in the future. Otherwise, you will have to take more drastic action - change the sealant completely.
Cleaning sealant from fungus:
- Fill a small container with warm water, add a little of any cleaning product intended for the bathroom and mix well.
- Moisten a sponge in the resulting soap solution and thoroughly treat the surface affected by mold and mildew.
- Next, the cleaning solution must be thoroughly rinsed with clean water.
- After this, the area cleared of mold must be treated with any disinfectant (regular bleach will do) to prevent the development of remaining pores.
- To obtain maximum effect, bleach applied to the seam should be left for at least 10 minutes. After this procedure, the surface will not only be well disinfected, but will also shine.
- Before washing off the disinfectant composition, the treated area must be thoroughly rubbed with a brush (sponge) so that it is guaranteed to penetrate into the micropores in which mold remains are still preserved.
- After this procedure, the disinfectant can be washed off, and the surface of the sealant must be wiped dry.
The harm caused by the fungus to the human body does not appear immediately. A person inhales harmful spores along with the surrounding air. Their accumulation in the body can cause very serious diseases of the digestive and respiratory systems, as well as other organs. Mold spores pose the greatest danger to people with weak immune systems and allergy sufferers.
Bathtub sealant is used to securely fasten plumbing fixtures to walls or other parts, as well as to create a watertight joint. Which composition is better - based on acrylic, silicone, polyurethane or polymers - depends on the purpose of using the sealing mixture. A universal option is MS sealant in a tube for a gun.
Required Tools
Liquid nails can withstand a load comparable to the force applied to bolts or other fasteners. Therefore, it is convenient for them to install floor plinths. To dismantle it you only need a screwdriver. With ceiling plinths, things are more complicated: there is a possibility of damage to the walls or ceiling. Therefore, the work will require not only your diligence, but also more construction tools:
- straight screwdriver or chisel;
- wooden or rubber carpenter's hammer;
- putty knife;
- stationery knife.