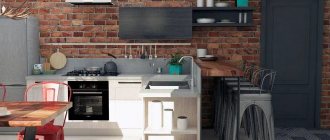
Modern kitchen sets consist of separate modules, wall cabinets, floor cabinets and pencil cases. The unifying elements give the furniture a holistic look: a single kitchen countertop, an apron, a cornice and a plinth. If you want to save money, “assemble” your kitchen in bulk from modules from series of well-known manufacturers. But be prepared for compromise solutions: it’s unlikely that you’ll be able to choose the ideal size and contents of a kitchen from standard modules. Another budget option is to make your own kitchen. Drawings of kitchen cabinets with dimensions for manufacturing will help you in drawing up a design project and subsequently calculating the costs of purchasing materials and components.
Buy ready-made furniture or make it yourself
The industry offers customers a large variety of kitchen sets. It is often possible to choose a ready-made option that takes into account the owner’s wishes. However, there are those who prefer to make furniture themselves. On the one hand, this will save a significant amount of money, on the other hand, it will require a significant investment of time and labor. Most often, the reasons why an owner wants to use a self-made kitchen are the following:
- The kitchen has a non-standard shape. If you buy ready-made furniture, it will require a long, complex and expensive adjustment.
- It is much more convenient for the owner to use furniture that was made just for her. In this case, both the physical characteristics of a person and aesthetic preferences can be taken into account. When, for example, cutting out a corner kitchen, you need to take into account the traditions accepted in the family and established habits.
- Kitchen sets are an expensive purchase. If the furniture is poorly installed or organized, it will have to be used for many years. Sometimes it’s easier to think through and make a kitchen set yourself than to look for the most suitable one.
- Some families are very limited in their financial resources. Sometimes self-made kitchen furniture is the only option available.
Having the opportunity to independently plan the installation of furniture and make it, the owner will receive exactly what he needs and at the same time save his money.
The plan must accurately indicate the dimensions of the furniture Source derevyannie-doma.com
DEPTH OF DESIGN
Anyone can become an on-site designer of kitchen and other cabinet furniture. This is possible due to the fact that each designer independently determines for himself the design depth to which he will dive. Including zero dive option. Let's take a step-by-step look at the main tasks that a field designer solves.
- 1.Search for a client
- 2. Sales meeting
- 3. Consulting
- 4. Measurement
- 5. Sketching
- 6. Design
- 7. Cost calculation
- 8. Preparation of documentation (payment for the order)
- 9. Order support in production
- 10. Delivery control
- 11. Installation control
- 12. Signing acceptance certificates
- 13. Order support during the warranty period
- 14. Post-warranty service
Some field designers make their own furniture and carry out the assembly and installation of furniture products. But these are rare exceptions. Moreover, it is recommended to concentrate on a minimum of tasks. This is the only way to increase your efficiency, and therefore productivity, which will ultimately affect your financial well-being. Trying to do all the work yourself will sooner or later affect your sales volume.
To increase sales, a successful field designer will sooner or later think about delegating the design task. That is why, as part of the project for training in planning custom-made kitchen furniture and creating any other cabinet furniture based on individual consumer projects, we offer this textbook for free - every successful designer is our potential partner. When the challenge of growth arises and the question arises of outsourcing the design stage, our partner’s candidacy will occupy an advantageous position. At this moment we can say that the depth of immersion in design becomes zero. Now the partners will be involved in the design.
A similar option may be chosen initially. Familiarity with the textbook materials allows you to understand the amount of work and level of responsibility that arises at the design stage. And not everyone has the desire to become a professional furniture designer.
Practical task
It is necessary to divide the above list of tasks of 14 points into two parts. In the first, you list the tasks that you would like to do on your own. The second contains tasks that you would like to delegate to your partners.
For each task from the second part, you need to find a business partner.
You can reach future partners through advertisements, information in the media, via the Internet, through business organizations and unions, through furniture showrooms
Video description
How to calculate a kitchen.
When drawing up drawings of kitchen furniture, you must not forget about the need to use a cutting table. The most convenient place for it is between the stove and the refrigerator. When designing a kitchen, it is important to ensure that the housewife spends minimal effort when doing the work. One of the most profitable solutions is to install a corner kitchen unit.
The height of the furniture should be comfortable for the hostess Source derevyannie-doma.com
Detailing the kitchen of your dreams
Hello, dear reader! I am glad to welcome you to the pages of bokovina.ru! I will please you with drawings and diagrams of kitchen modules. Thanks to which you can independently design the kitchen of your dreams! And these are not fairy tales, this is your achievable result.
I will give you drawings and diagrams, according to which you will calculate the detailing of your kitchen. It will be enough to indicate your own dimensions and, based on the design, calculate the dimensions of all parts. How to calculate the detailing based on the assembly diagram is explained in detail here.
Planning procedure
When planning, it is important to collect all the necessary information in advance. The diagram needs to show the exact shape of the kitchen space, the dimensions of each wall, the location of communications, ventilation, window and door openings.
The diagram prepared in this way will become the basis for further planning. It contains drawings of each cabinet. After this, you need to determine the location of various household appliances. Their dimensions must be accurately measured before indicating their place on the drawing.
The dimensions in the drawing must be accurately calculated Source derevyannie-doma.com
The next step is to indicate the location of the remaining items and furniture in this room. In this case, you need to think about installing tabletops, chairs or stools. The kitchen must have the required number of cabinets. There should be enough space for everything the housewife needs.
In the video you can find out where it is convenient to start making a kitchen:
Advantages of corner modules
- The main advantage of corner modules is the transformation of unused space into a work surface. Most often, the corners of the kitchen are difficult to use correctly.
Kitchen set, with corner cabinet under the sink
- Correctly designed corner design is many times more spacious than cabinets. The chosen fittings, which systematize the storage of items in the kitchen, are of considerable importance.
Storage system, in the form of boxes
In the form of rotating platforms
In the form of a system of “smart” shelves
- Corner sets can save significant space, so they are suitable for even the most modest kitchens .
Corner cabinet in the interior of a small kitchen
- It is elegantly designed, aesthetically and attractively, making the kitchen interior more harmonious.
- The lower part of the headset perfectly hides communications.
Harmoniously designed corner
There are also disadvantages to this design. The main one is the high cost, as such furniture is most often designed and made to order, according to individual standards.
In addition, due to damage to the work triangle, only one person can comfortably work in the kitchen at a time.
Video description
Where to start making a kitchen.
You need to think about the height of the furniture. Usually the first floor is no higher than 90 cm from the floor. For the second tier, you need to provide another 90 cm. It is convenient when the depth of the cabinets on the first level is 50 cm. For wall furniture, it should not be more than 30-40 cm. When determining the depth, the thickness of the facade is not taken into account - here we are talking only about the useful volume .
A carefully designed drawing will help you make high-quality furniture Source vstroyke.com
There are no strict requirements for the width of cabinets. In practice, it is determined taking into account the size of the kitchen space. Usually it does not exceed 100 cm. For corner cabinets on the lower level, the limit is 90 cm, for cabinets with 2 tiers - up to 60 cm.
After planning has been done, you need to consider your options for purchasing standard furniture. In this case, you will not have to adjust them. If it turns out that furniture of special dimensions is required, then it will need to be customized on your own.
Example of a corner hanging cabinet Source vstroyke.com
Designing a kitchen from scratch: 3 simple steps and examples of finished projects
Without a visual sketch to scale, it is difficult to imagine what size furniture you can afford, and whether the dining area can accommodate 2-8 people. Pre-prepared kitchen designs with dimensions in this regard greatly simplify the task: they help arrange furniture schematically and make the design process more consistent.
About custom furniture
When planning the arrangement of furniture in the kitchen, it may turn out that only standard furniture will be used. However, in most cases, shelves and cabinets are required, which you need to adjust to size yourself. This can be done at the request of the owner or due to the presence of certain features of the premises. This, for example, can happen in the following situations:
- Much depends on the placement of communications. Sometimes they are made in such a way that the owner must adapt the furniture arrangement to them.
- Sometimes there are niches in the kitchen. They can be large. In this case, they can be used to place furniture. If they are miniature, then they will have to find another use.
- When planning, you need to take into account how the outlets are located. If necessary, they can be rearranged. Finding them a more comfortable place. The issue of their placement must be resolved before work with furniture begins.
- The presence of non-standard protrusions can affect the configuration of the location of the kitchen unit.
The easiest way to account for niches or projections is to adjust the depth of cabinets and cabinets. This parameter must be changed so that it allows optimal use of the room area.
Kitchen module for oven Source vstroyke.com
How to make a kitchen set will be discussed below. Thus, a thoughtful and rational way of planning includes the following steps:
- Indicating the shape and size of the kitchen space. Here all niches and protrusions must be taken into account, with the exact value recorded.
- The location of window and door openings should be marked on the diagram.
- It is necessary to note all available communication elements. Dimensions provided must be exact and not approximate. Parameters must be obtained from technical documentation, and if necessary, measurements must be carried out independently.
- Next, on the drawings of kitchen furniture, you need to mark the place where household appliances should be located. They often use stands or nightstands, the placement of which must be taken into account when planning. Some owners may choose to place something else in the kitchen at their discretion. An example would be a washing machine. These objects must also be taken into account when planning.
- Taking into account the previous stages, you need to consider where you can get by with standard furniture, and where you will need special furniture. It is necessary to mark on the plan exactly where the regular furniture will be installed.
- Now you need to find where to put non-standard furniture and formulate requirements for its parameters.
At first glance, this procedure seems complicated, but if you neglect any of its stages, it is dangerous for the owner and will result in significant additional costs. To make things easier, you can schedule multiple times. In this case, at each step it is enough to make clarifications until a high-quality plan is obtained.
The video describes in detail the standard sizes of furniture:
Required materials and tools
Before you start learning the assembly process yourself, it is first important to prepare the necessary tools:
- Screwdriver. You will need it to tighten various parts: bolts, confirmations, screws. With their help, prepared parts of the fittings are necessarily attached. There is an alternative method of assembly - using ordinary screwdrivers, but in this case the whole process can take a long time, and not every person has such an opportunity.
- It is advisable to immediately purchase drills of various diameters. In many construction stores they are sold as a set (from 4.5 to 10mm). This will also save time on searching for all the necessary materials, especially since such a tool may be useful in the future;
- A drill for confirmation is purchased separately. In this case, you can drill a 5 mm hole in a very short time. For steps without special costs, the hole expands to 7mm;
- In order to tighten the confirmat efficiently and tightly, it is recommended to purchase a hexagon. As an alternative, some home craftsmen use a screwdriver equipped with special bits, but with this design it is impossible to get into hard-to-reach places;
- Anyone who wants to assemble cabinet furniture should have a Forsnel drill, since it is used to tighten hinges and other fittings;
- Marking supplies: ruler, pencil or bright felt-tip pen, metal square, tape measure, stationery knife;
- Circular saw;
- Electric jigsaw;
- A hammer, preferably with a nail puller (will be needed if you need to dismantle individual elements);
- Construction hair dryer.
If the furniture does not have any special features, when assembling it is recommended to use universal diagrams that are designed for a drilling angle of 90 degrees. Unfortunately, such a device cannot be called a budget option, so such a purchase is only advisable when the assembly becomes a professional craft.
Video description
Standard sizes of kitchen furniture.
You can also choose one of the ready-made projects as a basis. Then you need to make adjustments to suit the needs of your kitchen. It is easier to refine a project than to start it from scratch.
Creating a sketch will help you imagine your future kitchen Source stroyday.ru
The kitchen layout allows for a large number of options. However, it must be taken into account that there are not many initial elements for working on the plan. For example, one of the most common are various lockers.
They are divided into two main types: floor-mounted and wall-mounted. The first ones are installed on the floor. They usually have a relatively large capacity. The depth of the internal space allows you to place a lot of useful things here. This type of cabinet is often used to store the heaviest items. The following types of floor models are usually used:
- The most common are conventional cabinets, which are called straight. They contain shelves and drawers.
- To effectively use the corners of the room, specially shaped cabinets are used. They can be equipped with special door designs that provide convenient access to the contents.
- The kitchen set is made in such a way that the pieces of furniture included in it are located end to end. There are end tables at the edges. Unlike other cabinets, they must have an additional special design on the outer side.
- The sink cabinet differs from others in that it does not have a back wall. It is located under the tap. The tabletop is attached to it along the edges; the attachment point must be sealed so that moisture cannot seep through it.
- A cabinet may be required to accommodate the built-in oven. To work with it, you need to ensure ventilation.
- The use of pencil cases has become widespread. They can be used both for storing and placing household appliances.
First, the drawing indicates the shape and dimensions of the room, the location of communications. Source stroyday.ru
Step-by-step instruction
First you need to determine what cabinet furniture is made of. The most common and affordable materials are chipboard, fiberboard or chipboard. Solid wood is more reliable and stronger, but it costs more and is more difficult to work with.
Design
All instructions for creating cabinet furniture can be divided into two stages. The first is the design of cabinet furniture. This stage involves an artistic or graphic representation of all elements (drawings of cabinet furniture). This is a complex undertaking, since a project diagram must be correctly developed to help visualize the necessary functionality of the furniture.
Just a few years ago, such a project could only be developed by a qualified designer, but with the help of modern applications and programs, you can work on the task yourself. To draw up a clear plan for designing cabinet furniture with your own hands, it is worth determining what information should be contained in it:
- On a separate plan, you need to draw the general design of the room in order to visualize the position and appearance of cabinet furniture;
- All dimensions are included in the project - section dimensions, height, depth;
- All the details that will serve as the basis of cabinet furniture are worked out, drawings of facades with the required dimensions are included;
- The texture and color scheme are selected.
On the Internet you can find special 3D programs with which you can recreate absolutely any furniture project. In the functions you can set special parameters and even select the material from which you plan to create the desired interior items. The main advantage of such services is that there is no need to study information on how to calculate dimensions or draw “the old fashioned way,” especially since not every person has such skills. The finished version is printed on a printer as a photo project, and then it’s a matter of technique and practical skills.
The graphical drawing of the overall project determines the success of the planned business, but the creation of details is an equally important undertaking. First of all, everyone should think about what functions the furniture should perform and only after that start drawing. Correct sizing is a determining factor in the success of all further assembly. Otherwise, the part may not fit into place, which means that its shape will need to be adjusted, which means additional financial expenses. Even if the plans include making an ordinary storage cabinet, each detail should appear from a separate perspective in the drawing:
- Back wall;
- Front Panel;
- Side walls;
- Each shelf;
- Door.
As for the parts that will be retractable, they are also drawn separately from the rest.
We create the overall design
We take measurements
We create color design
Creating parts
The production of parts is carried out according to the general instructions:
- Selecting the material from which the parts will be formed;
- Creating a project on a computer using a 3D program or drawing by hand on whatman paper;
- Making patterns by printing on a printer or making patterns by hand;
- Transferring blanks to the material by tracing patterns with a pencil or bright marker;
- Sawing using a high-performance machine;
- Edge processing, grinding if necessary;
- Drilling holes for fasteners.
Choosing manufacturing materials
Let's make a project
Creating patterns and cutting materials
We cut chipboard
Sanding the coating
Making holes
Video description
Lessons Pro100.
Corner kitchen table. For each piece of furniture you need to make a drawing indicating the dimensions. Based on it, a material cutting map is drawn up. Having determined all the needs for it, you can decide how much of it is needed. In this case, you need to buy fittings, materials for making legs, and for decorative elements. For example, a drawing of corner kitchen furniture must contain the exact shape and dimensions of the cabinet and all the necessary fittings.
It is recommended to purchase not only the required quantity, but also an additional 10%-15% of materials. Having the professional skills to perform such work is important.
One of the options for inserting a sink into the countertop Source stroyday.ru
In the process of work, it is not necessary to act only independently. There is always the opportunity to contact specialized companies to perform some work. This may increase costs, but will guarantee the high quality of the work done. In this case, the owner will receive the following benefits:
- Such companies operate on efficient specialized equipment. This level of quality is difficult to achieve when making it yourself.
- The work gets done much faster.
- The owner is not faced with the need to remove debris left after carpentry work.
- The company that took on the work is responsible for the quality of workmanship. If there is a defect, the furniture will be remade and the customer will be paid compensation for damages.
- When purchasing raw materials, it is important to cut the material correctly. If professionals do this, they will do it optimally, minimizing the generation of waste. This will result in a significant reduction in furniture manufacturing costs.
Thus, when creating a headset yourself, it makes sense to entrust some or all of the work to specialists. This will allow you to achieve the desired result in accordance with the layout of the kitchen. The furniture will be made by professionals with their inherent high quality of work.
Various types of fasteners for kitchen furniture Source stroyday.ru
INFLUENCE OF EDGE ON DIMENSIONS OF PART
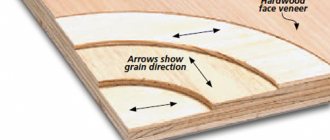
For 16 mm laminated chipboards, edge material (hereinafter referred to as edge) with a thickness of 2 mm and a width of 19 mm is mainly used. When processing a part, excess edges are cut off and a chamfer is formed (Fig. 1). There are two important conclusions from this:
- — the edge reduces the size of the parts;
- — a chamfer on the edge of a part requires changing the dimensions of adjacent parts.
It is obvious that edge thickness reduces the size of the part. For example, if you need to make the side of a wardrobe with a depth of 600 mm, then such a part dimension can be obtained using an edge 2 mm thick only due to the fact that the depth of the part itself (saw size) will be equal to 598 mm. If such an edge is applied not only on the front, but also on the rear end of the part, then the size of the part will be 600-2-2 = 596 mm.
Using furniture design programs allows you to forget about these “little things” - the part is designed to be 600 mm in size, then an edge is applied to the specified ends and the program itself calculates the saw dimensions of the part.
The situation is a little more complicated with the influence of the edge on neighboring parts. Figure 4 shows an example when parts are placed without taking into account the thickness of the edge (for example, a side panel in a section on the right and a shelf on the left).
Fig.4. The appearance of a gap due to a chamfered edge
The resulting gap spoils the appearance of the product. Therefore, the part on the left is recessed by 2 mm (Fig. 5).
Fig.5. Correct placement of parts.
Considering that there can be a lot of parts and they can be located in relation to each other very differently, some care is required in determining the dimensions of the parts. Figure 6 shows an example of taking edge thickness into account.
Fig.6. No edge gap design
In Figure 6, parts 1 form the width and depth dimensions. Let us assume that the dimensions of parts 1 are as follows: width 600 mm, depth 300 mm. And let’s also assume that the 2 mm edge is applied only from the front part of the product. In this case, the depth of the sidewalls 2 will be 298 mm. Shelf 3 is recessed 2 mm narrower in relation to the sides 2. Therefore, the depth of part 3 will be 296 mm. Therefore, partition 4 will be designed with a depth of 294 mm, and shelf 5 - 292 mm. Thus, due to the thickness of the edge, the difference in depth between parts 1 and 5 was 8 mm!
It should be noted that such a principle cannot always be applied. There are exceptions when the designer is forced to make parts of the same depth and sacrifice aesthetics for functionality. Or, from an aesthetic point of view, you have to choose the lesser evil. Fortunately, the designer always has the opportunity to “play” with the details and change the design. Therefore, exceptions are very rare.
Similarly, a 1mm edge should be taken into account.
The 0.4 mm edge is usually neglected (especially in kitchen modules). However, it is recommended, with the exception of kitchen modules, to treat a 0.4 mm edge as a 1 mm edge. Those. recess adjacent parts 1 mm deep. This must be done for the reason that the error of sawing and additives in total is 0.5 ÷ 1 mm. Without recessing the parts, a situation is quite possible, for example, when the shelf appears to protrude in relation to the sides and the unlined ends become noticeable.
Practical task
Create several projects in the design program* with different combinations of partitions and shelves, taking into account an edge thickness of 2 mm.
Among furniture makers in Minsk, the design program “Basis - furniture maker” is most often used for design. In further lessons, any mention of software will mean “Basis” software products.
How to assemble
After the components of all units of kitchen furniture have been manufactured, the time comes when it is necessary to begin assembling them. To do this, you need to separate all the blanks into sets corresponding to individual items.
Before continuing work, you need to check the furniture configuration. All necessary elements must be present. It is important to ensure that they correspond to the required dimensions. Assembly must occur sequentially. This will reduce the risk of making a mistake.
Fasteners for hanging furniture Source novamett.ru
Which product shape should I choose?
Trapezoidal shape corner kitchen cabinet Attached shape corner kitchen cabinet L shape corner kitchen cabinet
Once you decide on the dimensions, it’s time to think about what shape of the product you would like to fit into your kitchen space. We list the three most important varieties:
L-shaped cabinet - this form of cabinet is distinguished by the fact that the best door shape for it is folding, like the one used in trolleybuses. This way you can view the internal space to the maximum, which, by the way, can be turned from ordinary shelves into a carousel with the best angle of rotation.
A wall cabinet of this shape will serve as an excellent space saver. The cabinet itself is also good because it can successfully accommodate a sink. Since in Soviet apartments water supply and sewerage communications are usually located in the corners, you do not have to extend the pipes.
The attached design is a less convenient option for locating the cabinet. A small cabinet with a door at an angle of 90 degrees is added to the blank cabinet located in the corner. The problem is that with this arrangement you only have access to the interior of the smaller cabinet. This design also allows you to place a sink, but the plumbing fixtures are placed in a blind module, and space for dishes and kitchen utensils is provided in an accessible one.
Remember that when placing the sink in a blind section, you significantly complicate access for a plumbing specialist in case of need for repair work, and if the sink is removed from the blind cabinet, it will remain empty and useless.
However, practice shows that it is better to place the sink in another place, and equip the empty cabinet into a place for cooking or put a microwave oven there.
The space in the accessible module can be equipped with a carousel with a slight rotation angle or pull-out baskets.
A cabinet in the shape of a trapezoid is an original and stylish option, which however has its drawbacks. This form has one door, and sections of the kitchen unit are adjacent to it on the sides. The trapezoidal cabinet looks quite solid, especially in kitchens with a large area, but it is not entirely rational.
Firstly, the straight door makes it difficult to access some areas of the cabinet, especially near the wall. And secondly, it is better to avoid installing a carousel and a sink at the same time in such a cabinet at the same time, since the first, due to the force of friction, will constantly damage the second. So it’s better to put a microwave or other equipment on the cabinet.
Ready-made corner kitchen cabinet
Installation of facade, sink, plinth
You can install a façade, plinth, sink, etc. on the finished frame.
The façade is secured with hinges. Recesses (milling) are made on the doors for the hinge cup. Depending on its size, the diameter of the recess is different. It is advisable to order milling for hinges when cutting. It is not expensive, but it will avoid additional work, possible errors and the need to purchase a special Forstner drill.
Fig. 13.
Installation of hinges for fastening the facade.
When installing doors in corner cabinets, it is necessary to use hinges with a non-standard opening angle.
Fig. 14.
Features of installing a door in a corner kitchen cabinet. Special loops are used.
After the doors are installed, you can install the handles.
For the kitchen plinth, a piece made of chipboard or a special plastic strip can be used. Using the latter is preferable, as it is protected from moisture and will last much longer.
The plinth strip is attached to the legs of the kitchen unit. It is advisable to recess the base into the body of the kitchen unit by 7-10 cm, so it will be more convenient to use the kitchen.
Fig. 15.
The base is secured to the legs with special fasteners that come with the legs.
Most sink models cut into the countertop. Using the template that comes with the sink, mark the cut line. After preparing the hole, the sink is installed using special fasteners.
Fig. 16.
How to install a kitchen sink.
Drawings of kitchen units
Fig.21.
Drawing of a kitchen with a corner sink.
Fig.22.
Drawings of kitchen modules.
Fig.23.
Drawings of kitchen sections.
Fig.24.
Drawing of a corner kitchen.
Apron for kitchen set
An apron is an integral element of any kitchen that decorates and protects the wall between the countertop and the top row of cabinets. It can be made of MDF or ceramic tiles.
An MDF apron can be purchased ready-made or made to order. It is attached to the wall with self-tapping screws, which are later hidden with corner covers.
Fig. 17.
Apron for kitchen set made of MDF.
How to make a kitchen apron with your own hands? It’s very simple to make it from ceramic tiles. However, this approach takes longer, because Installation work may take several days. At the same time, a tile apron is more durable and fundamental, which cannot but affect the design.
Fig. 18.
Ceramic tile backsplash.
The final element is the wall plinth. It also has a functional purpose - it covers the junction of the apron and the kitchen unit, thereby preventing dirt and moisture from entering unprotected areas.