The supporting structures for bathtubs offered by manufacturers do not always correspond to the weight of the cuvettes. Many owners, installing a bowl on factory-made fragile legs or a bathtub frame made of a thin profile pipe, doubt the strength and reliability of the existing structure. And nothing else, if the bowl is compact in size and not intended for two, maybe the frame will hold it, but when the font has luxurious dimensions and shapes, then you need to approach the issue with all care. And, if the kit does not include a strong, reliable structure, buy the latter or make a frame for the bathtub with your own hands.
How to cover the bottom of the bathtub: ready-made models
Bath screens have important functional and aesthetic significance. It can instantly create a convenient and stylistically designed storage space.
Purchasing a ready-made screen is a simple and practical solution. This is a common way to quickly and easily seal the space under your bathtub. The simple design consists of one or more panels made of moisture-resistant MDF, plastic or glass, mounted on a metal frame. The screen dimensions usually correspond to the dimensions of standard bathtubs, but it is also possible to make a custom-made screen according to your parameters. The legs of the bathtub screen are usually height-adjustable, allowing it to be installed sideways. If necessary, this panel can be easily removed.
The following models of ready-made screens are available:
Deaf
With sliding doors
With drawers
With hinged doors
Examples of each type of screen can be seen here.
Blind screens
This screen is a solid panel that completely covers the space between the bathtub and the floor. It is possible to remove it if necessary, but only entirely. Therefore, covering the bottom of the bathtub with blank panels is not a very good solution from the point of view of storage and operation.
Sliding screens
In a sliding screen, one, two or three panels are movably mounted on guides and can be moved behind each other. They are more convenient than solid models, as they can be used to close the bathtub below, while simultaneously providing quick access to communications and small items stored under the bathtub. At the same time, open doors do not take up extra space. Such screens are also easy to install yourself. Some models of this type are equipped with niches and shelves on which it is convenient to place essential household items.
Hinged screens with doors
This design differs from the previous one only in the way the doors are opened - they are fixed on hinges. Exactly how they open and close may not be very convenient in a small space.
Retractable screens with drawers
The most modern and not the most common option is models with smoothly sliding drawer compartments. With all the functional advantages, this method of sealing the space under the bathroom can be called much more expensive than those mentioned above. Installing such a screen on your own can also cause certain difficulties.
Functionality
The screen has become not just a decorative tool that allows you to hide a network of pipes, but also a way to use space economically. Especially when it comes to small apartments, where there is always not enough space to store things. Screens are equipped with shelves, niches and grilles. They have doors.
By following the instructions for creating a screen, you can decorate your bathtub and get an original decorative element
Stationary structures
Stationary or permanent structures designed to completely cover the space under the bathroom. The choice of type of design depends on the material, construction skills and the availability of free space in the bathroom.
The basis of such structures is usually made from the following materials
- chipboard;
- moisture-resistant plasterboard;
- brick;
- board;
- plywood.
The finished base can be finished in any style - usually they are painted or tiled. Also common finishing methods are the use of film, mosaic, PVC panels or artificial stone. Decorating with wood is only possible if a moisture-resistant coating is used.
Brick options
This base will allow you to reliably and thoroughly close the niche under the bathtub. You can do it yourself at relatively low cost. The solid structure consists of half-brick brickwork with cement mortar, which guarantees strength and reliability. Cladding is also usually used, masking possible defects in the masonry by sealing them with one or several layers of tile adhesive.
MDF or plastic models
It is quite easy to cover the bathtub with panels that are attached to the frame at the top and bottom. It can also be made with your own hands, either from metal profiles or from wooden blocks treated with a special moisture-resistant compound.
First, according to the markings, the profile is installed from below
Then, every 60 cm, vertical supports are attached to it
The next stage is a profile or beam under the edge of the bathtub. Its level is fixed using guides screwed to the adjacent walls
The lower part of the frame is fixed with glue or sealant
If necessary, the profile is also fixed in the center of the future screen
It is important to provide a recess for the feet even at the frame stage, because the goal is not just to cover the bathtub with plastic from top to bottom, but also to provide ease of use, as well as the ability to quickly get to communications.
Panels of the required size are cut using an electric jigsaw
They also need to provide small ventilation slots.
You can connect several panels by inserting them into hollow plastic profiles like a locking system
The plastic structure is mounted on a finished frame using screws
Drywall
The general principle is the same as described above. However, when assembling the frame, it is worth considering the thickness of the final finish (for example, tiling). In bathrooms, only special plasterboard with a waterproof coating is used. When cutting sheets, subtract 2 cm from the desired screen height.
To prevent the canvas from swelling, it must be secured at a distance of 1 cm from the edge - best with self-tapping screws. After installation is completed, the material must be primed and sheathed with any material - tiles, film or decorative plaster. The gaps between the profile and the edge of the bathtub do not need to be sealed with sealant; construction foam can also be used.
Frameless installation
Now let's look at the features of installing a bathtub without arranging a frame for it. This option is most often used for acrylic bathtubs, but is also suitable for steel products. Let's consider a step-by-step algorithm of actions.
Preparation
The preparatory stage is standard for acrylic products:
- The bathtub is turned over, and the included transverse metal beams are screwed to its bottom. You should use only original (included) screws, as longer hardware will pierce right through the bottom. To avoid scratching the sides, when turning the bathtub over, place some kind of substrate under it, for example, strips of drywall, wooden blocks, even an ordinary blanket will do.
We screw the profile for the legs. - The legs are assembled and screwed to the beams using nuts.
Installing the legs. - Also at this stage, you can pre-adjust the legs by using a tape measure and level to set them at the same distance from the floor. This will make it easier to level the bathtub after placement in the bathroom. The height of the legs is set, first of all, based on the height of the outlet of the sewer pipe. To ensure normal drainage, it is necessary that the inlet pipe is located below the siphon outlet.
Adjusting the legs. - Also at this stage, it is recommended to attach a guide to the side for subsequent fastening of the screen, since this will be more difficult to do after installing the bathtub.
Fastening the guide for constructing the frame. - The final step of the preparatory phase is the assembly and installation of the drain and overflow system.
Siphon installation.
Decorative curtain
The easiest and fastest way to cover the entire space, including the legs of the bathtub, is a decorative curtain. It masks everything unnecessary and at the same time makes it possible to get something out from under the bath at any time. In addition, the curtain is easy to maintain. You can sew it yourself by choosing a suitable material (its width should allow you to cover the bottom of the bathroom), or purchase a ready-made model. It is better to use polyester - this type of fabric leads in terms of practicality and moisture resistance.
You can secure the curtain, for example, using double-sided Velcro tape
On one side, the tape is fixed under the rim of the bathtub (most often with “liquid nails”)
On the other side the curtain fabric is attached
Another option is to install a narrow furniture pipe under the rim of the bathtub, having previously strung fastenings on it in the form of loops, on which the curtain will be held.
Curtain under the bath
It is important to note that this simple and practical option for decorating the space under the bathroom is not suitable for all interior styles. So, it will look good as a variation of country style and look extremely unprofitable in a bathroom with an ultra-modern design.
Materials for production
You can decorate your bathroom with panel panels yourself. Let's look at the main materials from which the screen can be made:
- plastic. It is simple and easy to install; not afraid of water and high humidity; may have different door configurations; wide color color; ease of cleaning; durability (can last up to 30 years); high level of strength;
- MDF. The material is moisture resistant, easy to maintain and clean; wide range, low cost. The disadvantages of the material include its short service life. In practice, this is no more than 5 years;
- mirror. The material is usually used by designers to decorate a room. This allows you to visually expand the space and make the room even larger. But glass: fragile; it needs to be constantly looked after, even minimal drops will be visible; expensive; difficult to install;
- glass. It looks beautiful, but turns out to be fragile. Tinted glass options are most often used.
Bath screen made of chipboard
To make the room even better than it is, it is recommended to provide a screen. If you additionally equip it with special niches and shelves, then you can place a lot of things under the bathtub. Not to mention that the screen can become a real highlight of the room's decoration.
Bath podium
An elegant solution for spacious bathrooms. Here you are limited only by your own imagination. Like most blind stationary structures, the base of the podium covers the entire distance between the bathtub and the floor. It is laid out from bricks or blocks and finished with mosaics or tiles. The steps are covered with an anti-slip compound.
According to its design, a bathroom podium can be monolithic or frame. The first option involves one small step. The undoubted advantages of the monolith are its reliability and strength, as well as moisture resistance. But like all blind structures, it blocks access to communications.
To create a monolithic podium, formwork that is not adjacent to the walls is laid along the outer perimeter of the future structure. If the bathtub is installed, the drain is installed and all communications are in working order, the interior space is filled with concrete. The masonry mesh is slightly recessed on top. After the structure has hardened, you can proceed to finishing work.
The frame podium is hollow inside - it can be used for storage. The metal profile is additionally reinforced with wooden beams to impart rigidity to the structure. For the construction of steps, additional intermediate logs are used. The finished frame is covered with plywood or plasterboard and decorated.
Dependence of the complexity of a structure on its shape
It is clear that the more complex the shape of the bowl in plan, the more work an independent craftsman will have to do.
According to the degree of complexity, the arrangement methods can be divided into the following options:
- Regular rectangle. Its construction will not cause difficulties, especially if the frame is installed in a niche or in a corner formed by two adjacent walls.
- Triangle with a curly outer side . Similar designs are suitable for corner baths. The sides converging at right angles are usually located in the corner of the room, the frame is constructed along the outside, and includes several interconnected frames.
- Oval . It is arranged along the contour by installing a large number of frames or broken strapping. Although there is a simpler method.
To ease the effort when installing oval and fancy-shaped bathtubs, a rectangular structure with gypsum fiber lining is constructed.
A hole is cut out in the horizontally laid top sheathing panel for the bowl so that its sides rest completely on the frame.
Image gallery
Photo from
Arrangement of an oval bath
Specifics of frame construction
Forming a hole for the bowl
Template for marking the hole on the panel
Most homemade products do not require repeated assembly/disassembly. They are arranged in a non-disassembled form, although sometimes the possibility of dismantling and subsequent construction in a new place would be very useful for those who like to move frequently.
The frames supplied with acrylic bathtubs can be easily disassembled and reassembled many times. They include, as standard, a welded frame and adjustable supports in the form of steel threaded rods with plastic attachments. They come with fasteners and instructions with a detailed step-by-step description of the actions.
How to work with a finished screen
Factory-made panels are equipped with fittings, fasteners and frames as needed.
If the dimensions of the structure correspond to the dimensions of the bathtub, then installation will not cause any difficulties.
To work you will need:
- screwdriver;
- roulette;
- building level or plumb line.
Before installing the screen, the bowl must be filled with water.
The installation steps do not depend on the shape and design of the product and are performed in the following sequence:
Measurements and markings. They are carried out to determine the installation locations of fasteners for fixing the frame. If necessary, panels are adjusted to the required dimensions.
- Frame installation. Carry out in accordance with the instructions using a building level. If the product has moving elements, then guides are additionally attached.
- Adjustment of support legs. By twisting them, they achieve maximum support of the frame against the side of the bowl. To prevent the supports from moving, the legs are fixed with sealant.
- Fastening the upper part of the frame. The junction of the frame and the bathtub canopy must be blown with foam to impart rigidity to the structure.
- Installation of panels. The blades of sliding devices are installed in the grooves of the guides, while those of hinged devices are hung on hinges. The fittings are screwed onto the doors.
- Sealing of seams. The joints must be sealed with sealant or any other available method to prevent water from getting under the bathtub.
Installing a plastic model will require the installation of additional supports to give the product rigidity.
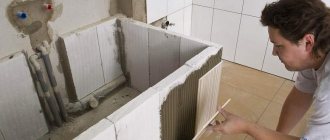
Nuances of gluing tiles
The final cladding of the partition formed under the bathtub is done using tile adhesive or liquid nails. The first option is applied to the back side of the tile with a notched trowel, and the second option is applied from a tube at several points along the perimeter and in its center.
The first tile of the tile is glued in one of the upper corners and leveled using a level, the rest will be placed next to it
To prevent the tiles from floating to the sides, plastic crosses are inserted between them, allowing you to accurately control the size of the seams between the tiles. The latter, after completion of the cladding, are subject to mandatory grouting. Otherwise, water will get under the ceramic through them, which will sooner or later lead to its falling off.
Reinforced frame
The bathtub becomes heavier after installing additional accessories. Such a bowl requires a reinforced frame. It is represented by a metal platform. Therefore, the metal of manufacture, its thickness, and the presence of treatment with anti-corrosion compounds are very important.
Tip: When buying a bathtub, focus on the frame. If it is designed with a lot of support points for the bowl, then this indicates that it is flimsy. For durable acrylic, it is enough to have support points in the corners.
Assembling a simple frame from timber and plywood
The work uses 20 mm FC - this is plywood that resists moisture well, and 100x50 mm timber. Drying oil is purchased for processing and self-tapping screws for fastening.
This model is relatively inexpensive. For the bathroom, it is recommended to choose oak beams, alder and larch. They have a high level of moisture resistance.
The bathtub frame model using plywood and timber is loved by beginners for its ease of assembly.
- The lower base of the frame is laid on the floor around the perimeter of the bathtub and secured with self-tapping screws.
- The vertical height of the supports is calculated. The first step is to measure the height of the font from the bottom point of the side to the floor. Next, add up the width of the base of the structure (or beam) at the bottom plus the width of the base of the structure (beam) at the top, plus the thickness of the plywood. The resulting amount is subtracted from the digital designation of the height of the bowl and the indicator of the brick cushion plus the width of the mortar layer is added.
- In the corners, the supports measured after calculations are lined up vertically. A distance of 0.5 m is maintained between them.
- The upper base of beams is assembled on top of the supports. Finally, a sheet of plywood is laid down and secured with self-tapping screws. A hole is cut for the bowl.
- The gaskets under the sides of the bowl are being prepared. Their thickness is calculated by summing the thickness of the tiles that will decorate the plywood and the width of the adhesive layer.
- Wooden beams are coated with drying oil. Drying time of the impregnation is 36 hours.
- To support the bathtub bowl, a pillow with a height equal to the width of two bricks is laid out from below. The base of the pillow is a concrete floor. It is important not to clog the drain hole with solution.
- Foam or solution is needed to place the font on the pillow. After this, you can be sure that the bottom is perfectly supported.