Air ducts are the transport networks of the ventilation system. Their design and installation are regulated by strict regulations and technological maps. Compliance with regulatory requirements during construction is a guarantee of flawless operation of the network, ensuring stable air exchange.
We will tell you how to install ventilation pipes in accordance with building requirements. Every developer must know the basic rules for laying and fastening air ducts. The information will also be useful for owners to understand the cause of the problem and decide how to fix it.
The process of attaching horizontal ventilation
All instructions for performing work boil down to the following points:
- Inspect the place where the air duct will pass.
- Place ventilation fastening elements on the walls.
- Install lifts and transport all parts.
- Assemble into blocks all the parts that are located separately, and strengthen the clamps needed to attach the suspension.
- Assembling air ducts using flange fastenings.
- The process of assembling and fastening the system to those elements that were previously attached to the walls.
- Check whether the installation was carried out correctly. Connect the section of ventilation that was carried out again, taking into account those blocks that are already in the building.
- Remove all devices that play only an auxiliary role and check how the assembled system works.
If the installation is carried out under the roof, parts and components must be supplied directly to the installation site. On site, they are independently connected, creating entire blocks, using special stands. Only after this, using winches, should the product be lifted and the flanges connected. They are pre-positioned in the places where they are needed. The section, which has already been assembled, is installed in place, the winches are moved, and work begins with the next link. In this way, the entire process is carried out until the work is finally completed.
Air duct installation
If the column itself is made in the form of a lattice, the process will be carried out between the braces or along the edges. When choosing the first option, you should initially secure the pipes and only then begin the main work. At the site where ventilation is installed, it is not introduced entirely, but in fragments. The second option is distinguished by the peculiarity of collecting large blocks, which should subsequently be lifted using a winch and attached with brackets.
Safety precautions during work
Most installation work is carried out at height. Lifting mechanisms are required. It is mandatory for installers to undergo safety training.
For the successful outcome of the work at height phase, it is required that:
- Work was carried out only by trained, qualified installers.
- The work site was fenced, and the passage of people near the site was limited.
- To reduce the degree of danger of installation at height, all preparatory processes were carried out at the zero level.
When performing work in private homes, reliable, strong scaffolding and inventory scaffolding are used. Work on laying ventilation pipes with thermal insulation is carried out wearing protective gloves and goggles.
The following article will introduce you to the specifics of arranging the passage of ventilation pipes through a roofing pie, which we recommend reading.
What methods are used for fixation?
The choice of installation type and fastening features is determined by the cross-section of the hole (round or square) and the location where the equipment is mounted (shaft or house wall).
For fastening use:
- The bracket is in the form of a corner, the structural elements are fastened to the corner with screws;
- Bracket in the shape of the letter Z. It is best suited for a rectangular section. Elements are also fastened using screws or screws;
- Studs and profile. To provide additional sound insulation, it is possible to use a rubber profile;
- Punched tape. The most suitable option for fixing the air exchanger in the form of a round pipe. To perform this type of fixation, a loop is made, then it is fastened to the bolt in those places where the ventilation elements are connected to each other. The advantage of this fixation option is its low cost, but this option also has a drawback: it does not have sufficient rigidity, so the pipe can vibrate;
- Fastening clamps complement well the fixation with punched tape and can significantly reduce the noise level. This method has limitations in application; it is suitable for pipes with a diameter not exceeding 20 cm;
- A clamp complemented by a hairpin;
- Anchor. This type of fixation requires a hole made in advance and a pin;
- Traverse in combination with a hairpin. The most suitable option for fixing pipes with a rectangular cross-section and large size. With this option, the support of the air exchanger is on the traverse;
- A metal beam with a clamp and a pin attached to it.
Other connection methods
The flange connection of air ducts is quite reliable, but not particularly relevant due to its high cost. It has a high level of rigidity. On the one hand, this is a plus, but on the other, a minus, since with the slightest configuration changes, unsuitable parts can simply be sent for remelting.
There are many options for fastening such a connection. But the most common is spot welding. This method is the fastest and easiest. The disadvantage of this connection is that it is not reliable enough, especially when working with galvanized parts. Since zinc can burn out during welding, there is a high probability of corrosion of the welding seam, as a result of which the fixation of the structure will weaken. To avoid such consequences, it is recommended to use corrosion-resistant rivets for fastening instead of welding.
Hood installation
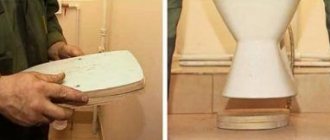
Preparation
Before proceeding with installation, choose the correct location for the equipment - gas stove + hood. The photo shows an electric stove - the recommendations are also relevant for gas objects.
Before installing a hood over a gas stove, you need to first prepare the room.
- Mark on the kitchen plan the location of all communications, as well as installed appliances, if the installation is carried out in an already used room.
- The energy dependence of the hood requires the presence of an outlet (but not above the stove!) with 220 V connected. A model with an automatic switch is preferable: it will always turn off in time if a short circuit or fire occurs. If the kitchen is not equipped with a grounded socket, the rules for installing a hood over a gas stove require that a separate RCD (16 A) be provided in the electrical panel. Connect to the network a line of three wires “zero”, “phase”, “ground” in yellow insulation with a green stripe running along it.
- The value between the exhaust device (lower edge) and the surface of the stove (burner) is measured.
- The completeness of the package is checked for the presence of the necessary fasteners, hooks, dowels, etc.
- The location for attaching the structure is marked.
Installation
- the air duct is assembled. It can be with a square or round cross-section. Standard option - size 130x130 mm It is better to choose a plastic design with smooth internal surfaces. Its diameter should be the same along its entire length, correspond to the cross-section of the ventilation hole and, preferably, have a check valve.
- Using a hammer drill, holes are drilled for the hood clamps.
- The screws are screwed in.
- Using a level, check the horizontal installation.
- The hood is hung (without a box).
- Connects to the exhaust pipe connected to the duct.
- The hood is connected to an electrical outlet. If the cord is missing or short, an autonomous line is drawn from the panel or diverted from the outlet closest to the hood. Making twists insulated with insulating tape in places where the missing part of the cord is added is strictly prohibited.
- A test run of the technical device is carried out in all modes.
- During normal operation, the final stage is to secure the box.
Exhaust equipment installation options
Comparative illustration: gas stove and electric
According to installation design, exhaust devices are:
- built-in type - the entire installation is hidden in a hanging cabinet;
- fireplace and dome type - the structures are fixed on the wall;
- island model - mounted on the ceiling;
- corner hood - placed in the corner;
- flat model - involves two planes of fixation: from the back - to the wall, from above - in the hanging cabinet.
Any of the models provides a certain type of filter elements that absorb strong odors, grease and other secretions.
Used as filters
- Grease traps are installed only in kitchens with a ventilation shaft.
- Carbon filters are elements of modern treatment systems with recirculation mode of operation.
Even if you follow the rules for installing the exhaust system and operating it, the efficiency will be reduced if preventive maintenance is not carried out in a timely manner: clean surfaces, change filters. Thus, creating the conditions necessary for a safe and comfortable stay in the kitchen is not difficult at all. Various methods are used for this. But it is the forced system with local exhaust above the stove that is considered the most optimal and common option.
Pre-launch tests
After assembling the entire ventilation complex and connecting all elements, its functionality is checked.
Pre-start tests at maximum power are necessary to ensure the following:
- all systems work correctly;
- design performance has been achieved;
- air exchange is carried out according to planned design standards, that is, the conditions for air distribution in individual rooms are met;
- smoke removal is effective;
- no vibration;
- fastening to the wall and ceiling did not reveal any flaws;
- electrical circuits do not spark, do not heat up, or short circuit.
- Heating elements change temperature evenly.
In accordance with the rules of SNiP, a trial run and adjustment of the equipment are carried out to confirm the design parameters of the system. Typically, pre-commissioning tests of a ventilation system are carried out before its industrial operation. Sometimes such launches are carried out after the completion of installation work of individual blocks or cycles. The results of intermediate checks must be recorded in reports, which upon completion will be included in the package of documents for the ventilation system.
Before a trial run, specialists must check the technical documentation to ensure that the following criteria are met:
- the equipment actually installed coincides with that stated in the project;
- installation work was carried out in accordance with technical specifications and standards;
- the degree of readiness of the installations corresponds to the operating instructions from the manufacturer;
- all deviations from the project are documented in the designer’s supervision book or other act, agreed upon and meet the requirements of SNiP;
- all identified defects were eliminated by the time of launch, as evidenced by the attached acceptance certificates.
If pre-launch tests reveal a discrepancy between the actual data and the design data, then after identifying the reasons, adjustment of the devices is necessary. The removal is carried out by the contractor installing the ventilation.
The following discrepancies are acceptable.
- A deviation of 10%, both plus and minus, in the indicators of the volume of air that passes through the head general exchange sections of the ventilation unit.
- Deviation of the volume of air flow passing through the dispensing or receiving units is in the range from -20% to +20%.
- Deviation of air volume indicators is ±10% entering special purpose buildings. These include medical institutions, in particular operating rooms, museums, control rooms and other premises where precise air conditions are required.
In the next video you will see the installation of ventilation in the kitchen.
General rules
When installing cables hidden or open, indoors or outdoors, there are several general rules:
- The optimal distance between fasteners is 40-50 cm.
- If self-tapping screws, screws, or dowels are used, they are tightened all the way so that the protruding cap does not damage the insulation.
- The cable is laid evenly, without humps. If a reserve is needed, it is placed in the least visible place.
Basically, that's all the recommendations. They are versatile and uncomplicated. The distance can be reduced if necessary. For example, at turns of the route, the fasteners are installed at a short distance from the bend point - 5-10 cm. The task is to ensure reliable fixation and prevent sagging.
Connection types
Nipple connection of the air duct
The connection of ventilation pipes to each other is carried out by welding or flanging. In addition, the elements can be fixed with a bandage, nipple or coupling.
Welded
It is possible to connect air duct fragments by welding if they are metal and their wall thickness exceeds 1.5 cm. More often, this method is used in industrial premises where harmful gases accumulate. In this case, the seams should be as tight as possible. Galvanized materials require highly skilled welding to avoid corrosion in the seam area.
Nipple
A nipple is a part of a pipe in the middle of which there is a convex rib. It is inserted into the main structure. The same rib is used for fixation. Another section of the air duct is put on the product. The joint is sealed with metallized tape.
The nipple connection is made using a coupling. Its diameter is larger than the main pipe. The coupling can combine 2 fragments of the structure. The edge in this case is located on the inner surface of the element. This method is used to connect round air ducts.
Flanged
Flange for joining two parts of the air duct
According to GOST, pipes can be connected using the flange method. Spot or solid welding is used to fasten parts. The flanges are secured to each other with nuts and bolts, as well as rivets. To ensure reliable sealing of the weld, it must be painted. A sealing gasket is placed between the steel elements. Despite its effectiveness, the flanged connection of air ducts is labor-intensive to manufacture and expensive.
Bandage
The bandage method of connecting structures is in demand at chemical industry enterprises. It provides high reliability of the joint, but the manufacturing process itself is expensive, therefore it is unpopular for domestic use. The bandage is attached over the connecting seam. Before this, the ends require flanging. The bandage space is filled with a chemically inert sealant. This method is used to connect plastic air ducts to each other.
Some nuances and points of SNiP
Effective sound insulation of air ducts.
Today, it is SNiP that regulates the correct execution of work on the installation of air ducts. Manual 7.91 to SNiP 2.0 allows you to create systems based on the data specified in it. Only in accordance with them will all the work be carried out correctly, and in the end the expected result will be obtained. This manual is intended for specialists who work with ventilation, air conditioning and heating systems. Of course, the manual can also be used by amateurs who decide to build similar structures in the house themselves. It is worth talking about the main points of this annex to SNiP in more detail.
Here, appropriate measures must be taken to protect the building from the penetration of fire. All this is included in the technical documentation of the project.
Measures and means of protection against the spread of fire include:
- placement of all air ducts and related systems within one fire-proof area of the building;
- restrictions on connecting into a common air duct systems that have varying degrees of fire safety and explosion hazard;
- the use of fire-resistant materials in the design of air conditioning, heating and ventilation systems;
- the use of a special system of valves, which, if necessary, can be closed to limit the spread of fire through the air ducts.
There are several basic systems for placing air ducts and related equipment. If the air valves on the branches are located behind the collector, then they have a reduced degree of fire safety. However, this does not mean that they cannot be used in practice. They are quite widespread due to their simplicity.
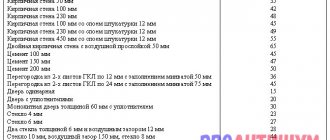
Standard distances in relation to building structures and utilities
Along with the rules for installing ventilation, there are restrictions related to the distance from engineering and construction buildings. With them, fastening ventilation ducts is not allowed:
- between the ceiling and round-type ventilation communication - 100 mm, between walls - 50 mm;
- the structure of rectangular air ducts and reinforced concrete columns should be at a distance of:
— 100 mm with ventilation side 400 mm;
— 200 mm on the side of the ventilation system from 400 to 800 mm;
- 400 mm with ventilation side from 800 to 1500 mm.
- the distance between communications and ventilation should be at least 250 mm;
- the distance between electricity cables and ventilation should be 300 mm;
- building elements and joints of ventilation systems must pass at a distance of at least one meter.
Duct selection
The choice of air duct should be entrusted to the specialists who design your ventilation and air conditioning system. Engineers will take into account all factors (aerodynamics of channels, equipment power, volume of exhausted or replaced air, etc.) and find the optimal solution, in particular, they will determine the required cross-section and material of the air duct.
Channel rigidity.
In an apartment or private house, a flexible hose is usually sufficient - due to the low noise level, ventilation will not cause any trouble to the owner. However, flexible and semi-flexible air ducts take up a lot of space, so rectangular ducts are often used as the main lines, and flexible hoses are routed directly to the ventilation grilles.
When implementing a larger-scale - general house or industrial ventilation system - predominantly rigid air ducts are used according to:
- VSN 353-86 “Design and application of air ducts from standardized parts”;
- TU-“Metal air ducts”;
Air duct material.
To move air masses with temperatures up to 80 ° C and relative humidity up to 60%, air ducts are used:
- Made from thin-sheet cold-rolled galvanized steel 0.5–1.0 mm thick
- Made of thin sheet hot-rolled steel 0.5–1.0 mm thick
If the temperature or humidity in the room exceeds the specified parameters, air ducts made of stainless steel or carbon steel with a thickness of 1.5 - 2.0 mm are used.
If there are chemically active gases, vapors, or dust in the air mixture, the air ducts are made of metal plastic, aluminum and its alloys, carbon steel with a thickness of 1.5–2.0 mm with an appropriate protective coating. The tightness of the air ducts is ensured according to class “H” of technical specifications and “B” according to EVROVENT 2/2 with a pressure and vacuum limit of 750 Pa.
Duct insulation.
The thermal insulation winding protects the air duct from condensation, which extends the service life of the system. However, in apartment or office ventilation ducts, thermal insulation can be neglected - it is required mainly for pipelines located on the street or in unheated rooms.
Soundproofing of air ducts is required mainly in residential areas - bedrooms, children's rooms. However, the noise problem can be solved constructively - using large-section pipes with thick walls or by installing vibration insulation.
The procedure and methods for installing air ducts
Before installation of the ventilation system begins, a work plan is developed. It outlines the individual stages of assembling large units. Depending on the dimensions of the structures, their masses, installation methods and the sequence of steps are chosen. Mark the fasteners and check their completeness. In the graphic part of the PPR, parking places for lifting mechanisms: winches, blocks, etc. are marked.
Only rigid ventilation lines are installed in basement and ground floors.
To pass through walls and partitions, special inserts and metal cartridges are used.
In order to minimize speed losses, the turning angles of the route are rounded with a circle radius of at least 2 diameters of the air duct.
For individual hidden areas of ventilation pipe distribution (in shafts, under ceilings), acceptance certificates for the installation of air ducts are drawn up, where the main characteristics and connections of the mounted structures are recorded. A sample document preparation is given in Appendix B of the set of rules SP 73.13330.2016.
According to Appendix A of the same joint venture, the dimensions of the holes in the walls and ceilings of the building for laying ventilation ducts must be 150 mm wider than the corresponding diameter or side of the air duct.
Installation of horizontal channels inside the building
Ventilation pipes are laid in accordance with the TTC regulations, section 07.33.01.
Work order:
- checking the presence of all necessary parts and fasteners;
- marking of fastening means;
- embedding anchors into the floor slab or support beams in the form of corners, channels;
- assembly of individual parts into larger units;
- installation of lifting mechanism;
- slinging the first knot;
- securing guy wires at both ends of the knot;
- trial hanging to clarify the center of gravity of the structure;
- lifting to the design location and securing with hangers;
- control of the accuracy of placement and unslinging of the block;
- repositioning the winch to install the next unit.
At the last stage, the accuracy of the block placement is checked, the slings are removed and the winch is rearranged for installation of the next unit.
The use of traverses when installing enlarged ventilation units helps to maintain the horizontality of structures and avoid deflections and breaks. Air ducts may only be attached to roofing trusses in units
Assembling vertical air ducts using the “build-up from below” method
The installation process is carried out according to TTK 07.33.05 and consists of a sequence of the following technological operations:
- Installing a lever winch above the installation opening.
- Slinging the first part by the head attached to the flange.
- Raising the first element slightly higher than the height of the second element.
- Connection of the second and first parts of the ventilation pipe with a flange connection with gaskets.
- Raising connected elements No. 1 and No. 2 to the height of the third part.
- Attaching the bottom of part No. 3 to elements No. 1 and No. 2.
- Building up the structure in a similar way until the parts are completely used.
- Installing the ventilation pipe in the designed position.
At the end, the correct location is checked, secured to the consoles using clamps or flanges, and lifting devices are removed.
Installation of vertical channels “by extension from above”
The algorithm of actions is described in the TTK 07.33.08. This method is used to connect heavy units created using the “build-up from below” technology.
A support beam is attached to the top of the shaft, on which a lever winch is attached. Individual links are assembled into large blocks using the “building up from below” method. The air ducts are raised to the top floor and located next to the ventilation shaft.
If several channels are to be installed in the shaft, when extending from above they can be mounted not only in series, but also in parallel
The first element is lowered down to the design location and finally secured to the supports. Then such operations are repeated for the remaining blocks until 100% assembly of the standing air duct is completed.
Installation of vertical air ducts by “extrusion”
The installation of the ventilation duct in the design position according to TTK 07.33.06 is carried out using two winches fixed in the lower part of the building. A support plate with brackets for slinging is bolted to the lower flange of the lower assembly, assembled using the “extension from above” method.
When assembling a vertical air duct using the “extrusion” method, the existing threat of the duct overturning is eliminated with the help of guy wires. When lifting a structure, lifting mechanisms operate at the same speed
Using two winches and blocks, tighten the slings and push the ventilation pipe 0.5 m above the roof. An umbrella is installed on the top flange from the roof and guy wires are secured. Then the air duct is lifted to the design level using winches, fixed with permanent fastenings, and the base plate and lifting rigging are removed.
Flexible air duct hanging
Bendable pipes are often used in ventilation systems of apartments or private houses, offices, and small retail premises.
Sequence of installation work:
- determination of the actual location of the channel with reference to building marks;
- installation of fasteners in the ceiling in the direction of laying the air duct, install dowels every 400 mm and hang clamps;
- stretching the flexible sleeve to the maximum and cutting pieces of the required length.
The soft sleeve is placed on a rigid pipe with a minimum overlap of 5 cm on its surface. Installation of flexible air ducts is carried out taking into account the direction of moving air flows. They are guided by marks on the surface of the pipes. The attachment points of such a channel are located at a distance of 1.5-3 m from each other. Sagging of the sleeve is allowed no more than 5 cm per 1 meter of total length.
In order to eliminate the formation of aerodynamic obstacles, flexible air ducts are laid with the least number of turns. They try to eliminate the formation of bends both vertically and horizontally
If a flexible hose is laid behind a suspended ceiling parallel to its surface, the supporting clamps are placed at a distance of 100 mm. When laying vertically, the free areas between fasteners can increase up to 1800 mm. Flexible ducts need protection from direct sunlight.
Elastic pipes have the ability to accumulate static voltage; it is important to ground the channel. To do this, the grounding wire is fixed at one end to the metal frame of the sleeve.
Design features and dimensions
Remember that when purchasing PVC air ducts, you need to stock up on adapters that will be needed to connect the plastic pipe and the hood. Adapters are also used for air duct bends and connection to general house ventilation. If a corrugated product is used for exhaust, then you can save money on adapters for bending the pipe.
Any bending also negatively affects the functionality of the hood. When installing air duct in the kitchen, try to avoid 90-degree angles. This will cause overload of the hood, which will significantly reduce the service life of the product.
The diameter of the plastic pipe is selected according to the cross-section of the ventilation hole. The sizes of rectangular and square PVC kitchen air ducts are standard. The most commonly used values are: 110 × 55, 120 × 60 and 204 × 60 mm. The sizes of round plastic pipes vary from 110 to 150 mm in diameter.
You can purchase these products at almost every hardware store. It is worth noting that the price of flexible air ducts is slightly higher than that of flat PVC ducts.
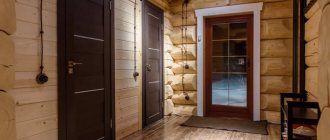
Ventilation system in a private house
The design and installation of a ventilation system in a single-apartment residential building is carried out taking into account the requirements for operational characteristics prescribed in SNiP 31-02-2001 and SP 55.13330.2016.
Ventilation in a private house can be with either natural or mechanical stimulation of air exchange, with the removal and influx of air masses through air ducts. The main thing is to maintain clean air in the premises.
Exhaust air with an unpleasant odor or containing harmful substances, such as fuel combustion products, is discharged directly outside. That is, they should not penetrate into other rooms in any way.
To ensure air exchange in a large private house, a ventilation system is required, which includes a system of air ducts that ensure the removal of polluted air masses and the supply of fresh air.
Be sure to ensure the removal and flow of air in the kitchen, bathroom, and boiler room. The minimum performance of the ventilation system with full or partial air exchange in a given period of time is regulated.
When organizing a ventilation system that meets established requirements and is capable of providing a comfortable microclimate, it is important to correctly determine the configuration of air ducts, take care of sealing ventilation openings, places where pipes pass through walls and ceilings in order to prevent the occurrence of cold bridges and prevent rodents and insects from entering the house.
Vertical fixation
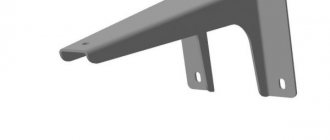
When attaching round air ducts to the ceiling, it is necessary to use supports, which include:
- console (metal);
- linings intended for this purpose;
- clamps.
To attach round ventilation systems to a massive column made of reinforced concrete, it is better to choose brackets consisting of consoles that have already been welded to an iron slab and a pair of clamps. They will need to be bolted together when the duct assembly is complete.
If it is impossible to install ventilation on the walls, it can be placed on the roof.
Horizontal ventilation
How to fix an air exchange system located vertically?
Vertical air ducts are fastened to the wall using a support consisting of a console, a lining, and a clamp. If you need to secure the equipment to a reinforced concrete column, you will need to use a bracket.
Before you begin, you need to mark the locations for installing fasteners. The following instructions are used:
- The first step is to install the mounting components;
- A bracket, a winch with blocks, and a lift are fixed on the outer wall;
- The structure with guy wires is assembled from the necessary parts;
- Install an umbrella;
Mounts for vertical ventilation - Raise the assembled element;
- Using guy wires, the structure is leveled and secured in the right place;
- Combine with those parts that were installed previously;
- They fix it.
General installation rules
The diagram is drawn up so that the highway has a minimum number of turns and connecting sections
At the technical design stage, the requirements for air exchange in the room are taken into account, the number of people and the volume of the room are taken into account
Ventilation is installed in the following order:
- before installation, the system is divided into separate branches, the length of which does not exceed 12 - 15 meters;
- connection points are placed on the parts and holes are drilled;
- the elements of the main line of a separate section must be secured with bolts, clamps, the connections are fixed with tape or insulating sealant.
The assembled blocks and assemblies are combined into a single circuit, the pipeline is fastened to a partition, wall, ceiling or routed through the roof.
Wall mount
Clamps, supports, and hangers are attached in increments of no more than 4 meters for the installation of horizontal air ducts. This step is relevant if the diameter of the round pipe or the largest side of the rectangular section does not exceed 40 cm. The step distance is reduced to 3 meters if the specified channel dimensions exceed 40 cm.
A step of 6 meters is provided for air ducts on the flanges of round or rectangular ducts with the largest cross-sectional side up to 20 cm or insulated pipes of different sections. If the dimensions exceed the specified value, the step is calculated in the project. Vertical fastening of ventilation pipes to the wall is carried out at a interval of no more than 4 meters. Mounting on the roof and outside of the building is indicated in the project and accepted according to calculations.
Ceiling mount
The air duct is attached to the ceiling in 50% of cases, if it is not possible to attach the ventilation to the wall. For hanging, pendants, studs and brackets are used.
Mounting options:
- Small pipes are hung with an L-shaped bracket using self-tapping screws. The pendants are fixed to the ceiling or beam with dowels (in concrete) and self-tapping screws (in wood).
- Z-shaped studs are used to install channels of rectangular cross-section, and fastening the boxes to the ceiling is carried out in the same way as the previous case. Due to the extra angle on the bracket, the load on the supporting hardware is reduced and strength increases.
- V-shaped pendants are fixed to the upper ceiling with anchors. This type of suspension can withstand significant loads.
Standard distances according to GOST
Installation standards are prescribed in the document SNiP 3.05.01 - 1985, and during the design, the standards for the location of air ducts from SNiP 2.04.05.1991 are taken into account. The central axes of the highway must run parallel to the plane of the enclosing structures.
Standard distances are maintained:
- from the top of the round pipe to the ceiling there should be at least 10 cm, and to nearby walls - 5 cm;
- from the round channel to the hot and cold water supply, gas pipeline, sewerage system there must be at least 25 cm;
- from the outer wall of the square and round pipe to the electrical wiring - at least 30 cm.
- when attaching rectangular air ducts, the distance to walls, ceilings, and other pipelines is no less than 10 cm (sectional width 10–40 cm), no less than 20 cm (width 40–80 cm), more than 40 cm (size 80–150 cm).
Installation features depending on the type of air duct
Air ducts have different geometric cross-sectional shapes, as well as structural properties. Depending on this, certain installation requirements are imposed. We will describe the characteristics of each type and also give a number of recommendations.
Rectangular
The material for their manufacture is most often galvanized steel, and they are used to service premises with a very large area. They look very presentable and are a natural fit for sports or assembly halls, large workshops and indoor industrial areas. To connect the sections, welding or flanges are used - special castings along the edges of the sections, which are mutually connected with bolts.
Installation of horizontal spans is carried out by installation on a traverse, and vertical spans are attached directly to the ceiling and floor. For high ceiling heights, the section is supported by wall fasteners, such as clamps.
Round
Pipelines with a round cross-section have the following positive characteristics:
- Rigidity - the circle absorbs all loads more softly.
- The air is distributed evenly.
- A small number of connections are required during installation.
- Ease of use.
As a rule, round clamps are used for installation, which are rigidly attached to the wall of one of the collapsible parts.
Flexible
Flexible air ducts for ventilation allow you to easily install connecting structures without the use of flanges and other connecting elements. For the manufacture of flexible air ducts, multilayer aluminum foil, laminated polyester tape with a spiral frame, or woven polyester fiber with a layer of insulation are used.
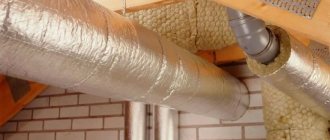
Thermally insulated
Thermally insulated air ducts serve for air removal both indoors and outdoors. For example, if the compressor is located outside the room and drives fresh air inside. They may have a different structure, but the main design nuance is the covering with an insulating layer of insulation.
In order to install an air duct with a thermal insulation layer and ensure its effectiveness, the following measures must be taken:
- The duct is measured and cut to the required length.
- The insulator layer at the attachment point must be wrapped with a corrugated pipe - this will protect the insulating coating from damage.
| Important! If it is necessary to connect two sections of an insulated air duct, then at the edges the insulator is withdrawn by 5-7 cm, the surface is exposed. The two sections are fastened together with corrugation, which is compressed with clamps. The exposed layer is wrapped with aluminum electrical tape for at least 2-3 layers. The insulator returns to its place. |
- Fastening to the wall or ceiling is done using traverses or clamps.
Variety of installation types
The first part is freed from the bandage. Its ends must be separated and inserted into the next part. All ends are tightened with a bolt. All parts are assembled and mounted one by one.
There are also fastening methods that use slats and tires. This option is perfect for installing a structure with a rectangular cross-section. The whole process comes down to several stages. It is necessary to install all fasteners and lifting mechanisms. Raise part of the structure and secure it where necessary. If installation is carried out in a horizontal position, then traverses will also be needed. Vertically, it would be better to use a grip, which is intended for this same purpose. All joints should be connected using busbars. Where this is not possible, ordinary planks will do.
Methods for securing ventilation
Ventilation installation is presented in the following options:
Installation of vertical air ducts using the extrusion method.
- Using an L-shaped bracket. Parts of the air duct are attached to it with screws or screws.
- To install a rectangular air channel, it is possible to use a Z-shaped bracket. This is also done with screws or screws.
- Installation using a profile and studs: the ventilation rests on the traverse, and the threaded parts limit lateral movement. A rubber profile is often used, which additionally provides sound.
- If you need to secure a round pipe, this can be done with punched tape. This is done either using a loop or by attaching it to a screw at the engagement points. This method has a major drawback - the lack of the required rigidity.
- The noise level of the air duct can be dramatically reduced if, when strengthening round air ducts, a clamp is used together with punched paper tape. But this method is applicable for pipes with a caliber of less than 20 cm.
- For installation, you can use studs and a clamp.
- Sometimes a brass anchor (expansion) is used, which is inserted into a pre-made hole, and the pin is tightened.
- If it is impossible to attach the air ducts to the ceiling, a metal beam with a clamp on which a pin is attached is used for installation.
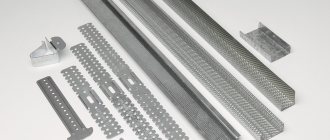
Materials, devices used for fastening air ducts:
- brackets of different shapes;
- traverses and profiles;
- punched paper tape, pins;
- clamps and clamps;
- sheet iron;
- steel corners;
- metal slats;
- lifting mechanisms.
Reliable methods of fastening air ducts and their installation are feasible only if all the recommendations given above are followed.
Recommendations for selection
Experienced specialists give a number of tips to make it easier for owners to choose products for arranging a ventilation system. Some of them:
It is best to buy products in branded stores or specialized retail outlets. In addition to the product, the kit should include instructions for use, as well as a warranty card.
If such documentation is missing, it is better to refuse the purchase. It is necessary to take into account the design of the products so that they fit organically into the interior of the room. The manufacturer is of no small importance. It is advisable to choose high-quality branded models. No need to focus on low prices
Of course, a high-quality and reliable ventilation system will be quite expensive, especially if good materials are used. However, you need to understand that high-quality models will serve for many years without complaints. Products must have sufficient performance. If the ventilation system is weak, the hood will not be able to cope well with its main task, so the exhaust air masses will remain in the room.
In addition, when choosing the components of the ventilation system, you need to take into account the main functions of the kitchen hood. The latter must meet the following characteristics:
- An attractive appearance is important so that the device fits organically into the interior, complementing it.
- Low noise level during operation.
- The ability to quickly and to the required extent remove foreign odors.
III. Restriction on the use of flexible ducts
Limitations on the use of flexible ducts are due, in most cases, to differences in national and industry standards and regulations. Other general restrictions on the use of flexible ducts include the following:
use in vertical risers more than two floors high;
use in systems with incoming air temperature more than 120°C;
outdoor use, unless the duct material is specifically protected from exposure to sunlight and other atmospheric influences;
use without taking into account classification, including heat resistance and design features of a particular type of product;
failure to maintain permissible installation distances in locations where excess heat occurs due to electrical devices, fossil fuels or solar energy;
installation of connecting air ducts through walls, partitions or parts of vertical risers having a fire resistance rating of more than 1 hour; through floors and through walls where automatic fire dampers or smoke exhaust valves are required;
use as components of ventilation systems in rooms for cooking, ironing and drying clothes, unless specifically specified by the manufacturer;
Application in concrete structures, in areas below ground level or in contact with the ground without regard to manufacturer's restrictions on direct contact with aggressive media or abrasive materials.
| Installation of flexible hoses: a) incorrectly; b) correct |
The article was prepared by specialists
Attaching cables to the ceiling
It is necessary to attach cables to the ceiling mainly when installing suspended ceilings or ceilings made of plastic panels and plasterboard. In the case of plasterboard, everything is somewhat simpler: there is a system of suspensions to which you can fasten wiring harnesses with plastic ties. In other cases, everything is somewhat more complicated: you have to drill a large number of holes for fasteners, because they use the same clips and brackets, and under each you need to install a dowel (if the ceiling is made of a concrete slab).
Attaching the cable to the ceiling is time-consuming
There are several ways to speed up installation:
- Using cable trays (described above).
- After attaching a number of lines to the ceiling, hang small wire harnesses from them using plastic ties.
- Use a long perforated strip of metal for fastening.
Distance between fastenings
SP 60.13330 and SP 73.13330.2012 indicate how to calculate the fastening of square and round air ducts. The recommendations of equipment manufacturers specified in the instructions are also taken into account. To get the correct result, you need to know the length of the air ducts and the permissible distance between the fasteners.
Fastenings for horizontal non-insulated metal wafer-free air ducts are installed at a distance of no more than 4 meters from each other. This requirement equally applies to supports, hangers, and clamps.
The rule applies to rectangular and round air ducts whose diameter or largest side does not exceed 40 cm. For air ducts with a rectangular cross-section or a diameter of more than 40 cm, the distance between fasteners is reduced to 3 meters.
Horizontal metal non-insulated air ducts on a flange connection with a diameter or larger side of up to 2 meters are mounted with a step of no more than 6 meters between fasteners. Attachment to flanges is not permitted. The maximum distance between fastenings of vertical metal air ducts is 4.5 meters.
When designing even the simplest kitchen hood, gaps are left between the surface of the air duct and the walls, ceiling, other communications and interior items.
To connect the main sections of air ducts, flexible air ducts made of polymer film can be used as shaped elements. In some cases, they serve as the main elements for constructing a ventilation line.
Rings made of steel wire are used to secure flexible polymer air ducts. The diameter of the wire should be within 3-4 mm, and the diameter of the ring itself should be 10 percent larger than the diameter of the air duct. The step between the rings is no more than 2 meters.
READ MORE: Painting the facade of a private house with your own hands, how to properly paint a wall with façade paint, preparing the surface with detailed photos
With this type of installation, a support cable is pulled along the air duct, to which the rings are attached. The cable itself is attached to building structures in increments of 20 to 30 meters. The flexible air duct must be tensioned so that sagging does not form between the rings, reducing the pressure in the system.
Features of types of fixation
Most often in a professional environment they use a combination of a bracket and a stud to secure parts. The fastening option is especially suitable if the weight of the system parts is significant. Thanks to the use of a bracket, a significant part of the load is removed from the fastening elements.
If it is necessary to install a rigid air exchanger, then the involvement of third-party specialists will be required. A metal pin is used to secure it to the wall. The thickness of the fastening pin is calculated based on parameters such as pipe length and stud material. This installation method can be used for both round and square pipes. To effectively support the parts, special clamps made of metal are used. The joints of components and structural parts are strengthened using special tightening bolts.
It is more convenient to use flexible fragments for DIY installation. To install them, you do not need to have special knowledge; all the necessary steps are easy to perform. You just need to take into account the direction of air flow during assembly. It is much easier to mount such structures in hard-to-reach places, such as ceilings and shafts, which can often be unsuitable for analogues made of hard materials.
The cost of elements for a flexible ventilation system and fastening air ducts to the wall will be much cheaper than steel analogues. If it is necessary to install an air exchanger at a high altitude, then it is necessary to seek the help of industrial climbers with experience in carrying out such work.
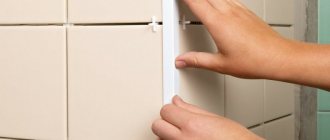
First steps to install an air duct to a wall
After choosing the right type of duct, it is necessary to install it correctly. If the air duct is installed to the wall, then many features and subtleties need to be taken into account. The first thing you need to do is mark the points on the wall to which you will attach. Make sure that the means of transporting the sections of the ventilation device are at hand. They will be needed for quick assembly of the structure.
https://youtube.com/watch?v=aG-ZPsV3c-M
Before installation begins, the outer wall must be equipped with fasteners, a console with a block, and a winch with a pull-out block. Next, you need to construct a block and attach slings to it. Next, it needs to be raised to the required height. Since it is unlikely that it will be possible to install the blocks evenly and correctly the first time, they can be leveled using special guys. Be sure to check the reliability of the fastening. The blocks must be tightly and hermetically connected to each other, forming a structure of vertical air ducts.
How to select and install ventilation clamps for securing air ducts
When installing air ducts, an important role is played by clamps - fastening elements with which parts of the ventilation pipe are secured. In addition, clamps are used to secure the pipe to the ceiling or wall. The effective operation and service life of ventilation depends on the correct choice of fasteners.
Advantages of duct fasteners
To ensure that the system is securely fastened, the use of clamps as fasteners is more than justified:
- The clamps are easy to install, having a simple and durable fixation mechanism.
- The possibility of unplanned detachment of fasteners is completely eliminated.
- The part is quite compact, so it is easy to install even in cramped conditions and limited space.
Note! The device with a rubber seal has sound-absorbing properties. Such a clamp is capable of reducing the noise level by 15 dts and reducing vibration of the system.
Purpose of fasteners for the air duct
The clamp is designed to secure the pipe in a horizontal or vertical position, as well as to connect parts of the air duct to each other. This is a universal fastener that you cannot do without when creating an efficient ventilation system.
How many fasteners are required?
The type of fasteners and their quantity are determined at the design stage, taking into account the weight, dimensions, location of different types of air ducts, materials of manufacture, type of ventilation system, etc. If you plan to tackle these issues yourself, you will need to do the calculations and use reference data.
The consumption rates for fastenings are calculated based on the surface area of the air ducts. Before you begin calculating the surface area, you need to determine the length of the duct. It is measured between two points where the center lines of the highways intersect.
If the duct has a round cross-section, its diameter is multiplied by the previously obtained length. The surface area of a rectangular duct is equal to the product of its height, width and length.
All calculations are made at the preliminary stage, the obtained data is used during installation, marking helps to observe the calculated distances without allowing errors.
Then you can use reference data, for example, standard indicators of material consumption (NPRM, collection 20) approved by the Ministry of Construction of the Russian Federation. Today this document has an inactive status, but the data contained in it for the most part remains relevant and is used by builders.
The consumption of fastenings in the directory is indicated in kg per 100 sq. m. m. surface area. For example, for round seam air ducts of class H, made of sheet steel, 0.5 mm thick and having a diameter of up to 20 cm, 60.6 kg of fasteners per 100 sq. m. will be required. m.
A properly designed and installed air duct system not only functions flawlessly, but also organically complements the interior of a modern home.
When installing air ducts, straight sections of air ducts along with bends, tees and other shaped elements are assembled into blocks up to 30 meters long. Next, fastenings are installed in accordance with the standards. The prepared air duct blocks are installed in the places designated for them.
The following article will familiarize you with the regulatory requirements for organizing ventilation in a private house, which all owners of country property should read.
How to combine a plasterboard ceiling with air ducts
Air ducts “get along” perfectly with plasterboard ceilings. The hollow space between the ceiling and the gypsum board is excellent for laying ventilation lines. An alternative option is to cover the air duct with a plasterboard box.
ATTENTION! It is necessary to ensure reliable thermal insulation of the channels to prevent the possible occurrence of condensation and damage to plasterboard sheets.
Hiding in the ceiling space
If the ceilings in the room are high enough, there will be no problems with masking the ventilation ducts. For installation in such cases, flat channels of rectangular cross-section with a heat-insulating coating are most suitable. Attaching the air ducts is carried out as usual. In this case, contact with the metal profile frame must be excluded so that vibration and noise are not transmitted to it.
What is installed first is a matter of personal preference for installers. You can, for example, mark out the ceiling hangers, then assemble the ventilation, and after that - the frame for the plasterboard. It is important to combine the fastening fittings of both structures on the ceiling area without violating the standards. The sheets are hemmed after testing the ventilation system.
We close it with a box
When the apartment already has low ceilings, you can hide the air ducts in another way. To do this, the main gypsum board ceiling is “pressed” against the ceiling as much as possible, and ventilation switches are mounted along the walls under the second-level ceiling duct. Of course, in this case, the costs for air ducts and fittings will increase somewhat, and a two-level design will cost more.
If the space is really bad, the ceiling is plastered for painting, and a mini-box made of gypsum plasterboard is assembled for the ventilation duct. In this case, a small amount of starting profile and one sheet of drywall will be enough for the room. When calculating, it is necessary to take into account that there should be a small space between the air duct and the walls of the box for air circulation.
As in any business, a creative and innovative approach is encouraged when installing ventilation systems. However, we should not forget about the main thing: any violation of the standards and rules for attaching air ducts to the ceiling leads to unnecessary problems.
Mandatory rules
- Installation of flexible and semi-flexible air ducts is carried out in full tension.
- The air hose should not sag in any area - pressure is lost at each deflection.
- Grounding the air duct is mandatory: during operation, static electricity accumulates in the line.
- When the ventilation system operates, the air in the ducts moves in a spiral (aerodynamics), this must be taken into account during design and installation.
- Flexible air ducts cannot be used on vertical sections of the main line longer than 2 floors.
- In rooms below ground level (basements, ground floors), in contact with the ground, in concrete structures passing through floor/ceiling ceilings - only rigid air ducts.
- If the air duct is damaged during installation, it should be replaced. The same applies to the external thermal insulation coating.
- When passing through walls, adapters and metal sleeves must be used.
- When making a sharp turn, the aerodynamic properties of the pipe are reduced; the turning radius must be no less than twice the diameter of the air duct.